All documentation links
ProActive Workflows & Scheduling (PWS)
-
PWS User Guide
(Workflows, Workload automation, Jobs, Tasks, Catalog, Resource Management, Big Data/ETL, …) PWS Modules
Job Planner
(Time-based Scheduling)Event Orchestration
(Event-based Scheduling)Service Automation
(PaaS On-Demand, Service deployment and management)
PWS Admin Guide
(Installation, Infrastructure & Nodes setup, Agents,…)
ProActive AI Orchestration (PAIO)
PAIO User Guide
(a complete Data Science and Machine Learning platform, with Studio & MLOps)
1. Introduction
The Job Planner schedules Workflows at specific points in time which are defined by Calendars.
A Workflow is scheduled by the Job Planner if it is associated to a Calendar Definition. A Calendar Definition can have several Workflows associated to it. Each of them can easily be activated and deactivated. The Workflows variables can be set with specific values when associating them to a calendar.
1.1. Glossary
The following terms are used throughout the documentation:
- ProActive Workflows & Scheduling
-
The full distribution of ProActive for Workflows & Scheduling, it contains the ProActive Scheduler server, the REST & Web interfaces, the command line tools. It is the commercial product name.
- ProActive Scheduler
-
Can refer to any of the following:
-
A complete set of ProActive components.
-
An archive that contains a released version of ProActive components, for example
activeeon_enterprise-pca_server-OS-ARCH-VERSION.zip. -
A set of server-side ProActive components installed and running on a Server Host.
-
- Resource Manager
-
ProActive component that manages ProActive Nodes running on Compute Hosts.
- Scheduler
-
ProActive component that accepts Jobs from users, orders the constituent Tasks according to priority and resource availability, and eventually executes them on the resources (ProActive Nodes) provided by the Resource Manager.
| Please note the difference between Scheduler and ProActive Scheduler. |
- REST API
-
ProActive component that provides RESTful API for the Resource Manager, the Scheduler and the Catalog.
- Resource Manager Portal
-
ProActive component that provides a web interface to the Resource Manager. Also called Resource Manager portal.
- Scheduler Portal
-
ProActive component that provides a web interface to the Scheduler. Also called Scheduler portal.
- Workflow Studio
-
ProActive component that provides a web interface for designing Workflows.
- Automation Dashboard
-
Centralized interface for the following web portals: Workflow Execution, Catalog, Analytics, Job Planner, Service Automation, Event Orchestration and Notifications.
- Analytics
-
Web interface and ProActive component, responsible to gather monitoring information for ProActive Scheduler, Jobs and ProActive Nodes
- Job Analytics
-
ProActive component, part of the Analytics service, that provides an overview of executed workflows along with their input variables and results.
- Node Gantt
-
ProActive component, part of the Analytics service, that provides an overview of ProActive Nodes usage over time.
- Health Dashboard
-
Web interface, part of the Analytics service, that displays global statistics and current state of the ProActive server.
- Job Analytics portal
-
Web interface of the Analytics component.
- Notification Service
-
ProActive component that allows a user or a group of users to subscribe to different types of notifications (web, email, sms or a third-party notification) when certain event(s) occur (e.g., job In-Error state, job in Finished state, scheduler in Paused state, etc.).
- Notification portal
-
Web interface to visualize notifications generated by the Notification Service and manage subscriptions.
- Notification Subscription
-
In Notification Service, a subscription is a per-user configuration to receive notifications for a particular type of events.
- Third Party Notification
-
A Notification Method which executes a script when the notification is triggered.
- Notification Method
-
Element of a Notification Subscription which defines how a user is notified (portal, email, third-party, etc.).
- Notification Channel
-
In the Notification Service, a channel is a notification container that can be notified and displays notifications to groups of users
- Service Automation
-
ProActive component that allows a user to easily manage any On-Demand Services (PaaS, IaaS and MaaS) with full Life-Cycle Management (create, deploy, pause, resume and terminate).
- Service Automation portal
-
Web interface of the Service Automation.
- Workflow Execution portal
-
Web interface, is the main portal of ProActive Workflows & Scheduling and the entry point for end-users to submit workflows manually, monitor their executions and access job outputs, results, services endpoints, etc.
- Catalog portal
-
Web interface of the Catalog component.
- Event Orchestration
-
ProActive component that monitors a system, according to predefined set of rules, detects complex events and then triggers user-specified actions.
- Event Orchestration portal
-
Web interface of the Event Orchestration component.
- Scheduling API
-
ProActive component that offers a GraphQL endpoint for getting information about a ProActive Scheduler instance.
- Connector IaaS
-
ProActive component that enables to do CRUD operations on different infrastructures on public or private Cloud (AWS EC2, Openstack, VMWare, Kubernetes, etc).
- Job Planner
-
ProActive component providing advanced scheduling options for Workflows.
- Job Planner portal
-
Web interface to manage the Job Planner service.
- Calendar Definition portal
-
Web interface, component of the Job Planner that allows to create Calendar Definitions.
- Calendar Association portal
-
Web interface, component of the Job Planner that defines Workflows associated to Calendar Definitions.
- Execution Planning portal
-
Web interface, component of the Job Planner that allows to see future executions per calendar.
- Job Planner Gantt portal
-
Web interface, component of the Job Planner that allows to see past and future executions on a Gantt diagram.
- Bucket
-
ProActive notion used with the Catalog to refer to a specific collection of ProActive Objects and in particular ProActive Workflows.
- Server Host
-
The machine on which ProActive Scheduler is installed.
SCHEDULER_ADDRESS-
The IP address of the Server Host.
- ProActive Node
-
One ProActive Node can execute one Task at a time. This concept is often tied to the number of cores available on a Compute Host. We assume a task consumes one core (more is possible, see multi-nodes tasks), so on a 4 cores machines you might want to run 4 ProActive Nodes. One (by default) or more ProActive Nodes can be executed in a Java process on the Compute Hosts and will communicate with the ProActive Scheduler to execute tasks. We distinguish two types of ProActive Nodes:
-
Server ProActive Nodes: Nodes that are running in the same host as ProActive server;
-
Remote ProActive Nodes: Nodes that are running on machines other than ProActive Server.
-
- Compute Host
-
Any machine which is meant to provide computational resources to be managed by the ProActive Scheduler. One or more ProActive Nodes need to be running on the machine for it to be managed by the ProActive Scheduler.
|
Examples of Compute Hosts:
|
- Node Source
-
A set of ProActive Nodes deployed using the same deployment mechanism and sharing the same access policy.
- Node Source Infrastructure
-
The configuration attached to a Node Source which defines the deployment mechanism used to deploy ProActive Nodes.
- Node Source Policy
-
The configuration attached to a Node Source which defines the ProActive Nodes acquisition and access policies.
- Scheduling Policy
-
The policy used by the ProActive Scheduler to determine how Jobs and Tasks are scheduled.
PROACTIVE_HOME-
The path to the extracted archive of ProActive Scheduler release, either on the Server Host or on a Compute Host.
- Workflow
-
User-defined representation of a distributed computation. Consists of the definitions of one or more Tasks and their dependencies.
- Workflow Revision
-
ProActive concept that reflects the changes made on a Workflow during it development. Generally speaking, the term Workflow is used to refer to the latest version of a Workflow Revision.
- Generic Information
-
Are additional information which are attached to Workflows or Tasks. See generic information.
- Calendar Definition
-
Is a json object attached by adding it to the Generic Information of a Workflow.
- Job
-
An instance of a Workflow submitted to the ProActive Scheduler. Sometimes also used as a synonym for Workflow.
- Job Id
-
An integer identifier which uniquely represents a Job inside the ProActive Scheduler.
- Job Icon
-
An icon representing the Job and displayed in portals. The Job Icon is defined by the Generic Information workflow.icon.
- Task
-
A unit of computation handled by ProActive Scheduler. Both Workflows and Jobs are made of Tasks. A Task must define a ProActive Task Executable and can also define additional task scripts
- Task Id
-
An integer identifier which uniquely represents a Task inside a Job ProActive Scheduler. Task ids are only unique inside a given Job.
- Task Executable
-
The main executable definition of a ProActive Task. A Task Executable can either be a Script Task, a Java Task or a Native Task.
- Script Task
-
A Task Executable defined as a script execution.
- Java Task
-
A Task Executable defined as a Java class execution.
- Native Task
-
A Task Executable defined as a native command execution.
- Additional Task Scripts
-
A collection of scripts part of a ProActive Task definition which can be used in complement to the main Task Executable. Additional Task scripts can either be Selection Script, Fork Environment Script, Pre Script, Post Script, Control Flow Script or Cleaning Script
- Selection Script
-
A script part of a ProActive Task definition and used to select a specific ProActive Node to execute a ProActive Task.
- Fork Environment Script
-
A script part of a ProActive Task definition and run on the ProActive Node selected to execute the Task. Fork Environment script is used to configure the forked Java Virtual Machine process which executes the task.
- Pre Script
-
A script part of a ProActive Task definition and run inside the forked Java Virtual Machine, before the Task Executable.
- Post Script
-
A script part of a ProActive Task definition and run inside the forked Java Virtual Machine, after the Task Executable.
- Control Flow Script
-
A script part of a ProActive Task definition and run inside the forked Java Virtual Machine, after the Task Executable, to determine control flow actions.
- Control Flow Action
-
A dynamic workflow action performed after the execution of a ProActive Task. Possible control flow actions are Branch, Loop or Replicate.
- Branch
-
A dynamic workflow action performed after the execution of a ProActive Task similar to an IF/THEN/ELSE structure.
- Loop
-
A dynamic workflow action performed after the execution of a ProActive Task similar to a FOR structure.
- Replicate
-
A dynamic workflow action performed after the execution of a ProActive Task similar to a PARALLEL FOR structure.
- Cleaning Script
-
A script part of a ProActive Task definition and run after the Task Executable and before releasing the ProActive Node to the Resource Manager.
- Script Bindings
-
Named objects which can be used inside a Script Task or inside Additional Task Scripts and which are automatically defined by the ProActive Scheduler. The type of each script binding depends on the script language used.
- Task Icon
-
An icon representing the Task and displayed in the Studio portal. The Task Icon is defined by the Task Generic Information task.icon.
- ProActive Agent
-
A daemon installed on a Compute Host that starts and stops ProActive Nodes according to a schedule, restarts ProActive Nodes in case of failure and enforces resource limits for the Tasks.
2. Creation of a Planning
2.1. Creating Calendar Definitions
To create new calendar definition, use the Job Planner Portal, Calendar Definition page. When clicking the "+" button, a calendar definition is created with default parameters.
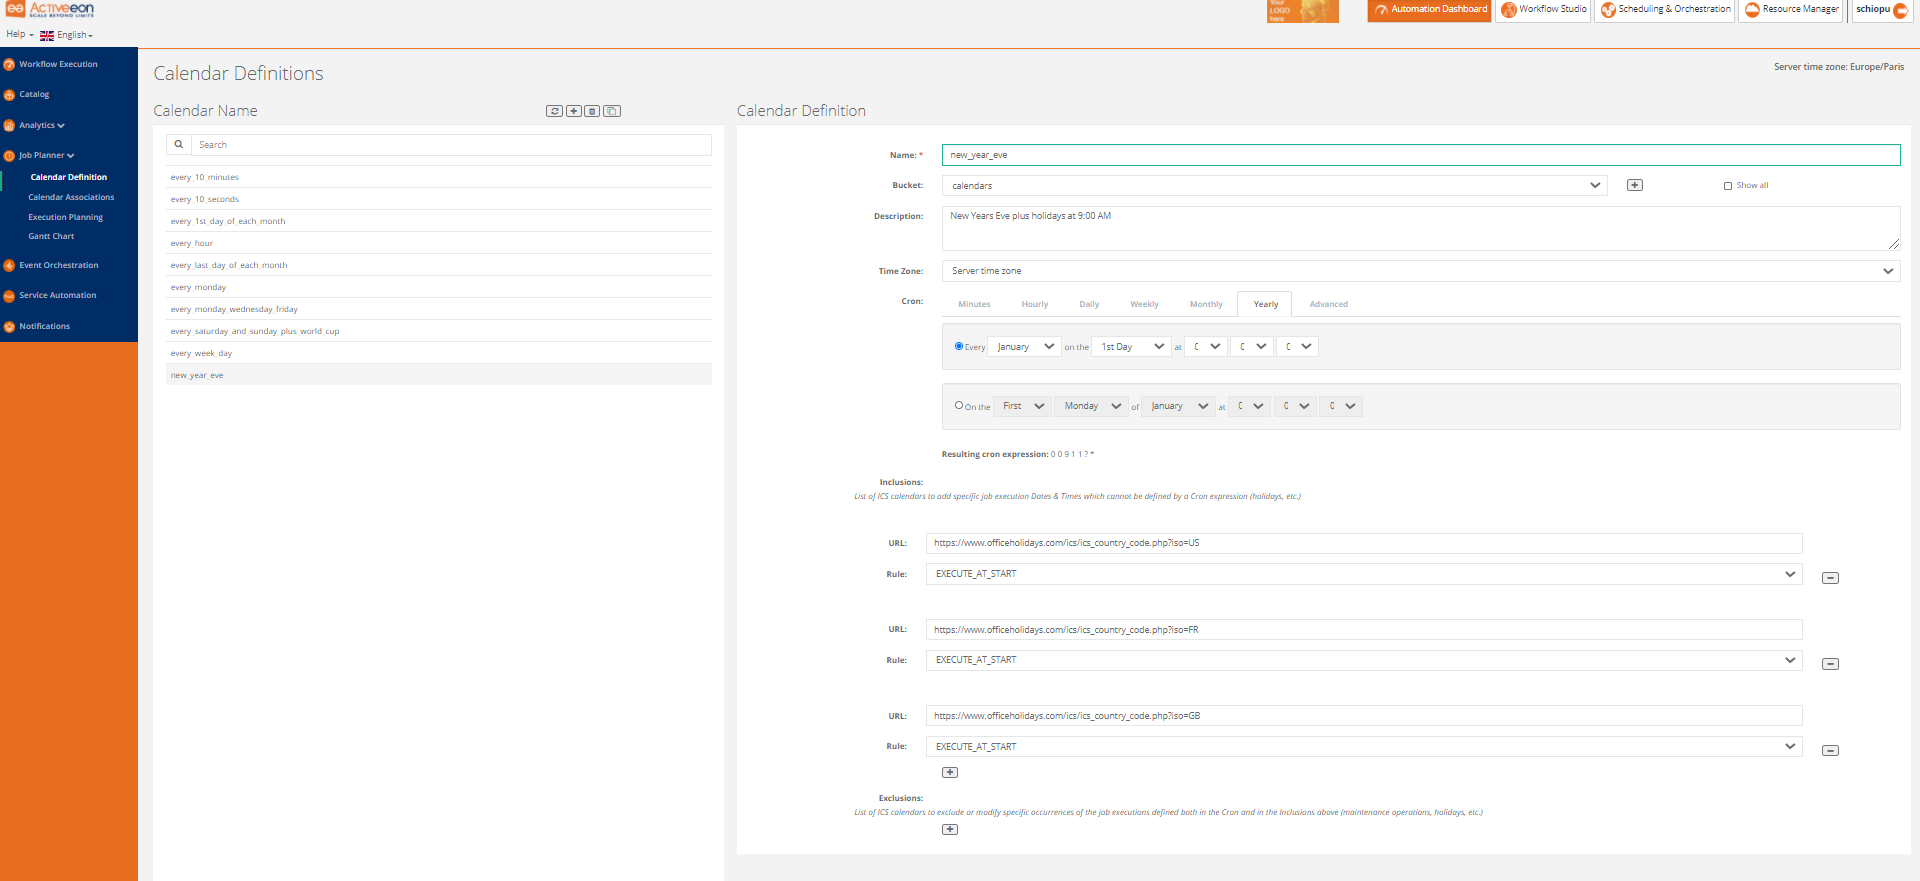
Click on a Calendar Definition to modify it. Its fields will be visible on the main panel ("Calendar Definition"). The name of the Calendar Definition must be unique in a bucket. The cron expression can be set using the widget, or manually with the "Advanced" tab. The resulting cron expression is shown under the widget.
Changes made in the Calendar Definition panel will be automatically saved. When a calendar definition is selected, it can be removed by clicking on the trash button.
2.2. Associating workflows to Calendar Definitions
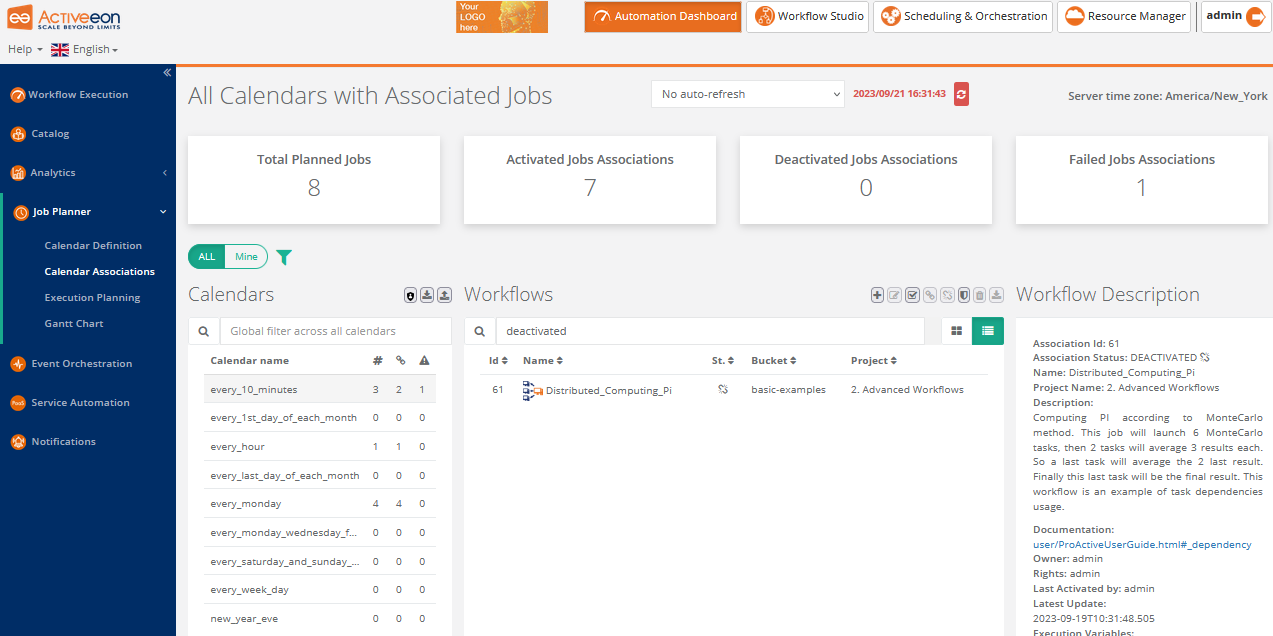
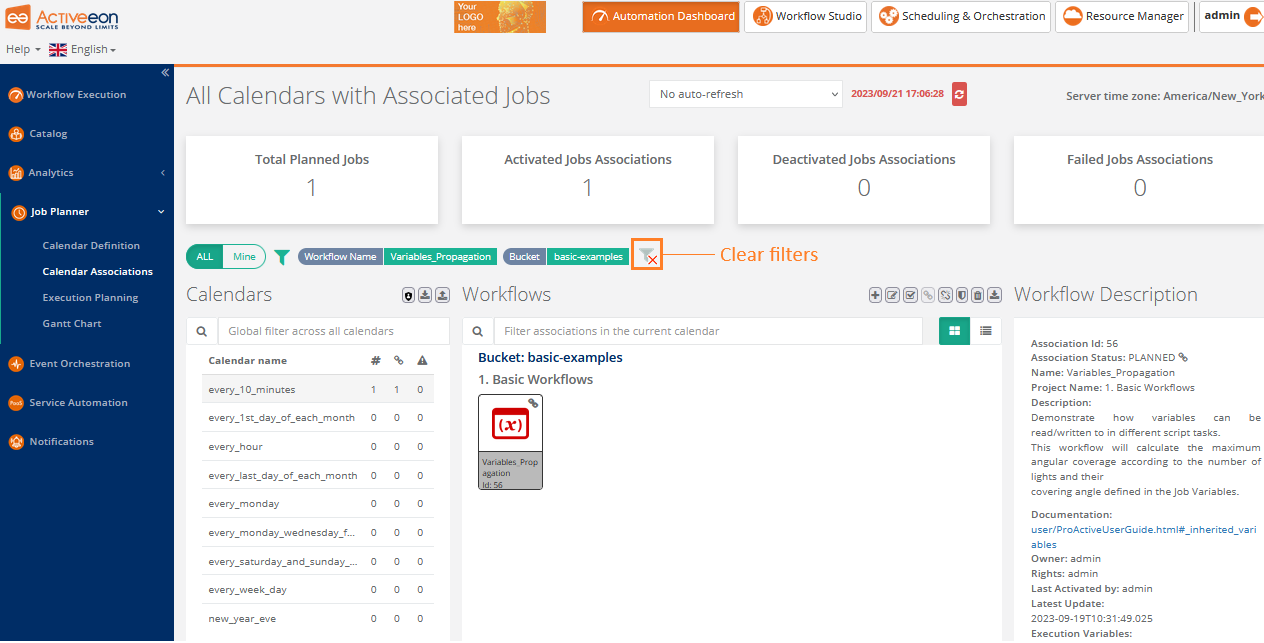
Once a workflow has been published to the Catalog, it can be planned with the Job Planner Portal, Calendar Association page. On the top of this page there is a dashboard of counters that display statistics on the status of planned jobs (total, active, deactivated and failed) to help users gain a better understanding of the operational view of the platform. As a result, when an association is added / removed / deactivated / failed, the corresponding counter is updated accordingly as shown in the screenshot below.
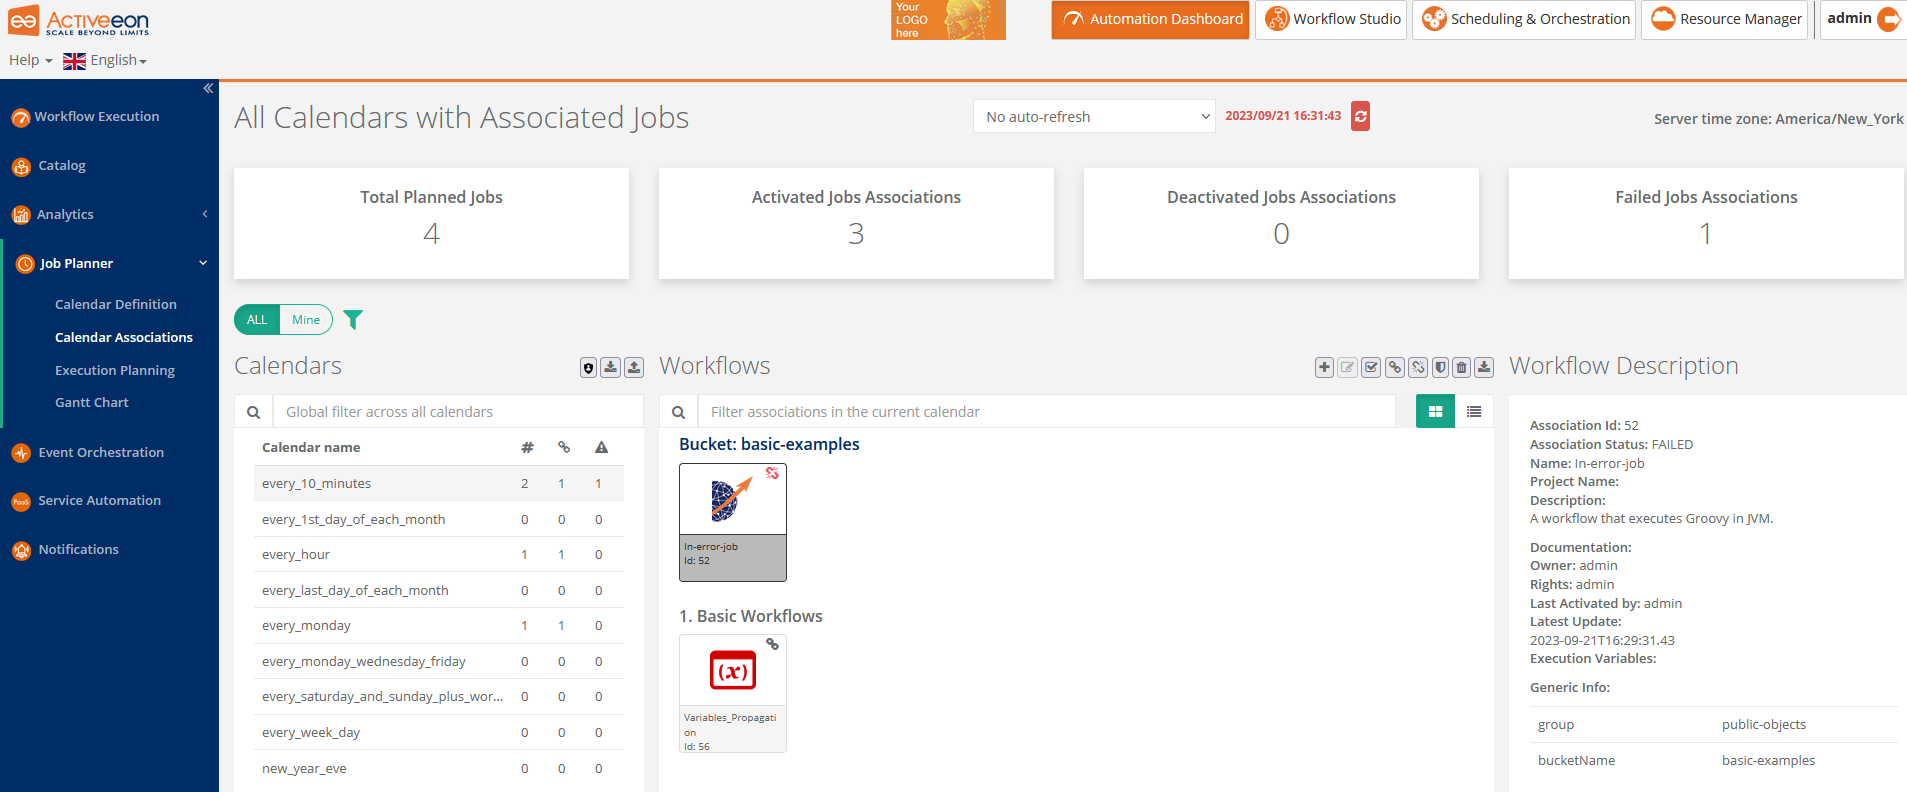
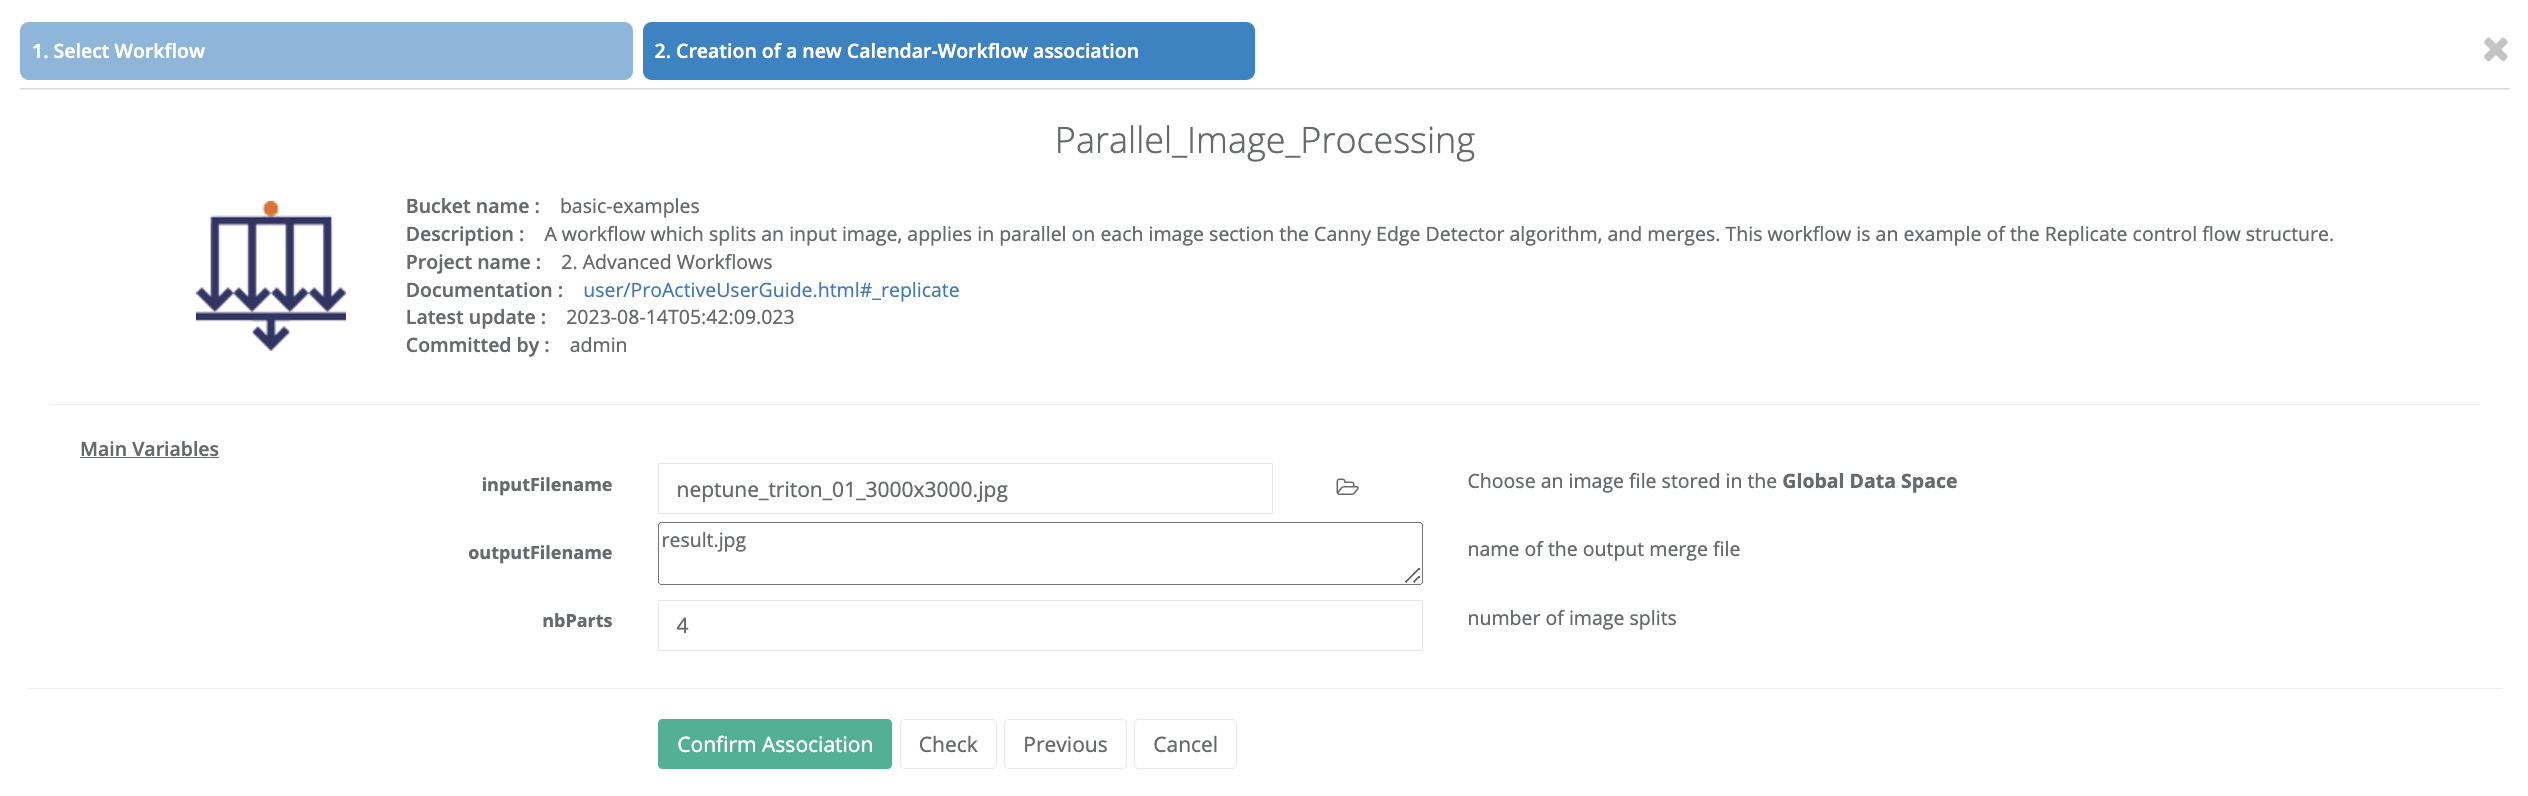
To plan a workflow, first select a calendar from the list on the left, then click on the add button to browse the catalog for the workflow to be scheduled. When creating an association, workflow variables can be given specific values, which may differ from the default values stored in the catalog for that workflow. Thus, a single workflow can be scheduled many times for the same calendar but with different input parameters.
The created association can be deactivated by clicking on the unlink button. This means that the workflows won’t be submitted for the next calendar occurrences, but it will still be visible on the Execution Planning and the Gantt chart. You can reactivate it with the link button. On the left panel, you can easily see the number of associated workflows to each calendar, and how many of them are activated or failed.
It is possible to display the associations as icons or as list by switching between the two buttons next to the search field.
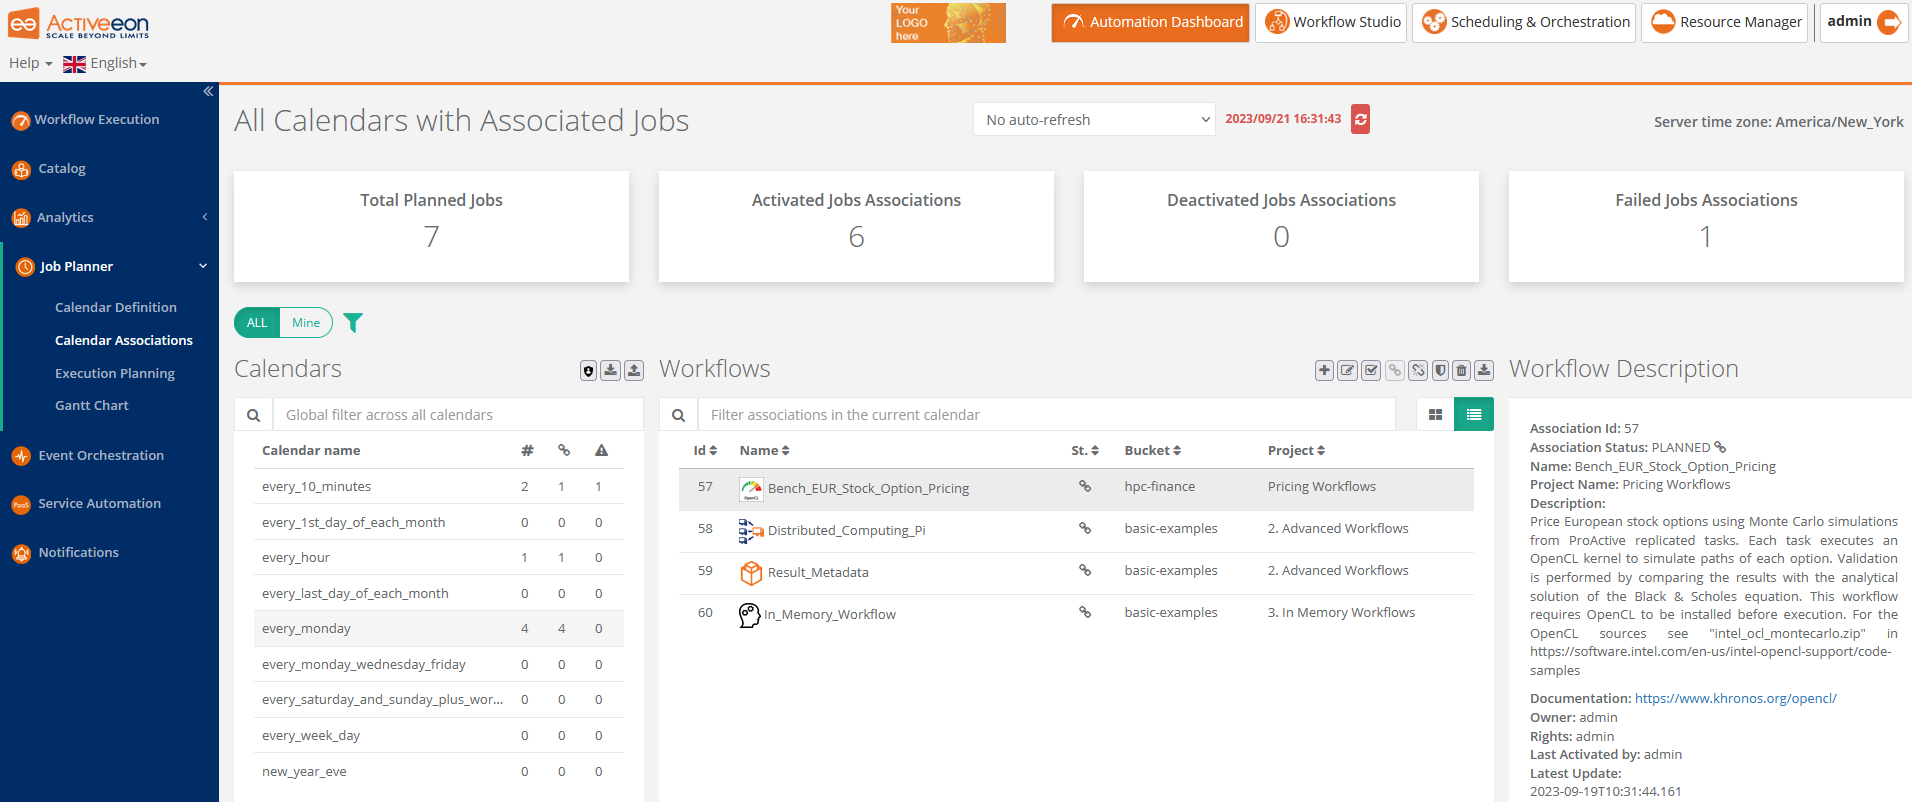
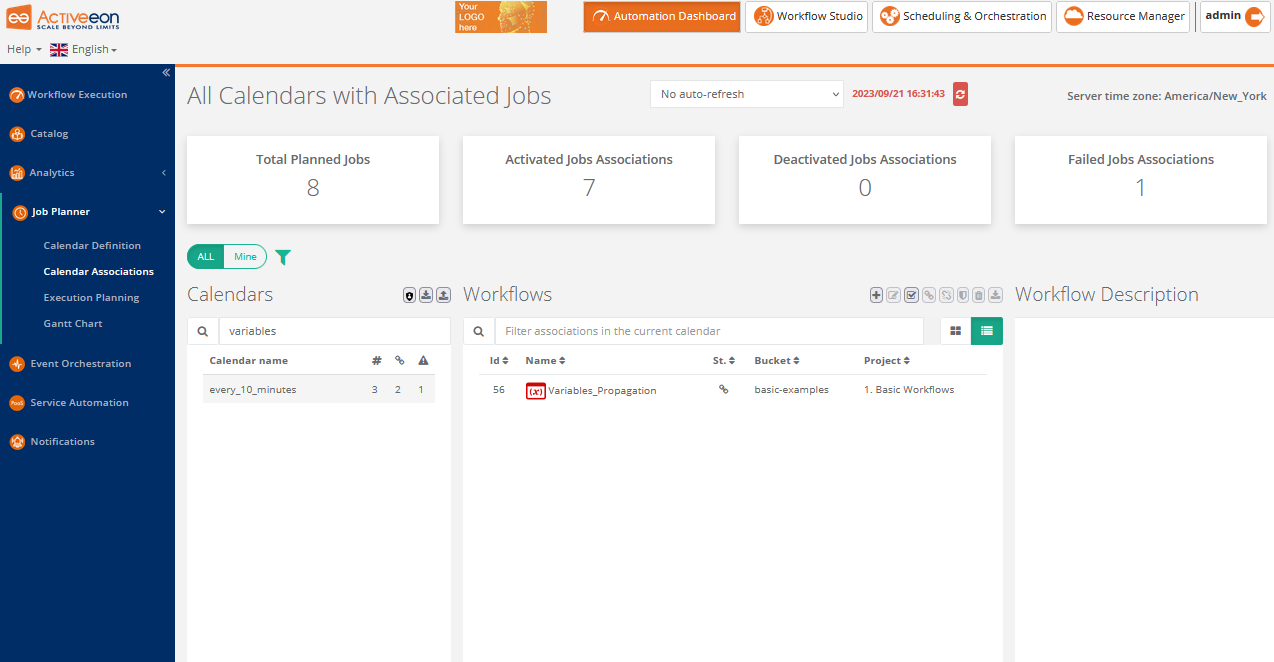
When selecting a calendar with associated workflows, it is possible to filter the associations within this calendar by workflow name, bucket name, username, status, project name, id, description, variables(name and value), and generic info(value and name).
This filtering can also be applied in the Calendars section on the left. By applying this filtering, it will filter both calendars and associated workflows.
An advanced filtering is available by clicking on the filter icon.
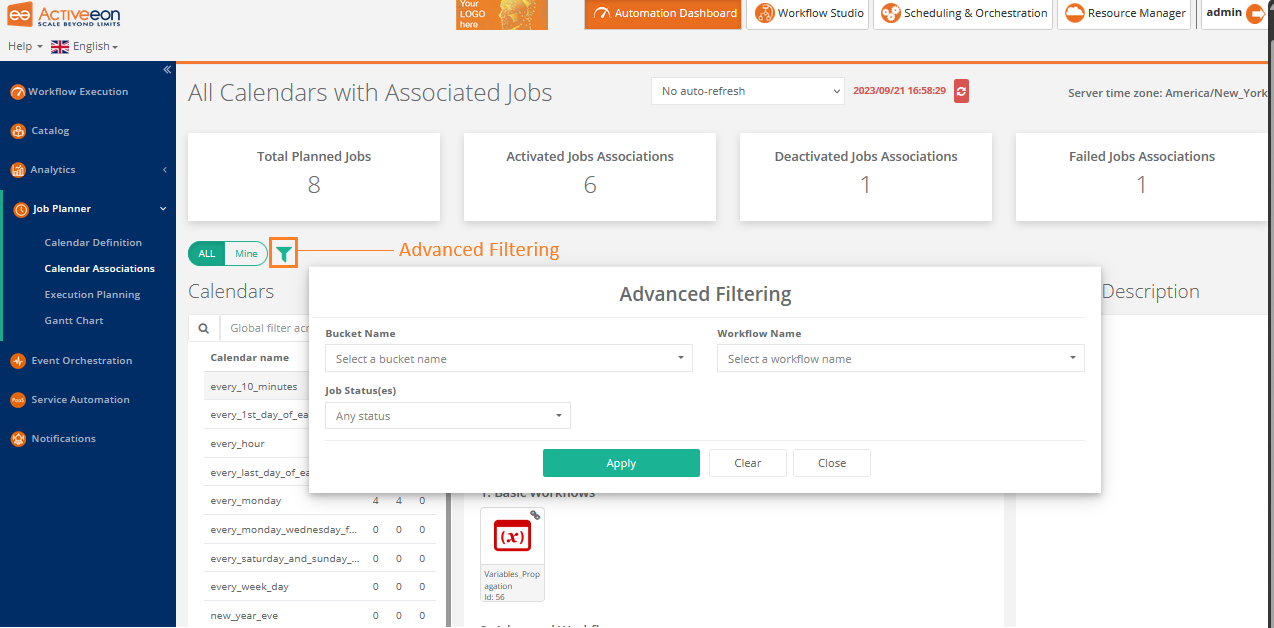
Advanced filtering will update the associations to match the filters but also the calendars and the statistics on the status of planned jobs at the top of the page.
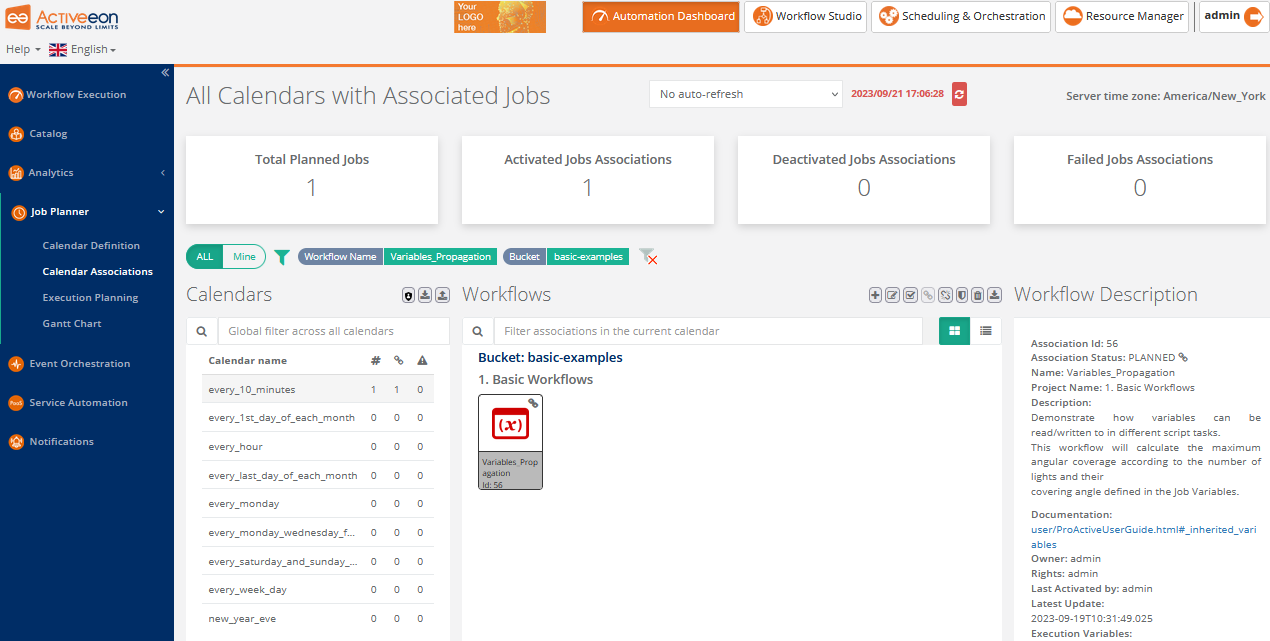
To reset the filters, you have two options: you can click on the "Clear icon" located next to the filter pills, or you can use the "Clear button" within the advanced filtering form, as depicted in the second screenshot above
This page can also be opened when clicking on the "plan" button on the Studio or the Scheduler Portal.
2.3. Activating the Execution Deviation Detection
2.3.1. Introduction
The Job Planner features a Deviation Detection for planned workflows. This feature allows to detect when a planned job deviates more or less than a user defined threshold from its average execution time. It can detect if a job takes too long or too short to execute.
| The average execution time for each association is constantly updated with new executions time regardless if there is a deviation detection configured. This means that average execution times will level over time. |
2.3.2. Configuration
To start receiving planned jobs execution deviation notifications, follow these two steps:
1: Configure the Notification Service
The Notification Service requires a one time setup. Once configured, Execution Deviation Time notifications will be received for all Planned Workflows that defines a Deviation Detection in their Calendar association.
-
Go to the Notification Portal.
-
On the Subscriptions Tab, open the Job Planner Subscription.
-
Add the Execution Time Deviation event to the subscription.
-
Activate the Portal Notification Methods and/or any other desired notification method.
-
Activate the Subscription.
The Subscription is now configured to receive Execution Time Deviation notifications sent by the Job Planner.
2: Configure the Workflow Calendar associations
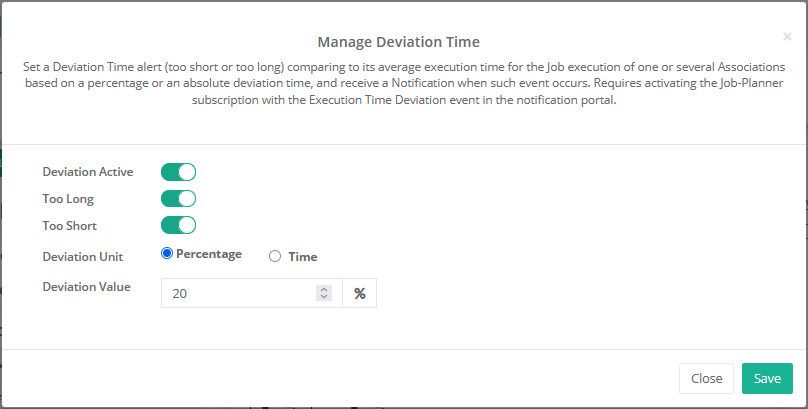
Each Calendar Workflow association defines its own Deviation Detection configuration. To access the Deviation Detection configuration, right click an association and click on the Manage Deviation menu item.
From the Manage Deviation Time modal you can:
-
Activate or deactivate the deviation detection.
-
Activate the too long and the too short deviation detection: Detect if the job takes more or less time than its average to execute.
-
Select the Deviation Unit: The detection threshold is either a percentage (ie: 20%) or an absolute time (ie: 5 minutes).
-
Select the threshold value: The limit value that triggers the deviation notification.
Example of configuration:
3. Execution Planning visualisation and GANTT
On the Job Planner Portal, Execution Planning page, you can see the recurrence of Calendar Definitions . You can select one or several Calendar Definitions on the left panel and associated workflows will appear on the right panel. There are 4 ways to visualize planning of the selected Calendar Definitions:
-
by workflow
-
Chronologically
-
On a standard Calendar
-
with a GANTT chart
3.1. Visualization by workflow, Chronologically or on a standard Calendar
There are 3 different tabs for the planning visualization:
-
"Sort by workflow" tab: For each workflow, a list of execution time is displayed. The combo box allows you to choose the period of the execution planning. If several workflows are associated to one Calendar Definition, they will be grouped. If a workflow is associated to several Calendar Definitions, it will appear several times. The name of the Calendar Definition is always displayed next to the workflow name, in order to know which Calendar Definition is related to the given executions.
-
"Sort chronologically" tab: All executions are displayed chronologically in a list, with for each execution, the workflow that will be executed and the corresponding Calendar Definition. The combo box allows you to choose the period of the execution planning.
-
"Calendar" tab: You can see the execution planning of the selected Calendar Definitions, by year/month/week or day. In the year and month views, you can see the number of executions in one month/day. If you click on it, you can see more details on which workflows are executed and when. In the week view, if several workflows are executed at the same time, you will only be able to see one at a time.
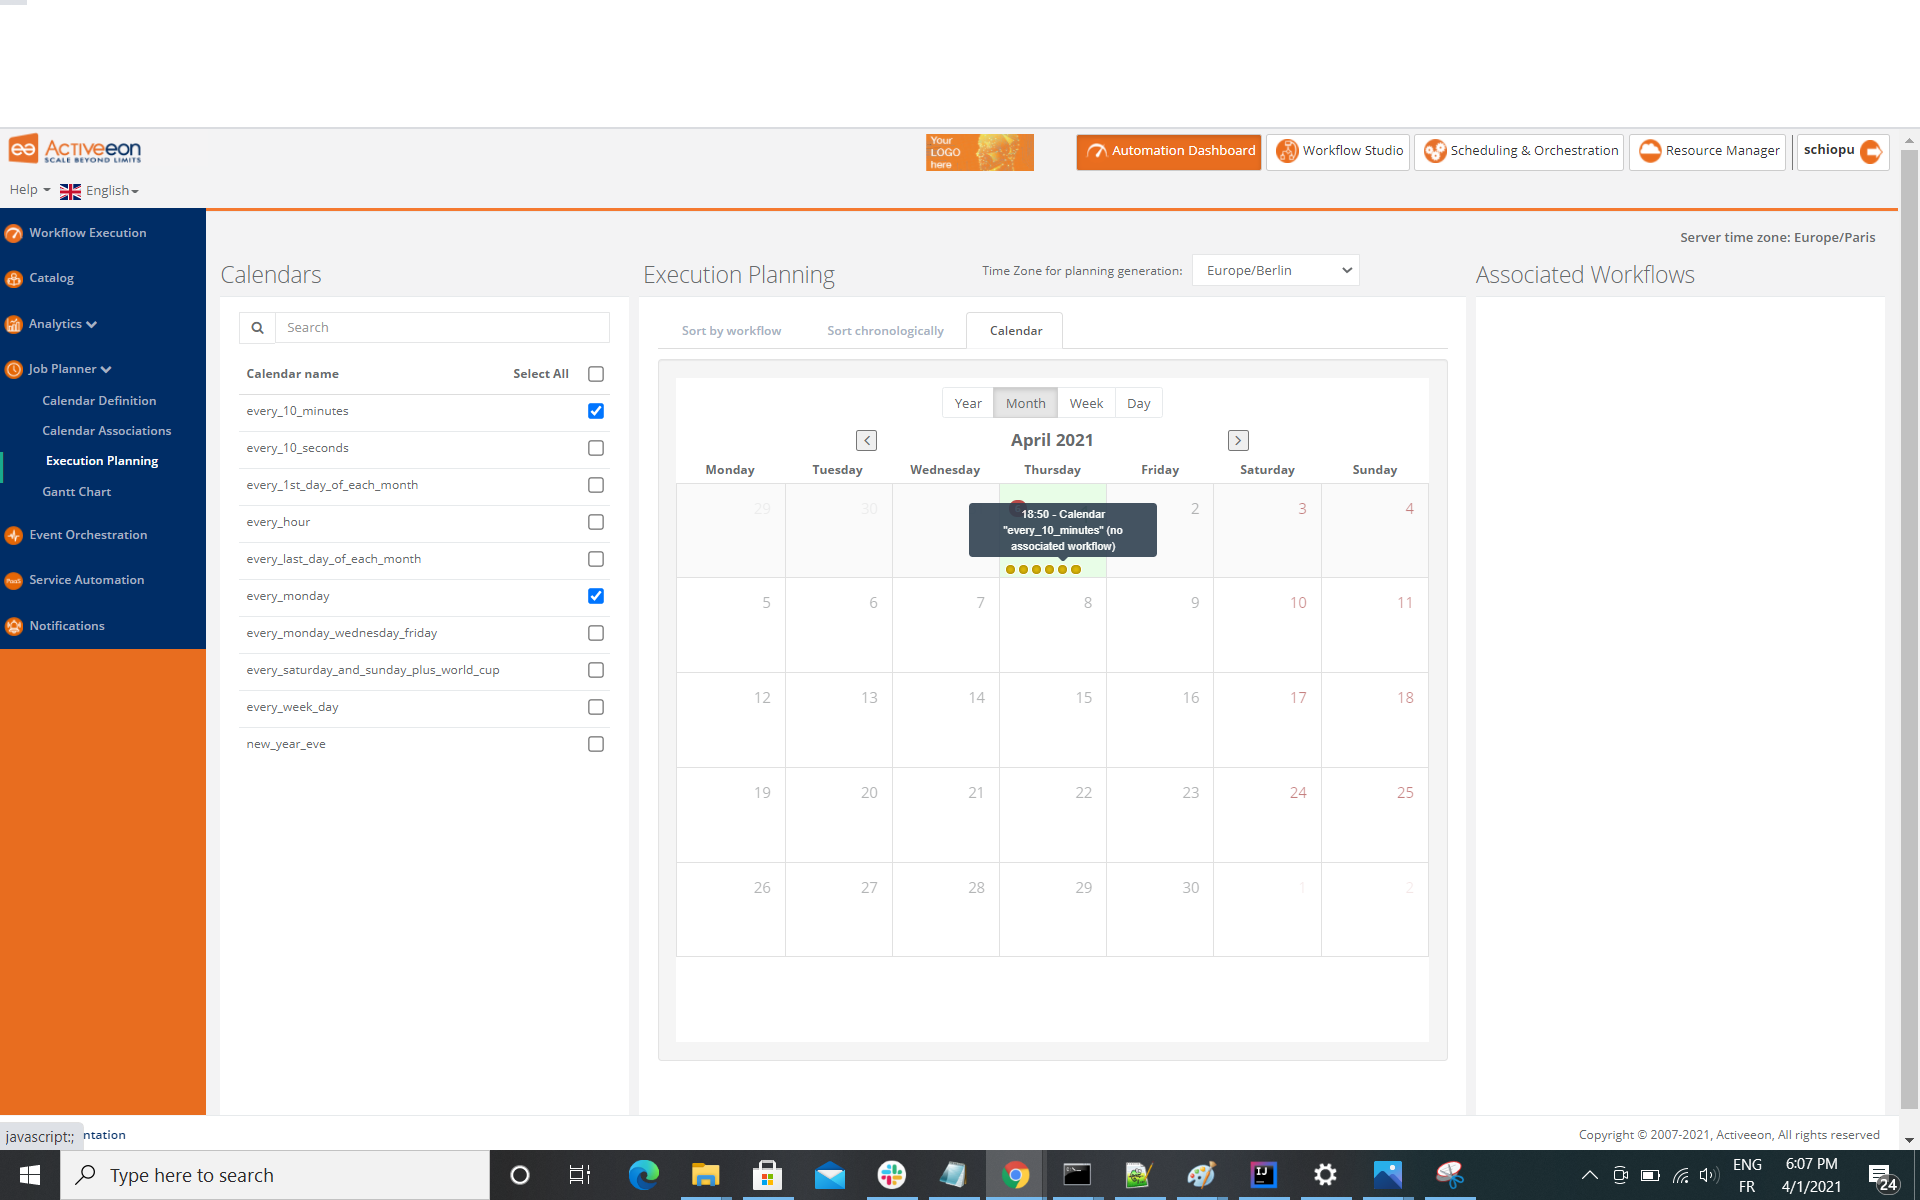
If a calendar has no association, you can still select it and see its recurrence on the Execution Planning panel. If nothing is displayed, it means the selected Calendar Definitions have no recurrence on the selected period.
3.2. GANTT Visualization of the Job Planning
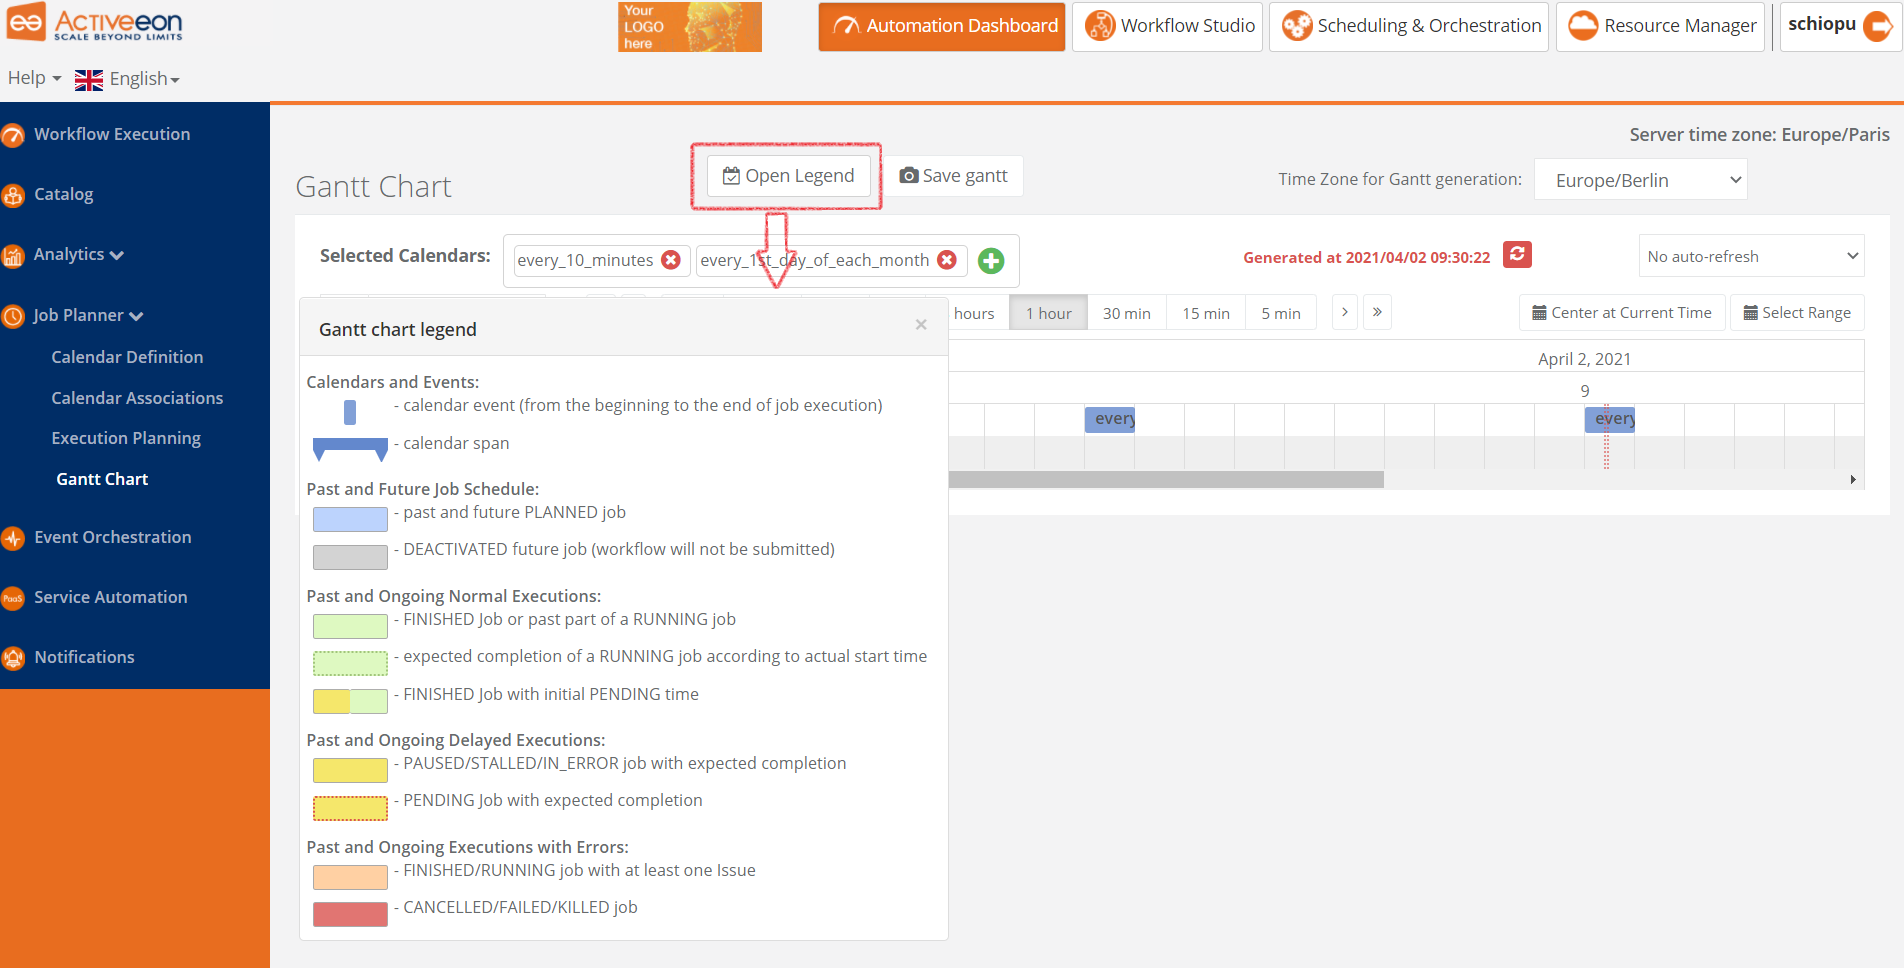
You can also use the Gantt chart to visualize the executions:
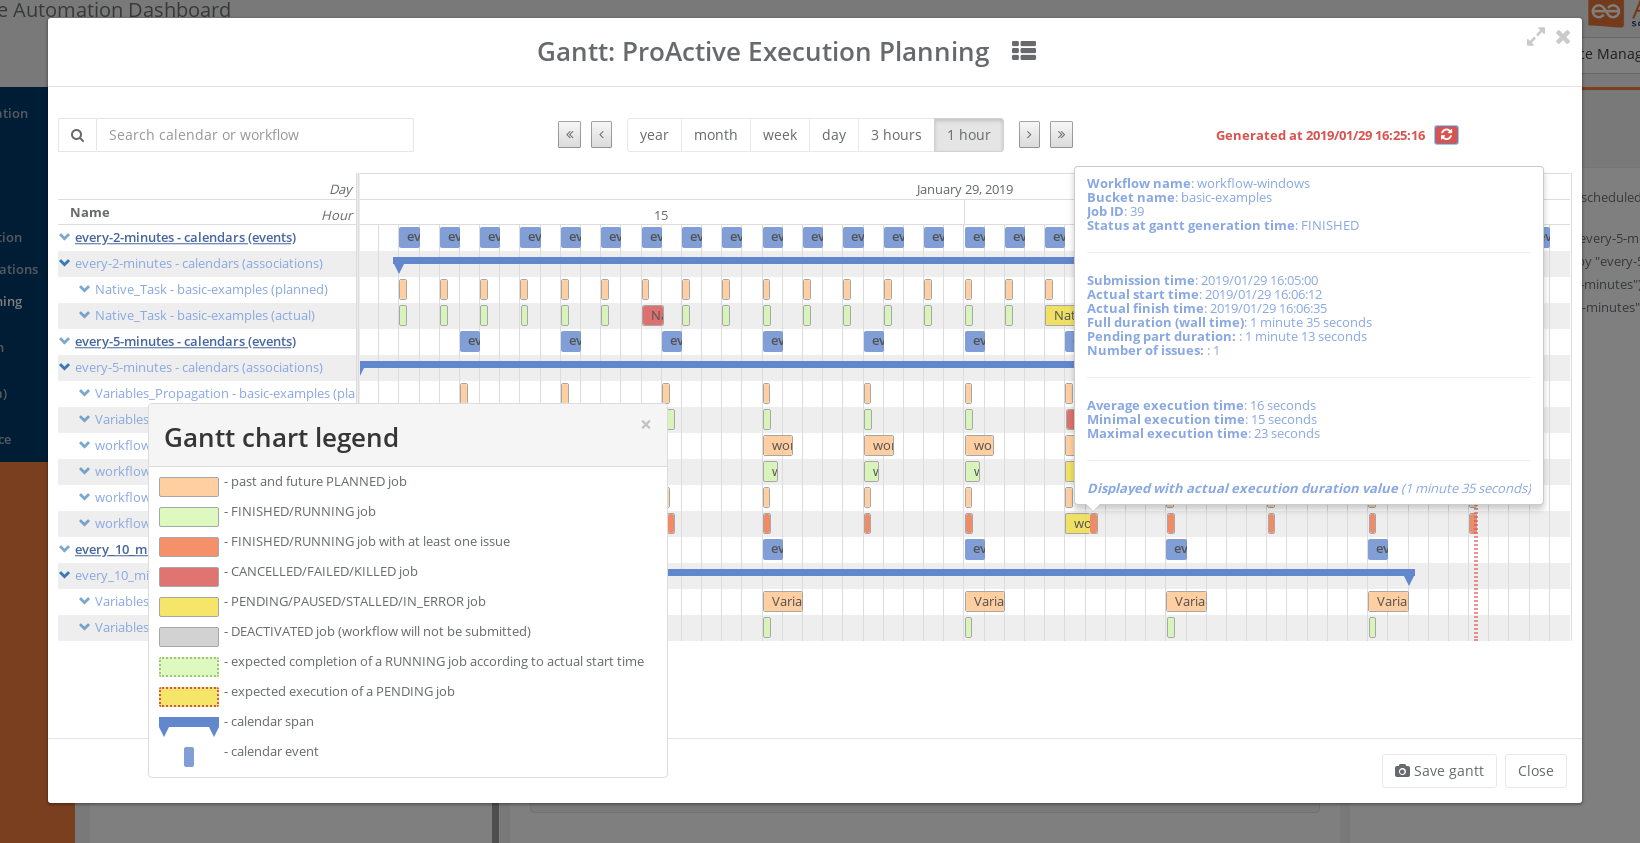
In addition to the Execution Planning panel, the Gantt chart allows you to see the past job history, the current one being executed, as well as the future ones, all in a comprehensive interactive view. In this view, you will easily see the potential difference between the Planned Submission time and the Actual Start Time of the Jobs. You will also get estimations of the Finished Time, taking into account the Actual Start Time.
Moreover, you can visualize the Job that stayed PENDING for some time (in Yellow), as well as the Jobs that had issues and got KILLED, CANCELLED, or FAILED (in red).
The planned jobs (in orange) are on the row just above the actual jobs so that you can easily compare what was planned and what actually executed. Please refer to the chart legend (Open legend button) for a complete definition of the colors and patterns used in the Gantt chart.
The length of the displayed planned jobs can be:
-
the expected execution time given by users in the workflow with the Generic Information:
JOB_EXEC_TIME -
if the workflow doesn’t have any
JOB_EXEC_TIMEGeneric Information, it will be the average execution time computed from the past association executions -
if the workflow doesn’t have any
JOB_EXEC_TIMEGeneric Information and has never been executed with the association, it will be a default 15 minutes duration
If a job has been PENDING before starting, depending on the scale you have selected, you can see a yellow part on the displayed job. This corresponds to the time the job was PENDING and helps to highlight a resource problem.
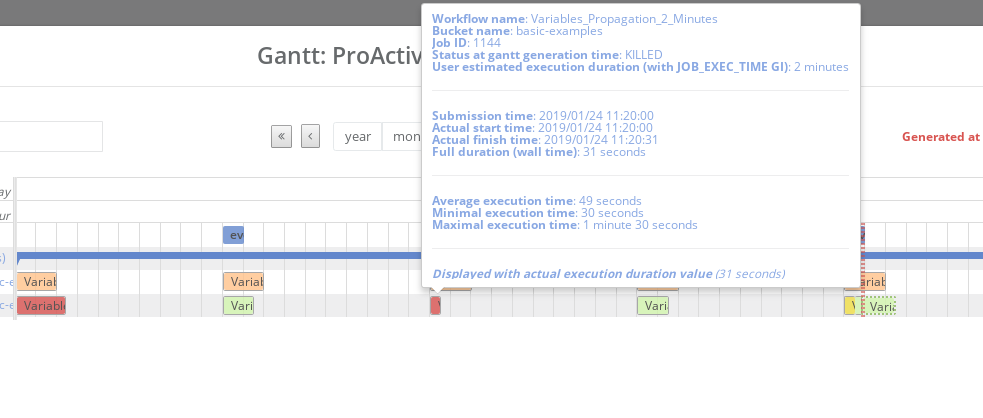
You can see more information jobs in the tooltips, when passing your mouse over a specific job:
-
Workflowandbucket name -
Job ID: the ID given by the scheduler when a job has been submitted -
Status: the status of the job when the Gantt has been generated -
User estimated execution duration: Generic InformationJOB_EXEC_TIMEgiven by users in the workflow. This information doesn’t appear if the Generic Information is not defined in the workflow. -
Submission time: the time when the job had been submitted by the job planner -
Actual start time: the time when the job has started. If it has been PENDING before starting,Submission timeandActual start timewill be different. -
Actual finish time: the time when the job has finished (event if it was killed, cancelled or that it failed) -
Full duration (wall time): the duration of the job, from the time it was submitted (Submission time) to the time it finished (Actual finish time) -
Average execution time: the average duration of the workflow submitted with this specific calendar by the job planner -
Minimal execution time: the minimal duration of the workflow submitted with this specific calendar by the job planner -
Maximal execution time: the maximal duration of the workflow submitted with this specific calendar by the job planner -
Displayed with […]: which one of the values above was used to display the bar representing the job
Depending on the status of the job, the information won’t be the same. For example, if the job is RUNNING or STALLED, Actual finish time will be replaced by Planned finish time: the time when the job should finish, depending on when it started or how long it has been delayed.
| If you select a calendar that will occur frequently (such as "every_10_min"), you might encounter troubles with big scales (such as "year"). The Gantt chart will take a long time to load and events will be too condensed to be readable. This is why for these kind of calendars, it is easier to select a smaller scale (such as "1 hour"). You can also select only the calendars you need to see before opening the Gantt chart modal, to make it load faster. |
The "Save Gantt" button will take a screenshot of the visible part of the Gantt chart. Like for Gantt chart loading, it might take a while if there are too many events. You can also chose a smaller scale and select only the calendars you need.
4. Calendar Definition Syntax
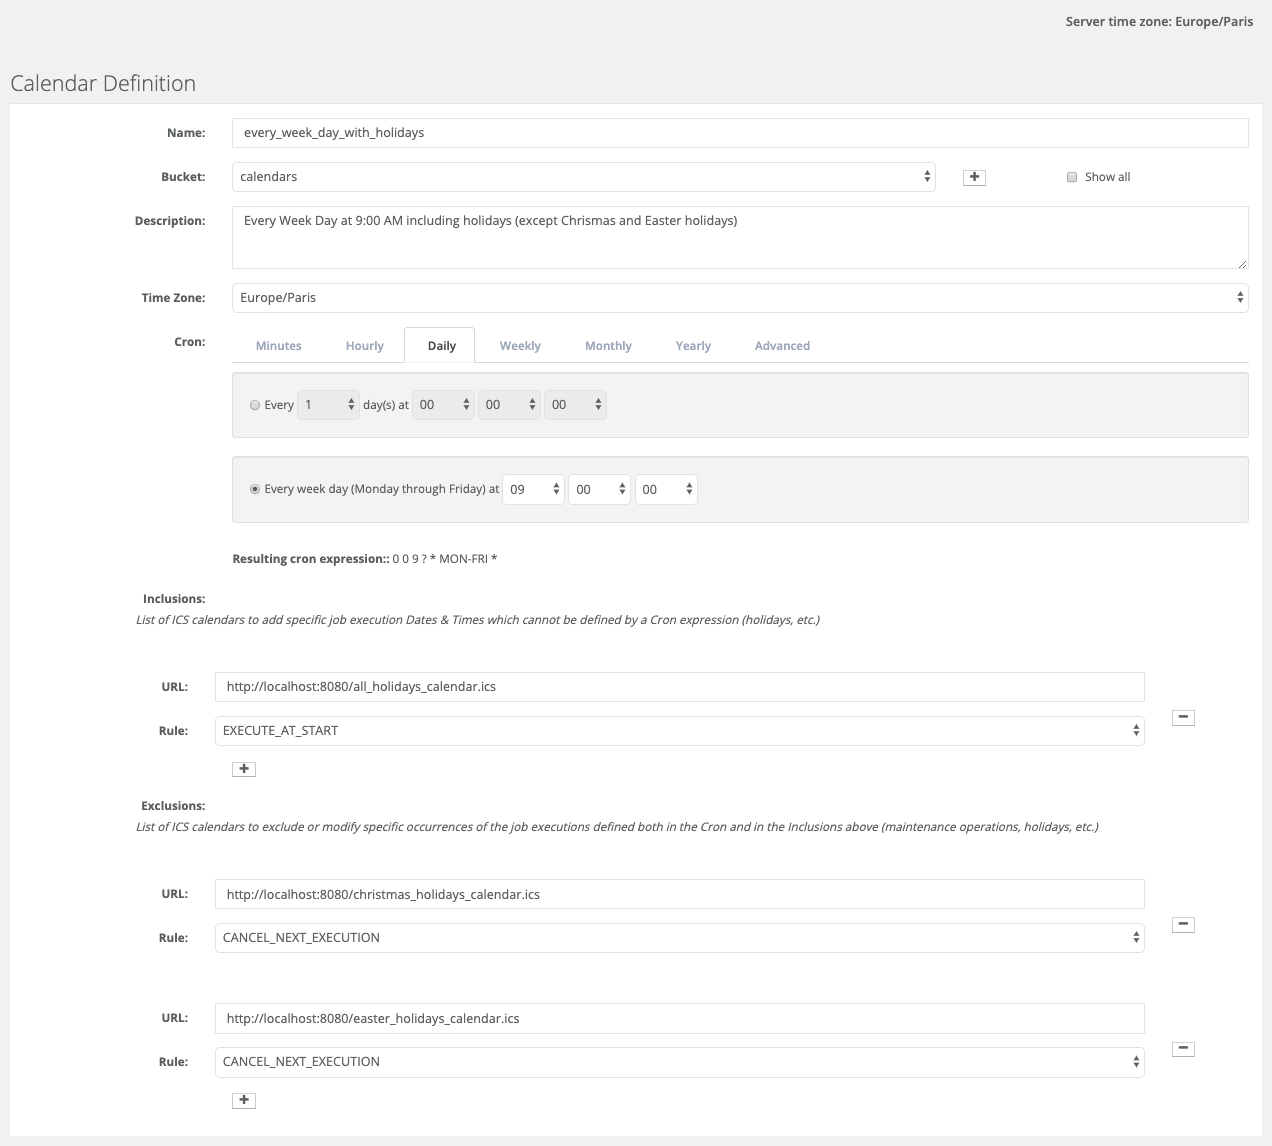
Job Planner uses a Calendar Definition to know how the job will be planned over the time. As shown on the example below, this definition is composed of 4 fields:
-
a description (providing a humain-readable description of the used cron expression, when is the Calendar Definition used, etc.)
-
a specific time zone for the future scheduled jobs depending on the region (Europe/Paris, US/Eastern, etc.)
-
a cron expression to define the recurrence (every morning at 6am, etc.)
-
a set of inclusions calendars to add specific job executions which cannot be defined by a cron expression (holidays, etc.)
-
a set of exclusions calendars to exclude specific occurrences of the job executions defined in cron and inclusion definitions (maintenances operations, holidays, etc.)
Based on the above configuration, the following JSON object will be stored in the Catalog.
{
  "description": "Every Week Day at 9:00 AM including holidays (except Christmas and Easter holidays)",
  "cron_timezone": "Europe/Paris",
  "cron": "0 0 9 ? * MON-FRI *",
  "inclusion_calendars": [
      {
        "url": "http://localhost:8080/all_holidays_calendar.ics",
        "action": "EXECUTE_AT_START"
      }
  ],
  "exclusion_calendars": [
    {
      "url": "http://localhost:8080/christmas_holidays_calendar.ics",
      "action": "CANCEL_NEXT_EXECUTION"
    },
    {
      "url": "http://localhost:8080/easter_holidays_calendar.ics",
      "action": "CANCEL_NEXT_EXECUTION"
    }
  ]
}
4.1. Description
The description allows users who are not familiar with cron expressions to provide a humain-readable description to know when it occurs. It might also be used for other purpose, for example saying when is the Calendar Definition used.
4.2. Time Zone
The aim of the time zone is to make the user able to select a specific time for his future scheduled jobs depending on the region. By default, it is set according to the client location. The server time zone is always displayed on the top right corner. It indicates the time of the machine where ProActive instance is running. To simplify the process of selecting a time zone, the time zone dropdown now features a search field. Users can enter a value into this field to filter and narrow down the list of available options.
4.3. Cron
The aim of the cron expression is to launch the planned workflow according to the cron syntax. One can see the cron expression "0 0 9 ? * MON-FRI *", which follows the quartz cron expression syntax explained in the Quartz Cron Expression Syntax section. The cron expression in this example executes at 9:00 AM on working days (Monday to Friday).
4.4. Inclusion Calendar
The purpose of the inclusion calendar section is to use an ICS file to specify a workflow launching policies during calendar events. For instance automatically submit a worklfow at event start. Given an event, a predefined action will be applied on the workflow execution.
| Inclusion action | Description |
|---|---|
EXECUTE_AT_START |
The workflow will be submitted at each event start. |
4.5. Exclusion Calendar
The purpose of the exclusion calendar is to use an ICS file to prevent workflows to be executed during a calendar event. Given an event, a predefined action will be applied on the workflow execution.
| Exclusion action | Description |
|---|---|
CANCEL_NEXT_EXECUTION |
All workflow submissions are canceled during the calendar events. |
4.6. External calendar retrieved from URL
If an inclusion or exclusion calendar is not retrievable, it is blocking the Workflow submission. An inclusion or exclusion calendar can become not retrievable if it cannot be downloaded from its URL and the Job Planner cache doesn’t hold a copy.
5. Notifications
The Job Planner can send notifications to users when particular events occur. The Notification service user guide documentation is available here and its configuration in the admin guide is available here.
To start receiving notifications from the Job Planner, you must:
-
Configure your Job planner’s Subscription as it is described in Service subscriptions documentation of the Notification service.
-
Inside the Job planner subscription, select from available events the ones you wish to be notified of. Available Job planner events with their description and example values are detailed in the table Job Planner event types.
6. Job Planner Configuration
When an unexpected event occurs and prevent the Job Planner from submitting Workflows according to the given Calendar, multiple configurable strategies can be used to handle the issue.
This configuration is done in the properties file PROACTIVE_HOME/dist/war/job-planner/WEB-INF/classes/application.properties
6.1. Planned execution(s) has been missed
This configuration controls how the Job Planner reacts when it detects that one or more executions have been missed for a given association. For instance, if the server is down for a period of time, the Job Planner won’t be able to submit Workflows during this interval. Two properties are used to define how the Job Planner reacts to this situation.
pa.on_skipped_execution.submit=true
True by default, this option tells the Job Planner to submit a new execution if it detects that previous executions have been missed. It is equivalent to say that the submission has been delayed and thus a Delayed submission executing notification will be triggered for all users subscribed to this event. If set to false, the Job Planner will not submit a new execution.
pa.on_skipped_execution.submit.windows=-1
This property, when greater than zero, allows the job planner to submit a missed execution within a given time window in milliseconds. If the job planner is unable to submit the missed execution after the configured delay, it will be skipped until the next calendar occurrence. By default, the skipped execution window is disabled : -1.
6.2. A previous planned execution is still on going
This feature enables to specify to the Job Planner what should be done when a planned execution must occur but the previous one is still executing.
The Job Planner can either remove (default) or postpone the submission.
pa.on_going_job.cancel_execution=true
With pa.on_going_job.cancel_execution=true (default), when a past submission of the same calendar association is still ongoing (job is not finished),
the Job Planner will decide to skip submission until the next calendar occurrence.
In such case, a Submission canceled notification will be triggered to users subscribed to this event.
#if postponed_execution is set to true it will replace the cancel execution feature
pa.on_going_job.postponed_execution=false
If enabled pa.on_going_job.postponed_execution=true, when a past submission of the same calendar association is still ongoing (job is not finished),
the Job Planner will decide to postpone submission until the previous job terminates its execution.
In such case we can expect two notifications:
-
A Submission postponed notification to inform that an execution has been postponed.
-
A Delayed submission executing to inform that the previous delayed execution is now executing.
6.3. Last finished planned job has issues
This feature defines the behavior of the Job Planner when the previous execution for a planned workflow has errors. By default, it will continue to submit according to the calendar.
pa.on_faulty_jobs_association.put_in_error=false
If set to true, the Calendar Association will be set to FAILED and Job Planner will stop submitting until the user manually reactivates the association.
In such case, an Association failed notification will be triggered to users subscribed to this event.
6.4. Job planner could not retrieve a resource from the catalog
If a workflow or a calendar cannot be retrieved by the Job Planner from the catalog, the association will be set to FAILED and will require manual reactivation for the submissions to restart.
In such case, an Association failed notification will be triggered to users subscribed to this event.
6.5. Job Planner RBAC management
RBAC, or Role Based Access Control, represents a control model for a system in which each access decision is based on the role to which the user is associated. In the Job-Planner, RBAC operations are only performed by Job-Planner admins or associations' owners. RBAC operations can be distinguished in two types:
-
Managing an authorization for an association
-
Managing an authorization for all associations owned by a specific user
Both types of authorizations can be assigned for either a specific user (using her/his username) or a user group (that contains multiple users). Only one authorization can be assigned to a username or a user group for each type of RBAC operation. However, the user can eventually have multiple authorizations due to a mix of both types of RBAC operations. Furthermore, the created authorizations can be modified or deleted.
An authorization gives the specified user(s) some access permission to the specific association(s). We provide four authorization levels:
-
read: The user or user group can only view the association(s), along with its parameters and visualize its planning in the gantt chart. -
write: The user or user group have, in addition to the read right, the privilege to deactivate or reactivate an association and modify its parameters. -
admin: The user or user group have, in addition to the write rights, the ability to remove the association. Additionally, this level allow users to create, modify or delete authorization rules. -
noAccess: The association will be hidden from the user or user group. Any operation on this association is forbidden.
6.5.1. Manage the authorizations of a single association
To manage an association’s authorizations in the Job-Planner Calendar Associations portal, first select the association, then click on the  above the associations view as shown in the figure below:

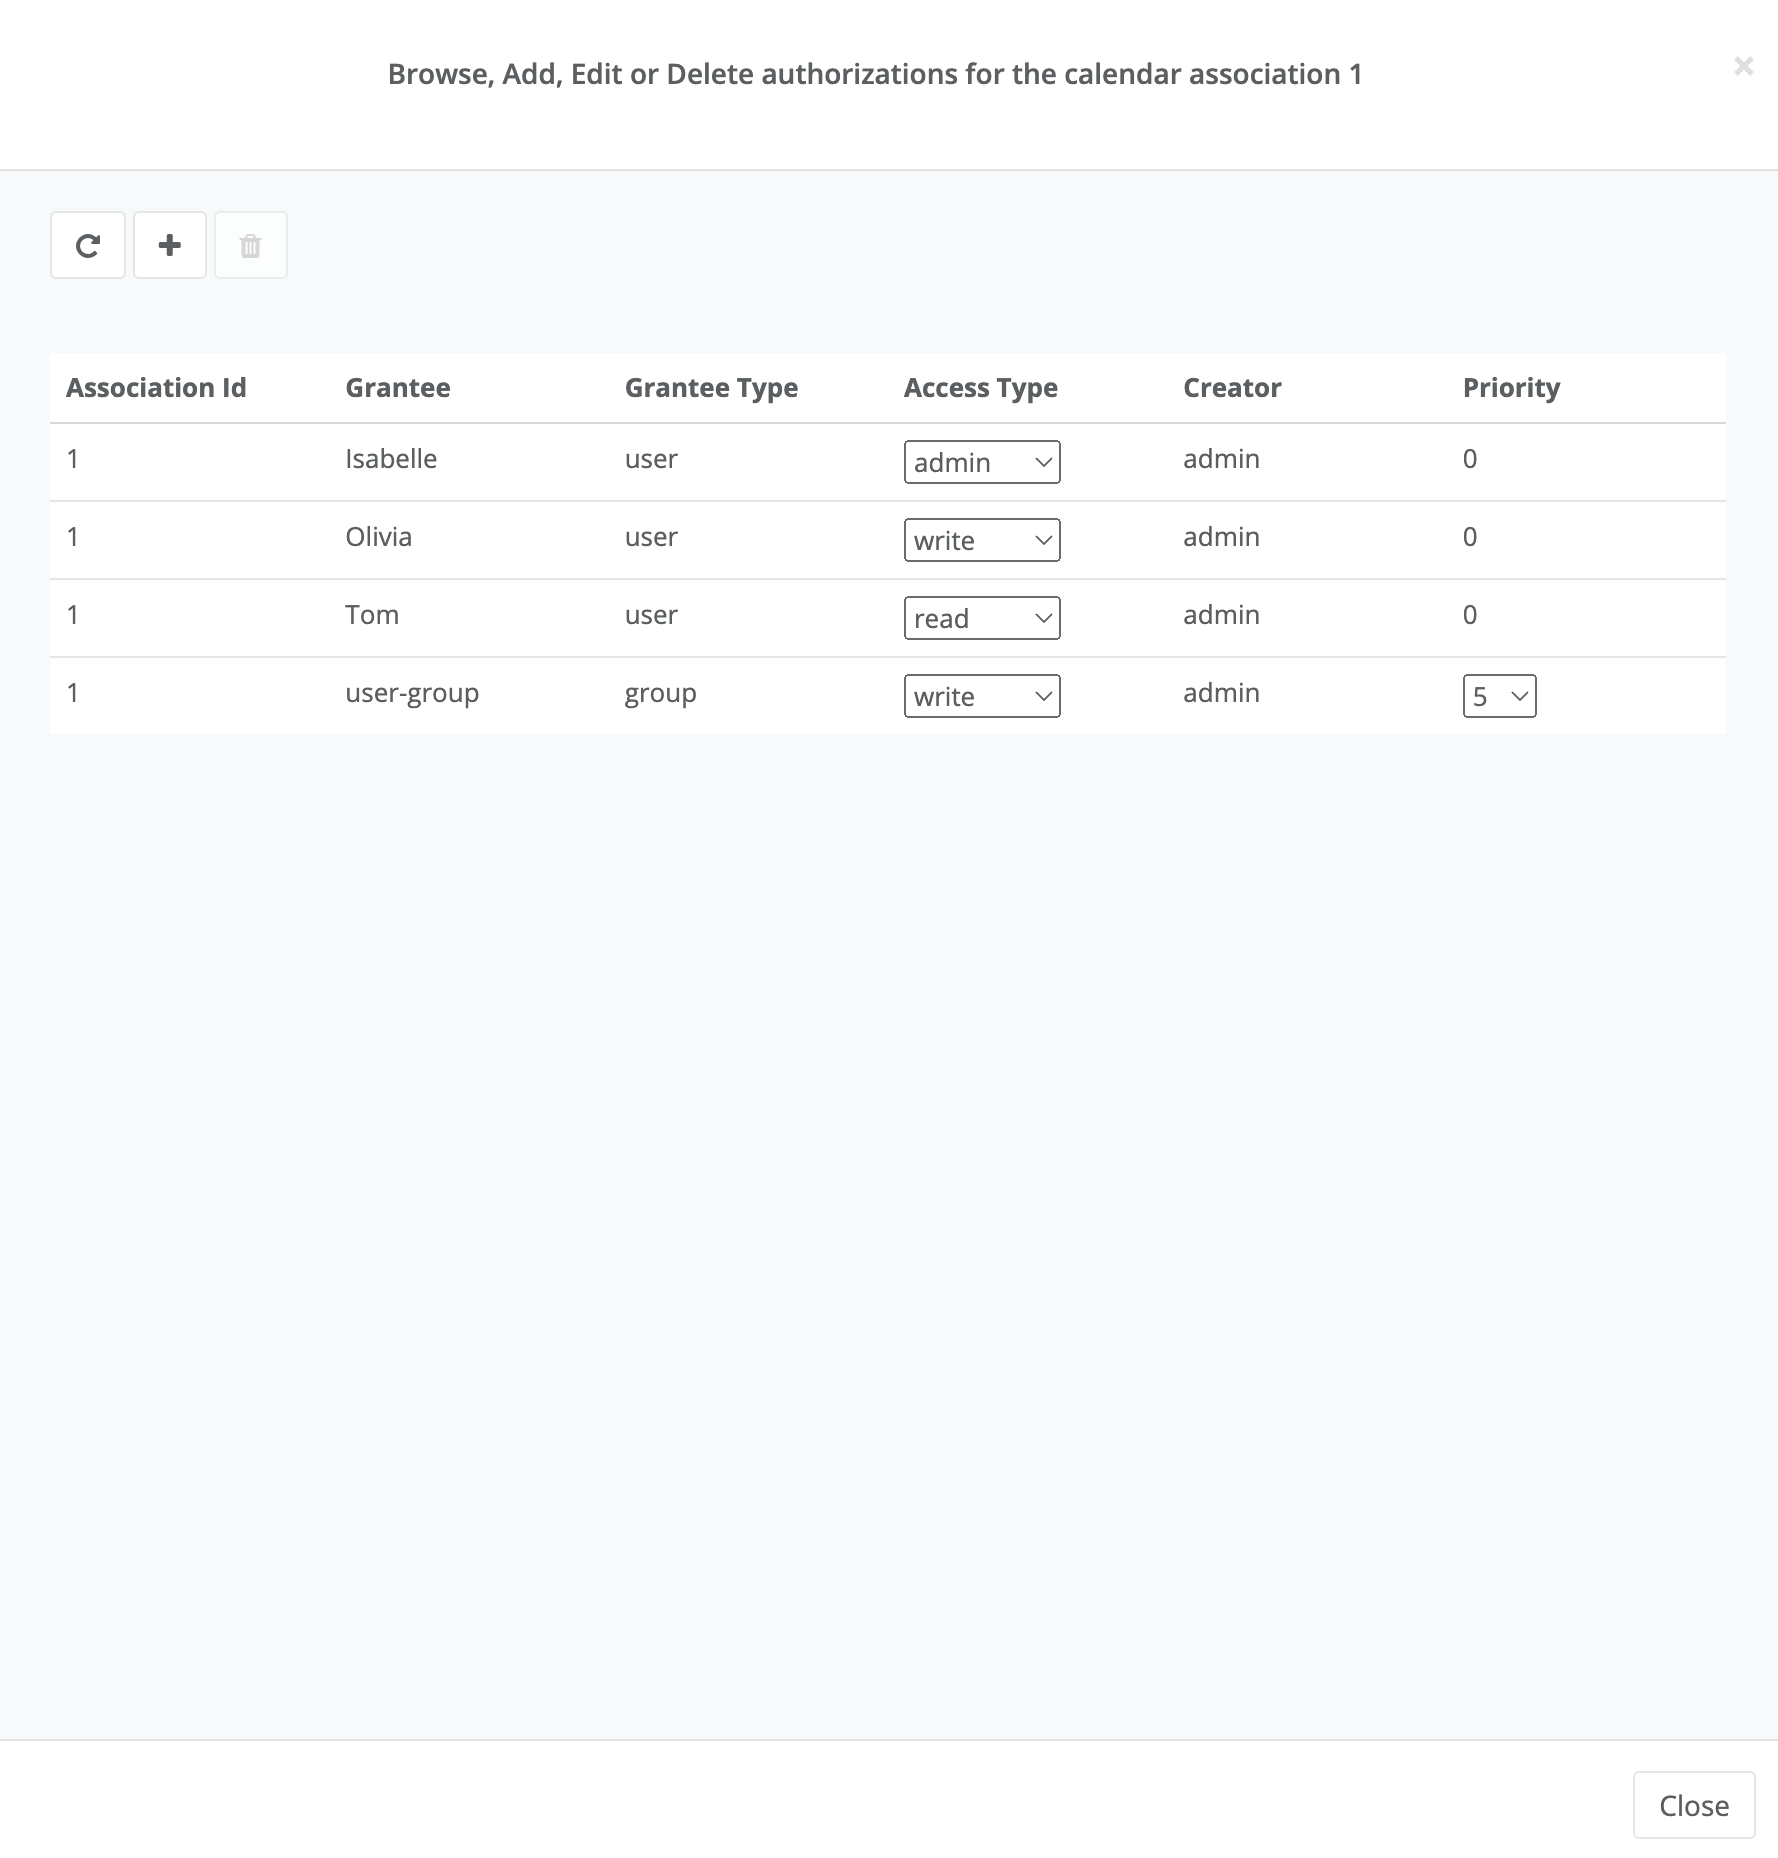
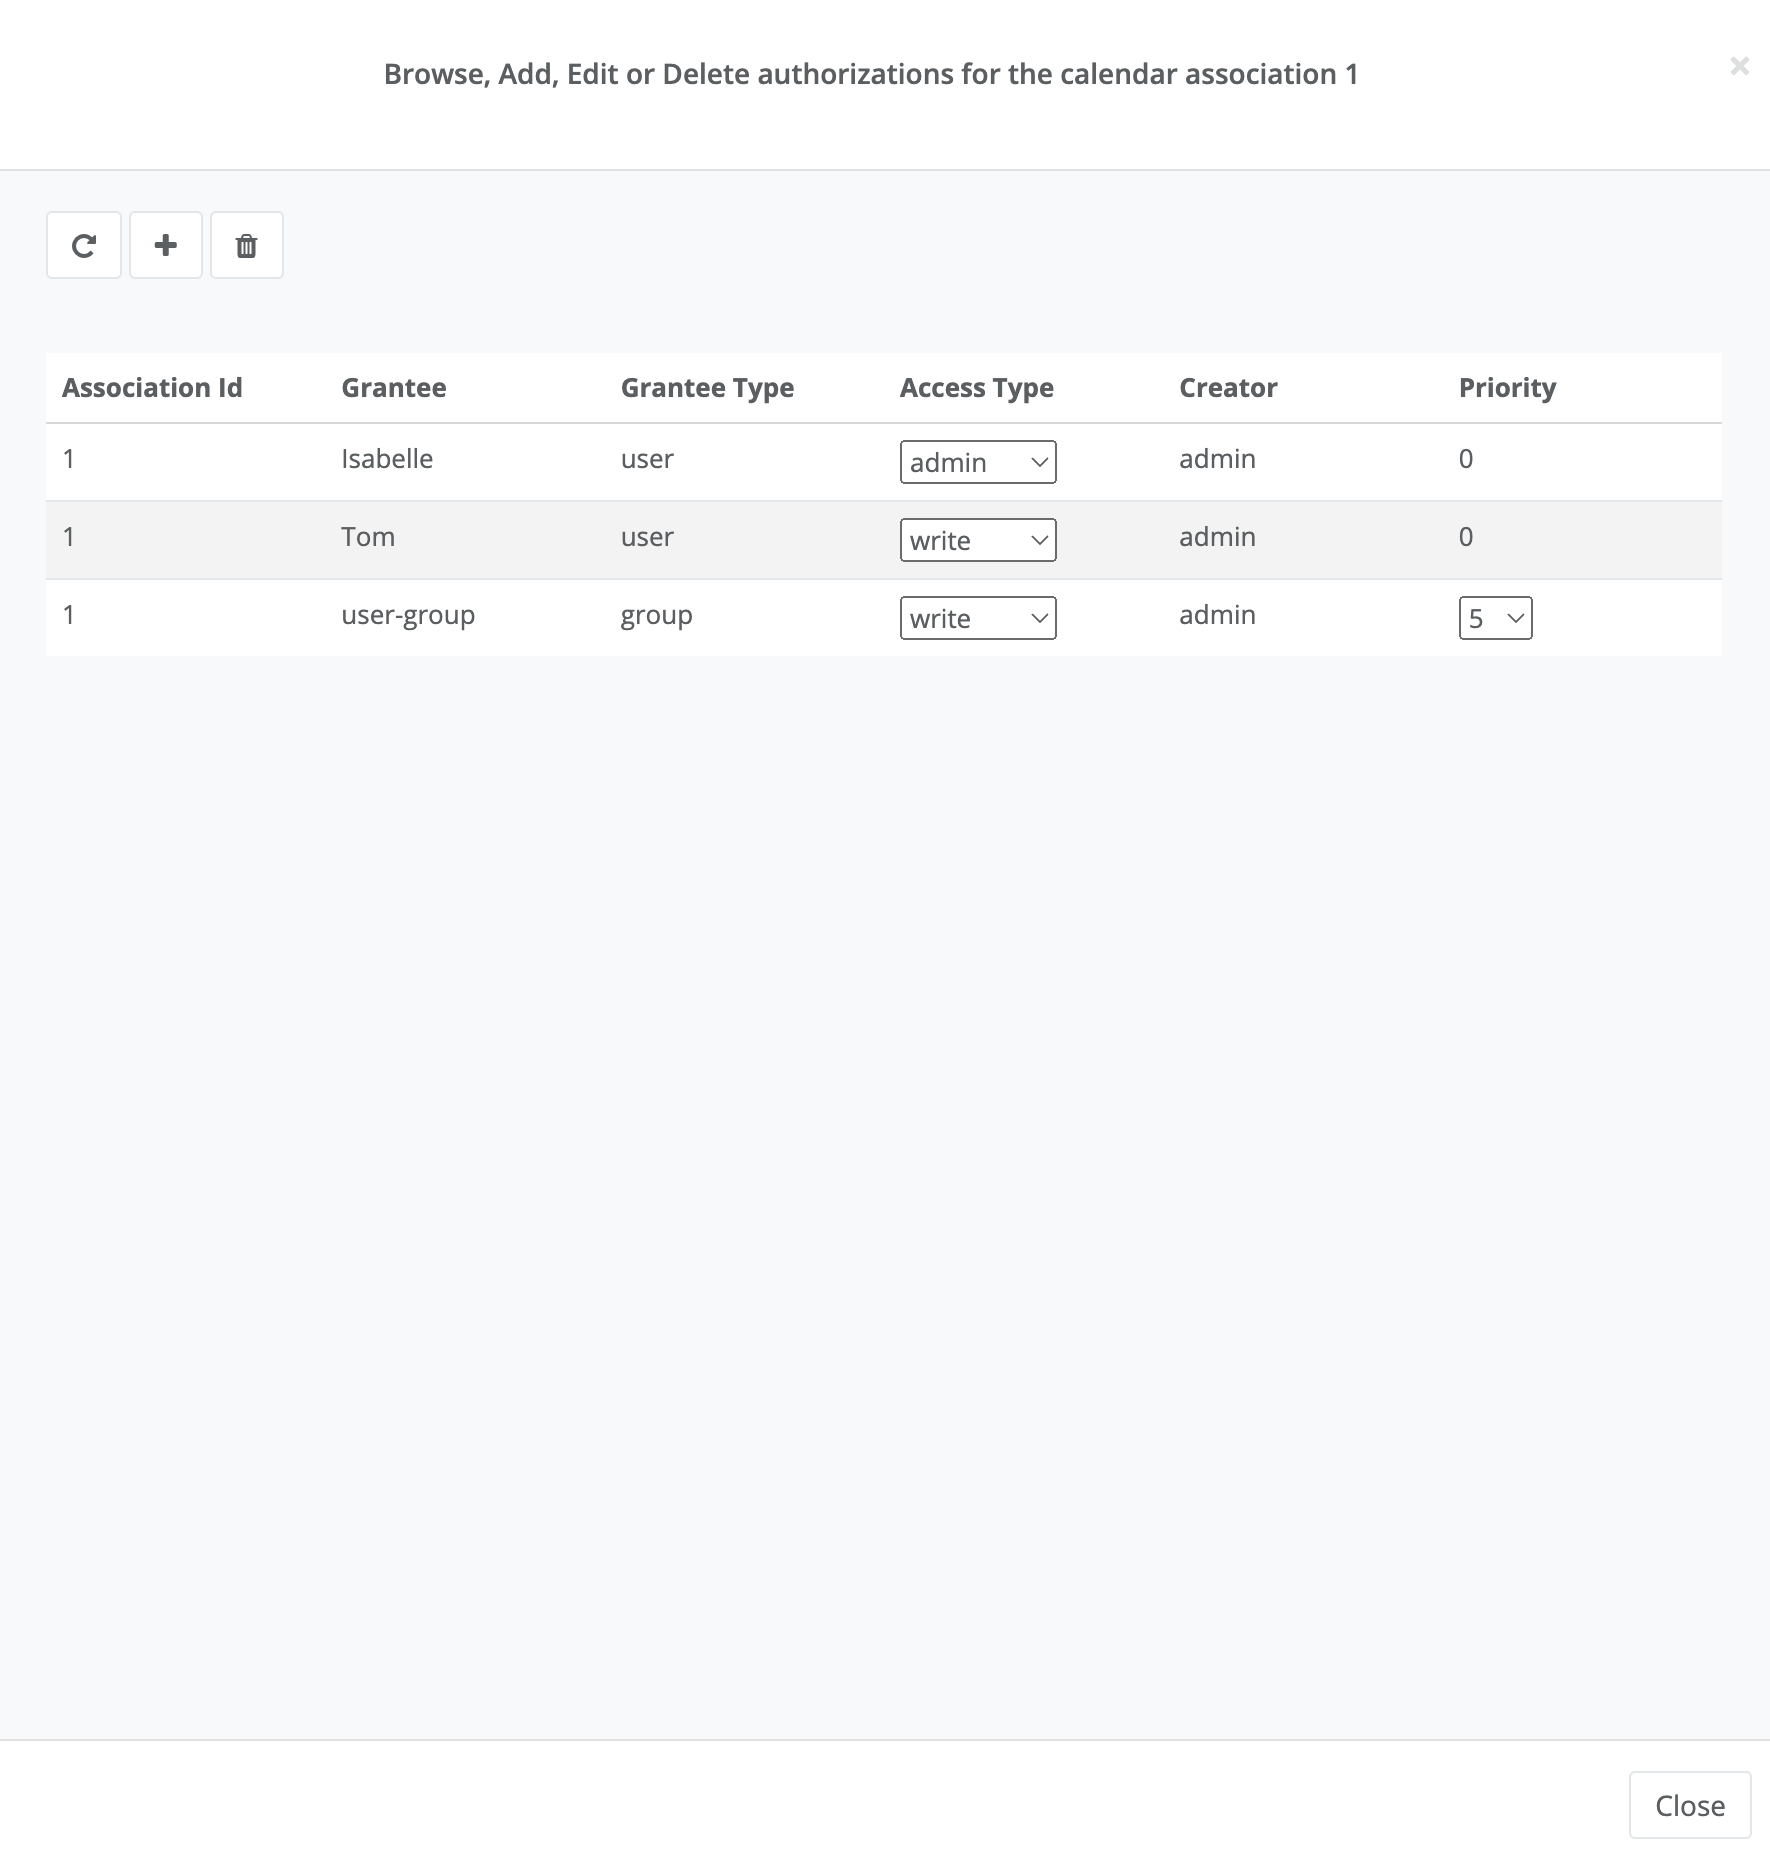
A dedicated authorization view will open. The figure below shows an example:
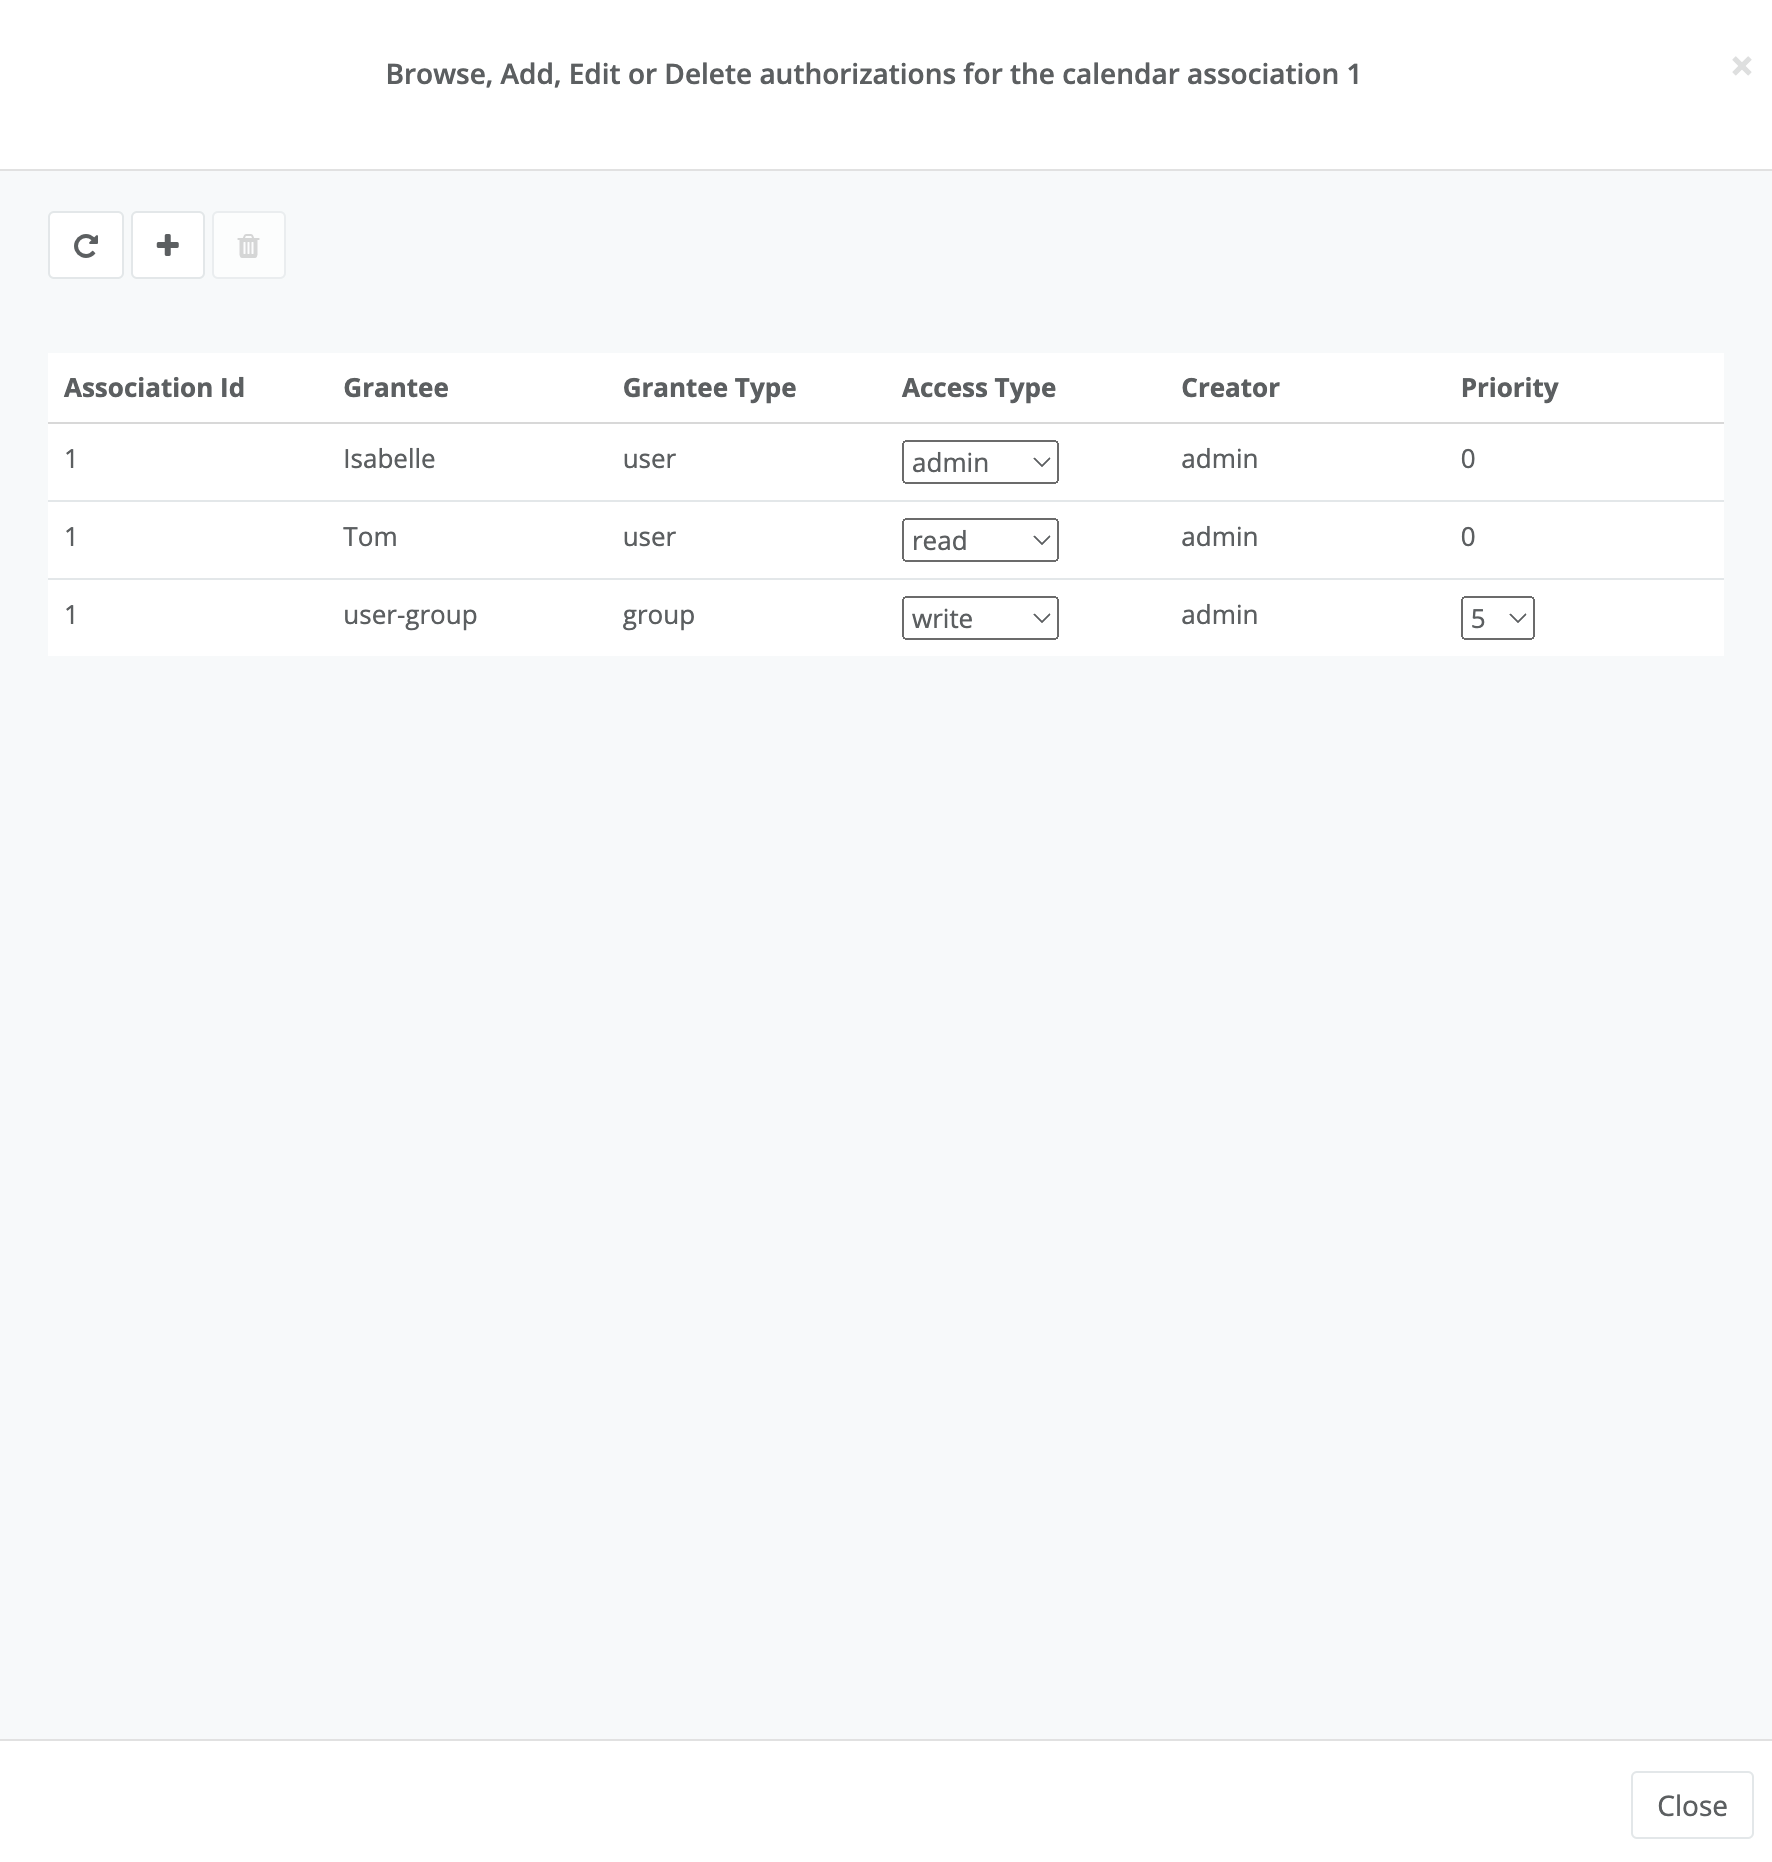
The authorization view consists in two parts:
-
The buttons on top allow to refresh the authorizations list, add a new authorization and delete an existing one.
-
The list below shows the authorization rules that are assigned to the selected association.
Each authorization has the following properties:
-
Association ID
-
Grantee (required): the username or the user group name
-
Grantee Type: group or user
-
Access Type:
read,write,adminornoAccess -
Creator: The user who created the authorization
-
Priority: This attribute is only used for access associated with a group. For example, if the user belongs to 2 groups and each group has a different type of access, the system will choose the access with the highest priority for the user. For an authorization assigned to a user, the value is 0, since it will be ignored when calculating the resulting access type.
To create a new authorization, the admin just needs to click on the  button.
Then the view of creating an authorization (as shown in the figure below) will be popped up.
The admin needs to fill in the authorization attributes (as presented above), then click the "Add authorization" button.
The figure below shows an example of an authorization which gives the user named
button.
Then the view of creating an authorization (as shown in the figure below) will be popped up.
The admin needs to fill in the authorization attributes (as presented above), then click the "Add authorization" button.
The figure below shows an example of an authorization which gives the user named Olivia write access to association 1.

Once the admin has created an authorization, it will appear in the authorizations list in the authorization view, as shown in the figure below.
Once the first authorization has been created, the admin will see a "shield" icon next to the association to which the authorization was created. The figure below shows an example.
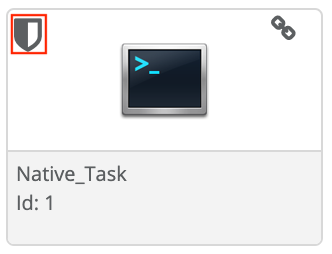
Moreover, when the user, who is benefiting from the authorization, log in to his/her account, he/she will be able to visualize an icon indicating the rights he/she possess over the association(s). These icons are the following:
-
The first icon indicates that the user has
readrights over the association(s). -
The second icon indicates that the user has
writerights over the association(s). -
The third icon indicates that authorizations rules are defined on the association and the user has
adminrights over the association.
The figure below shows how the user visualize the authorization icon next to the association.
To delete an authorization, the admin simply needs to select it from the list and click on the  button.
The figure below shows an example:
button.
The figure below shows an example:
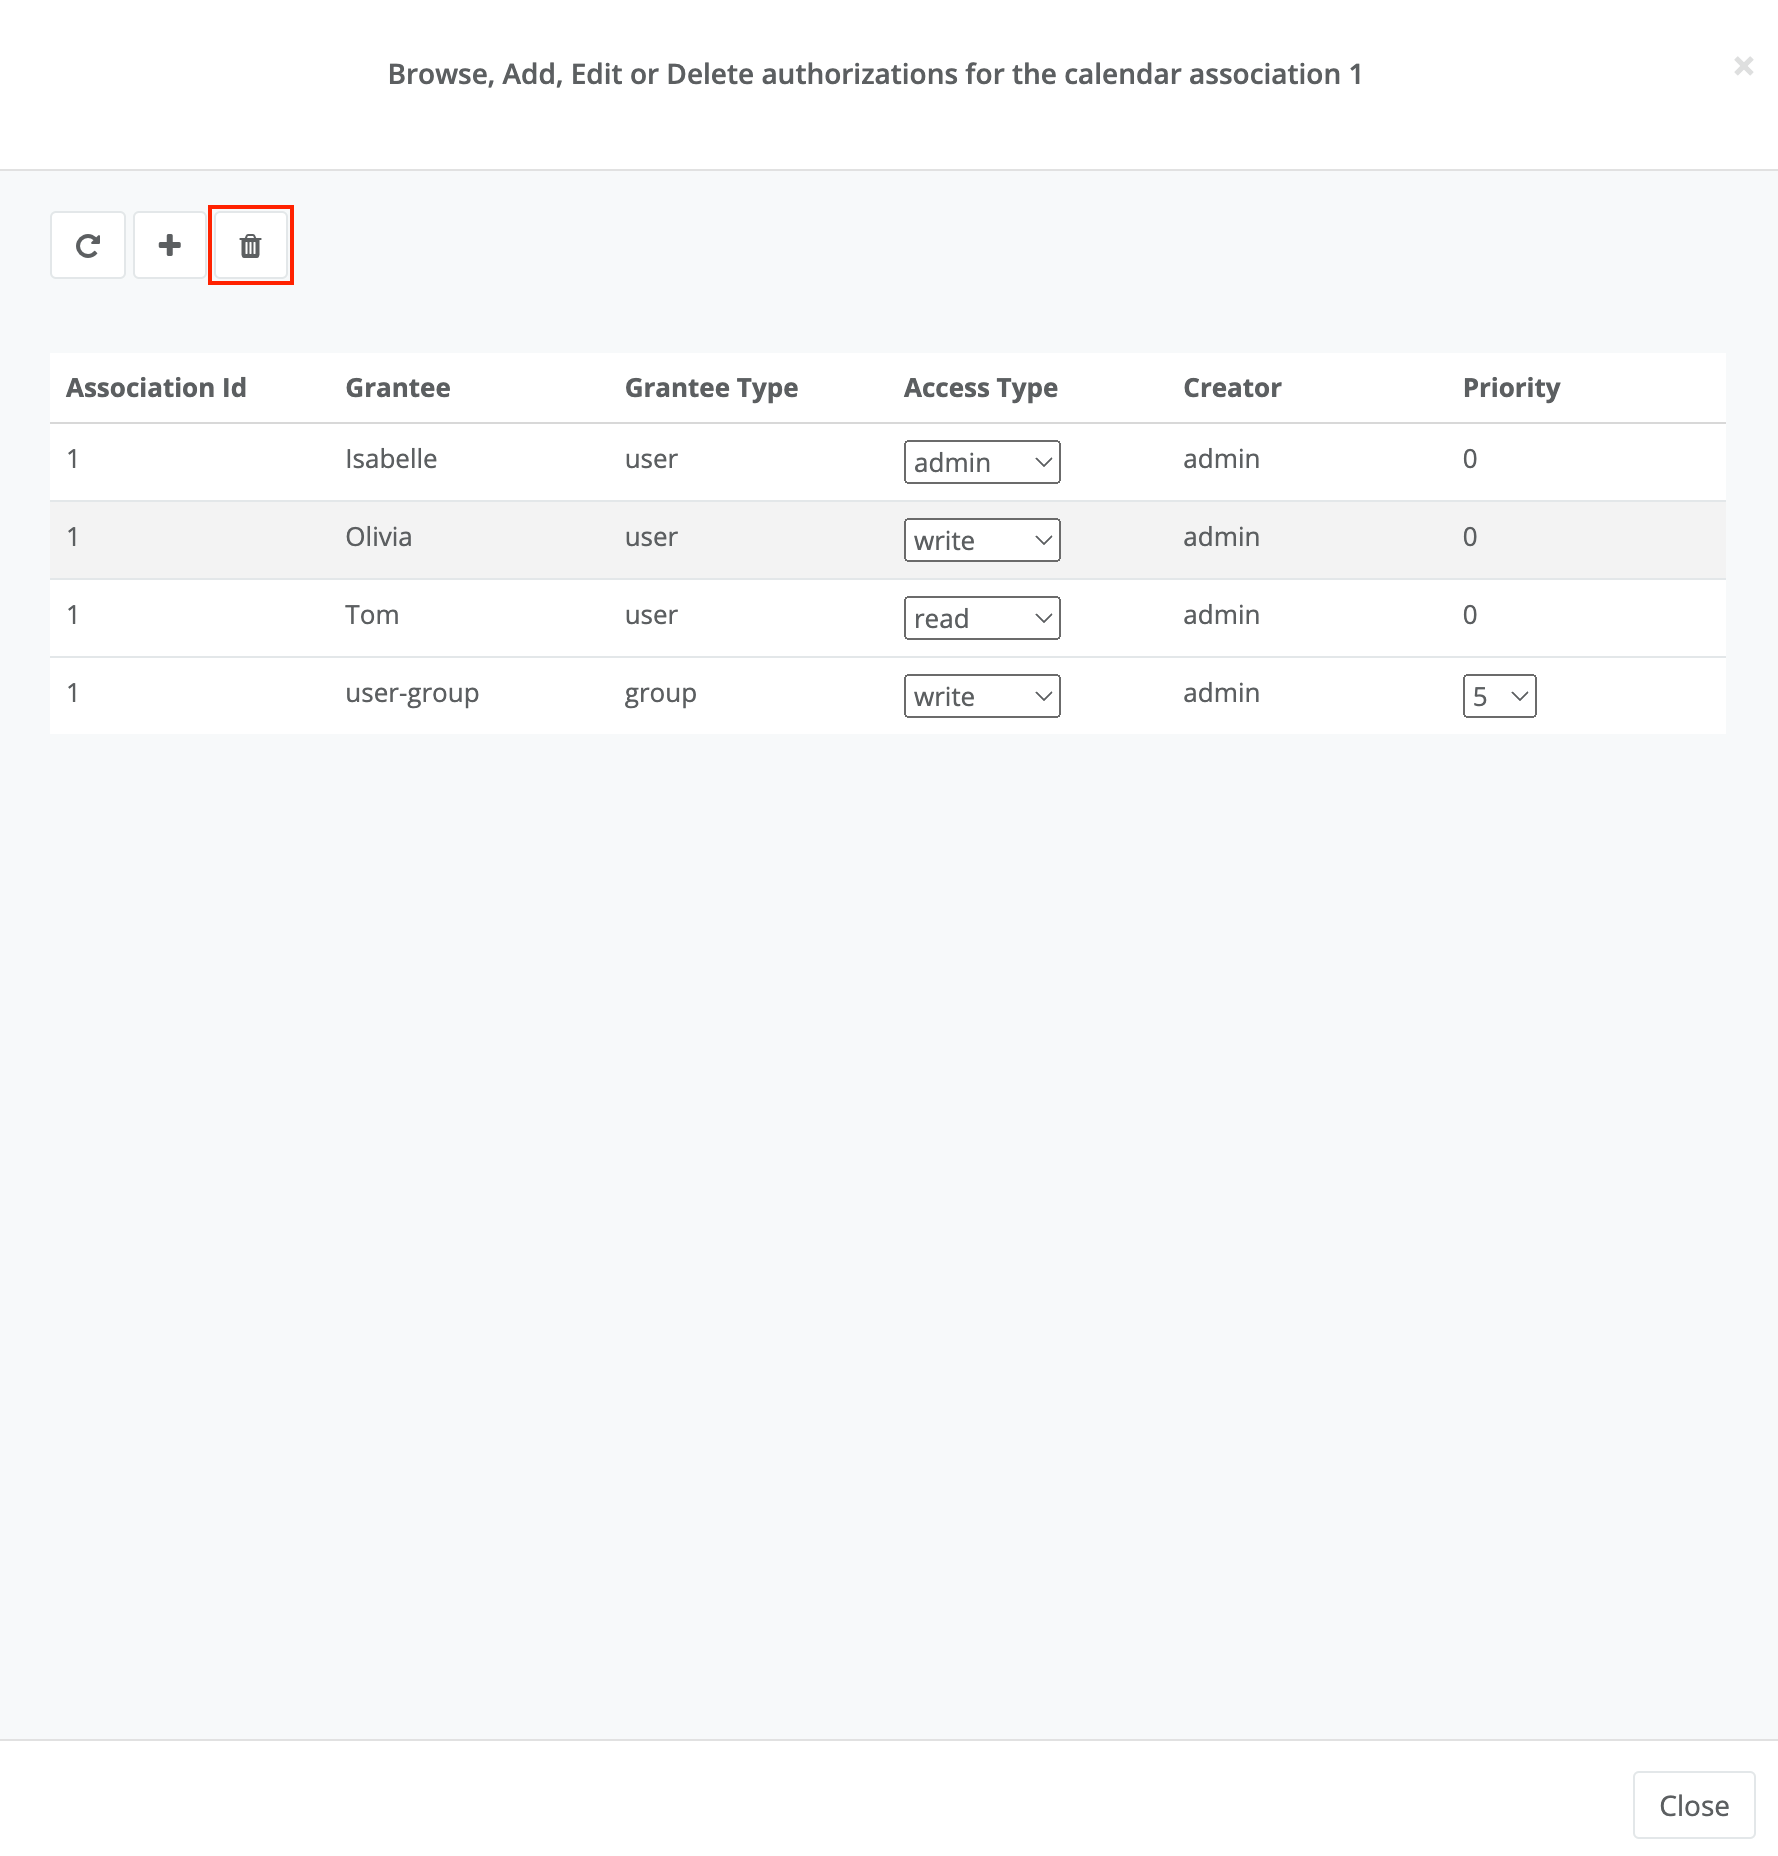
Once the admin deletes the authorization, it will be removed from the list as shown in the figure below:
To update an authorization, the admin needs to click on the drop-down list of the access type or the priority level and select a new value. The figure below shows an example:
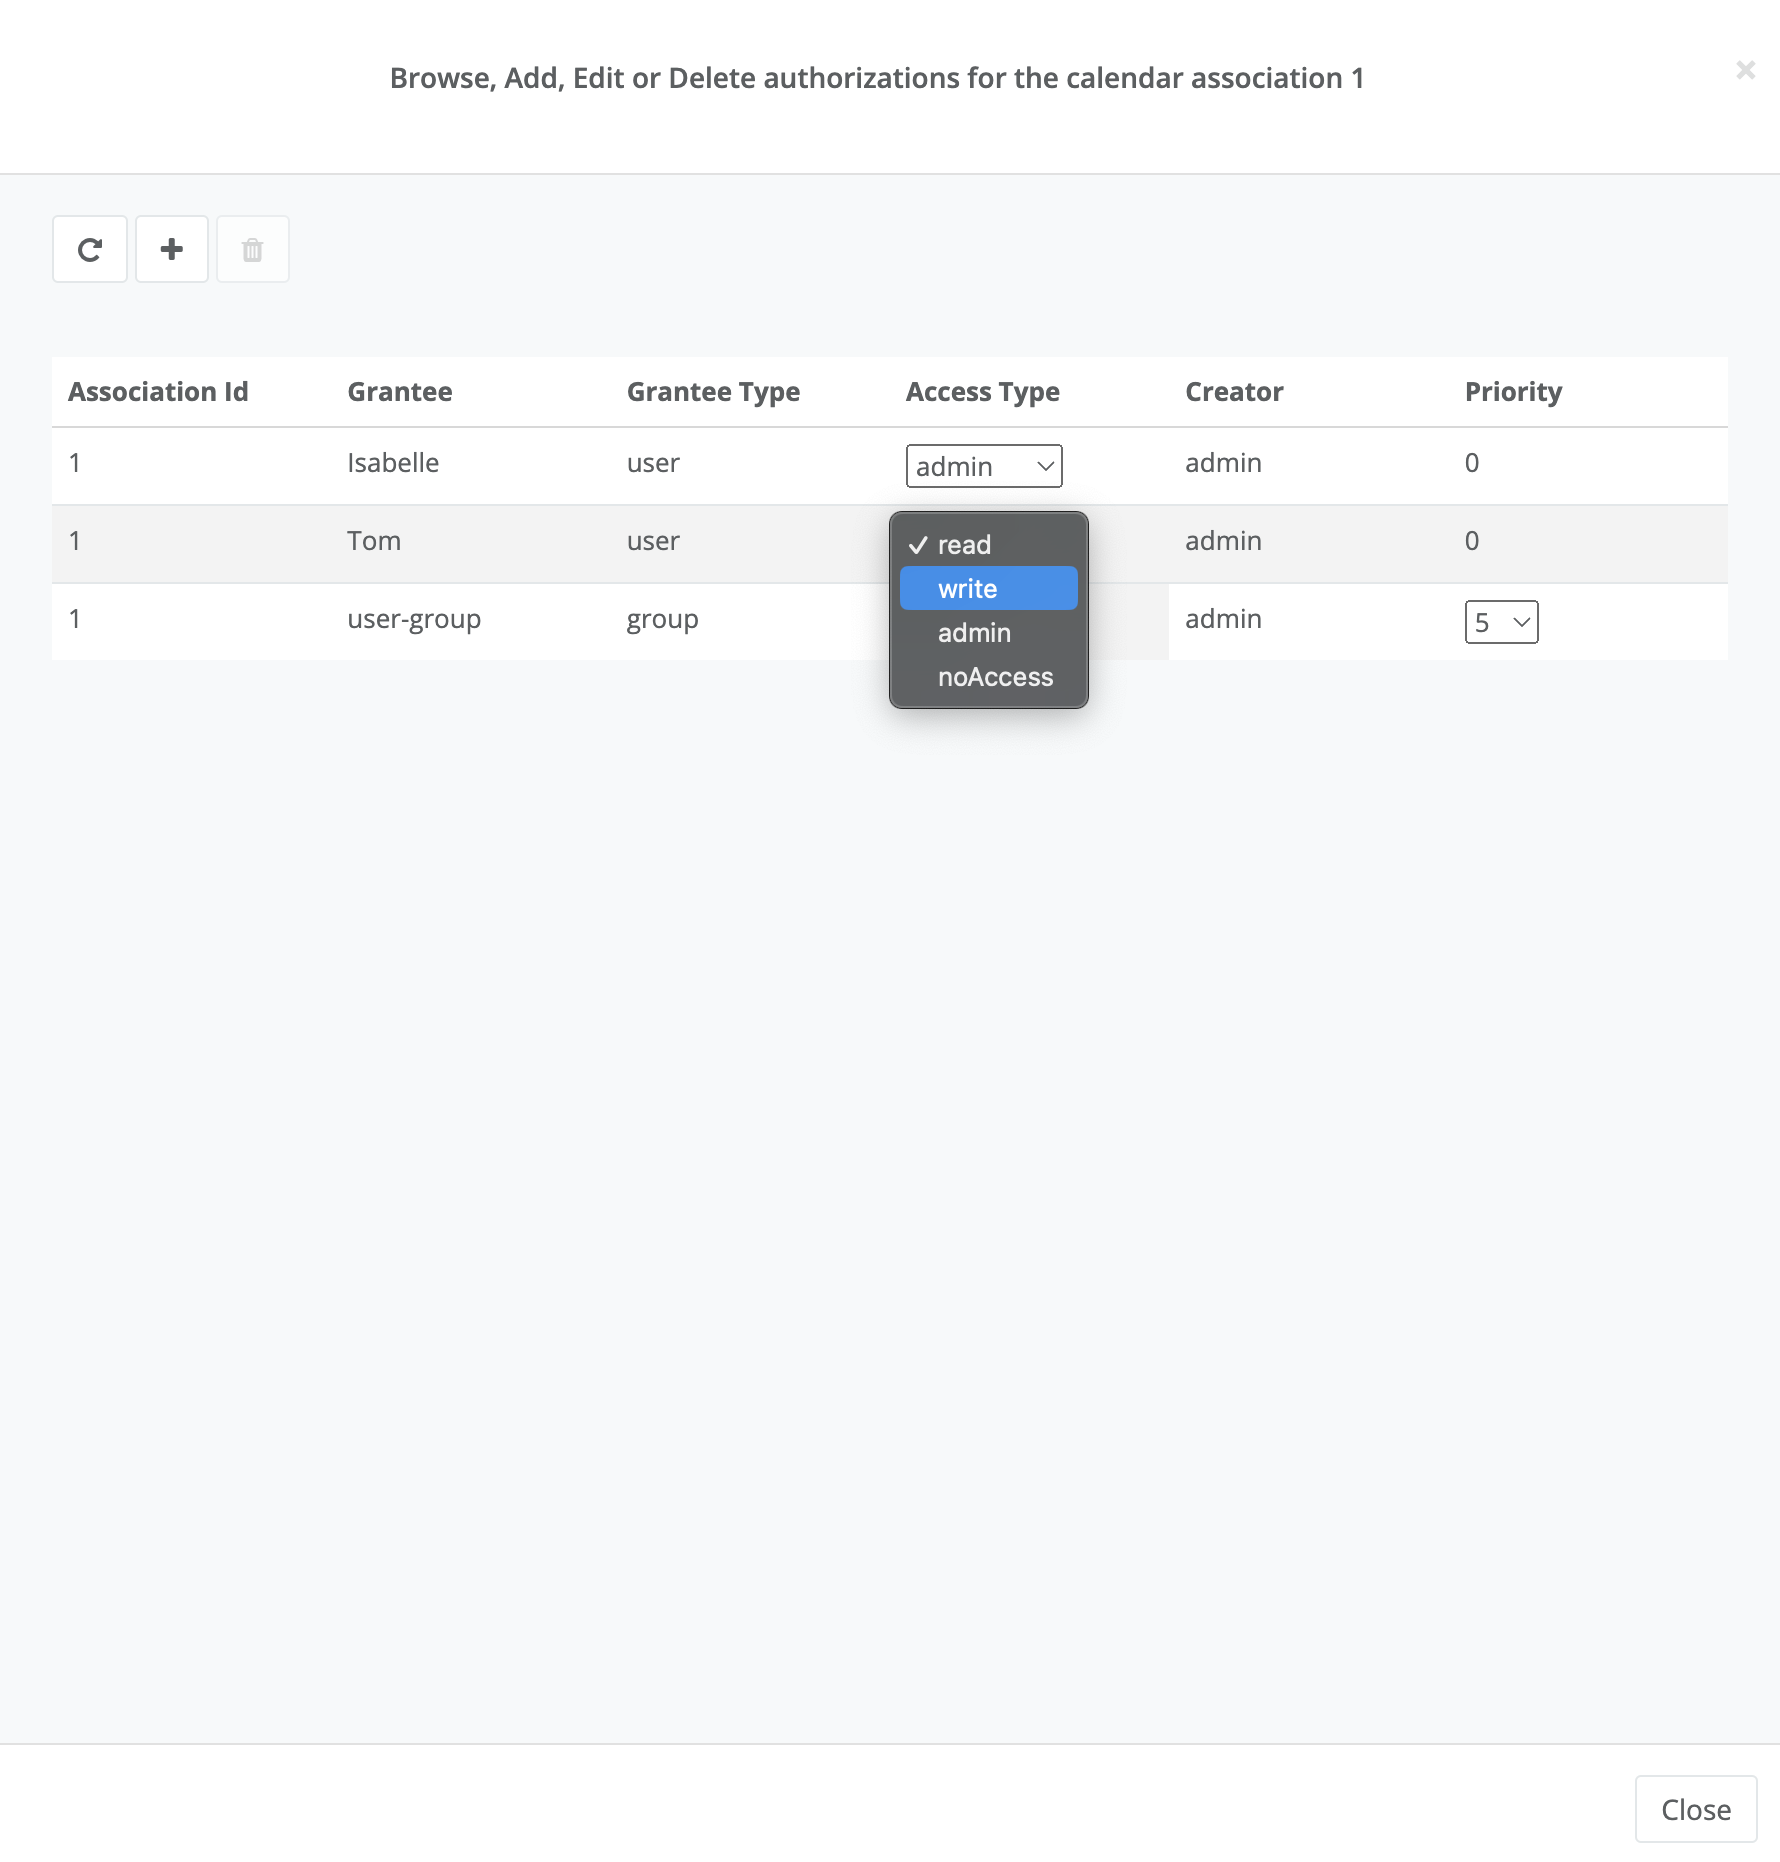
Once the selection is made the authorization will be updated as shown in the figure below:
6.5.2. Manage authorizations for all associations owned by the user
To manage authorization for all associations owned by a specific user, the process is nearly identical.
The user can manage the global authorizations level of every association he/she created by clicking on the  button above the calendars view, as shown in the figure below:

A dedicated authorization view will open. The figure below shows an example:
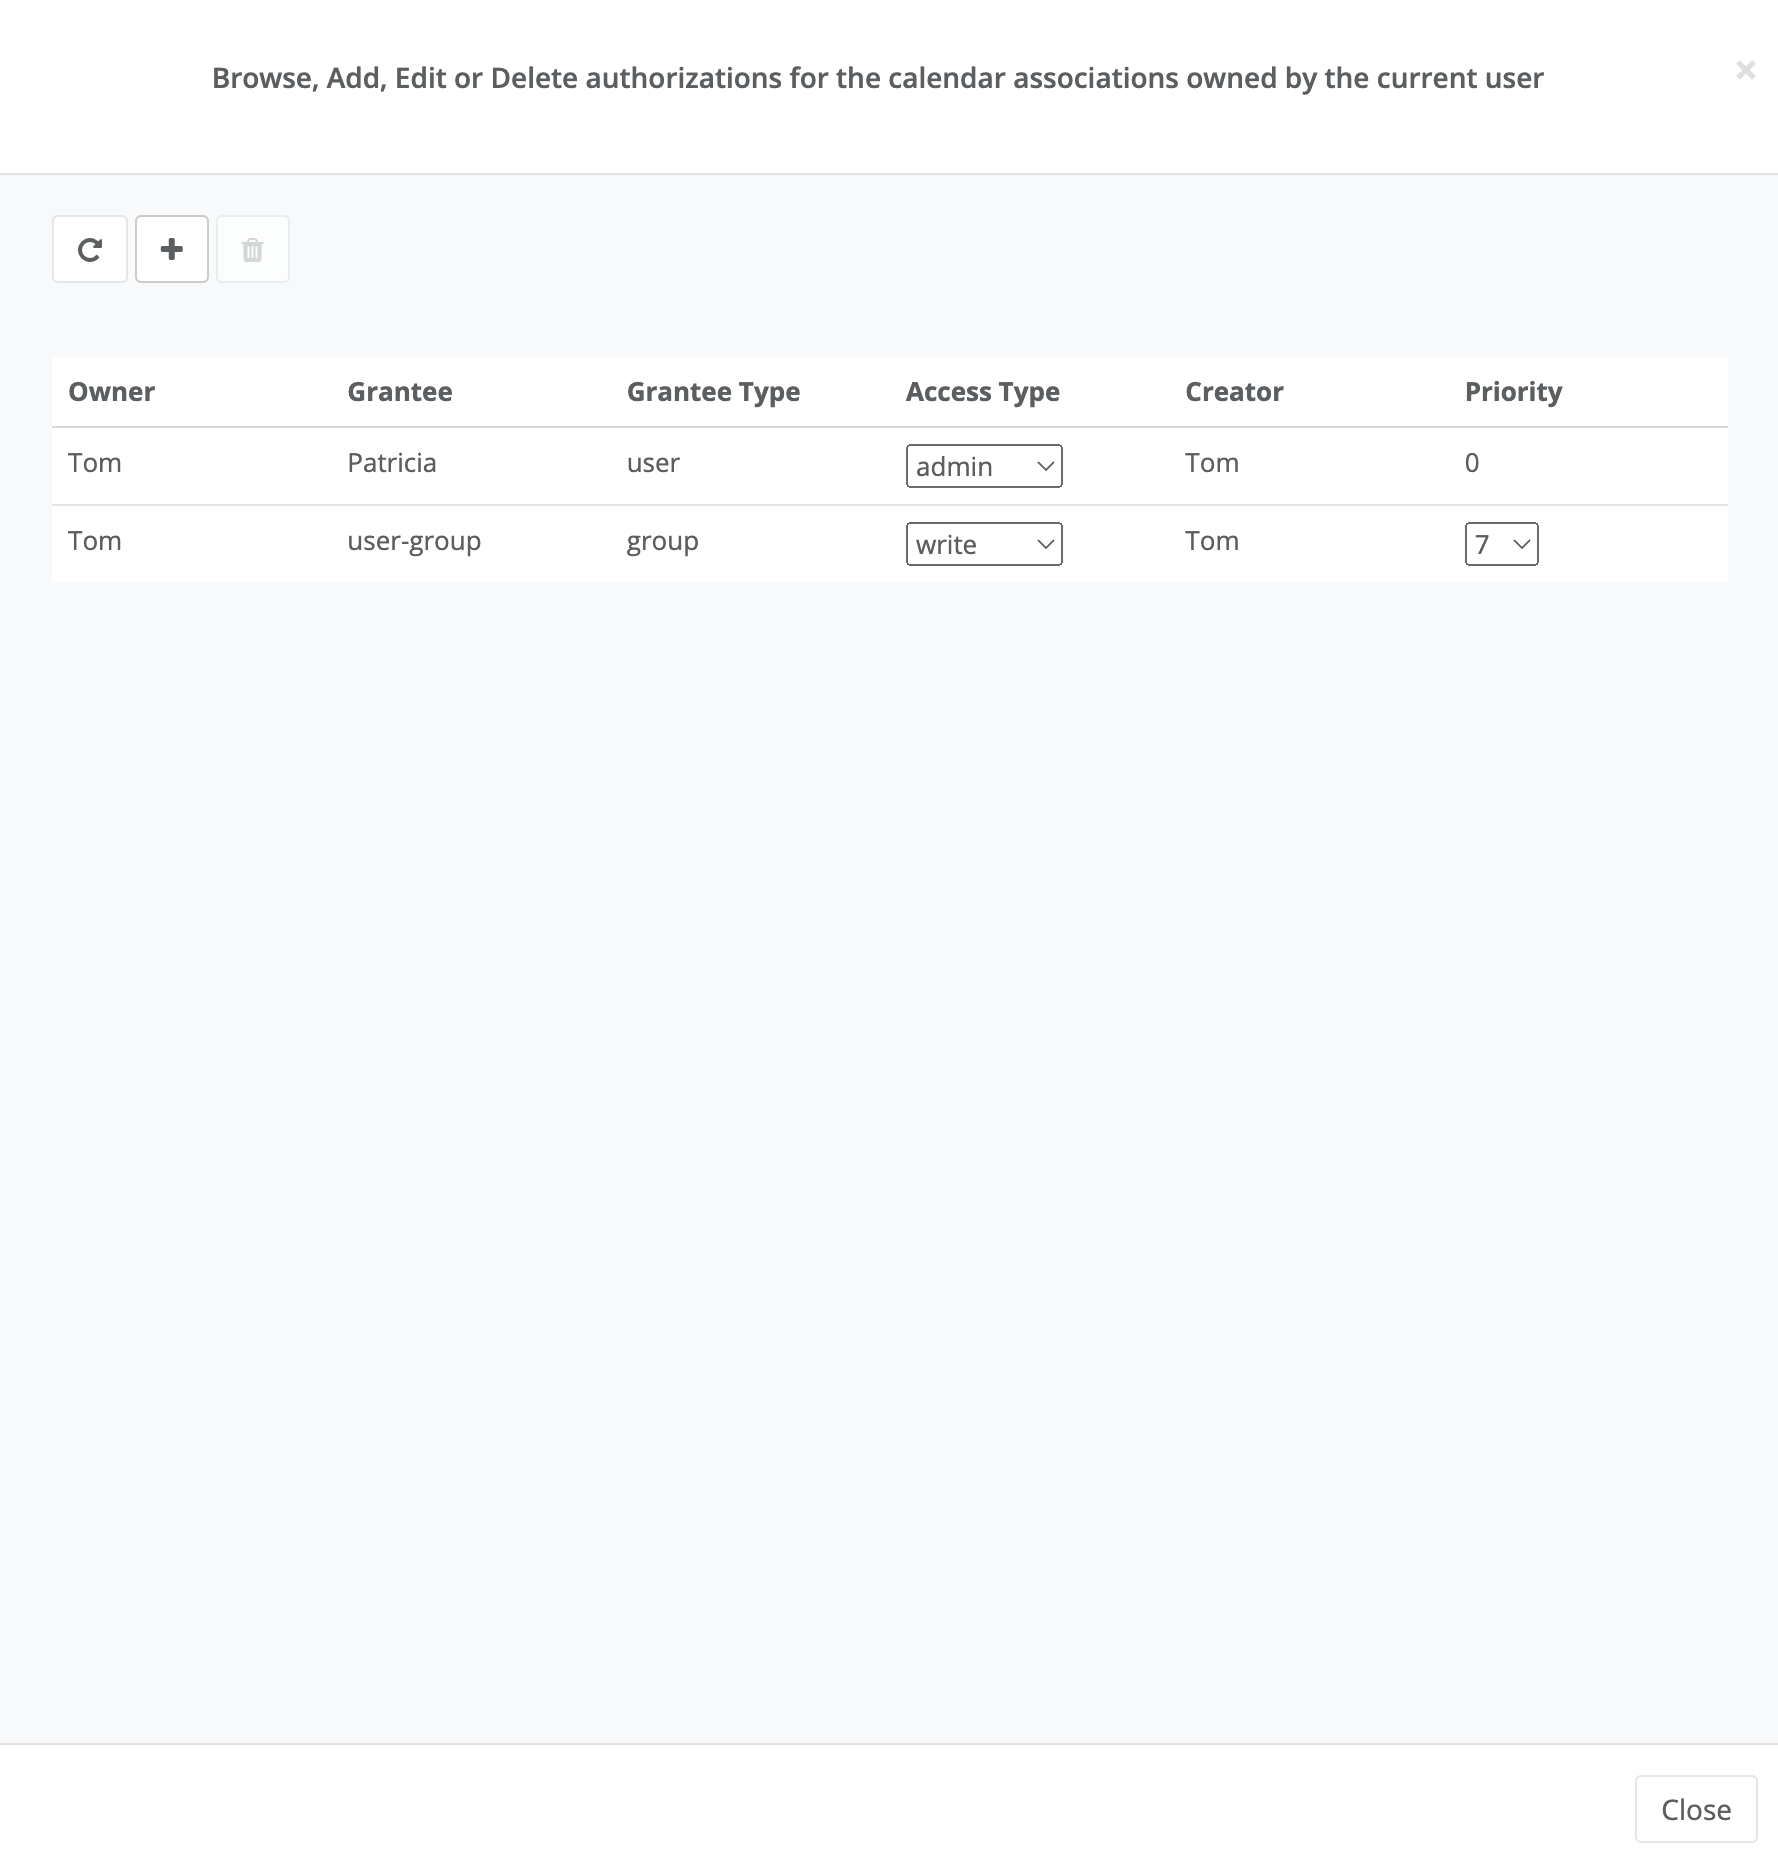
Each authorization has the same attributes as an association authorization, however, the association ID is replaced by Owner.
This attribute is used to give access to all associations created by the specified username.
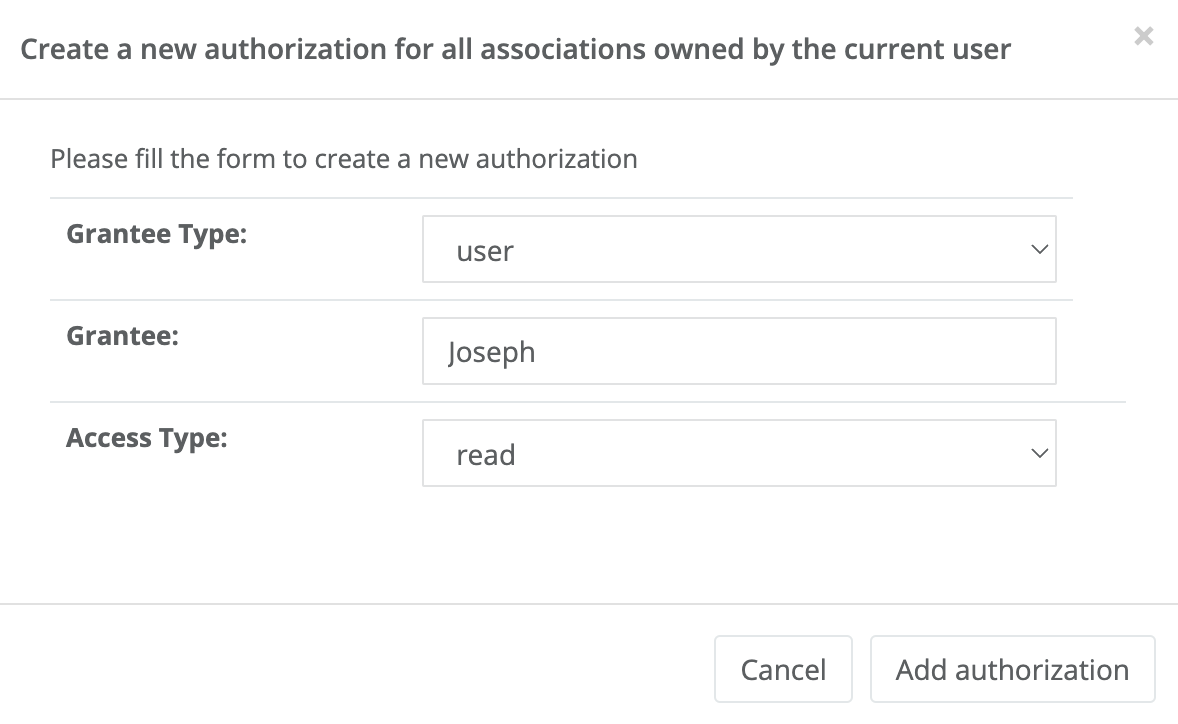
To create a new associations' owner authorization, the user just needs to click on the "+" button.
Then the view of creating authorization (as shown in the figure below) will appear.
The user needs to fill in the authorization attributes (as presented above), then click the "Add authorization" button.
The figure below shows an example of an authorization which gives the user named Joseph read access to all of Tom 's associations.
Once the user has created an authorization, it will appear in the authorization view, as shown in the figure below:
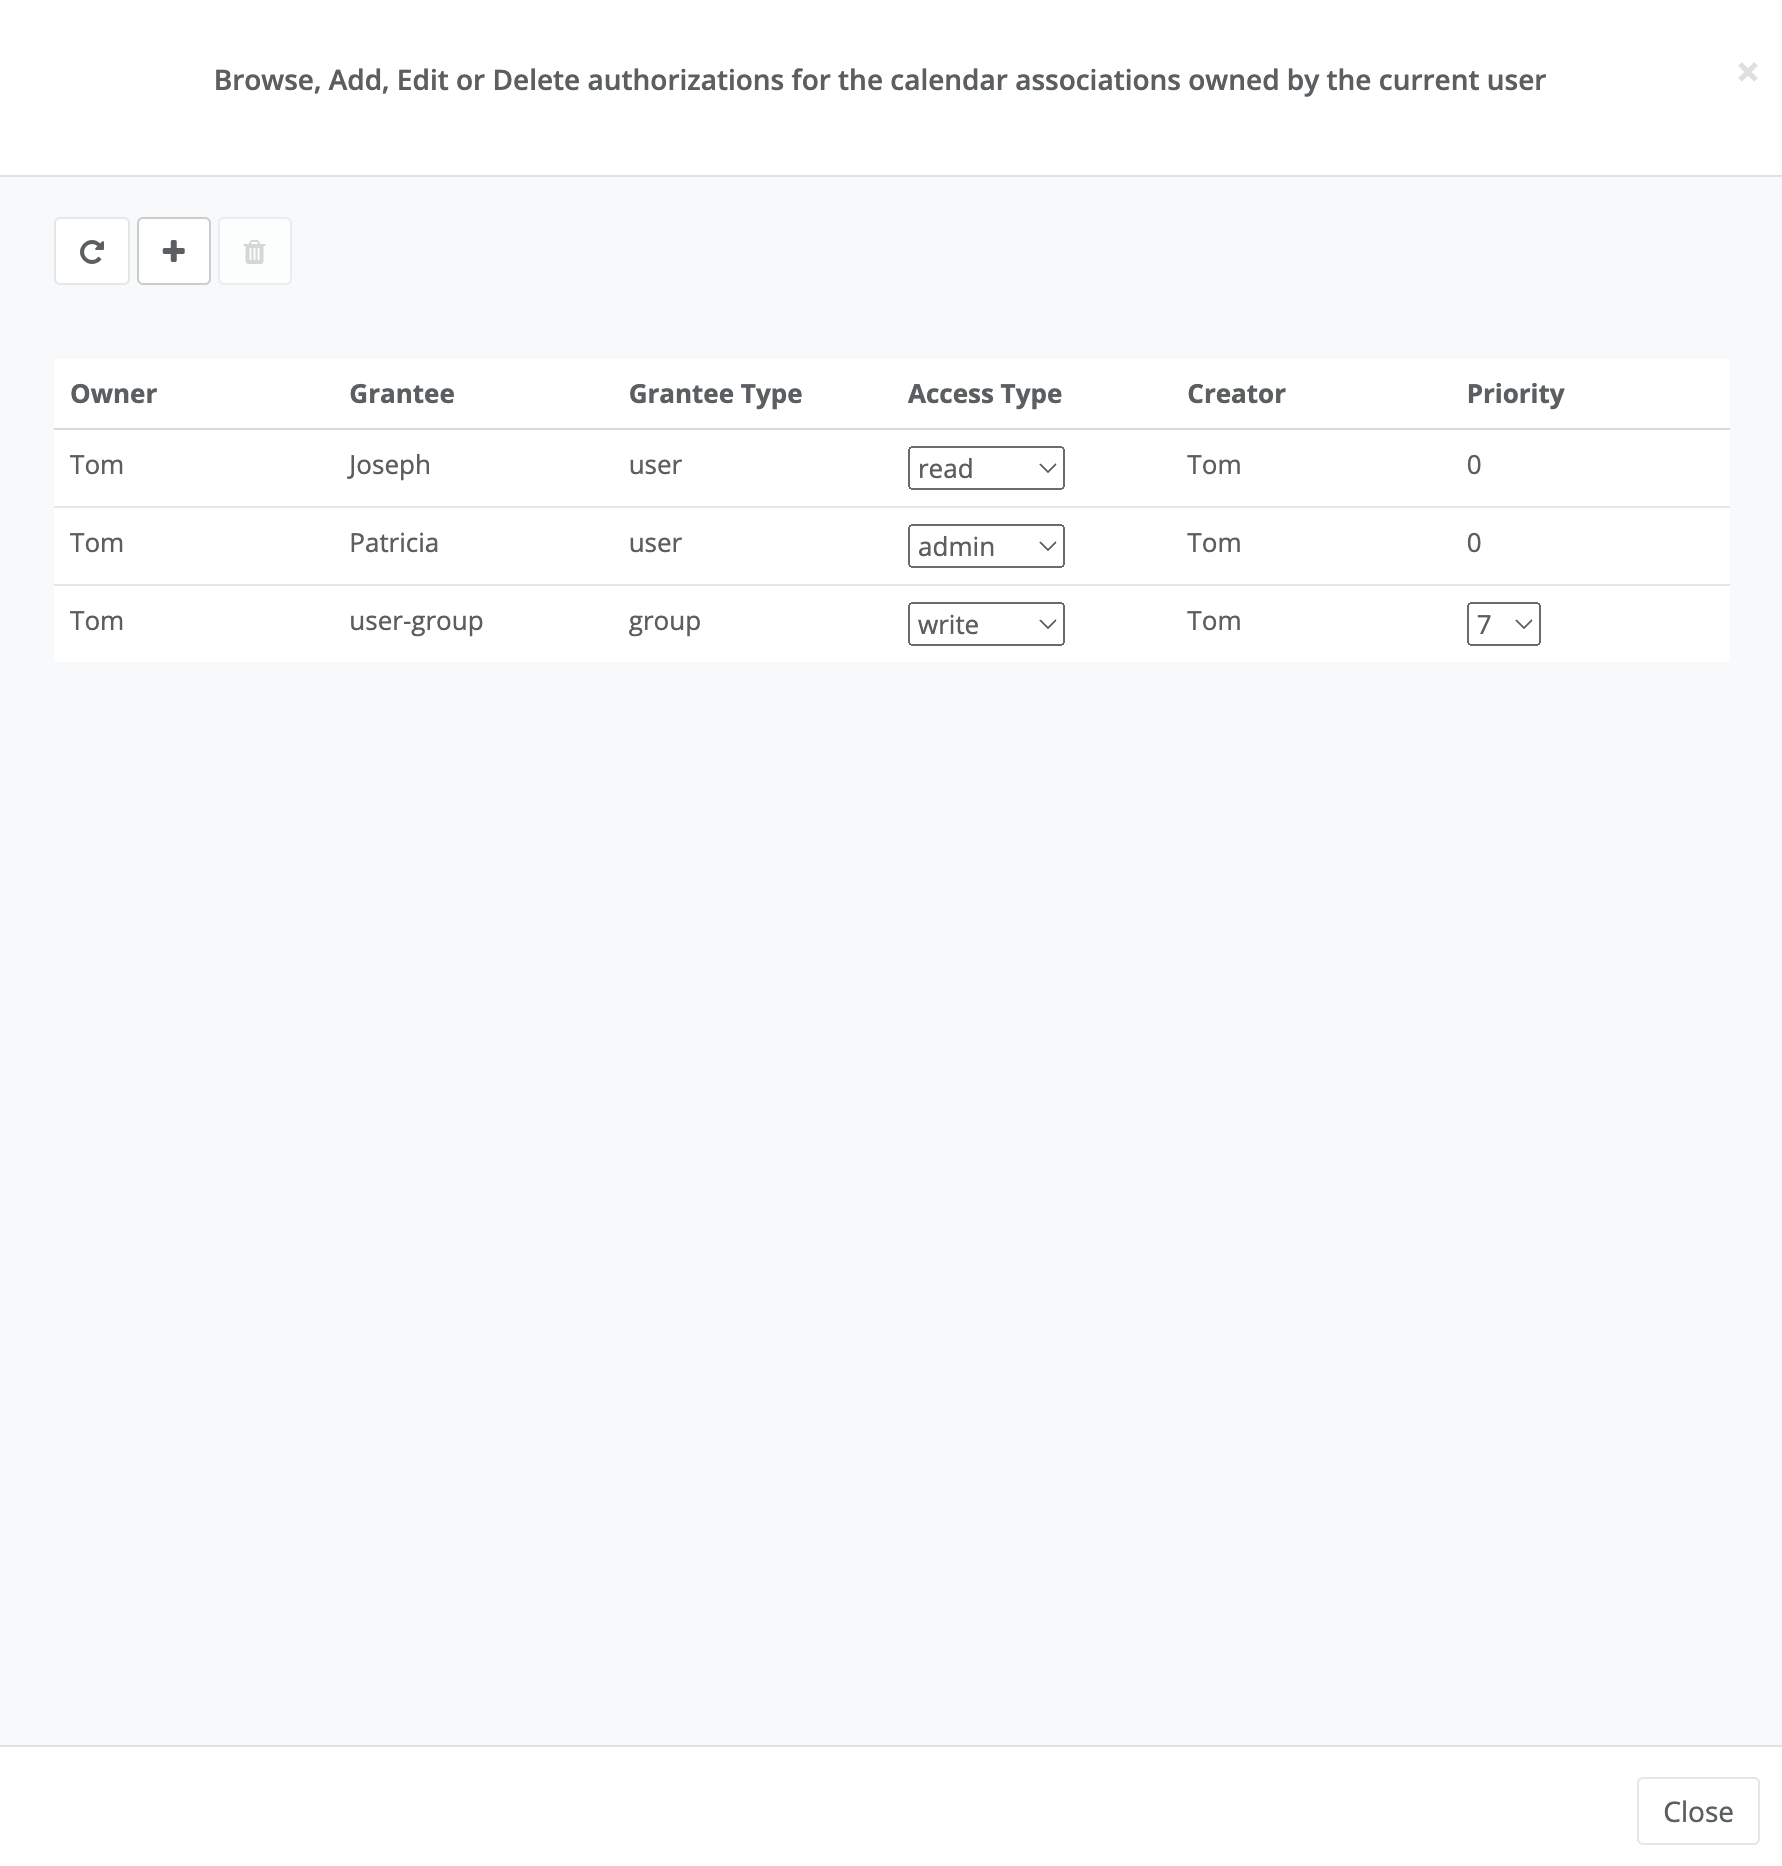
The remaining actions such as edit and delete are identical to the association authorization actions.
6.6. Authorization calculation rules
Since each user might belong to multiple user groups, a user could have multiple authorizations over an association or a group of them due to his/her username or user group(s) authorizations. In such case, the resulting access type will be calculated as follows:
-
If a username-assigned authorization for the association exists, it is prioritized and its access type will be the user’s resulting rights over the association.
-
If the previous case does not exist, but the association owner has created a global username-assigned authorization targeting the current-user, then this authorization will take the priority.
-
If multiple user-groups association authorizations exist for the selected association, and none of the previous cases apply, the resulting user’s rights over the association will be the access type of the group authorization that has the highest priority. If two authorizations have the same priority level, the resulting rights will be based on the following access type order (from the most prioritized access type to the least): admin → write → read → noAccess.
-
If none of the previous case apply and multiple user-groups assigned associations' owner authorizations exist, the resulting user’s rights over the association will be the access type of the group authorization that has the highest priority. The same apply as before if two authorizations have the same priority level.
-
If none of the above apply, the default authorization for a user who is not the creator of a job-planner association is
noAccess.Legal notice
Activeeon SAS, © 2007-2019. All Rights Reserved.
For more information, please contact contact@activeeon.com.