All documentation links
User Guide
ProActive Workflow & Scheduler (PWS) User Guide (Workflows, Tasks, Jobs Submission, Resource Management)
ML Open Studio
Machine Learning Open Studio (ML-OS) User Guide (ready to use palettes with ML Tasks & Workflows)
Cloud Automation
ProActive Cloud Automation (PCA) User Guide (automate deployment and management of Services)
Admin Guide
Administration Guide (Installation, networks, nodes, clusters, users, permissions)
API documentation: Scheduler REST Scheduler CLI Scheduler Java Workflow Creation Java Python Client
1. Overview
ProActive Scheduler is a free and open-source job scheduler. The user specifies the computation in terms of a series of computation steps along with their execution and data dependencies. The Scheduler executes this computation on a cluster of computation resources, each step on the best-fit resource and in parallel wherever its possible.
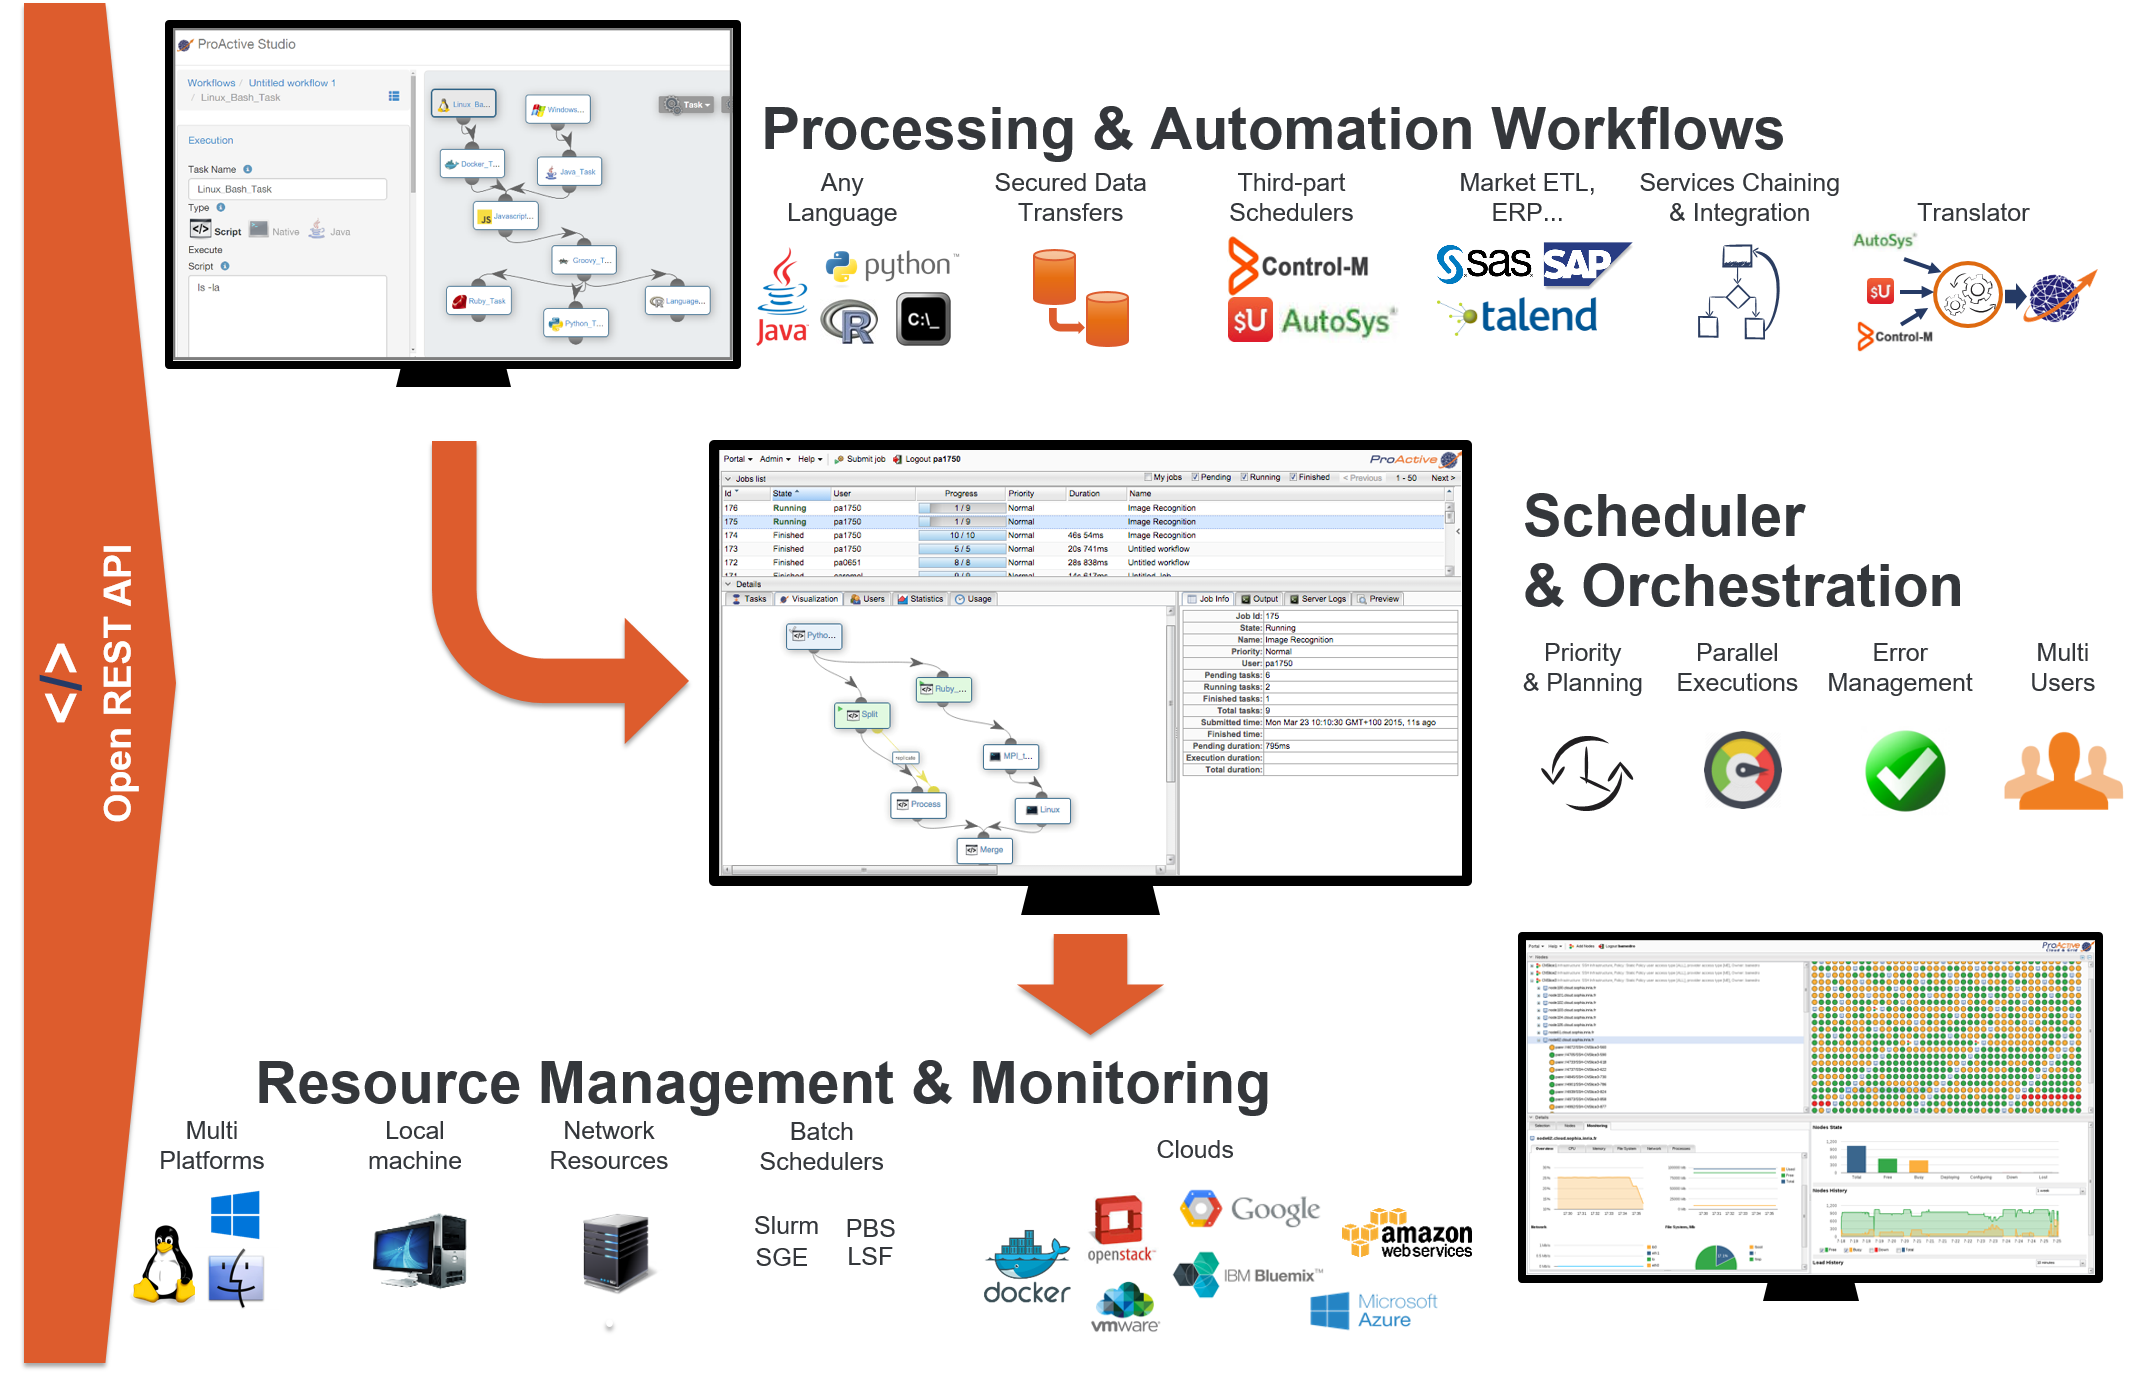
On the top left is the Studio interface that allows you to build Workflows. It can be interactively configured to address specific domains, for instance Finance, Big Data, IoT, Artificial Intelligence (AI). See for instance the Documentation of Machine Learning Open Studio here, and try it online here. In the middle is the Scheduler that enables an enterprise to orchestrate and automate Multi-users, Multi-application Jobs. Finally, at the bottom right is the Resource manager interface that manage and automate resource provisioning on any Public Cloud, on any virtualization software, on any container system, and on any Physical Machine of any OS. All the components you see come with fully Open and modern REST APIs.
The administration guide covers cluster setup and cluster administration. Cluster setup includes two main steps:
-
The installation and configuration of the ProActive Scheduler.
-
The set up of ProActive Nodes.
1.1. Glossary
The following terms are used throughout the documentation:
- ProActive Workflows & Scheduling
-
The full distribution of ProActive for Workflows & Scheduling, it contains the ProActive Scheduler server, the REST & Web interfaces, the command line tools. It is the commercial product name.
- ProActive Scheduler
-
Can refer to any of the following:
-
A complete set of ProActive components.
-
An archive that contains a released version of ProActive components, for example
activeeon_enterprise-pca_server-OS-ARCH-VERSION.zip. -
A set of server-side ProActive components installed and running on a Server Host.
-
- Resource Manager
-
ProActive component that manages ProActive Nodes running on Compute Hosts.
- Scheduler
-
ProActive component that accepts Jobs from users, orders the constituent Tasks according to priority and resource availability, and eventually executes them on the resources (ProActive Nodes) provided by the Resource Manager.
| Please note the difference between Scheduler and ProActive Scheduler. |
- REST API
-
ProActive component that provides RESTful API for the Resource Manager, the Scheduler and the Catalog.
- Resource Manager Web Interface
-
ProActive component that provides a web interface to the Resource Manager. Also called Resource Manager Portal.
- Scheduler Web Interface
-
ProActive component that provides a web interface to the Scheduler. Also called Scheduler Portal.
- Workflow Studio
-
ProActive component that provides a web interface for designing Workflows.
- Job Planner
-
A ProActive component providing advanced scheduling options for Workflows.
- Bucket
-
ProActive notion used with the Catalog to refer to a specific collection of ProActive Objects and in particular ProActive Workflows.
- Server Host
-
The machine on which ProActive Scheduler is installed.
SCHEDULER_ADDRESS-
The IP address of the Server Host.
- ProActive Node
-
One ProActive Node can execute one Task at a time. This concept is often tied to the number of cores available on a Compute Host. We assume a task consumes one core (more is possible, see multi-nodes tasks, so on a 4 cores machines you might want to run 4 ProActive Nodes. One (by default) or more ProActive Nodes can be executed in a Java process on the Compute Hosts and will communicate with the ProActive Scheduler to execute tasks.
- Compute Host
-
Any machine which is meant to provide computational resources to be managed by the ProActive Scheduler. One or more ProActive Nodes need to be running on the machine for it to be managed by the ProActive Scheduler.
|
Examples of Compute Hosts:
|
- Node Source
-
A set of ProActive Nodes deployed using the same deployment mechanism and sharing the same access policy.
- Node Source Infrastructure
-
The configuration attached to a Node Source which defines the deployment mechanism used to deploy ProActive Nodes.
- Node Source Policy
-
The configuration attached to a Node Source which defines the ProActive Nodes acquisition and access policies.
- Scheduling Policy
-
The policy used by the ProActive Scheduler to determine how Jobs and Tasks are scheduled.
PROACTIVE_HOME-
The path to the extracted archive of ProActive Scheduler release, either on the Server Host or on a Compute Host.
- Workflow
-
User-defined representation of a distributed computation. Consists of the definitions of one or more Tasks and their dependencies.
- Workflow Revision
-
ProActive concept that reflects the changes made on a Workflow during it development. Generally speaking, the term Workflow is used to refer to the latest version of a Workflow Revision.
- Generic Information
-
Are additional information which are attached to Workflows.
- Calendar Definition
-
Is a json object attached by adding it to the Generic Information of a Workflow.
- Job
-
An instance of a Workflow submitted to the ProActive Scheduler. Sometimes also used as a synonym for Workflow.
- Job Id
-
An integer identifier which uniquely represents a Job inside the ProActive Scheduler.
- Job Icon
-
An icon representing the Job and displayed in portals. The Job Icon is defined by the Generic Information workflow.icon.
- Task
-
A unit of computation handled by ProActive Scheduler. Both Workflows and Jobs are made of Tasks. A Task must define a ProActive Task Executable and can also define additional task scripts
- Task Id
-
An integer identifier which uniquely represents a Task inside a Job ProActive Scheduler. Task ids are only unique inside a given Job.
- Task Executable
-
The main executable definition of a ProActive Task. A Task Executable can either be a Script Task, a Java Task or a Native Task.
- Script Task
-
A Task Executable defined as a script execution.
- Java Task
-
A Task Executable defined as a Java class execution.
- Native Task
-
A Task Executable defined as a native command execution.
- Additional Task Scripts
-
A collection of scripts part of a ProActive Task definition which can be used in complement to the main Task Executable. Additional Task scripts can either be Selection Script, Fork Environment Script, Pre Script, Post Script, Control Flow Script or Cleaning Script
- Selection Script
-
A script part of a ProActive Task definition and used to select a specific ProActive Node to execute a ProActive Task.
- Fork Environment Script
-
A script part of a ProActive Task definition and run on the ProActive Node selected to execute the Task. Fork Environment script is used to configure the forked Java Virtual Machine process which executes the task.
- Pre Script
-
A script part of a ProActive Task definition and run inside the forked Java Virtual Machine, before the Task Executable.
- Post Script
-
A script part of a ProActive Task definition and run inside the forked Java Virtual Machine, after the Task Executable.
- Control Flow Script
-
A script part of a ProActive Task definition and run inside the forked Java Virtual Machine, after the Task Executable, to determine control flow actions.
- Control Flow Action
-
A dynamic workflow action performed after the execution of a ProActive Task. Possible control flow actions are Branch, Loop or Replicate.
- Branch
-
A dynamic workflow action performed after the execution of a ProActive Task similar to an IF/THEN/ELSE structure.
- Loop
-
A dynamic workflow action performed after the execution of a ProActive Task similar to a FOR structure.
- Replicate
-
A dynamic workflow action performed after the execution of a ProActive Task similar to a PARALLEL FOR structure.
- Cleaning Script
-
A script part of a ProActive Task definition and run after the Task Executable and before releasing the ProActive Node to the Resource Manager.
- Script Bindings
-
Named objects which can be used inside a Script Task or inside Additional Task Scripts and which are automatically defined by the ProActive Scheduler. The type of each script binding depends on the script language used.
- Task Icon
-
An icon representing the Task and displayed in the Studio portal. The Task Icon is defined by the Task Generic Information task.icon.
- ProActive Agent
-
A daemon installed on a Compute Host that starts and stops ProActive Nodes according to a schedule, restarts ProActive Nodes in case of failure and enforces resource limits for the Tasks.
2. Get Started
Download ProActive Scheduler and unzip the archive.
The extracted folder will be referenced as PROACTIVE_HOME in the rest of the documentation.
The archive contains all required dependencies.
ProActive Scheduler is ready to be started with no extra configuration.
$ PROACTIVE_HOME/bin/proactive-serverThe router created on localhost:33647
Starting the scheduler...
Starting the resource manager...
The resource manager with 4 local nodes created on pnp://localhost:41303/
The scheduler created on pnp://localhost:41303/
Starting the web applications...
The web application /scheduler created on http://localhost:8080/scheduler
The web application /rm created on http://localhost:8080/rm
The web application /rest created on http://localhost:8080/rest
The web application /studio created on http://localhost:8080/studio
The web application /catalog created on http://localhost:8080/catalog
*** Get started at http://localhost:8080 ***The following ProActive Scheduler components are started:
The URLs of the Scheduler, Resource Manager, REST API and Web Interfaces are displayed in the output.
Default credentials: admin/admin
Your ProActive Scheduler is ready to execute Jobs!
2.1. Minimum requirements
The minimum requirements can be found in the Data Sheet. Please find an up to date Data Sheet in the in the resources.
3. ProActive Scheduler configuration
All configuration files of ProActive Scheduler can be found under PROACTIVE_HOME.
3.1. Java Virtual Machine configuration
Various command-line tools shipped with ProActive (bin/proactive-server, bin/proactive-node) start a Java Virtual Machine. The parameters of the JVM can be modified by editing DEFAULT_JVM_OPTS= in the corresponding script both in Linux and Windows.
For example, to set the maximum heap capacity on the JVM to 6GB in Linux:
Change the line
DEFAULT_JVM_OPTS='"-server" "-Dfile.encoding=UTF-8" "-Xms4g"'
into
DEFAULT_JVM_OPTS='"-server" "-Dfile.encoding=UTF-8" "-Xms4g" "-Xmx6g"'
3.2. General configuration
| Component | Description | File | Reference |
|---|---|---|---|
Scheduler |
Scheduling Properties |
config/scheduler/settings.ini |
|
Resource Manager |
Node management configuration |
config/rm/settings.ini |
|
Web Applications |
REST API and Web Applications configuration |
config/web/settings.ini |
|
Networking |
Network, firewall, protocols configuration |
config/network/node.ini, config/network/server.ini |
|
Security |
User logins and passwords |
config/authentication/login.cfg |
|
User group assignments |
config/authentication/group.cfg |
||
User permissions |
config/security.java.policy-server |
||
LDAP configuration |
config/authentication/ldap.cfg |
||
Database |
Scheduler configuration |
config/scheduler/database.properties |
|
Resource Manager configuration |
config/rm/database.properties |
||
Scheduling-api microservice |
dist/war/scheduling-api/WEB-INF/classes/application.properties |
||
Job-planner microservice |
dist/war/job-planner/WEB-INF/classes/application.properties |
||
Catalog microservice |
dist/war/catalog/WEB-INF/classes/application.properties |
3.3. Database configuration
Scheduler, Resource Mananger, and three microservices require to have direct access to the database. Thus, they must each have a correct database configuration.
To configure Scheduler or Resource Mananger, one have to modify config/scheduler/database.properties
and config/rm/database.properties respectively. The following five properties must be configured:
hibernate.connection.driver_class, hibernate.connection.url, hibernate.dialect,
hibernate.connection.username, and hibernate.connection.password.
For each microservice, a microservice configuration file can be found in: /dist/war/MICROSERVICE-NAME/classes/application.properties.
The job-planner, catalog and scheduling-api microservices must contain a database configuration.
In their application.properties file, you need to set the following five properties:
spring.datasource.url, spring.datasource.username, spring.datasource.password,
spring.datasource.driver-class-name, and spring.jpa.database-platform.
4. Installation on a Cluster
Adding Compute Hosts of a cluster to the ProActive Scheduler typically involves unpacking the release archive on all those hosts. Once it’s done you need to run a ProActive Node on the Compute Host and connect it to the ProActive Scheduler. There are two principal ways of doing that:
-
Launch a process on the Compute Host and connect it to the ProActive Scheduler
-
Initiate the deployment from the ProActive Scheduler: Node Source creation
If you are not familiar with ProActive Scheduler you may want to try the first method as it’s easier to understand. Combined with ProActive Agents, it gives you the same result as the second method.
The second method implies that you have a remote access to Compute Hosts (e.g. SSH access) and you want to start and stop ProActive Nodes by launching commands remotely on Compute Hosts. For instance, it can be useful when a virtual machine needs to be deployed prior to launching a ProActive Node.
4.1. Deploy ProActive Nodes manually
4.1.1. Using proactive-node command
Let’s take a closer look at the first method described above. To deploy a ProActive Node from the Compute Host you need to run the following command
$ PROACTIVE_HOME/bin/proactive-node -r pnp://SCHEDULER_ADDRESS:64738
where -r option is used to specify the URL of the Resource Manager.
You can find this URL in the output of the ProActive Scheduler (the Resource Manager URL).
If you want to run multiple tasks at the same time on the same machine, you can either start a few proactive-node processes
or start multiple nodes from the same process using the -w command line option.
You can also use discovery to let the ProActive Node find the URL to connect to on its own.
Simply run proactive-node without any parameter to use discovery.
It uses broadcast to retrieve the URL so this feature might not work depending on your network configuration.
|
4.1.2. Using node.jar
It is also possible to launch a ProActive Node without even copying the ProActive Scheduler to a Compute Host:
-
Open a browser on the Compute Host.
-
Navigate to the Resource Manager Web Interface. You can find the URL in the output of the ProActive Scheduler (the Resource Manager web application URL).
-
Use default demo/demo account to access the Resource Manager Web Interface.
-
Click on 'Portal→Launch' to download node.jar.
-
Click on 'Portal→Create Credentials' and download your credential file.
-
Create a Node Source using the infrastructure DefaultInfrastructureManager.
-
Run it:
$ java -Dproactive.communication.protocol=pnp -jar node.jar -f CREDENTIAL_FILE -s NAME
Where NAME is the name of the node source.
It should connect to the ProActive Scheduler automatically using the discovery mechanism otherwise you might
have to set the URL to connect to with the -r parameter.
| If you would like to execute several Tasks at the same time on one host, you can either launch several ProActive Node process or use the -w parameter to run multiple nodes in the same process. A node executes one Task at a time. |
4.1.3. Using proactive-node-autoupdate command
This method is a combination of the two above, it starts a node from the command line, and makes sure the node libary (node.jar) is synchronized with the latest server version.
The proactive-node-autoupdate command acts as a bootstrap and spawns a new java virtual machine with the up-to-date library classpath.
Launching the node is similar to the proactive-node command, additional options must be specified to allow the download of the node.jar from the server:
$ PROACTIVE_HOME/bin/proactive-node-autoupdate -r pnp://SCHEDULER_ADDRESS:64738 -nju http://SCHEDULER_ADDRESS:8080/rest/node.jar -njs /tmp/node.jar -nja
where -nju option is used to specify the http URL of the node.jar.
You can find this URL in the output of the ProActive Scheduler, the node.jar url is built by appending /rest/node.jar to the base http url of the server.
-nju option is used to specify where the node.jar will be stored locally on the machine.
Finally, -nja option, when enabled, specifies that the proactive-node-autoupdate will be always up, it means that it will automatically restart when the node terminates (for example in case of server upgrades).
4.2. Deploy ProActive Nodes via SSH
The second way of deploying ProActive Nodes is to create Node Sources from the ProActive Scheduler.
|
Examples of a Node Source:
|
When creating a Node Source, you can choose an Infrastructure Manager from the list of supported Node Source Infrastructures and a Node Source Policy that defines rules and limitations of nodes' utilization.
To create a Node Source you can do any of the following:
-
Use the Resource Manager Web Interface ('Add Nodes' menu)
-
Use the REST API
-
Use the Command Line
In order to create an SSH Node Source you should first configure an SSH access from the server to the Compute Hosts
that does not require password. Then create a text file (refered to as HOSTS_FILE below) containig the hostnames of all your Compute Hosts.
Each line shoud have the format:
HOSTNAME NODES_COUNTwhere NODES_COUNT is the number of ProActive Nodes to start (corresponds to the number of Tasks that can be executed in parallel) on the corresponding host. Lines beginning with # are comments. Here is an example:
# you can use network names
host1.mydomain.com 2
host2.mydomain.com 4
# or ip addresses
192.168.0.10 8
192.168.0.11 16
Then using this file create a Node Source either from the Resource Manager Web Interface or from the command line:
$ PROACTIVE_HOME/bin/proactive-client -createns SSH_node_source --infrastructure org.ow2.proactive.resourcemanager.nodesource.infrastructure.SSHInfrastructure HOSTS_FILE 60000 3 5000 "" /home/user/jdk/bin/java PROACTIVE_HOME Linux "" config/authentication/rm.credDon’t forget to replace SCHEDULER_ADDRESS, HOSTS_FILE and PROACTIVE_HOME with the corresponding values.
See SSH Infrastructure reference for details on each parameter.
4.3. Deploy ProActive Nodes via Agents
In your production environment you might want to control and limit the resources utilization on some or all Compute Hosts, especially if those are desktop machines where people perform their daily activities. Using ProActive Agent you can:
-
Control the number of ProActive Node processes on each Compute Host
-
Launch ProActive Nodes automatically when a Compute Host starts
-
Restart ProActive Nodes if they fail for some reason and reconnect them to ProActive Scheduler
4.3.1. ProActive Linux Agent
The ProActive Agent for Linux can be downloaded from ActiveEon’s website.
To install the ProActive Agent on Debian based distributions (the archive name will vary depending on the version and architecture):
sudo dpkg -i proactive-agent.deb
Some extra dependencies might be required, to install them: sudo apt-get -f install
|
To install the ProActive Agent on Redhat based distributions (the archive name will vary depending on the version and architecture):
sudo rpm -i proactive-agent.rpm
Some extra dependencies might be required, to install them you need to install each dependency individually using sudo yum install
|
By default the Linux Agent will launch locally as many nodes as the number of
CPU cores available on the host minus one. The URL to use for connecting nodes
to the Resource Manager can be configured in /opt/proactive-agent/config.xml,
along with several other parameters. If no URL is set, then broadcast is used
for auto discovery. However, this feature might not work depending on your
network configuration. Consequently, it is recommended to set the Resource
Manager URL manually.
Logs related to the Agent daemon are located in
/opt/proactive-agent/proactive-agent.log.
Binaries, configuration files and logs related to ProActive nodes started by the
agent are available at /opt/proactive-node/, respectively in subfolders dist/lib,
config and logs.
Configuring the Linux Agent
To configure the agent behaviour:
-
Stop the Linux Agent
sudo /etc/init.d/proactive-agent stop
-
Update the config.xml file in
/opt/proactive-agentfolderIn case there is no such directory, create the directory. Then, create the config.xml file or create a symbolic link
sudo mkdir -p /opt/proactive-agent
sudo ln -f -s <path-to-config-file> /opt/proactive-agent/config.xml
-
Change the ownership of the config.xml file
sudo chown -Rv proactive:proactive config.xml
If the group named "proactive" does not exist, create the group and add "proactive" user to the group:
sudo groupadd proactive
sudo usermod -ag proactive proactive
-
Start the Linux Agent
sudo /etc/init.d/proactive-agent start
4.3.2. ProActive Windows Agent
The ProActive Windows Agent is a Windows Service: a long-running executable that performs specific functions and which is designed to not require user intervention. The agent is able to create a ProActive Node on the local machine and to connect it to the ProActive Resource Manager.
After being installed, it:
-
Loads the user’s configuration
-
Creates schedules according to the working plan specified in the configuration
-
Spawns a ProActive Node that will run a specified java class depending on the selected connection type. 3 types of connections are available:
-
Local Registration - The specified java class will create a ProActive Node and register it locally.
-
Resource Manager Registration - The specified java class will create a ProActive Node and register it in the specified Resource Manager, thus being able to execute java or native tasks received from the Scheduler. It is is important to note that a ProActive Node running tasks can potentially spawn child processes.
-
Custom - The user can specify his own java class.
-
-
Watches the spawned ProActive Nodes in order to comply with the following limitations:
-
RAM limitation - The user can specify a maximum amount of memory allowed for a ProActive Node and its children. If the limit is reached, then all processes are automatically killed.
-
CPU limitation - The user can specify a maximum CPU usage allowed for a ProActive Node and its children. If the limit is exceeded by the sum of CPU usages of all processes, they are automatically throttled to reach the given limit.
-
-
Restarts the spawned ProActive Node in case of failures with a timeout policy.
4.3.3. Install Agents on Windows
The ProActive Windows Agent installation pack is available on the official ProActive website.
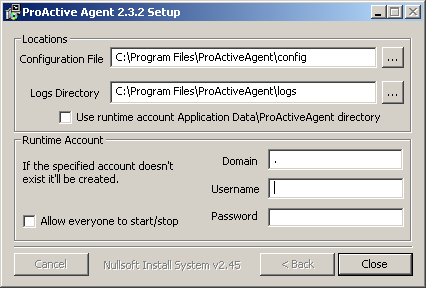
Run the setup.exe file and follow instructions. When the following dialog appears:
-
Specify the directory that will contain the configuration file named
PAAgent-config.xml, note that if this file already exists in the specified directory it will be re-used. -
Specify the directory that will contain the log files of the ProActive Agent and the spawned runtimes.
-
Specify an existing, local account under which the ProActive Nodes will be spawned. It is highly recommended to specify an account that is not part of the Administrators group to isolate the ProActive Node and reduce security risks.
-
The password is encrypted using Microsoft AES Cryptographic Provider and only Administrators have access permissions to the keyfile (restrict.dat) this is done using the SubInACLtool.
-
If the specified account does not exist the installation program will prompt the user to create a non-admin account with the required privileges.
Note that the ProActive Agent service is installed under LocalSystem account, this should not be changed, however it can be using the
services.mscutility. ('Control Panel→Administrative Tools→Services') -
If you want that any non-admin user (except guest accounts) be able to start/stop the ProActive Agent service check the "Allow everyone to start/stop" box. If this option is checked the installer will use the SubInACL tool. If the tool is not installed in the
Program Files\Windows Resource Kits\Toolsdirectory the installer will try to download its installer from the official Microsoft page. -
The installer will check whether the selected user account has the required privileges. If not follow the steps to add these privileges:
-
In the 'Administrative Tools' of the 'Control Panel', open the 'Local Security Policy'.
-
In 'Security Settings', select 'Local Policies' then select 'User Rights Assignments'.
-
Finally, in the list of policies, open the properties of 'Replace a process-level token' policy and add the needed user. Do the same for 'Adjust memory quotas for a process'. For more information about these privileges refer to the official Microsoft page.
-
At the end of the installation, the ProActive Agent Control utility should be started. This next section explains how to configure it.
To uninstall the ProActive Windows Agent, simply run 'Start→Programs→ProActiveAgent→Uninstall ProActive Agent'.
4.3.4. Configure Agents on Windows
To configure the Agent, launch 'Start→Programs→ProActiveAgent→AgentControl' program or click on the notify icon if the "Automatic launch" is activated. Double click on the tray icon to open the ProActive Agent Control window. The following window will appear:

From the ProActive Agent Control window, the user can load a configuration file, edit it, start/stop the service and view logs. A GUI for editing is provided (explained below). Even if it is not recommended, you can edit the configuration file by yourself with your favorite text editor.
It is also possible to change the ProActive Nodes Account using the 'Change Account' button.
When you click on 'GUI Edit', the following window appears:
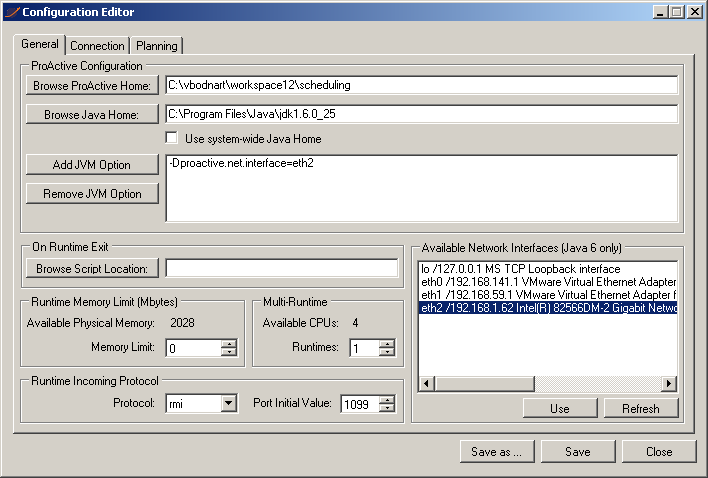
In the general tab, the user can specify:
-
The ProActive Scheduler location.
-
The JRE location (usually something like
C:\Program Files\Java\jdk1.6.0_12). -
The numbers of Runtimes and Nodes (the number of spawned processes and the number of ProActive Nodes per process).
-
The JVM options. Note that if the parameter contains
${rank}, it will be dynamically replaced by the ProActive Node rank starting from 0. -
The On Runtime Exit script. A script executed after a ProActive Node exits. This can be useful to perform additional cleaning operation. Note that the script receives as parameter the PID of the ProActive Node.
-
The user can set a memory limit that will prevent the spawned processes to exceed a specified amount of RAM. If a spawned process or its child process requires more memory, it will be killed as well as its child processes. Note that this limit is disabled by default (0 means no limit) and a ProActive Node will require at least 128 MBytes.
-
It is possible to list all available network interfaces by clicking on the "Refresh" button and add the selected network interface name as a value of the
proactive.net.interfaceproperty by clicking on "Use" button. See the ProActive documentation for further information. -
The user can specify the protocol (PNP or PAMR) to be used by the ProActive Node for incoming communications.
-
To ensure that a unique port is used by a ProActive Node, the initial port value will be incremented for each node process and given as value of the
-Dproactive.SELECTED_PROTOCOL.portJVM property. If the port chosen for a node is already used, it is incremented until an available port number is found.
Clicking on the 'Connection' tab, the window will look like this:

In the 'Connection' tab, the user can select between three types of connections:
-
Local Registration - creates a local ProActive node and registers (advertises) it in a local RMI registry. The node name is optional.
-
Resource Manager Registration - creates a local ProActive node and registers it in the specified Resource Manager. The mandatory Resource Manager’s url must be like protocol://host:port/. The node name and the node source name are optional. Since the Resource Manager requires authentication, the user specifies the file that contains the credential. If no file is specified the default one located in
%USERPROFILE%\.proactive\securityfolder is used. -
Custom - the user specifies his own java starter class and the arguments to be given to the main method. The java starter class must be in the classpath when the ProActive Node is started.
Finally, clicking on the "Planning" tab, the window will look like this:
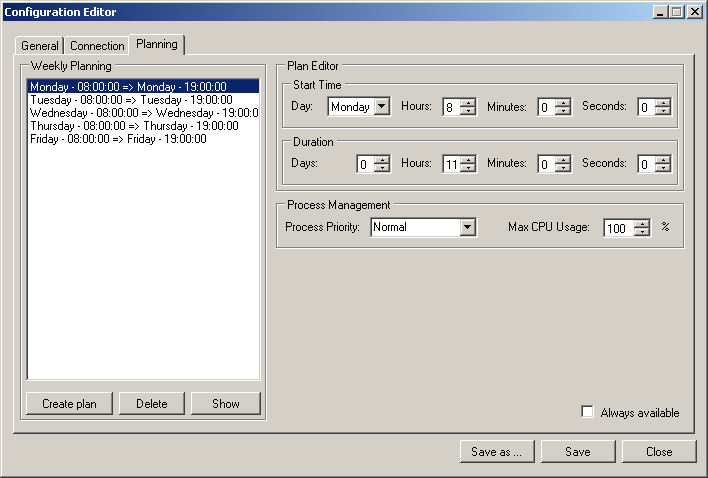
In the Planning Tab, depending on the selected connection type, the agent will initiate it according to a weekly planning where each plan specifies the connection start time as well as the working duration. The agent will end the connection as well as the ProActive Nodes and its child processes when the plan duration has expired.
Moreover, it is possible to specify the ProActive Node Priority and its CPU usage limit. The behavior of the CPU usage limit works as follows: if the ProActive Node spawns other processes, they will also be part of the limit so that if the sum of CPU% of all processes exceeds the user limit they will be throttled to reach the given limit. Note that if the Priority is set to RealTime the CPU % throttling will be disabled.
The "Always available" makes the agent to run permanently with a Normal Priority and Max CPU usage at 100%.
4.3.5. Launching Windows Agent
Once you have configured the agent, you can start it clicking on the "Start" button of the ProActive Agent Control window. However, before that, you have to ensure that ProActive Scheduler has been started on the address you specified in the agent configuration. You do not need to start a node since it is exactly the job of the agent.
Once started, you may face some problems. You can realise that an error occurred by first glancing at the color of the agent tray icon. If everything goes right, it should keep the blue color. If its color changes to yellow, it means that the agent has been stopped. To see exactly what happened, you can look at the runtime log file located into the agent installation directory and named Executor<runtime number>Process-log.txt.
The main troubles you may have to face are the following ones:
-
You get an access denied error: this is probably due to your default java.security.policy file which cannot be found. If you want to specify another policy file, you have to add a JVM parameter in the agent configuration. A policy file is supplied in the scheduling directory. To use it, add the following line in the JVM parameter box of the agent configuration (Figure 5.3, “Configuration Editor window - General Tab ”):
-Djava.security.policy=PROACTIVE_HOME/config/security.java.policy-client
-
You get an authentication error: this is probably due to your default credentials file which cannot be found. In the "Connection" tab of the Configuration Editor (Figure 5.4, “Configuration Editor window - Connection Tab (Resource Manager Registration)”), you can choose the credentials file you want. You can select, for instance, the credentials file located at PROACTIVE_HOME/config/authentication/scheduler.cred or your own credentials file.
-
The node seems to be well started but you cannot see it in the Resource Manager interface : in this case, make sure that the port number is the good one. Do not forget that the runtime port number is incremented from the initial ProActive Resource Manager port number. You can see exactly on which port your runtime has been started looking at the log file described above.
4.3.6. Automate Windows Agent Installation
The automated installation can be run through a command line (cmd.exe) with administrator priviledge. This can be useful to trigger installation. In order to launch the silent installation, the /S option must be passed in the command line to the ProActive Windows Agent installer. Several options are required, such as the user and password.
Here is an example of automated installation command:
ProactiveAgent-8.3.0-standalone-x64-setup.exe /S /USER=proactive /PASSWORD=proactiveOptionally you can add a domain name.
ProactiveAgent-8.3.0-standalone-x64-setup.exe /S /USER=proactive /PASSWORD=proactive /DOMAIN=mydomainYou can also activate compatibility mode from the command line if you have any problems:
set __COMPAT_LAYER=WINXPSP3
ProactiveAgent-8.3.0-standalone-x64-setup.exe /S /USER=proactive /PASSWORD=proactive
Here is the full list of command line options which can be passed to the installer:
|
Run silently without graphical interface, uninstall any previous installation. |
|
Run the uninstall only. |
|
Allow all users to control the service. |
|
Associate |
|
Define password for the proactive agent |
|
Specify |
|
Define |
|
Define |
|
Use current user’s account home as |
4.3.7. Configuring Linux Or Windows Agents For Auto-Update
The Linux or Windows Agents can be configured to automatically synchronize the node libary (node.jar) with the ProActive server.
The behavior is similar to the proactive-node-autoupdate command, the main JVM will act as a bootstrap and spawn a child JVM with the up-to-date library in its classpath.
In order to enable auto-update, you need to edit the agent configuration file. This file location is:
-
Linux Agent:
/opt/proactive-agent/config.xml -
Windows Agent:
C:\Program Files (x86)\ProActiveAgent\config\PAAgent-config.xml
The following changes must be performed:
-
Change the <javaStarterClass> to
org.ow2.proactive.resourcemanager.updater.RMNodeUpdater -
Add the following <jvmParameters>
-
node.jar.url: url of the node jar (similar to thenjuoption of theproactive-node-autoupdatecommand) -
node.jar.saveas: path used to store the node.jar file locally (similar to thenjsoption of theproactive-node-autoupdatecommand)
-
-
Other JVM properties specified will be forwarded to the spawned JVM, but non-standard options such as -Xmx will not be forwarded. In order to do so, you must declare them using the following syntax:
   <param>-DXtraOption1=Xmx2048m</param>
   <param>-DXtraOption2=Xms256m</param>
   ...
4.4. Deploy ProActive Nodes dynamically via other schedulers (PBS, SLURM, …)
This functionality is also called *Meta-Scheduling*.
If an existing cluster is available in your organization and this cluster is managed by a native scheduler such as SLURM, LSF or PBS, you may want to execute transparently on this cluster ProActive Workflows and Tasks.
As ProActive Tasks can be executed only on ProActive Nodes, it is necessary to deploy ProActive Nodes on the cluster.
Dynamic deployment of ProActive Nodes on a cluster to execute ProActive Tasks is handled by defining a Native Scheduler Node Source containing three components:
-
The
Native Scheduler Infrastructure: a Node Source Infrastructure which allows to interact with a native scheduler to deploy ProActive Nodes. -
The
Native Scheduler Policy: a Node Source Policy which interacts with the Native Scheduler Infrastructure to request ProActive Nodes deployment dynamically based on the ProActive Scheduler pending queue. -
The
Native Scheduler Scheduling Policy: a Scheduling Policy which allows the execution of ProActive Tasks on ProActive Nodes provisioned by the Native Scheduler Policy.
The provisioning of ProActive Nodes is controlled by a specific Generic Information "NS" which can be defined at _Task or Job level.
When this generic information is configured for a Task, a ProActive Node will be dynamically deployed on the cluster to execute the Task. This ProActive Node will be associated with the Task and will only accept this Task execution. When the Task terminates, the ProActive Node will also be terminated.
When this generic information is configured for a Job, all Tasks contained in the Job will execute on the cluster. Nodes will be created dynamically to execute Tasks of this Job, with a similar Task/Node association.
The behavior of the Meta-Scheduling feature is summarized on the following diagram (example for PBS integration):
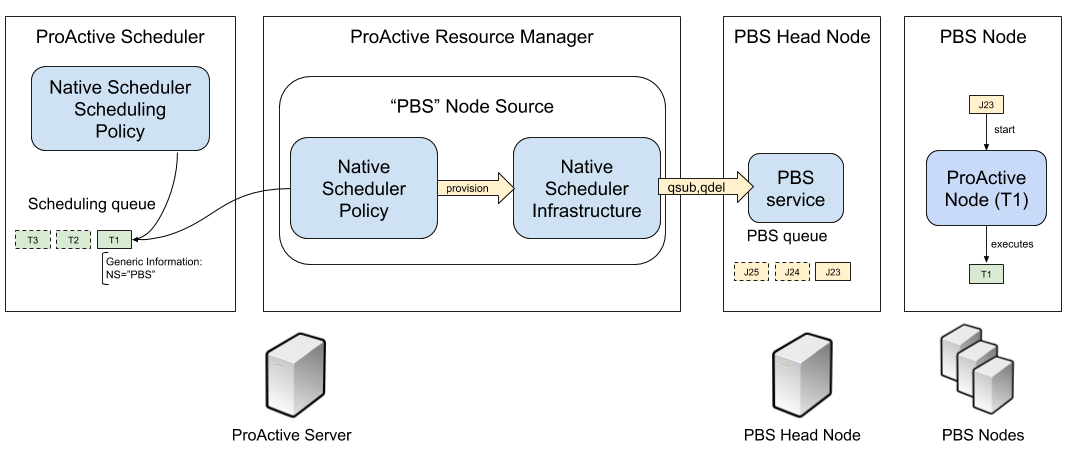
The following paragraphs explain how to configure the Native Scheduler Infrastructure, Native Scheduler Policy, Native Scheduler Scheduling Policy and execute ProActive tasks using a Native Scheduler Node Source.
4.4.1. Glossary
- Cluster
-
a group of tightly coupled nodes managed by a native scheduler.
- Cluster Node
-
a computer, part of a cluster used to execute cluster jobs.
- Native Scheduler
-
A software which dispatch cluster jobs on cluster nodes, also known as Cluster Manager.
- Cluster Job
-
A running command executed on a cluster by a native scheduler. Also known as Batch Job.
- Cluster Job Id
-
Identifier representing a cluster job inside a native scheduler.
- Head Node
-
A specific cluster node where the native scheduler server runs.
- Cluster User
-
A linux operating system account registered on the cluster.
- ProActive Scheduler User
-
An account registered in the ProActive Scheduler, the account is only registered inside the ProActive Scheduler and does not necessarily match an operating system account.
- ProActive Scheduler Process User
-
The operating system account which started the ProActive Scheduler server process.
4.4.2. Native Scheduler Node Source Configuration
Using the Resource Manager Web Interface, you can create a Node Source used to acquire ProActive Nodes from a Native Scheduler.
From The drop down menu, the NativeSchedulerInfrastructure and NativeSchedulerPolicy must be selected.
Here is an explanation of the node source parameters:
-
Name: you should name the node source accordingly to your infrastructure, it can be the cluster name, head node name, or native scheduler name (PBS, SLURM), etc.
NativeSchedulerInfrastructure
-
RMCredentialsPath: path to a file which contains the credentials of an administrator user which will own the node source. The ProActive Scheduler Server release contains two admin users credentials files :config/authentication/rm.credandconfig/authentication/admin_user.cred -
NSFrontalHostAddress: the host name or IP address of the cluster head node. -
NSSchedulerHome: the location of the shared ProActive installation on cluster nodes (cluster nodes must be able to access ProActive libraries in order to start ProActive Node). Example/opt/proactive/activeeon_enterprise-node-linux-x64-8.1.0. -
javaHome: similarly, cluster nodes must be able to access the java command in order to start ProActive Nodes. ProActive installation includes a Java Runtime Environment under thejresubfolder. Example:/opt/proactive/activeeon_enterprise-node-linux-x64-8.1.0/jre. -
jvmParameters: additional options which can be passed to the java command. -
sshOptions: additional options which can be passed to the ssh command used to connect to connect to the host name or IP address specified in the NSFrontalHostAddress parameter. -
NSNodeTimeoutInSeconds: timeout to wait for the deployment of ProActive Nodes on the cluster. As the time needed to deploy ProActive Nodes depends on the cluster load, this timeout should be a large value. If the timeout is reached, the ProActive Nodes will be in"Lost"state. -
ìmpersonationMethod: when a job is submitted to the native scheduler, the submission is performed under the current ProActive Scheduler user. An impersonation is thus performed between the scheduler server process and the target cluster user. This impersonation can be performed using 3 different strategies:-
ssh: in that case the head node is contacted using a ssh command with the current ProActive Scheduler user and password. User/password combination between the ProActive Scheduler and the head node operating system must match. -
none: in that case the head node is contacted using a ssh command with the ProActive Scheduler process user (passwordless ssh). Submission to the native scheduler will be performed with the same account. -
sudo: similar tononeregarding the connection to the head node, but asudocommand will be initiated to impersonate as the current ProActive Scheduler user, before doing a job submission.
-
-
alternateRMUrl: the url used by the ProActive Nodes to contact ProActive Resource Manager. This url is displayed on ProActive server startup. Example:pnp://myserver:64738. -
sshPort: port used for ssh connections. -
nsPreCommand: a linux command which can be run before launching ProActive Nodes on the cluster. Can be used as a workaround when some system environment variables are not properly set when starting ProActive Nodes. -
nsSubmitCommand: this is the main command used to start ProActive Nodes on the cluster. Depending on the actual native scheduler implementation,nsSubmitCommandwill vary, here are examples definitions:PBS
qsub -N %NS_JOBNAME% -o %LOG_FILE% -j oeSLURM
sbatch -J %NS_JOBNAME% -o %LOG_FILE%LSF
bsub -J %NS_JOBNAME% -o %LOG_FILE% -e %LOG_FILE%The command can use patterns which will be replaced dynamically by the ProActive Resource Manager.
%NS_JOBNAME%contains a configurable job name dynamically created by the resource manager.
%LOG_FILE%contains a log file path dynamically created by the resource manager and located in side the NSSchedulerHome installation. This log file is useful to debug errors during cluster job submission.
%PA_USERNAME%contains the current ProActive Scheduler user.
-
nsKillCommand: this is the command used to kill ProActive Nodes started previously by the nsSubmitCommand. Similarly to nsSubmitCommand,nsKillCommandwill vary for each native scheduler syntax:PBS
qdel %NS_JOBID%SLURM
scancel -n %NS_JOBNAME%LSF
bkill -J %NS_JOBNAME%It can use the following patterns:
%NS_JOBNAME%contains a configurable job name dynamically created by the resource manager.
%NS_JOBID%contains the job id returned by the native scheduler when submitting the job. Currently, job id can only be used with PBS, when the setting
submitReturnsJobIdis set totrue. -
submitReturnsJobId: is the cluster job id returned plainly when calling the nsSubmitCommand. This is the behavior of PBS, and this is why this setting should be set totruewhen using PBS. -
nsJobName: a way to configure the%NS_JOBNAME%pattern. The following patterns can be used:%PA_TASKID%contains the ProActive Task and Job ID associated with the node request.
%PA_USERNAME%contains the current ProActive Scheduler user.
-
maxDeploymentFailure: number of attempts when starting a ProActive Node on the cluster using the nsSubmitCommand, after all attempts failed, the ProActive Node will be declared asLost.
NativeSchedulerPolicy
-
userAccessType: which users are allowed to use ProActive Nodes created by the NativeSchedulerInfrastructure. Refer to the Policies documentation. -
providerAccessType: defines who can add nodes to this node source. Refer to the Policies documentation. -
schedulerUrl: the url used by the ProActive Nodes to contact the ProActive Resource Manager. This url is displayed on ProActive server startup. Example:pnp://myserver:64738. -
schedulerCredentialsPath: path to a file which contains the credentials of an administrator user which will connect to the scheduler. The ProActive Scheduler Server release contains two admin users credentials files :config/authentication/rm.credandconfig/authentication/admin_user.cred -
rearrangeTasks: currently not implemented. -
autoScaling: if set totrue, the NativeSchedulerPolicy will scan the Resource Manager activity and Scheduling queue. If the scheduling queue is not empty and all resource manager nodes are busy,autoscalingwill automatically start ProActive Nodes from the NativeSchedulerInfrastructure. This setting cannot be used when multiple NativeScheduler node sources are deployed. -
refreshTime: the NativeSchedulerPolicy will refresh its status and observe the ProActive Scheduler queue everyrefreshTimemilliseconds.
Creating the Node Source
When the node source is created, it will be activated as other node sources (LocalInfrastructure, SSHInfrastructure, etc), but no ProActive Node will appear.
This is expected as the Native Scheduler node source is dynamic, it will only create ProActive Nodes when specific conditions are met.
4.4.3. Configure NativeSchedulerSchedulingPolicy
After creating the Native Scheduler Node Source, it is necessary as well to change the ProActive Scheduling Policy to use the NativeSchedulerSchedulingPolicy.
This policy ensures that tasks are executed on appropriate ProActive Nodes when using a Native Scheduler Node Source.
In order to do that, edit the file PROACTIVE_HOME/config/scheduler/settings.ini and change the following line:
pa.scheduler.policy=org.ow2.proactive.scheduler.policy.ExtendedSchedulerPolicy
to:
pa.scheduler.policy=org.ow2.proactive.scheduler.policy.NativeSchedulerSchedulingPolicy
4.4.4. Match User Accounts With the Cluster
Submission of jobs to the native scheduler is done by default using a SSH connection.
When a ProActive Task belonging to a given user Alice needs to execute on a NativeScheduler node source, a SSH connection will be performed with the login and password of the Alice user registered in the ProActive Scheduler.
Accordingly, this login/password combination must correspond to a real user on the cluster head node.
Please refer to the User Authentication section in order to manage ProActive Users.
4.4.5. Execute Tasks on a Native Scheduler Node Source
The Generic Information "NS" allows a ProActive Task to be executed on a Native Scheduler node source.
It must contain the name of the target node source. For example, to submit a Task on the "PBS" Node Source:
<task name="PBS_Task">
    <description>
        <![CDATA[ Execute this Task in the PBS node source. ]]>
    </description>
    <genericInformation>
        <info name="NS" value="PBS"/>
    </genericInformation>
    <scriptExecutable>
        <script>
          <code language="groovy">
            <![CDATA[
println "Hello World"
]]>
          </code>
        </script>
    </scriptExecutable>
</task>
The NS value can also be defined at the job level, in that case, every task of this job will be executed on the Native Scheduler node source:
<?xml version="1.0" encoding="UTF-8"?>
<job
  xmlns:xsi="http://www.w3.org/2001/XMLSchema-instance"
  xmlns="urn:proactive:jobdescriptor:3.10"
     xsi:schemaLocation="urn:proactive:jobdescriptor:3.10 http://www.activeeon.com/public_content/schemas/proactive/jobdescriptor/3.10/schedulerjob.xsd"
    name="PBS_Job"
    priority="normal"
    onTaskError="continueJobExecution"
     maxNumberOfExecution="2"
>
  <genericInformation>
    <info name="NS" value="PBS"/>
  </genericInformation>
  <taskFlow>
    <task name="Groovy_Task">
      <description>
        <![CDATA[ The simplest task, ran by a groovy engine. ]]>
      </description>
      <scriptExecutable>
        <script>
          <code language="groovy">
            <![CDATA[
println "Hello World"
]]>
          </code>
        </script>
      </scriptExecutable>
    </task>
  </taskFlow>
</job>
It is also possible to define in a ProActive Task or Job the #BATCH generic information. This parameter allows to provide custom arguments to nsSubmitCommand.
For example, to submit a task on the PBS Node source, using a specific PBS queue and reserve for this task 2 cluster nodes with 2 cpu each:
<task name="PBS_Task">
  <description>
    <![CDATA[ Runs on the PBS node source on queue1, using 2 nodes * 2 cpus ]]>
  </description>
  <genericInformation>
    <info name="NS" value="PBS"/>
    <info name="#BATCH" value="-q queue1 -lnodes=2:ppn=2"/>
  </genericInformation>
  <scriptExecutable>
    <script>
      <code language="groovy">
         <![CDATA[
println "Hello World"
]]>
      </code>
    </script>
  </scriptExecutable>
</task>
4.4.6. Native Scheduler Node Life Cycle
As soon as tasks containing the NS generic information are pending, the target Native Scheduler node source will try to deploy ProActive Nodes to execute them.
The node will first appear in Deploying state. If some error occurs prior to the nsSubmitCommand execution (SSH connection, command syntax), the node state will change to Lost, with some explanation about the failure displayed.
If the node remains in Deploying state, it is possible to monitor the job execution on the native scheduler itself, by logging into the head node, and use the native scheduler command tools.
Example using the PBS qstat command:
root@osboxes:/tmp/activeeon_enterprise-node-linux-x64-8.1.0-SNAPSHOT/logs# qstat

Job ID                    Name             User            Time Use S Queue
------------------------- ---------------- --------------- -------- - -----
241.osboxes                STDIN            osboxes                0 R batch

root@osboxes:/tmp/activeeon_enterprise-node-linux-x64-8.1.0-SNAPSHOT/logs# qstat -f 241

Job Id: 241.osboxes
    Job_Name = STDIN
    Job_Owner = osboxes@osboxes
    job_state = R
    queue = batch
    server = osboxes
    Checkpoint = u
    ctime = Fri May  4 10:13:06 2018
    Error_Path = osboxes:/tmp/activeeon_enterprise-node-linux-x64-8.1.0-SNAPSH
	OT/logs/Node-osboxes_852t0.out
    exec_host = osboxes/0
    Hold_Types = n
    Join_Path = oe
    Keep_Files = n
    Mail_Points = a
    mtime = Fri May  4 10:13:06 2018
    Output_Path = osboxes:/tmp/activeeon_enterprise-node-linux-x64-8.1.0-SNAPS
	HOT/logs/Node-osboxes_852t0.out
    Priority = 0
    qtime = Fri May  4 10:13:06 2018
    Rerunable = True
    Resource_List.walltime = 01:00:00
    Resource_List.nodes = 1
    Resource_List.nodect = 1
    Resource_List.neednodes = 1
    session_id = 6486
    substate = 42
    Variable_List = PBS_O_QUEUE=batch,PBS_O_HOME=/home/osboxes,
	PBS_O_LOGNAME=osboxes,
	PBS_O_PATH=/usr/local/sbin:/usr/local/bin:/usr/sbin:/usr/bin:/sbin:/b
	in:/usr/games:/usr/local/games,PBS_O_MAIL=/var/mail/osboxes,
	PBS_O_SHELL=/bin/bash,PBS_O_LANG=fr_FR.UTF-8,
	PBS_O_WORKDIR=/home/osboxes,PBS_O_HOST=osboxes,PBS_O_SERVER=osboxes
    euser = osboxes
    egroup = osboxes
    hashname = 241.osboxes
    queue_rank = 237
    queue_type = E
    comment = Job started on Fri May 04 at 10:13
    etime = Fri May  4 10:13:06 2018
    submit_args = -o /tmp/activeeon_enterprise-node-linux-x64-8.1.0-SNAPSHOT/l
	ogs/Node-osboxes_852t0.out -e /tmp/activeeon_enterprise-node-linux-x64
	-8.1.0-SNAPSHOT/logs/Node-osboxes_852t0.out -j oe
    start_time = Fri May  4 10:13:06 2018
    Walltime.Remaining = 3587
    start_count = 1
    fault_tolerant = False
    job_radix = 0
    submit_host = osboxes
    init_work_dir = /home/osboxes
    request_version = 1
When the deployment is successful, the ProActive Node state will change to Free and shortly after to Busy as soon as the associated task will be deployed on the node.
After the task completes, the node will be removed and the cluster job will be cancelled using the nsKillCommand.
4.4.7. Troubleshooting
If the cluster job is in running state, but the ProActive Node associated remains in Deploying state, it probably means there is a connection issue between the ProActive Node and the Resource Manager.
If the default ProActive Network Protocol is used (PNP), it is necessary to have a two way connection between the cluster and ProActive server. You can refer to the network protocols documentation for more info.
To troubleshoot node deployment, you can:
-
inspect the output of the cluster job if provided in the
nsSubmitCommand -
add the following log4j loggers to the ProActive Scheduler Server
config/log/server.properties
log4j.logger.org.ow2.proactive.scheduler.policy=DEBUG
log4j.logger.org.ow2.proactive.scheduler.util=DEBUG
log4j.logger.org.ow2.proactive.nativescheduler=DEBUG-
inspect the ProActive Scheduler server logs.
5. Available Network Protocols
ProActive Workflows and Scheduling offers several protocols for the Scheduler and nodes to communicate. These protocols provide different features: speed, security, fast error detection, firewall or NAT friendliness but none of the protocols can offer all these features at the same time. Consequently, the selection should be made carefully. Below are introduced available network protocols. Configuration and properties are discussed in Network Properties.
5.1. ProActive Network Protocol
ProActive Network Protocol (PNP) is the general purpose communication protocol
(pnp:// scheme). Its performances are quite similar to the well known Java RMI
protocol, but it is much more robust and network friendly. It requires only one
TCP port per JVM and no shared registry. Besides, it enables fast network
failure discovery and better scalability.
PNP binds to a given TCP port at startup. All incoming communications use this
TCP port. Deploying the Scheduler or a node with PNP requires to open one and
only one incoming TCP port per machine.
5.2. ProActive Network Protocol over SSL
ProActive Network Protocol over SSL (PNPS) is the PNP protocol wrapped inside
an SSL tunnel. The URI scheme used for the protocol is pnps://. It includes
the same features as PNP plus ciphering and optionally authentication.
Using SSL creates some CPU overhead which implies that PNPS is slower than PNP.
5.3. ProActive Message Routing
ProActive Message Routing (PAMR) allows the deployment of the Scheduler and nodes
behind a firewall. Its associated URI
scheme is pamr://. PAMR has the weakest expectations on how the network is
configured. Unlike all the other communication protocols introduced previously,
it has been designed to work when only outgoing TCP connections are available.
6. Installation on a Cluster with Firewall
When incoming connections are not allowed (ports closed, firewalls, etc.), the ProActive Scheduler allows you to connect nodes without significant changes in your network firewall configuration. It relies on the PAMR protocol.
This last does not expect bidirectional TCP connections. It has been designed to work when only outgoing TCP connections are available. Such environments can be encountered due to:
-
Network address translation devices
-
Firewalls allowing only outgoing connections (this is the default setup of many firewalls)
-
Virtual Machines with a virtualized network stack
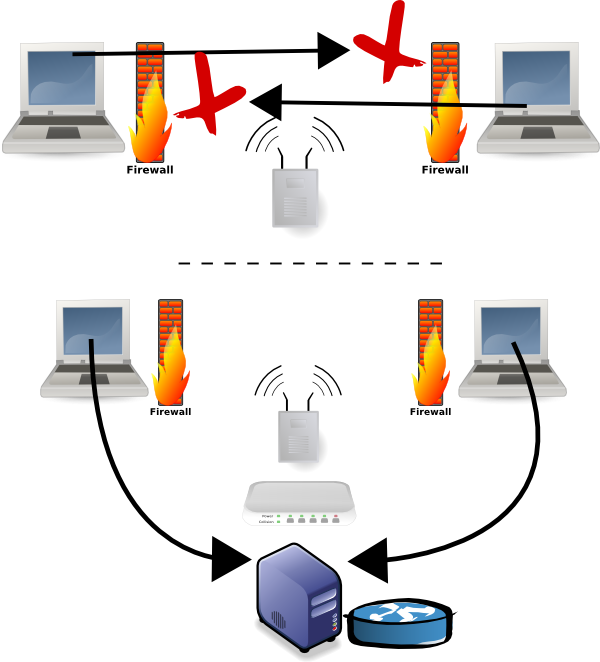
When PAMR is activated, the ProActive Scheduler and nodes connect to a PAMR router. This connection is kept open, and used as a tunnel to receive incoming messages. If the tunnel goes down, it is automatically reopened by nodes.
The biggest drawback of PAMR is that a centralized PAMR router is in charge of routing message between all the PAMR clients. To soften this limitation PAMR can be used with other communication protocols. This way, PAMR is used only when needed.
By default, PNP is enabled. PNP is the default protocol for better performance and nodes can also use PAMR if needed. The PAMR Router is started by default along with the ProActive Scheduler.
For a ProActive Node to connect to the ProActive Scheduler using PAMR, the following ProActive configuration file can be used
(PROACTIVE_HOME/config/network/node.ini). The properties tell the ProActive Node where to find the PAMR router.
The ProActive Node will then connect to pamr://0 where 0 is the PAMR id of the Scheduler (0 by default).
proactive.communication.protocol=pamr
proactive.pamr.router.address=ROUTER_HOSTNAME
proactive.pamr.router.port=33647
This sample configuration requires to open only one port 33647 for incoming connections on the router host
and all the ProActive Nodes will be able to connect to the Scheduler.
PAMR communication can be tunneled using SSH for better security. In that case, the ProActive node will establish a SSH tunnel between him and the ProActive Scheduler and use that tunnel for PAMR traffic.
See PAMR Protocol Properties reference for a detailed explanation of each property.
7. Control the resource usage
7.1. Policies
You can limit the utilization of resources connected to the ProActive Scheduler in different ways. When you create node sources you can use a node source policy. A node source policy is a set of rules and conditions which describes when and how many nodes have to be selected for computations.
| Node source policy are enforced for non-admin users only, and will have no effect for a user granted with the administrator privileges. |
Each node source policy regardless it specifics has a common part where you describe users' and groups' permissions. When you create a policy you must specify them:
-
nodeUsers - utilization permission that defines who can get nodes for computations from this node source. It has to take one of the following values:
-
ME- only the node source creator -
users=user1,user2;groups=group1,group2;tokens=t1,t2- only specific users, groups or tokens. I.e. users=user1 - node access is limited to user1; users=user1;groups=group1 - node access is limited to user1 and all users from group group1; users=user1;tokens=t1 - node access is limited to user1 or anyone who specified token t1. If node access is protected by a token, node will not be found by the ProActive Resource Manager when trying to execute workflows, unless the corresponding token is specified inside the workflow(s). -
ALL- everybody can use nodes from this node source
-
| To specify a token inside a chosen workflow, add the key/value pair NODE_ACCESS_TOKEN:<token> to its generic information. |
-
nodeProviders - provider permission defines who can add nodes to this node source. It should take one of the following values:
-
ME- pnly the node source creator -
users=user1,user2;groups=group1,group2- only specific users or groups (for our example user1, user2, group1 and group2). It is possible to specify only groups or only users. -
ALL- everybody can add nodes to this node source
-
The user who created the node source is the administrator of this node source. He can add and removed nodes to it, remove the node source itself, but cannot use nodes if usage policy is set to PROVIDER or PROVIDER_GROUPS.
In the ProActive Resource Manager, there is always a default node source configured with a DefaultInfrastructureManager and a Static policy. It is not able to deploy nodes anywhere but makes it possible to add existing nodes to the Scheduler (see Deploy ProActive Nodes manually)
Out of the box the Scheduler supports time slot policies, cron policies, load based policies and many others. Please see detailed information about policies in Node Source Policy.
7.2. Agents schedule
Node source policies limit ProActive Nodes utilization on the level of the ProActive Scheduler. If you need fine-grained limits on the node level ProActive Agents will help you achieve that.
| The typical scenario is when you use desktop workstation for computations during non working hours. |
Both linux and windows agents have an ability to:
-
Run ProActive Nodes according to the schedule
-
Limit resources utilization for these daemons (e.g CPU, memory)
Agents configuration is detailed in the section Deploy ProActive Nodes via Agents.
7.3. Locking ProActive Nodes
The Resource Manager allows to lock and unlock ProActive nodes. Locking a Node prevents new Tasks to be launched on that node. This operation is possible whatever the state of a Node is. Once locked, the Resource Manager keeps track of who has locked the Node and when.
A common use case for locking Nodes is about maintenances. You may have a long running Task executing on a ProActive Node where a maintenance is planned. Let’s say the current Task must not be interrupted and new ones not started before achieving the maintenance. A solution is to lock the Node. This way, the current Task will complete but no new Tasks are scheduled on that Node. Then, it is possible to perform the maintenance and on termination to unlock the Node. Upon unlocking, the Node becomes again eligible for Tasks execution.
Locking and unlocking a Node, or more generally a set of Nodes, is possible from the REST API, the command line client but also the Resource Manager portal.
Please note that locks are restored, by default, on Resource Manager restart and thus Scheduler restart.
It is possible to disable this feature by editing the value associated to the property named
pa.rm.nodes.lock.restoration in PROACTIVE_HOME/config/rm/settings.ini.
When the nodes lock restoration feature is enabled, the Resource Manager will try to lock, per Node Source, as many Nodes as there were on the previous run. The approach is best effort and Node hostname is not considered. As a consequence, Nodes are not necessarily locked on the same host after a Scheduler restart.
7.4. Undeploying Node Sources
The Resource Manager allows for Node Sources to be undeployed. In this case, the Node Source is shut down and its Nodes are removed, but the Node Source definition is kept. An undeployed Node Source can be redeployed later, using its initial configuration.
Node Source undeploying can be preemptive or not. If a Node Source undeploying is initiated with a non-preemptive requirement, then the Nodes of this Node Source which are currently running Tasks will not be removed until their Task is finished. In this case, these Nodes are displayed in the to-be-removed state. In other terms, if a Node Source is undeployed non-preemptively, it will be completely undeployed as soon as all of its Nodes have finished executing their Task. On the opposite, if a Node Source is undeployed with preemption, its Nodes are immediately removed regardless of whether they execute Tasks, and this may cause Tasks to fail.
Deploying and undeploying Node Sources is possible from the Resource Manager Web Interface, from the Resource Manager REST API, and from the Command Line client.
| The deployment status of a Node Source is persistent. If the Resource Manager is restarted, then all Node Sources will be restored to their previous state. |
8. User Authentication
In order to use ProActive Scheduler every user must have an account. It supports three methods for authentication:
-
File based
-
LDAP
-
PAM
8.1. Select authentication method
By default the ProActive Scheduler is configured to use file based authentication and has some default accounts ('demo/demo', 'admin/admin') that work out of the box.
If you would like to change the method authentication type to use your LDAP server or use Linux PAM, you need to modify two configs:
-
Resource Manager configuration (
PROACTIVE_HOME/config/rm/settings.ini)#Property that defines the method that has to be used for logging users to the Resource Manager #It can be one of the following values: # - "RMFileLoginMethod" to use file login and group management # - "RMLDAPLoginMethod" to use LDAP login management # - "RMPAMLoginMethod" to use PAM login management pa.rm.authentication.loginMethod=RMLDAPLoginMethod -
Scheduler configuration (
PROACTIVE_HOME/config/scheduler/settings.ini)#Property that define the method that have to be used for logging users to the Scheduler #It can be one of the following values : # - "SchedulerFileLoginMethod" to use file login and group management # - "SchedulerLDAPLoginMethod" to use LDAP login management # - "SchedulerPAMLoginMethod" to use PAM login management pa.scheduler.core.authentication.loginMethod=SchedulerLDAPLoginMethod
8.2. File
By default, the ProActive Resource Manager stores users accounts, passwords, and group memberships (user or admin), in two files:
-
users and passwords accounts are stored in
PROACTIVE_HOME/config/authentication/login.cfg. Each line has to follow the format user:encypted password. The default accounts inlogin.cfgfile correspond to the following passwords, which are encrypted in the actual login.cfg file:unencrypted_login.cfgadmin:admin user:pwd demo:demo guest:pwd test:pwd radmin:pwd nsadmin:pwd provider:pwd scheduler:scheduler_pwd rm:rm_pwd watcher:w_pwd test_executor:pwd
-
users membership is stored in
PROACTIVE_HOME/config/authentication/group.cfg. For each user registered in login.cfg, a group membership has to be defined in this file. Each line has to look like user:group. Group has to be user to have user rights, or admin to have administrator rights. Below is an examplegroup.cfgfile:group.cfgadmin:admin demo:admin guest:guests rm:admin scheduler:user user:user watcher:watchers
ProActive contains a set of predefined groups such as "user" and "admin". Groups are defined in PROACTIVE_HOME/config/security.java.policy-server as described in chapter User Permissions.
In order to create new users, delete an existing user, or modify the groups or password for an existing user, a command-line tool is available.
This command is available inside the tools folder: PROACTIVE_HOME/tools/proactive-users.
You can check the command syntax using the -h option.
$ proactive-users -h
usage: proactive-users [-C | -D | -U]  [-g <GROUPS>] [-gf <GROUPFILE>] [-h] [-kf <KEYFILE>] [-l <LOGIN>] [-lf <LOGINFILE>] [-p
       <PASSWORD>] [-sgf <SOURCEGROUPFILE>] [-slf <SOURCELOGINFILE>]
Here are examples of use:
-
Creating users
$ proactive-users -C -l user1 -p pwd1 -g user
Created user user1 in H:\Install\scheduling\tools\..\config/authentication/login.cfg
Added group user to user user1
The user with login "user1", password "pwd1" and group "user" was created
-
Updating users
$ proactive-users -U -l user1 -p pwd2 -g nsadmins,admin
Changed password for user user1 in H:\Install\scheduling\tools\..\config/authentication/login.cfg
Added group nsadmins to user user1
Added group admin to user user1
User "user1" now has password pwd2 and groups nsadmins & admin (group "user" was removed).
-
Deleting users
$ proactive-users -D -l user1
Deleted user user1 in H:\Install\scheduling\tools\..\config/authentication/login.cfg
User "user1" does not exist any more.
-
Creating multiple users
It is also possible to create multiple users at once using a source login file and a source group file. In that case, the source login file contains, for each user, a line with the format "login:unencrypted_password". The source group file has the same structure as the
PROACTIVE_HOME/config/authentication/group.cfgfile. This can be used, for example, to convert login files used by ProActive Scheduler versions prior to 7.19.0.$ proactive-users -C -slf source_login.cfg -sgf source_group.cfg Adding group admin to user admin1 Created user admin1 Adding group user to user user2 Created user user2 Adding group user to user user1 Created user user1 Stored login file in H:\Install\scheduling\tools\..\config/authentication/login.cfg Stored group file in H:\Install\scheduling\tools\..\config/authentication/group.cfg
-
Updating multiple users
Similarly, it is possible to update existing users with source login or group files. It is possible to update only group membership for existing users, or only passwords, or both.
The example below shows how to update only groups for existing users:
proactive-users -U -sgf source_group_2.cfg
Adding group admin to user user1
Updated user user1
Adding group admin to user user2
Updated user user2
Stored login file in H:\Install\scheduling\tools\..\config/authentication/login.cfg
Stored group file in H:\Install\scheduling\tools\..\config/authentication/group.cfg
8.3. LDAP
The ProActive Resource Manager is able to connect to an existing LDAP server, to check users login/password and verify users group membership. This authentication method can be used with existing LDAP server that is already configured.
In order to use it, few parameters have to be configured, such as path in LDAP tree users, LDAP groups that define user and admin group membership, URL of the LDAP server, LDAP binding method used by connection and configuration of SSL/TLS if you want a secured connection between the ProActive Resource Manager and LDAP.
We assume that LDAP server is configured in the way that:
-
all existing users and groups are located under single domain
-
users have object class specified in parameter pa.ldap.user.objectclass
-
groups have object class specified in parameter pa.ldap.group.objectclass
-
user and group name is defined in cn (Common Name) attribute
# EXAMPLE of user entry
#
# dn: cn=jdoe,dc=example,dc=com
# cn: jdoe
# firstName: John
# lastName: Doe
# objectClass: inetOrgPerson

# EXAMPLE of group entry
#
# dn: cn=mygroup,dc=example,dc=com
# cn: mygroup
# firstName: John
# lastName: Doe
# uniqueMember: cn=djoe,dc=example,dc=com
# objectClass: groupOfUniqueNames
The LDAP configuration is defined in PROACTIVE_HOME/config/authentication/ldap.cfg. You need to:
-
Set the LDAP server URL
First, you have to define the LDAP’s URL of your organisation. This address corresponds to the property:
pa.ldap.url. You have to put a standard LDAP-like URL, for example ldap://myLdap. You can also set a URL with secure access: ldaps://myLdap:636. -
Define object class of user and group entities
Then you need to define how to differ user and group entities in LDAP tree. The users object class is defined by property
pa.ldap.user.objectclassand by default is inetOrgPerson. For groups, the propertypa.ldap.group.objectclasshas a default value groupOfUniqueNames which could be changed. -
Configure LDAP authentication parameters
By default, the ProActive Scheduler binds to LDAP in anonymous mode. You can change this authentication method by modifying the property
pa.ldap.authentication.method. This property can have several values:-
none (default value) - the ProActive Resource Manager performs connection to LDAP in anonymous mode.
-
simple - the ProActive Resource Manager performs connection to LDAP with a specified login/password (see below for user password setting).
You can also specify a SASL mechanism for LDAPv3. There are many SASL available mechanisms: cram-md5, digest-md5, kerberos4. Just set this property to sasl to let the ProActive Resource Manager JVM choose SASL authentication mechanism. If you specify an authentication method different from 'none' (anonymous connection to LDAP), you must specify a login/password for authentication.
There are two properties to set in LDAP configuration file:
-
pa.ldap.bind.login- sets user name for authentication. -
pa.ldap.bind.pwd- sets password for authentication.
-
-
-
Set SSL/TLS parameters
A secured SSL/TLS layer can be useful if your network is not trusted, and critical information is transmitted between the rm server and LDAP, such as user passwords. First, set the LDAP URL property
pa.ldap.urlto a URL of type ldaps://myLdap. Then setpa.ldap.authentication.methodto none so as to delegate authentication to SSL.For using SSL properly, you have to specify your certificate and public keys for SSL handshake. Java stores certificates in a keyStore and public keys in a trustStore. In most of the cases, you just have to define a trustStore with public key part of LDAP’s certificate. Put certificate in a keyStore, and public keys in a trustStore with the keytool command (keytool command is distributed with standard java platforms):
keytool -import -alias myAlias -file myCertificate -keystore myKeyStore
myAlias is the alias name of your certificate, myCertificate is your private certificate file and myKeyStore is the new keyStore file produced in output. This command asks you to enter a password for your keyStore.
Put LDAP certificate’s public key in a trustStore, with the keytool command:
keytool -import -alias myAlias -file myPublicKey -keystore myTrustStore
myAlias is the alias name of your certificate’s public key, myPublicKey is your certificate’s public key file and myTrustore is the new trustStore file produced in output. This command asks you to enter a password for your trustStore.
Finally, in
config/authentication/ldap.cfg, set keyStore and trustStore created before to their respective passwords:-
Set
pa.ldap.keystore.pathto the path of your keyStore. -
Set
pa.ldap.keystore.passwdto the password defined previously for keyStore. -
Set
pa.ldap.truststore.pathto the path of your trustStore. -
Set
pa.ldap.truststore.passwdto the password defined previously for trustStore.
-
-
Use fall back to file authentication
You can use simultaneously file-based authentication and LDAP-based authentication. Then, ProActive Scheduler can check at first user password and group membership in login and group files, as performed in FileLogin method. If user or group is not found in login file, login or group will be searched in LDAP. It uses
pa.rm.defaultloginfilenameandpa.rm.defaultgroupfilenamefiles to authenticate user and check group membership. There are two rules:-
If file group membership checking fails, fall back to group membership checking with LDAP. To activate this behavior set
pa.ldap.group.membership.fallbackto true, in LDAP configuration file. -
If a user is not found in the login file, fall back to authentication and group membership checking with LDAP. To activate this behavior, set
pa.ldap.authentication.fallbackto true, in LDAP configuration file.
-
8.4. PAM
The ProActive Scheduler & Resource Manager are able to interact with Linux PAM (Pluggable Authentication Modules) to check users login/password.
It is not currently possible to retrieve linux system group memberships for users. Thus groups must be managed using the PROACTIVE_HOME/config/authentication/group.cfg file.
In order to enable PAM authentication, follow the following steps:
-
Configure the PAM login methods in the Scheduler and RM settings:
PROACTIVE_HOME/config/rm/settings.inipa.rm.authentication.loginMethod=RMPAMLoginMethod
PROACTIVE_HOME/config/scheduler/settings.inipa.scheduler.core.authentication.loginMethod=SchedulerPAMLoginMethod
-
Copy the file
PROACTIVE_HOME/config/authentication/proactive-jpamto/etc/pam.d(you must be root to perform this operation).You can modify this default PAM configuration file if you need specific PAM policies.
-
Add the user which will start the scheduler process
PROACTIVE_HOME/bin/proactive-serverto the shadow groupsudo usermod -aG shadow your_userAfter this command, the user, called "your_user" here in this example, will be added to group shadow. You may need to logoff/logon before this modification can be effective.
-
Associate, for each Linux system users which will connect to the Scheduler, a ProActive group.
Following the procedure described in chapter File, groups must be associated to existing PAM users in the ProActive group file
PROACTIVE_HOME/config/authentication/group.cfg.In case of PAM users, the login file should not be modified as password authentication will be performed at the Linux system level. Accordingly, you should not use the proactive-users command to associate groups to PAM users.
| Similarly to the LDAP authentication, there is a fallback mechanism for login authentication, with the difference that it is always activated. A user defined in the ProActive login file always has precedence over the same user defined on the Linux system. |
9. Task Termination Behavior
9.1. ProActive Node Graceful Task Termination (SIGTERM) at Killing
The task termination timeout is a cleanup timeout for each task (executed on this Node) after it was killed (through the Scheduler REST API or the Scheduler web portal). By default the task termination timeout is set to 10 seconds but it can be setup on each ProActive Node individually. It can be set at node startup by setting the "proactive.node.task.cleanup.time" property. Example: add "-Dproactive.node.task.cleanup.time=30" (set to 30 seconds as example) to the node startup command.
Find an overview of termination behavior by task and language in section Termination behavior by language.
9.1.1. Step by Step Killing Example
With a 30 seconds termination timeout following steps happen.
Second
The ProActive Node which executes the task receives the kill request. The behavior depends if the Scheduler Server is configured to launch tasks in Forked or Non-Forked Mode.
Forked Mode:
On Linux, a SIGTERM signal is send to the JVM which executes the task. On Windows, the TerminateProcess method of the JVM process which executes the task is executed. That will finally lead to the Task Process being interrupted by:
-
A SIGTERM signal on Linux
-
TerminateProcess method called, on Windows
The task can deal with the killing event and start a cleanup procedure. If the task has started sub-processes it is responsible to initiate graceful termination of the sub-processes. Handling a graceful termination event looks different in each task type and is dependent on the capabilities of the language used. As an example Bash and Jython (Python task) can catch a SIGTERM signal. Java and Groovy task need to register shutdownHooks to achieve similar behavior.
Non-Forked Mode:
In Non-Forked Mode, the task runs in a separate thread in the same JVM as the ProActive Node. Therefore, the thread running the task will be interrupted.
Bash tasks, in Non-Forked Mode, do receive SIGTERM. Java and Groovy tasks will receive an InterruptedException, which can be used to handle the graceful termination of that task and sub-processes. But, Jython (Python tasks) will not receive any notification. If the task has started sub-processes it is responsible to initiate graceful termination of the sub-processes, if possible.
Third
The ProActive Node waits as many seconds as setup in the proactive.node.task.cleanup.time property or until the task is stopped. Example: cleanup timeout is 30 seconds and the task takes 3 seconds to terminate, then the ProActive Node will wait 3 seconds only.
Fourth
The ProActive Node initiates the task process and sub-process removal. This will forcefully kill the whole tree of processes. Another SIGTERM might be send shortly before the forcefully killing (SIGKILL).
Additional information
On Windows the termination procedure is similar. But the Windows SIGTERM equivalent is executing the TerminateProcess method of the process. Whereas the SIGKILL is equivalent to the forceful removal of the running process.
Termination behavior by language
| Language/Execution type | Bash | Python | Java | Groovy |
|---|---|---|---|---|
Forked Mode |
Handle SIGTERM. Task waits cleanup timeout, before being killed. |
Handle SIGTERM. Task waits cleanup timeout, before being killed. |
Add a shutdown hook. Task waits cleanup timeout, before being killed. |
add a shutdown hook. Task waits cleanup timeout, before being killed. |
Forked Mode Run As Me |
Handle SIGTERM. Task waits cleanup timeout, before being killed. |
Handle SIGTERM. Task waits cleanup timeout, before being killed. |
Add a shutdown hook. Task waits cleanup timeout, before being killed. |
Add a shutdown hook. Task waits cleanup timeout, before being killed. |
Non-Forked Mode |
Handle SIGTERM. Task waits cleanup timeout, before being killed. |
Terminates immediately. |
Catch an InterruptedException. Task waits cleanup timeout, before being killed. |
Catch an InterruptedException. Task waits cleanup timeout, before being killed. |
10. User Permissions
All users authenticated in the Resource Manager have their own role according to granted permissions. In ProActive Scheduler, we use the standard Java Authentication and Authorization Service (JAAS) to address these needs.
The file PROACTIVE_HOME/config/security.java.policy-server allows to configure fine-grained access for all users, e.g. who has the right to:
-
Deploy ProActive Nodes
-
Execute jobs
-
Pause the Scheduler
-
etc
11. Monitor the cluster state
Cluster monitoring typically means checking that all ProActive Nodes that were added to ProActive Scheduler are up and running. We don’t track for example the free disk space or software upgrade which can be better achieved with tools like Nagios.
In the Resource Manager Web Interface you can see how many ProActive Nodes were added to the Resource Manager and their usage.
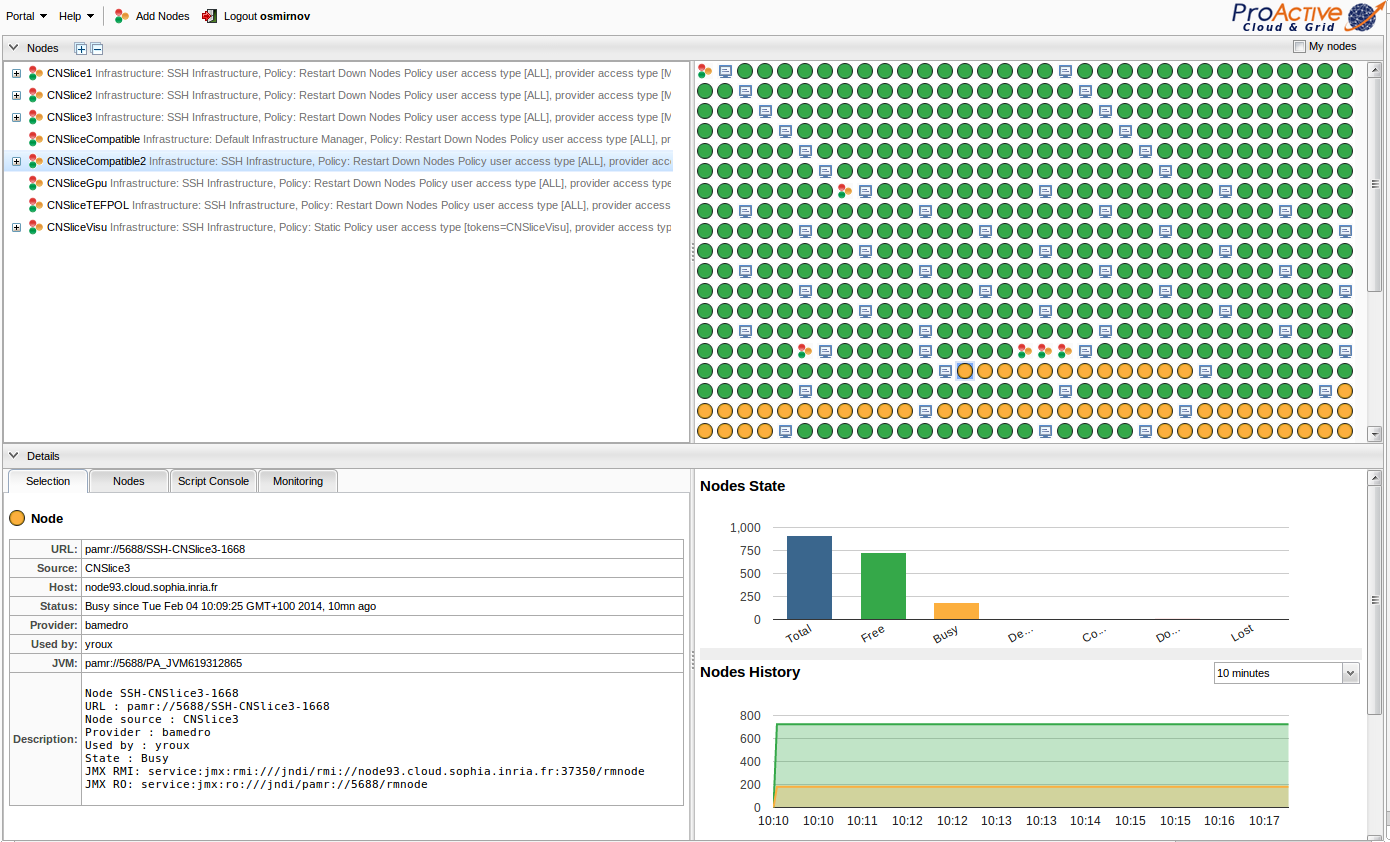
The same information is accessible using the command line:
$ PROACTIVE_HOME/bin/proactive-client --listnodes11.1. ProActive Node States
When you look at your cluster, ProActive Nodes can be in one of the following states:
-
Deploying- The deployment of the node has been triggered by the ProActive Resource Manager but it has not yet been added. -
Lost- The deployment of the node has failed for some reason. The node has never been added to the ProActive Resource Manager and won’t be usable. -
Configuring- Node has been added to the ProActive Resource Manager and is being configured. -
Free- Node is available for computations. -
Busy- Node has been given to user to execute computations. -
To be removed- Node is busy but requested to be removed. So it will be removed once the client will release it. -
Down- Node is unreachable or down and cannot be used anymore.
The state of a ProActive Node is managed by the Resource Manager. However, each Node has a user managed lock status.
11.2. JMX
The JMX interface for remote management and monitoring provides information about the running ProActive Resource Manager and allows the user to modify its configuration. For more details about JMX concepts, please refer to official documentation about the JMX architecture.
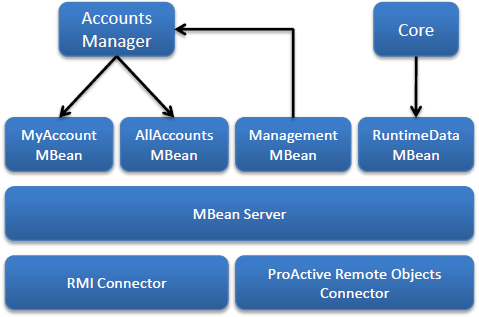
The following aspects (or services) of the ProActive Scheduler are instrumented using MBeans that are managed through a JMX agent.
-
Server status is exposed using the RuntimeDataMBean
-
The Resource Manager status
-
Available/Free/Busy/Down nodes count
-
Average activity/inactivity percentage
-
-
The Accounts Manager exposes accounting information using the MyAccountMBean and AllAccountsMBean
-
The used node time
-
The provided node time
-
The provided node count
-
-
Various management operations are exposed using the ManagementMBean
-
Setting the accounts refresh rate
-
Refresh all accounts
-
Reload the permission policy file
-
MBean server can be accessed by remote applications using one of the two available connectors
-
The standard solution based on Remote Method Invocation (RMI) protocol is the RMI Connector accessible at the following url:
service:jmx:rmi:///jndi/rmi://HOSTNAME:PORT/JMXRMAgentwhere-
HOSTNAME is the hostname on which the Resource Manager is started
-
PORT (5822 by default) is the port number on which the JMX RMI connector server has been started. It is defined by the property pa.rm.jmx.port .
-
-
The ProActive Remote Objects Connector provides ProActive protocol aware connector accessible at the following url:
service:jmx:ro:///jndi/PA_PROTOCOL://HOSTNAME:PORT/JMXRMAgentwhere-
PA_PROTOCOL is the protocol defined by the proactive.communication.protocol property
-
HOSTNAME is the hostname on which the Resource Manager is started
-
PORT is the protocol dependent port number usually defined by the property proactive.PA_PROTOCOL.port
-
The name of the connector (JMXRMAgent by default) is defined by the property rm.jmx.connectorname.
The JMX url to connect to can be obtained from the Authentication API of the Resource Manager or by reading the log file located in PROACTIVE_HOME/logs/RM.log.
In that log file, the address you have to retrieve is the one where the JMX RMI connector server has been started
[INFO 2010-06-17 10:23:27,813] [RM.AbstractJMXHelper.boot] Started JMX RMI connector server at service:jmx:rmi:///jndi/rmi://kisscool.inria.fr:5822/JMXRMAgentOnce connected, you’ll get an access to Resource Manager statistics and accounting.
For example, to connect to the ProActive Scheduler JMX Agent with JConsole tool, just enter the url of the standard RMI Connector, as well as the username and the password.
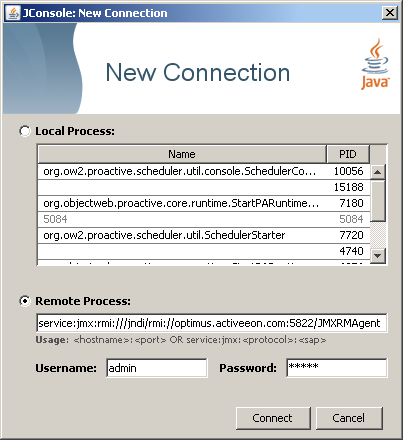
Then depending on the allowed permissions browse the attributes of the MBeans.

11.3. Accounting
The users of ProActive Scheduler request and offer nodes for computation. To keep track of how much node time was consumed or contributed by a particular user, ProActive Scheduler associates a user to an account.
More precisely, the nodes can be manipulated by the following basic operations available to the users
-
The
ADDoperation is a registration of a node in the Resource Manager initiated by a user considered as a node provider. A node can be added, through the API, as a result of a deployment process, through an agent or manually from the command line interface. -
The
REMOVEoperation is the unregistration of a node from the Resource Manager. A node can be removed, through the API, by a user or automatically if it is unreachable by the Resource Manager. -
The
GEToperation is a node reservation, for an unknown amount of time, by a user considered as a node owner. For example, the ProActive Scheduler can be considered as a user that reserves a node for a task computation. -
The
RELEASEoperation on a reserved node by any user.
The following accounting data is gathered by the Resource Manager
-
The used node time: The amount of time other users have spent using the resources of a particular user. More precisely, for a specific node owner, it is the sum of all time intervals from
GETtoRELEASE. -
The provided node time: The amount of time a user has offered resources to the Resource Manager. More precisely, for a specific node provider, it is the sum of all time intervals from
ADDtoREMOVE. -
The provided node count: The number of provided nodes.
The accounting information can be accessed only through a JMX client or the ProActive Resource Manager command line.
12. Run Computation with a user’s system account
Configure a ProActive Node to execute tasks under a user’s system account by ticking the Run as me box in the task configuration. By default authentication is done through a password, but can also be configured using a SSH key.
Find a step by step tutorial here.
For proper execution, the user’s system account must have:
-
Execution rights to the PROACTIVE_HOME directory and all it’s parent directories.
-
Write access to the PROACTIVE_HOME directory.
Logs are written during task execution, as a matter of fact, the executing user needs write access to the PROACTIVE_HOME directory. ProActive does some tests before executing as a different user, those need full execution rights, including the PROACTIVE_HOME parent directories.
| Create a ProActive group which owns the PROACTIVE_HOME directory and has write access. Add every system user, which executes tasks under its own system account, to the ProActive group. |
| On Mac OS X, the default temporary folder is not shared between all users. It is required by the RunAsMe feature. To use a shared temporary folder, you need to set the $TMPDIR environment variable and the Java property java.io.tmpdir to /tmp before starting the ProActive Node. |
| the same applies on Windows. To use a shared temporary folder, create a folder shared by all proactive users e.g. C:\TEMP and define the Java property java.io.tmpdir to C:\TEMP before starting the ProActive Node. |
Example:
proactive-node -Djava.io.tmpdir=C:\TEMP
12.1. Using password
The ProActive Node will try to impersonate the user that submitted the task when running it. It means the username and password must be the same between the Scheduler and the operating system.
12.2. Using SSH keys
A SSH key can be tied to the user’s account and used to impersonate the user when running a task on a given machine (using SSH). The .ssh/authorized_keys files of all machines must be configured to accept this SSH key. The SSH key must require no passphrase.
When login into the scheduler portal, the private key of the user must be provided, this can be done by selecting on the login dialog : More options > Use SSH private key.
To enable this method, set the system property pas.launcher.forkas.method to key when starting a ProActive Node.
Example:
proactive-node -Dpas.launcher.forkas.method=key
12.3. Using passwordless sudo
This configuration, only availabe on linux nodes, allows the impersonation to be performed using passwordless sudo.
To enable it at the system level, edit the /etc/sudoers file to allow passwordless sudo from the account running the proactive node to any users which require impersonation. Passwordless sudo should be enabled for any command.
For example, the following line will allow the proactive account to impersonate to any user:
proactive ALL=(ALL) NOPASSWD: ALL
To enable this configuration on the proactive node, start it with the system property pas.launcher.forkas.method to none
Example:
proactive-node -Dpas.launcher.forkas.method=none
13. Configure Web applications
The ProActive Scheduler deploys automatically several web applications in an
embedded Jetty web server. The binaries and sources associated to the web
applications can be found in PROACTIVE_HOME/dist/war.
To configure Web applications, for instance the HTTP port to use, edit the PROACTIVE_HOME/config/web/settings.ini file.
|
Web applications are deployed on the host using the HTTP port 8080 by default. The local part of the URL is based on the WAR files found in PROACTIVE_HOME/dist/war.
For instance, the Scheduler web portal is available at http://localhost:8080/scheduler.
13.1. Enable HTTPS
ProActive Workflows and Scheduling provides support for HTTPS. Similarly to
other web settings, HTTPS related properties are defined in
PROACTIVE_HOME/config/web/settings.ini and any update necessitates a restart
of the Scheduler instance.
Enabling HTTPS requires to set web.https to true but also to define a path
to a valid keystore through
web.https.keystore along with its associated password
by using web.https.keystore.password. A default keystore is provided for
testing purposes, however it must not be used in production.
When you are using the default keystore or a custom keystore with a self-signed
certificate you need to enable web.https.allow_any_certificate and optionally
web.https.allow_any_hostname if your certificate Common Name (CN) does not
match the fully qualified host name used for the machine hosting the Web
applications.
Port 8443 is used for listening to HTTPS connections.
This port number prevents to have root access for deploying web applications.
However, you can change it by editing web.https.port value.
When HTTPS is set up, you can automatically redirect any HTTP request from
users to the secured version of the protocol to make sure exchanged information
is protected. It requires to enable web.redirect_http_to_https.
Unlike other web applications, the Scheduler, the Resource Manager and the studio web portals together with the Proactive cloud watch, Cloud automation service, Job planner and Notification service require manual configuration based on your HTTPS settings. The configuration files to edit are respectively in
-
PROACTIVE_HOME/dist/war/scheduler/scheduler.conf -
PROACTIVE_HOME/dist/war/rm/rm.conf -
PROACTIVE_HOME/config/web/settings.ini -
PROACTIVE_HOME/dist/war/proactive-cloud-watch/WEB-INF/classes/application.properties -
PROACTIVE_HOME/dist/war/cloud-automation-service/WEB-INF/classes/application.properties -
PROACTIVE_HOME/dist/war/job-planner/WEB-INF/classes/application.properties -
PROACTIVE_HOME/dist/war/notification-service/WEB-INF/classes/application.properties
| If you are familiar with Nginx or a similar web server, you can also use it to enable HTTPS connection to Web applications. It has the advantage to make it possible to have ProActive web applications and additional ones to coexist. |
13.1.1. Creating a valid keystore
Java is bundled with some utility binaries such as keytool. This last allows to create and manage a keystore but also to generate keys and certificates.
With a self-signed certificate
Generating a new self-signed certificate imported in a new keystore with a custom password is as simple as executing the following command:
$JAVA_HOME/bin/keytool -keystore keystore -alias jetty -genkey -keyalg RSA -validity 365This command prompts for information about the certificate and for a password to
protect both the keystore and the keys within it. The only mandatory responses
are to provide a password and the Fully Qualified Domain Name of the server. Once
done, the value for properties web.https.keystore and
web.https.keystore.password must be adapted based on the information you have
entered.
For more information, please look at the Jetty documentation.
With a trusted certificate
The first step is to obtain a trusted certificate that is valid for your Fully Qualified Domain Name (FQDN). This process differs from a Certification Authority (CA) to another. In the following, it is assumed that Let’s Encrypt is used. By way of illustration, Digital Ocean provides examples for CentOS and Ubuntu.
Assumming your FQDN is example.org, then after obtaining a certificate you will
get the following PEM-encoded files in /etc/letsencrypt/live/example.org:
-
cert.pem: Your domain’s certificate
-
chain.pem: The Let’s Encrypt chain certificate
-
fullchain.pem: cert.pem and chain.pem combined
-
privkey.pem: Your certificate’s private key
Before loading the key and the certificate into a new keystore that is recognized by ProActive Workflows and Scheduling, you need to combine them into a PKCS12 format file. You can achieve this action by means of the following OpenSSL command:
openssl pkcs12 \
    -inkey /etc/letsencrypt/live/example.org/privkey.pem \
    -in /etc/letsencrypt/live/example.org/cert.pem \
    -export -out jetty.pkcs12
Then, you can load the resulting PKCS12 file into a JSSE keystore with keytool:
keytool -importkeystore -srckeystore jetty.pkcs12 \
    -srcstoretype PKCS12 -destkeystore keystore
Both commands prompt for a password. You need to use the same and set it as a
value to property web.https.keystore.password. The resulting keystore file
corresponds to the file whose path must be used for property
web.https.keystore.
| Starting from update 101, Java 8 trusts Lets Encrypt certificates. However, if you are using a less recent version of Java for running JVMs related to ProActive Workflows and Scheduling, you will need to update the truststore of your Java installation. |
13.2. Enable VNC remote visualization in the browser
The Rest API web application embeds a proxy to allow the remote display visualization of a ProActive Node running a given task via a VNC server from the browser. To enable this feature, the scheduler has to be configured as follows:
-
configure the proxy: edit the
PROACTIVE_HOME/config/web/settings.inifile and setnovnc.enabledto true in order to start the proxy. -
configure the scheduler portal to use the proxy when opening a new tab browser that shows the remote visualization: edit the
PROACTIVE_HOME/dist/war/scheduler/scheduler.conf.-
Set
sched.novnc.urlto the public address of the proxy. This public address is the public address of the host where the sheduler is started and the port specified by the optionnovnc.portin the filePROACTIVE_HOME/config/web/settings.ini -
Set
sched.novnc.page.urlto the public address of the VNC client to be executed in the browser. The client is located in the REST API with the filenovnc.html.
-
For more information, see https://github.com/ow2-proactive/scheduling/blob/master/rest/README-novnc.txt
13.3. Catalog
The Catalog stores ProActive Objects and in particular ProActive Workflows through a REST API. It is subdivided into buckets. Each bucket has a unique name and stores zero, one or more versioned ProActive Objects.
By default, ProActive objects are persisted on disk using the embedded HSQL database.
The data is located in PROACTIVE_HOME/data/db/catalog.
The Catalog is a WAR file which contains a configuration file. More information regarding the Catalog configuration can be found in Catalog Properties.
A complete documentation of the Catalog REST API is available by default on:
http://localhost:8080/catalog/swagger-ui.html
This documentation is automatically generated using Swagger.
14. Configure script engines
Most script engines do not need any configuration. This section talks about the script engines which can be configured individually.
14.1. Docker Compose (Docker task)
The Docker Compose script engine is a wrapper around the Docker Compose command. It needs to have Docker Compose
and Docker installed, in order to work. The Docker Compose script engine has a configuration file which configures each ProActive Node individually.
The configuration file is in PROACTIVE_HOME/config/scriptengines/docker-compose.properties.
docker-compose.properties has the following configuration options:
docker.compose.command=[docker-compose executable example:/usr/local/bin/docker-compose] --- Defines which Docker Compose executable is used by the script engine.
docker.compose.sudo.command=[sudo executable example:/usr/bin/sudo] --- Defines the sudo executable which is used. The sudo property is used to give the Docker Compose command root rights.
docker.compose.use.sudo=false --- Defines whether to execute Docker Compose with sudo [true] or without sudo [false]
docker.host= --- Defines the DOCKER_HOST environment variable. The DOCKER_HOST variable defines the Docker socket which the Docker client connects to. That property is useful when accessing a Docker daemon which runs inside a container or on a remote machine. Further information about the DOCKER_HOST property can be found in the official Docker documentation.
14.2. Perl scripts execution (Perl task)
Perl should be installed on your machine. By default the perl engine is installed in Linux and Mac Os. Please install the perl engine on Windows.
The execution mechanism of perl tasks is based on running perl files on your machine.
If you encountered the issues, please check if you have installed Perl properly on you machine. In order to verify this you can follow the next steps:
-
For example you should to be able to launch the command 'perl -V'.
-
Then from command line you should be able to launch a simple perl file (perl yourPerlFile.pl).
14.3. Python Script Engine (Python task)
Python should be installed on your machine. By default Python2 is installed on Linux and Mac OS. If another version of Python is required, it should be installed on your machine in advance.
More over, the native Python Script Engine depends on the py4j library in order to communicate with our Java classes. Please follow the following step to install it:
-
With Python2:
pip install py4j -
With Python3:
pip3 install py4j
Further information can be found in the official py4j documentation.
15. Extending ProActive Scheduling Policy
In order to decide which pending Tasks are executed, the ProActive Scheduler uses a Scheduling Policy.
This policy allows, for example, to execute task in a First-In-First-Out order or according to priorities.
The default Scheduling Policy can be extended to perfectly fit with an organization scheduling constraints.
Moreover, policy can be changed dynamically throught Java API org.ow2.proactive.scheduler.common.Scheduler::changePolicy(String policyClassName).
In the following example, we show how a different policy can be used to control Task Scheduling.
15.1. Earliest deadline first (EDF) policy
To use the earliest deadline first (EDF) policy, edit the file PROACTIVE_HOME/config/scheduler/settings.ini and change the following line:
pa.scheduler.policy=org.ow2.proactive.scheduler.policy.ExtendedSchedulerPolicy
to:
pa.scheduler.policy=org.ow2.proactive.scheduler.policy.edf.EDFPolicyExtended
15.2. License Policy Example
To use the LicenseSchedulingPolicy, edit the file PROACTIVE_HOME/config/scheduler/settings.ini and change the following line:
pa.scheduler.policy=org.ow2.proactive.scheduler.policy.ExtendedSchedulerPolicy
to:
pa.scheduler.policy=org.ow2.proactive.scheduler.policy.license.LicenseSchedulingPolicy
The LicenSchedulingPolicy requires an extra configuration:
The maximum number of licenses per software must be specified into PROACTIVE_HOME/config/scheduler/license.properties like this
software_A = 3
software_B = 2
From now, given a task, user can specify which software licenses are required, by adding the REQUIRED_LICENSES generic information, which value can be
softwareA,softwareB
As expected, if 10 replicated tasks requiring software_A,software_B licenses are submitted, they will be executed 3 by 3.
16. Addons
16.1. Get Notification on Job Events Configuration
In order to enable this functionality the following properties should be set in config/scheduler/setting.ini:
pa.scheduler.notifications.email.enabled = true
pa.scheduler.notifications.email.from = username@example.com
To configure the email sender on Scheduler, the configuration file config/scheduler/emailnotification.properties should be filled in, please refer to
SMTP configuration examples for examples.
16.2. Email notification
The email notification addons includes an utility Java class but also a Groovy task (accessible from the Studio Web app) that allow to send an email from a ProActive Workflow.
The task assumes that configuration for connecting to an SMTP server is done using third-party credentials. It requires to define some values as key/value pairs in the third-party credentials associated to the user that runs the task.
This configuration can be achieved from the Scheduler Web portal, the ProActive client or even through the REST API. Please see Third-party credentials for more information.
16.2.1. SMTP configuration examples
Gmail
Password authentication to Google servers requires extra configuration.
| Key | Value |
|---|---|
mail.smtp.password |
user_password |
mail.smtp.host |
smtp.gmail.com |
mail.smtp.starttls.enable |
true |
mail.smtp.ssl.trust |
smtp.gmail.com |
mail.smtp.username |
16.3. Statistics on ProActive Jobs and Resource Usage
This addon generates a gantt chart to visualize executions of jobs and tasks, per node and over the time.
16.3.1. Installation
To enable this addon, a Node connected to the Resource Manager must have access to the PA_PLOT application configured in it.
Requirements
-
Linux, Windows, or MacOSX.
-
Python 2.7 or 3.5.
-
Bokeh, dateutil, requests, pytest, sphinx.
Requirements setup with Anaconda
Anaconda is the fastest and easiest way to install all requirements. You do not need internet access on the installation host.
-
Download and install Anaconda
-
Linux/MacOSX::
source <anaconda root>/bin/activate -
Windows:
Run "Anaconda Prompt"
Requirements setup with Miniconda
Miniconda is a stripped down version of Anaconda, much smaller in size. The downside is that it normally requires internet access on the machine where it is installed.
-
Download and install Miniconda
-
If behind a proxy, compile condarc
-
Linux/MacOSX::
source <anaconda root>/bin/activateWindows:
Run "Anaconda Prompt"
-
Execute::
conda install -y python-dateutil bokeh requests -
Addional optional dependencies to run the unit tests:
- Python 2.7
-
conda install -y pytest mock - Python 3.5
-
conda install -y pytest
-
Additional optional dependencies to regenerate the documentation::
conda install -y sphinx
17. Scheduler start tuning
Scheduler start can be customized by automatically triggering user’s scripts.
A list of scripts can be specified in PROACTIVE_HOME/config/scheduler/settings.ini
following this
pa.scheduler.startscripts.paths=/your/script1/path;/your/script2/path;/your/script3/path
For example, load-examples.groovy which is executed by default at scheduler start, has in charge the full deployment of proactive-examples by: populating the running Catalog, exposing as templates specific workflows and copying workflows dependencies into dataspaces.
18. Performance tuning
18.1. Database
By default, ProActive Scheduler is configured to use HSQLDB embedded database. This last is lightweight and does not require complex configuration. However, it cannot compete with more conventional database management systems, especially when the load increases. Consequently, it is recommended to setup an RDBMS such as MariaDB, Postgres or SQL Server if you care about performance or notice a slowdown.
ProActive Workflows and Scheduling distribution is provided with several
samples for configuring the Scheduler and Resource Manager to use most
standard RDBMS.
You can find these examples in PROACTIVE_HOME/config/rm/templates/ and
PROACTIVE_HOME/config/scheduler/templates/ folders.
18.1.1. Indexes
The Scheduler and RM databases rely on Hibernate to create and update the database schema automatically on startup. Hibernate is configured for adding indexes on frequently used columns, including columns associated to foreign keys. The goal is to provide a default configuration that behaves in a satisfactory manner with the different features available in the Scheduler. For instance, the Jobs housekeeping feature requires indexes on most foreign keys since a Job deletion may imply several cascade delete.
Unfortunately, each database vendor implements its own strategy regarding indexes on foreign keys. Thus, some databases such as MariaDB and MySQL automatically add indexes for foreign keys whereas some others like Postgres or Oracle do not add such indexes by default. Besides, Hibernate does not offer control over this strategy. As a consequence, this difference of behaviour, once linked to our default configuration for Hibernate, may lead to duplicate indexes (two indexes with different names for a same column) that are created for columns in RM and Scheduler tables.
In case you are using in production MySQL, MariaDB or a similar database that automatically adds indexes on foreign keys, it is strongly recommended to ask your DBA to identify and delete duplicate indexes created by the database system since they may hurt performances.
18.1.2. Housekeeping
The Scheduler provides a housekeeping mechanism that periodically removes finished jobs from the Scheduler Portal. It can also remove jobs and all its data from the database to save space. This mechanism has two phases:
-
Once a job is finished, it sets its scheduled time for removal (the job expiration date)
-
Actual cleaning of expired jobs from the scheduler and/or the database will be periodically triggered and performed in a bulk operation
The following parameters are accessible in the scheduler config file.
One can edit the pa.scheduler.core.automaticremovejobdelay parameter to set the delay before
marking a job to be removed.
The pa.scheduler.core.removejobdelay parameter can be used in the case where the delay should only
start once the job result has been accessed.
The housekeeping mechanism is periodically triggered through the cron
expression pa.scheduler.core.automaticremovejobcronexpression.
As the pa.scheduler.job.removeFromDataBase property is set to true by default,
a query is executed in-base to remove all jobs that qualify for the bulk removal.
18.1.3. Database impact on job submission performance
The choice of the database provider can influence the Scheduler and Resource Manager performance overall. In the following figure, we see the job submission time between different database providers:
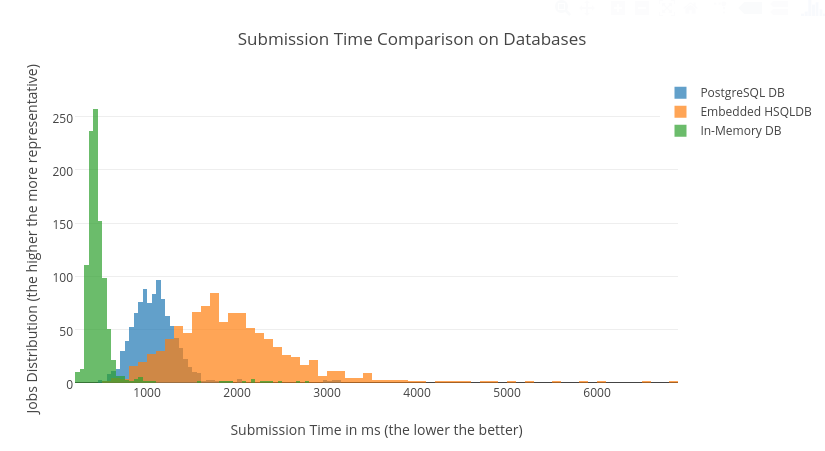
On a 1000-jobs submission basis across ProActive’s embedded database, the in-memory database and a standalone PostgreSQL server, we can see that the in-memory database is in fact faster and more consistent in speed than the default embedded database. However the in-memory database has no persistence of the data on disk, as opposed to the embedded database. A standalone database is a good tradeoff between speed and data resilience.
The embedded database is used by default in ProActive. To switch to an in-memory database, you need to modify the following files:
PROACTIVE_HOME/config/scheduler/database.properties:
Replace the default value of hibernate.connection.url to:
hibernate.connection.url=jdbc:hsqldb:mem:scheduler;hsqldb.tx=mvcc;hsqldb.lob_file_scale=1PROACTIVE_HOME/config/rm/database.properties:
Replace the default value of hibernate.connection.url to:
hibernate.connection.url=jdbc:hsqldb:mem:rm;hsqldb.tx=mvcc;hsqldb.lob_file_scale=1To switch to a standalone database, see Database.
18.1.4. Database impact on task creation performance
The choice of the database provider influences task creation time. In the following figure, we see the task creation time for different database providers:
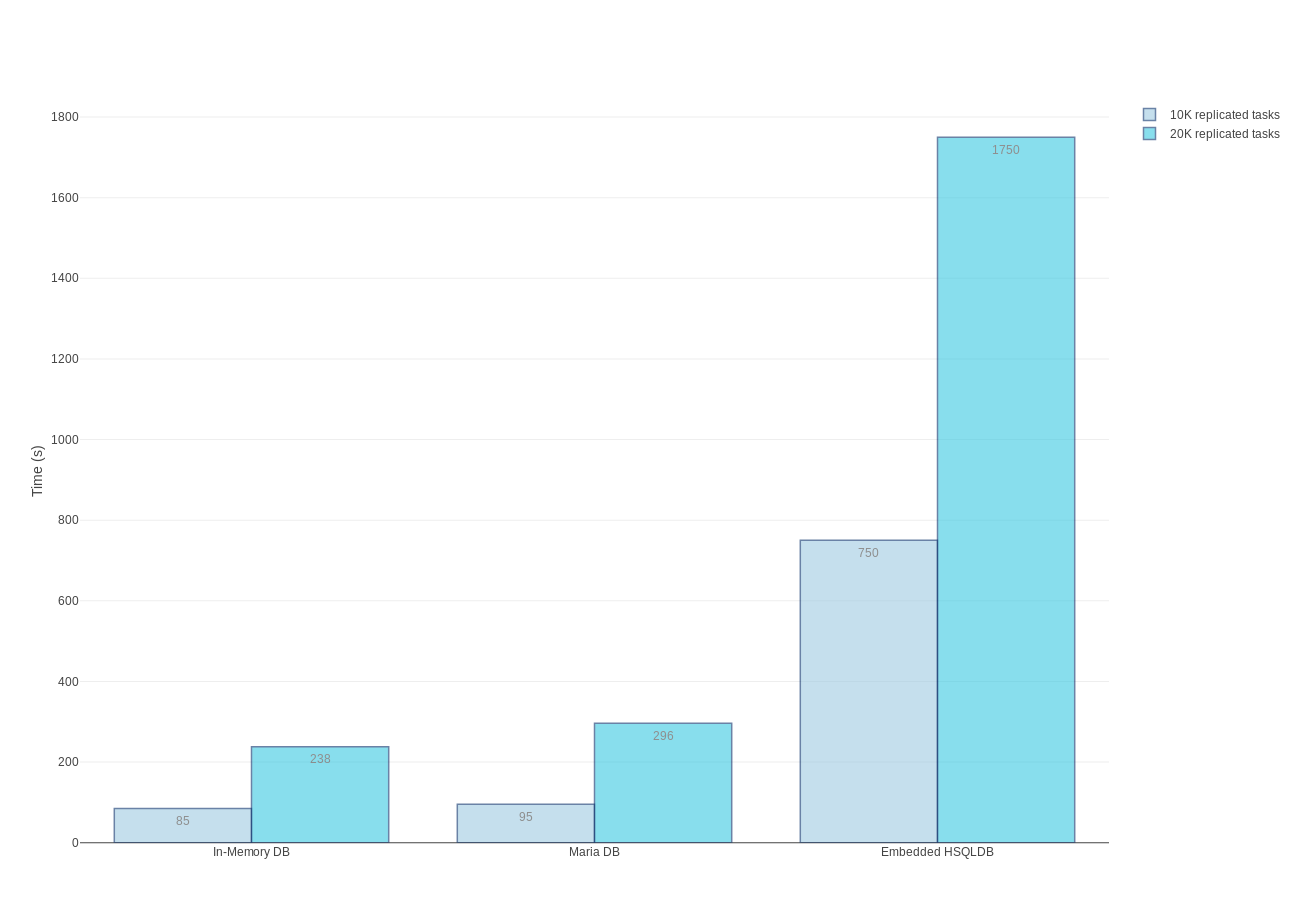
Each experiment, consists of submitting one replicated job with some number of replicated tasks, and measuring time to create all these replicated tasks.
18.2. Tuning Linux for 15K nodes
It is necessary to tune underlying Linux system, in case there will be plenty of nodes in the Resource Manager.
It is mandatory to allow having a large number of running processes and open files.
For example, on 15.000 nodes, the recommended ulimit settings for running processes and open files are:
nproc soft/hard 100000
nofile soft/hard 65536
In addition, we recommend to have at least 16GB RAM for 15.000 nodes.
19. Nodes and Task Recovery
The Scheduler can be started in recovery mode. If so, the Scheduler will try to restore Resource Manager nodes and ProActive tasks that were running in the previous execution of the Scheduler. The nodes and task recovery feature makes sure you do not lose on-going computations if the Scheduler experiences a failure.
19.1. Use Case and Scope of the Feature
Suppose that at an instant T the Scheduler is running tasks. Without the nodes and task recovery feature, if the Scheduler crashed at instant T, then the tasks that were on-going would be re-scheduled on any node and re-executed from the beginning when the Scheduler restarts. With the nodes and task recovery feature enabled, when the Scheduler restarts it will retrieve the previous RM nodes and the on-going tasks, and the execution of the tasks will continue and finish as if there was no failure of the Scheduler.
| The nodes and task recovery feature is not applicable when the Scheduler is cleanly stopped or exits normally. This is a mechanism that is only applicable upon failure of the Scheduler (machine crash, abrupt exit). |
19.2. How Does Nodes and Task Recovery Work?
At startup, the Scheduler checks the nodes and the tasks that were previously persisted in database to be able to restore their state. Here are the different cases that can occur at recovery time:
-
If a node that is found in database is still alive, the node’s information is restored in the Resource Manager. The same restoration mechanism is applied for running tasks in the Scheduler.
-
If however, no node is found in database for a given node source, then the node recovery will not take place for this node source. Instead, the nodes will be re-deployed like for the first time.
-
If a node that is found in database is not alive at recovery time, then the node will also be recreated automatically.
A recovery is not a restart, and as such a clean restart of the Scheduler will not preserve on-going tasks and running nodes. Indeed, in the case of a regular shutdown of the Scheduler, the nodes are cleaned and removed from the Resource Manager before the Scheduler exits. Thus, there will be no nodes and no running tasks to recover when the Scheduler is started again.
To handle the particular situation in which the Scheduler is down when a running task terminates, a proper configuration of the Scheduler allows the task to hold the result until the Scheduler is up and running again.
19.3. Nodes and Task Recovery Configuration
19.3.1. Restrictions
The nodes recovery is not available for Scheduler settings that use the PAMR protocol. This is because this communication protocol relies on router endpoint identifiers that are regenerated when connections are reestablished.
The nodes recovery is also not available on the Nodes that are launched at the Scheduler startup by default. However you get the choice to activate or deactivate the feature when you create your own Node Source. By default, the nodes recovery is activated for any new Node Source.
19.3.2. How to make sure that nodes and task recovery is enabled
| The nodes and task recovery feature requires a proper configuration to ensure that nodes and tasks are kept alive during the down time of the Scheduler. |
-
Resource Manager configuration (
PROACTIVE_HOME/config/rm/settings.ini)In order to enable the nodes and task recovery feature, make sure that the
pa.rm.nodes.recoveryproperty of the Resource Manager is set totrue. This property is set totrueby default. -
Node configuration
The ProActive nodes should be started with a configuration that keeps them alive if the Scheduler fails. Node properties can be set at node startup:
-
Use
-Dproactive.node.ping.delayto specify how often the node will try to communicate with the Resource Manager. The default for this property is 30 seconds. -
Use
-Dproactive.node.reconnection.attemptsto specify how many times the node will try to reconnect with the Resource Manager. The default for this property is to attempt 10 times.
These two properties define the total delay for the node to reconnect to the Resource Manager. By default, the total delay of reconnection is 5 minutes. When this total delay is consumed, the node shuts itself down, and the node recovery will not be applicable any more for this node.
-
-
Scheduler configuration (
PROACTIVE_HOME/config/scheduler/settings.ini)In order to make sure that a task will attempt several times to send back its result to the Scheduler, you must set the properties:
-
pa.scheduler.core.node.ping.attemptsto specify the number of times a finished task will try to contact the Scheduler. The default for this property is to attempt only once. -
pa.scheduler.core.nodepingfrequencyproperty to define a delay (in seconds) in between two attempts. The default for this property is 20 seconds.
If the Scheduler is still not up and running after the total delay defined by these properties (which is 20 seconds by default), then the task’s result will be lost forever. Note that these two properties are also used by the scheduler to decide when to re-schedule tasks.
-
19.3.3. How to disable nodes and task recovery
You can completely disable the nodes and task recovery feature by setting the pa.rm.nodes.recovery property of the
Resource Manager to false.
In addition, the nodes and task recovery can be configured per Node Source at creation time. This configuration will
be applied only if the global pa.rm.nodes.recovery property is set to true. The specification of nodes recovery per
Node Source can be done through the Resource Manager Web Interface, through the Resource
Manager REST API, and through the Command Line client (CLI).
-
Through the Web Interface, the form to create a new Node Source contains a checkbox that controls nodes recoverability.
-
Through the REST API, the
nodesRecoverableparameter of therm/nodesource/createandrm/nodesourceREST endpoints specify whether the ProActive Nodes of a new Node Source will be recoverable. Nodes recovery will be disabled if the given value does not match any case of the "true" string. -
Through the CLI, the
creatensanddefinenscommands take an optional parameter to specify whether the ProActive Nodes of a new Node Source will be recoverable. Nodes recovery will be disabled if the optional parameter is provided and does not match any case of the "true" string.
19.4. Nodes and Task Recovery on Cloud Platforms
The nodes and task recovery feature of ProActive is also available for the deployments on Microsoft Azure and Amazon EC2 clouds.
For these platforms, when the Scheduler is restarted after a failure, it will try to contact the nodes that are deployed on the cloud instances:
-
If the nodes are alive then the recovery proceeds like with non-cloud infrastructures.
-
If the nodes cannot be contacted, the recovery mechanism will try to re-deploy them by asking the instances to run a node deployment script.
-
If the script fails, it means that the cloud instances do not exist anymore, so the recovery mechanism will trigger a re-deployment including the re-creation of the instances.
19.5. Nodes and Task Recovery Performance Tuning
By default, the persistence of the node states is slightly delayed in order to batch several database operations in the same transaction. This is done in order to minimize the execution time overhead of the nodes and task recovery feature. However, this default batching mechanism can be overriden to adapt the delay, or to disable batching.
The properties that allow performance tuning are the following:
-
pa.rm.node.db.operations.delaydefines the delay in milliseconds that is applied when the RM requests the persistence of a node. By default the delay is set to 100 milliseconds. If the value of this property is set to0, then all database operations related to the persistence of nodes are executed immediately and synchronously. -
pa.rm.nodes.db.operations.update.synchronousdefines whether the node updates are persisted synchronously (with no delay) whenever it is possible. By default this property is set totrue.
20. Troubleshooting
20.1. Logs
If something goes wrong the first place to look for the problem are the Scheduler logs. By default all logs are in
PROACTIVE_HOME/logs directory.
Users submitting jobs have access to server logs of their jobs through the Scheduler Web interface

20.2. Common Problems
20.2.1. 'Path too Long' Errors When Unzipping Windows Downloads
When you unzip a Windows package using the default Windows compression utility, you might get errors stating that the path is too long. Path length is determined by the Windows OS. The maximum path, which includes drive letter, colon, backslash, name components separated by backslashes, and a terminating null character, is defined as 260 characters.
Workarounds:
-
Move the Zip file on the root level of the system drive and unzip from there.
-
Use a third-party compression utility. Unlike the default Windows compression utility, some third-party utilities allow for longer maximum path lengths.
21. Reference
21.1. Scheduler Properties
Scheduler Properties are read when ProActive Scheduler is started therefore you need to restart it to apply changes.
The default configuration file is SCHEDULER_HOME/scheduler/settings.ini.
# INFORMATION : each file path must be absolute, OR relative to the Scheduler_Home path
#-------------------------------------------------------
#-------------   SCHEDULER PROPERTIES   ----------------
#-------------------------------------------------------

# Scheduler home directory (this default value should be proper in most cases)
pa.scheduler.home=.

# Scheduler rest url. If not defined, it is set automatically when starting the server.
# When the server has a public endpoint, different from the hostname available on the machine, this property should be used to correctly set the url
#pa.scheduler.rest.url=

#Catalog rest url. If not defined, it is set automatically when starting the server. Same as scheduler rest url
#pa.catalog.rest.url=

# Timeout for the scheduling loop (in millisecond)
pa.scheduler.core.timeout=10000

# Auto-reconnection to the Resource Manager default reconnection attempt every 10 seconds for 1 hour
pa.scheduler.core.rmconnection.autoconnect = true
pa.scheduler.core.rmconnection.timespan = 10000
pa.scheduler.core.rmconnection.attempts = 360

# Number of threads used to execute client requests
# (e.g. change Job priority, kill Job, etc.)
pa.scheduler.core.clientpoolnbthreads=5

# Number of threads used to execute internal scheduling operations
# (handle task termination, restart task, etc.)
pa.scheduler.core.internalpoolnbthreads=5

# Number of threads used to ping tasks regularly to get its progress and detect node failures
pa.scheduler.core.taskpingerpoolnbthreads=10

# Number of threads used to delay operations which are NOT related to housekeeping
# (e.g. scheduler shutdown, handle task restart on error, etc.)
pa.scheduler.core.scheduledpoolnbthreads=2

# Number of threads used to handle scheduled operations with the housekeeping feature
pa.scheduler.core.housekeeping.scheduledpoolnbthreads=5

# Check for failed node frequency in second
# Also used by the node to ping the scheduler after finishing a task
pa.scheduler.core.nodepingfrequency=20

# The scheduler will decide to restart a task, after a given tolerated number of failed attempts.
# A value of zero means that the scheduler will restart a task after the first failure.
# Also used by a node to retry to send the result of a task to the scheduler
pa.scheduler.core.node.ping.attempts=1

# Scheduler default policy full name
pa.scheduler.policy=org.ow2.proactive.scheduler.policy.ExtendedSchedulerPolicy

# Defines the maximum number of tasks to be scheduled in each scheduling loop.
pa.scheduler.policy.nbtaskperloop=10

# Path of the license properties file
pa.scheduler.license.policy.configuration=config/scheduler/license.properties

# Name of the JMX MBean for the scheduler
pa.scheduler.core.jmx.connectorname=JMXSchedulerAgent

# Port of the JMX service for the Scheduler.
pa.scheduler.core.jmx.port=5822

# Accounting refresh rate from the database in seconds
pa.scheduler.account.refreshrate=180

# RRD data base with statistic history
pa.scheduler.jmx.rrd.name=data/scheduler_statistics.rrd

# RRD data base step in seconds
pa.scheduler.jmx.rrd.step=4

# User session time. User is automatically disconnect after this time if no request is made to the scheduler. 8 hours by default.
# negative number indicates that session is infinite (value specified in second)
pa.scheduler.core.usersessiontime=28800

# Timeout for the start task action. Time during which the scheduling could be waiting (in millis)
# this value relies on the system and network capacity
pa.scheduler.core.starttask.timeout=5000

# Maximum number of threads used for the start task action. This property define the number of blocking resources
# until the scheduling loop will block as well.
# As it is related to the number of nodes, this property also define the number of threads used to terminate taskLauncher
pa.scheduler.core.starttask.threadnumber=5

# Maximum number of threads used to send events to clients. This property defines the number of clients
# than can block at the same time. If this number is reached, every clients won't receive events until
# a thread unlock.
pa.scheduler.core.listener.threadnumber=5

# List of the scripts paths to execute at scheduler start. Paths are separated by a ';'.
pa.scheduler.startscripts.paths=tools/LoadPackages.groovy

#-------------------------------------------------------
#----------------   JOBS PROPERTIES   ------------------
#-------------------------------------------------------

# Remove job delay (in seconds). (The time between getting back its result and removing it from the scheduler)
# Set this time to 0 if you don't want the job to be removed.
pa.scheduler.core.removejobdelay=0

# Automatic remove job delay (in seconds). (The time between the termination of the job and removing it from the scheduler)
# Set this time to 0 if you don't want the job to be removed automatically.
pa.scheduler.core.automaticremovejobdelay=0

# Remove job in database when removing it from the scheduler.
# This housekeeping feature can be replaced by a stored procedure
# that runs at the desired period of time (e.g. non-business hours)
# Such an example is available in samples/scripts/database/postgres/
pa.scheduler.job.removeFromDataBase=true

# This cron expression determines the housekeeping call frequency.
# Default value is 10 minutes: this will invoke the housekeeping mechanism
# to remove every jobs which are set to be removed and has their scheduled time for removal reached.
pa.scheduler.core.automaticremovejobcronexpression=*/10 * * * *

# Specific character encoding when parsing the job xml file
pa.file.encoding=UTF-8

#-------------------------------------------------------
#---------------   TASKS PROPERTIES   ------------------
#-------------------------------------------------------
# Initial time to wait before the re-execution of a task. (in millisecond)
pa.scheduler.task.initialwaitingtime=1000

# Maximum number of execution for a task in case of failure (node down)
pa.scheduler.task.numberofexecutiononfailure=2

# If true tasks are ran in a forked JVM, if false they are ran in the node's JVM
pa.scheduler.task.fork=true

# If true tasks are always ran in RunAsMe mode (impersonation). This automatically implies pa.scheduler.task.fork=true (other setting is ignored)
pa.scheduler.task.runasme=false

# Maximum number of tasks in a tasks page
pa.scheduler.tasks.page.size=100

# if the following property is set to a non-empty value, the scheduler will be able to execute only forkenvironment or clean scripts contained
# in the provided directory. All other scripts will be rejected.
#pa.scheduler.script.authorized.dir=

# The pa.scheduler.script.authorized.dir is browsed every refreshperiod time to load authorized scripts.
pa.scheduler.script.authorized.dir.refreshperiod=60000

# Refresh time to reload the security policy file (security.java.policy-server)
pa.scheduler.auth.policy.refreshperiod.seconds=30


#-------------------------------------------------------
#-------------   DATASPACES PROPERTIES   ---------------
#-------------------------------------------------------

# Default INPUT space URL. The default INPUT space is used inside each job that does not define an INPUT space.
# Normally, the scheduler will start a FileSystemServer on a default location based on the TEMP directory.
# If the following property is specified, this FileSystemServer will be not be started and instead the provided dataspace
# url will be used
#pa.scheduler.dataspace.defaultinput.url=

# The following property can be used in two ways.
# 1) If a "pa.scheduler.dataspace.defaultinput.url" is provided, the defaultinput.path property
#   tells the scheduler where the actual file system is (provided that he has access to it). If the scheduler does not have
#   access to the file system where this dataspace is located then this property must not be set.
#       - On windows, use double backslash in the path, i.e. c:\\users\\...
#       - you can provide a list of urls separated by spaces , i.e. : http://myserver/myspace file:/path/to/myspace
#       - if one url contain spaces, wrap all urls in the list between deouble quotes :
#               "http://myserver/myspace"  "file:/path/to/my space"
# 2) If a "pa.scheduler.dataspace.defaultinput.url" is not provided, the defaultinput.path property will tell the scheduler
#   to start a FileSystemServer on the provided defaultinput.path instead of its default location

### the default location is SCHEDULER_HOME/data/defaultinput
#pa.scheduler.dataspace.defaultinput.localpath=

# Host name from which the localpath is accessible, it must be provided if the localpath property is provided
#pa.scheduler.dataspace.defaultinput.hostname=

# The same for the OUPUT (see above explanations in the INPUT SPACE section)
# (concerning the syntax, see above explanations in the INPUT SPACE section)
#pa.scheduler.dataspace.defaultoutput.url=
### the default location is SCHEDULER_HOME/data/defaultoutput
#pa.scheduler.dataspace.defaultoutput.localpath=
#pa.scheduler.dataspace.defaultoutput.hostname=

# The same for the GLOBAL space. The GLOBAL space is shared between each users and each jobs.
# (concerning the syntax, see above explanations in the INPUT SPACE section)
#pa.scheduler.dataspace.defaultglobal.url=
### the default location is SCHEDULER_HOME/data/defaultglobal
#pa.scheduler.dataspace.defaultglobal.localpath=
#pa.scheduler.dataspace.defaultglobal.hostname

# The same for the USER spaces. A USER space is a per-user global space. An individual space will be created for each user in subdirectories of the defaultuser.localpath.
# Only one file server will be created (if not provided)
# (concerning the syntax, see above explanations in the INPUT SPACE section)
#pa.scheduler.dataspace.defaultuser.url=
### the default location is SCHEDULER_HOME/data/defaultuser
#pa.scheduler.dataspace.defaultuser.localpath=
#pa.scheduler.dataspace.defaultuser.hostname=

#-------------------------------------------------------
#----------------   LOGS PROPERTIES   ------------------
#-------------------------------------------------------
# Logs forwarding method
# Possible methods are :
# Simple socket : org.ow2.proactive.scheduler.common.util.logforwarder.providers.SocketBasedForwardingProvider
# SSHTunneled socket : org.ow2.proactive.scheduler.common.util.logforwarder.providers.SocketWithSSHTunnelBasedForwardingProvider
# ProActive communication : org.ow2.proactive.scheduler.common.util.logforwarder.providers.ProActiveBasedForwardingProvider
#
# set this property to empty string to disable log forwarding alltogether
pa.scheduler.logs.provider=org.ow2.proactive.scheduler.common.util.logforwarder.providers.ProActiveBasedForwardingProvider

# Location of server job and task logs (comment to disable job logging to separate files).
# Can be an absolute path or a path relative to the scheduler home.
# If you are interested in disabling all outputs to 'logs/jobs' you must
# also have a look at the property 'pa.rm.logs.selection.location' in 'PROACTIVE_HOME/config/rm/settings.ini'
# Please note that disabling job logging will prevent Jobs and Tasks Server logs to be retrieved
# from the REST API and thus the Scheduler portal.
pa.scheduler.job.logs.location=logs/jobs/

# Size limit for job and task logs in bytes
pa.scheduler.job.logs.max.size=10000

# Format pattern for the task output logs
pa.scheduler.job.task.output.logs.pattern=[%X{job.id}t%X{task.id}@%X{host};%d{HH:mm:ss}] %m %n

# The following parameters are to monitor the quantity of jobs and the impact on memory and DB.
# This feature is disabled by default. The following log settings (in the config/log folder)
# need to be uncommented to enable the polling:
# log4j.logger.org.ow2.proactive.scheduler.core.helpers.TableSizeMonitorRunner
# log4j.logger.org.ow2.proactive.scheduler.core.helpers.JobsMemoryMonitorRunner
#
# Each polling from TableSizeMonitorRunner will print the following information into the logs:
# - JobData (All)
# - JobData (Finished)
# - JobDataVariable
# - JobContent
# - TaskData (All)
# - TaskData (Finished)
# - SelectorData
# - EnvironmentModifierData
# - ScriptData
# - SelectionScriptData
# - TaskDataVariable
# - TaskResultData
# - ThirdPartyCredentialData

# Each polling from JobsMemoryMonitorRunner will print the following information into the logs:
# - pendingJobs
# - runningJobs
# - finishedJobs
# - allJobsActual
# - AllJobsComputed
# - deleteCount
# - updateCount
# - insertCount
# - fetchCount
# - loadCount
# - flushCount

# The last 6 metrics are fetched from the Hibernate Statistics layer.

# Modify the polling frequency for the memory metrics. The default value is 1 minute.
# pa.scheduler.mem.monitoring.freq=* * * * *

# Define verbosity of job description when submitted
# If true, Job and Tasks details are logged (can slow down processes for jobs with many (>500) tasks)
# If false, only Job metadata are logged
pa.scheduler.job.submission.detailed.logging=true

#-------------------------------------------------------
#-----------   AUTHENTICATION PROPERTIES   -------------
#-------------------------------------------------------

# Path to the Jaas configuration file which defines what modules are available for internal authentication
pa.scheduler.auth.jaas.path=config/authentication/jaas.config

# Path to the private key file which is used to encrypt credentials for authentication
pa.scheduler.auth.privkey.path=config/authentication/keys/priv.key

# Path to the public key file which is used to encrypt credentials for authentication
pa.scheduler.auth.pubkey.path=config/authentication/keys/pub.key

# LDAP Authentication configuration file path, used to set LDAP configuration properties
# If this file path is relative, the path is evaluated from the Scheduler dir (ie application's root dir)
# with the variable defined below : pa.scheduler.home.
# else, (if the path is absolute) it is directly interpreted
pa.scheduler.ldap.config.path=config/authentication/ldap.cfg

# Login file name for file authentication method
# If this file path is relative, the path is evaluated from the Scheduler dir (ie application's root dir)
# with the variable defined below : pa.scheduler.home.
# else, the path is absolute, so the path is directly interpreted
pa.scheduler.core.defaultloginfilename=config/authentication/login.cfg

# Group file name for file authentication method
# If this file path is relative, the path is evaluated from the Scheduler dir (ie application's root dir)
# with the variable defined below : pa.scheduler.home.
# else, the path is absolute, so the path is directly interpreted
pa.scheduler.core.defaultgroupfilename=config/authentication/group.cfg

# Property that define the method that have to be used for logging users to the Scheduler
# It can be one of the following values:
#	- "SchedulerFileLoginMethod" to use file login and group management
#	- "SchedulerLDAPLoginMethod" to use LDAP login management
#	- "SchedulerPAMLoginMethod" to use PAM login management
pa.scheduler.core.authentication.loginMethod=SchedulerFileLoginMethod

# Creates a credential file (username.cred) for each successful login in the authentication folder
pa.scheduler.create.credentials.when.login=true

#-------------------------------------------------------
#------------------   RM PROPERTIES   ------------------
#-------------------------------------------------------
# Path to the Scheduler credentials file for RM authentication
pa.scheduler.resourcemanager.authentication.credentials=config/authentication/scheduler.cred

# Use single or multiple connection to RM :
# (If true)  the scheduler user will do the requests to rm
# (If false) each Scheduler users have their own connection to RM using their scheduling credentials
pa.scheduler.resourcemanager.authentication.single=false

# Set a timeout for initial connection to the RM connection (in ms)
pa.scheduler.resourcemanager.connection.timeout=120000

#-------------------------------------------------------
#--------------   HIBERNATE PROPERTIES   ---------------
#-------------------------------------------------------
# Hibernate configuration file (relative to home directory)
pa.scheduler.db.hibernate.configuration=config/scheduler/database.properties

# Drop database before creating a new one
# If this value is true, the database will be dropped and then re-created
# If this value is false, database will be updated from the existing one.
pa.scheduler.db.hibernate.dropdb=false

# This property is used to limit number of finished jobs loaded from the database
# at scheduler startup. For example setting this property to '10d' means that
# scheduler should load only finished jobs which were submitted during last
# 10 days. In the period expression it is also possible to use symbols 'h' (hours)
# and 'm' (minutes).
# If property isn't set then all finished jobs are loaded.
#pa.scheduler.db.load.job.period=

# Defines the maximum number of times a transaction that fails and rollbacks
# will be retried. Each retry is performed after a given amount of time.
# The default value is 1 and any value below 1 is replaced by the default value.
pa.scheduler.db.transactions.maximum.retries=5

# Initial delay to wait in ms before the first retry in case of a transaction
# failure. This delay is multiplied by `pa.scheduler.db.transactions.damping.factor`
# after each retry.
pa.scheduler.db.transactions.sleep.delay=1000

# Defines the factor by which the sleep delay is multiplied after each retry.
pa.scheduler.db.transactions.damping.factor=2

# Batch size to load Jobs from database when scheduler is restarted
pa.scheduler.db.recovery.load.jobs.batch_size=100

# Batch size to fetch parent tasks'results in a merge task
pa.scheduler.db.fetch.batch_size=50

#-------------------------------------------------------
#----------  EMAIL NOTIFICATION PROPERTIES  ------------
#-------------------------------------------------------

# Change emailnotification.properties file to set up the From address for notifications
# and its smtp servers etc.
pa.scheduler.notification.email.configuration=config/scheduler/emailnotification.properties

# Set to true to enable email notifications about finished jobs. Emails
# are sent to the address specified in the generic information of a
# job with the key EMAIL; example:
#    <genericInformation>
#        <info name="EMAIL" value="user@example.com"/>
#    </genericInformation>
pa.scheduler.notifications.email.enabled=false
# From address for notifications emails (set it to a valid address if
# you would like email notifications to work)
pa.scheduler.notifications.email.from=example@username.com

#-------------------------------------------------------
#----------  SYNCHRONIZATION STORE PROPERTIES  ---------
#-------------------------------------------------------

# location of the jdbm database for persistent channels
pa.scheduler.synchronization.db=data/synchronization

#-------------------------------------------------------
#----------------  PORTAL PROPERTIES  ------------------
#-------------------------------------------------------
pa.scheduler.portal.configuration=config/portal/scheduler-portal-display.conf
21.2. Resources Manager Properties
Resource Manager Properties are read when ProActive Scheduler is started therefore you need to restart it to apply changes.
The default configuration file is SCHEDULER_HOME/rm/settings.ini.
#-------------------------------------------------------
#-------------   RMCORE PROPERTIES   ----------------
#-------------------------------------------------------


# definition of all java properties used by resource manager
# warning : definition of these variables can be override by user at JVM startup,
# using for example -Dpa.rm.home=/foo, in the java command

# name of the ProActive Node containing RM's active objects
pa.rm.node.name=RM_NODE

# number of local nodes to start with the Resource Manager
# if value is -1, then the number of local nodes is max(2, numberOfCoreAvailableLocally-1)
pa.rm.local.nodes.number=-1

# ping frequency used by node source for keeping a watch on handled nodes (in ms)
pa.rm.node.source.ping.frequency=45000

# Periodic down and lost nodes removal attempts (cron expression)
# If not set, the down and lost nodes will never be removed automatically
pa.rm.nodes.unavailable.removal.frequency=*/30 * * * *
# Time (in minutes) after which a down or lost node is eligible to periodic removal
# If not set, or if not greater than 0, the down and lost nodes will never be removed automatically
pa.rm.nodes.unavailable.maxperiod=1440

# ping frequency used by resource manager to ping connected clients (in ms)
pa.rm.client.ping.frequency=45000

# The period of sending "alive" event to resource manager's listeners (in ms)
pa.rm.aliveevent.frequency=300000

# timeout for selection script result
pa.rm.select.script.timeout=60000

# number of selection script digests stored in the cache to predict the execution results
pa.rm.select.script.cache=10000

# The time period when a node has the same dynamic characteristics (in ms).
# It needs to pause the permanent execution of dynamic scripts on nodes.
# Default is 5 mins, which means that if any dynamic selection scripts returns
# false on a node it won't be executed there at least for this time.
pa.rm.select.node.dynamicity=300000

# The full class name of the policy selected nodes
pa.rm.selection.policy=org.ow2.proactive.resourcemanager.selection.policies.ShufflePolicy

# Timeout for remote script execution (in ms)
pa.rm.execute.script.timeout=180000

# If set to non-empty value the resource manager executes only scripts from this directory.
# All other selection scripts will be rejected.
# pa.rm.select.script.authorized.dir=

# The pa.rm.select.script.authorized.dir is browsed every refreshperiod time to load authorized scripts.
pa.rm.select.script.authorized.dir.refreshperiod=60000

# timeout for node lookup
pa.rm.nodelookup.timeout=60000

# GCM application (GCMA) file path, used to perform GCM deployments
# If this file path is relative, the path is evaluated from the Resource manager dir (ie application's root dir)
# defined by the "pa.rm.home" JVM property
# else, the path is absolute, so the path is directly interpreted
pa.rm.gcm.template.application.file=config/rm/deployment/GCMNodeSourceApplication.xml

# java property string defined in the GCMA defined above, which is dynamically replaced
# by a GCM deployment descriptor file path to deploy
pa.rm.gcmd.path.property.name=gcmd.file

# Resource Manager home directory
pa.rm.home=.

# Lists of supported infrastructures in the resource manager
pa.rm.nodesource.infrastructures=config/rm/nodesource/infrastructures

# Lists of supported node acquisition policies in the resource manager
pa.rm.nodesource.policies=config/rm/nodesource/policies

# Timeout (ms) for the resource manger to recover a broken node source in scheduler aware policy
pa.rm.scheduler.aware.policy.nodesource.recovery.timeout=10000

# Number of trials for the resource manager to recover a broken node source in scheduler aware policy
pa.rm.scheduler.aware.policy.nodesource.recovery.trial.number=10

# Max number of threads in node source for parallel task execution
pa.rm.nodesource.maxthreadnumber=75

# Max number of threads in selection manager
pa.rm.selection.maxthreadnumber=50

# Max number of threads in monitoring
pa.rm.monitoring.maxthreadnumber=5

# Number of threads in the node cleaner thread pool
pa.rm.cleaning.maxthreadnumber=5

# Maximum node and user history period in seconds (Default, disabled, uncomment to enable 7 days max history)
#pa.rm.history.maxperiod=604800

# Frequency of node history removal (cron expression)
pa.rm.history.removal.cronperiod=*/10 * * * *


# Max number of lines stored from the infrastructure processes output
pa.rm.infrastructure.process.output.maxlines=2000

#Name of the JMX MBean for the RM
pa.rm.jmx.connectorname=JMXRMAgent

#port of the JMX service for the RM.
pa.rm.jmx.port=5822

#Accounting refresh rate from the database in seconds (0 means disabled)
pa.rm.account.refreshrate=180

# RRD data base with statistic history
pa.rm.jmx.rrd.name=data/rm_statistics.rrd

# RRD data base step in seconds
pa.rm.jmx.rrd.step=4

# path to the Amazon EC2 account credentials properties file,
# mandatory when using the EC2 Infrastructure
pa.rm.ec2.properties=config/rm/deployment/ec2.properties

# Defines if the lock restoration feature is enabled on RM startup.
# When set to {@code true}, the RM will try to lock per Node Source
# as many Nodes as there were on the previous run.
#
# The approach is best effort and Node hostname is not considered.
# As a result, Nodes are not necessarily locked on the same host.
pa.rm.nodes.lock.restoration=true

# Defines if the node restoration feature is enabled.
# When set to {@code true}:
# - on RM startup the RM tries to look up the nodes that were present
#   before the scheduler crashed
# - the RM persists node information
pa.rm.nodes.recovery=true

# Insert a delay before a database node source update or any node operation
# is executed. If set to 0, all database operation are executed synchronously.
pa.rm.node.db.operations.delay=500

# If set to {@code true}, and if {@link pa.rm.node.db.operations.delay} is not
# set to 0, then node updates will be executed synchronously as much as possible.
# In this case, node updates can still be postponed if the node creation is still
# pending.
#
pa.rm.nodes.db.operations.update.synchronous=true

# Defines if  the runtime (RT) have to be killed when the resource manager (RM) is shutdown.
pa.rm.shutdown.kill.rt=true

# Defines the maximum number of RMEvents which can be sent to the client in one request.
pa.rm.rest.monitoring.maximum.chunk.size=100


#-------------------------------------------------------
#---------------   AUTHENTICATION PROPERTIES   ------------------
#-------------------------------------------------------

# path to the Jaas configuration file which defines what modules are available for internal authentication
pa.rm.auth.jaas.path=config/authentication/jaas.config

# path to the private key file which is used to encrypt credentials for authentication
pa.rm.auth.privkey.path=config/authentication/keys/priv.key

# path to the public key file which is used to encrypt credentials for authentication
pa.rm.auth.pubkey.path=config/authentication/keys/pub.key

# LDAP Authentication configuration file path, used to set LDAP configuration properties
# If this file path is relative, the path is evaluated from the resource manager dir (ie application's root dir)
# with the variable defined below : pa.rm.home.
# else, (if the path is absolute) it is directly interpreted
pa.rm.ldap.config.path=config/authentication/ldap.cfg

# Login file name for file authentication method
# If this file path is relative, the path is evaluated from the resource manager dir (ie application's root dir)
# with the variable defined below : pa.rm.home.
# else, the path is absolute, so the path is directly interpreted
pa.rm.defaultloginfilename=config/authentication/login.cfg

# Group file name for file authentication method
# If this file path is relative, the path is evaluated from the resource manager dir (ie application's root dir)
# with the variable defined below : pa.rm.home.
# else, the path is absolute, so the path is directly interpreted
pa.rm.defaultgroupfilename=config/authentication/group.cfg

#Property that define the method that have to be used for logging users to the resource manager
#It can be one of the following values :
#	- "RMFileLoginMethod" to use file login and group management
#	- "RMLDAPLoginMethod" to use LDAP login management
#	- "RMPAMLoginMethod" to use PAM login management
pa.rm.authentication.loginMethod=RMFileLoginMethod

# Path to the rm credentials file for authentication
pa.rm.credentials=config/authentication/rm.cred

# Refresh time to reload the security policy file (security.java.policy-server)
pa.rm.auth.policy.refreshperiod.seconds=30

#-------------------------------------------------------
#--------------   HIBERNATE PROPERTIES   ---------------
#-------------------------------------------------------
# Hibernate configuration file (relative to home directory)
pa.rm.db.hibernate.configuration=config/rm/database.properties

# Drop database before creating a new one
# If this value is true, the database will be dropped and then re-created
# If this value is false, database will be updated from the existing one.
pa.rm.db.hibernate.dropdb=false

# Drop only node sources from the data base
pa.rm.db.hibernate.dropdb.nodesources=false

#-------------------------------------------------------
#--------------   TOPOLOGY  PROPERTIES   ---------------
#-------------------------------------------------------
pa.rm.topology.enabled=true

# By default, the computation of distances between nodes is disabled,
# as it implies a very slow node acquisition time. Activate it only if mandatory
pa.rm.topology.distance.enabled=false
# Pings hosts using standard InetAddress.isReachable() method.
pa.rm.topology.pinger.class=org.ow2.proactive.resourcemanager.frontend.topology.pinging.HostsPinger
# Pings ProActive nodes using Node.getNumberOfActiveObjects().
#pa.rm.topology.pinger.class=org.ow2.proactive.resourcemanager.frontend.topology.pinging.NodesPinger

# Location of selection scripts' logs (comment to disable logging to separate files).
# Can be an absolute path or a path relative to the resource manager home.
# If you are interested in disabling all outputs to 'logs/jobs' you must
# also have a look at the property 'pa.scheduler.job.logs.location' in 'PROACTIVE_HOME/config/scheduler/settings.ini'
# Please note that disabling Job logging will prevent Jobs and Tasks Server logs to be retrieved
# from the REST API and thus the Scheduler portal.
pa.rm.logs.selection.location=logs/jobs/

# Size limit for selection scripts' logs in bytes
pa.rm.logs.selection.max.size=10000
21.3. Network Properties
Configuration files related to network properties for the Scheduler and nodes are located respectively in:
-
PROACTIVE_HOME/config/network/server.ini -
PROACTIVE_HOME/config/network/node.ini
If you are using ProActive agents, then the configuration file location differs depending of the Operating System:
-
On Unix OS, the default location is
/opt/proactive-node/config/network/node.ini -
On Windows OS, the default one is
C:\Program Files (x86)\ProActiveAgent\schedworker\config\network\node.ini.
21.3.1. Common Network Properties
The protocol to use by the Server and the nodes can be configured by setting a
value to the property proactive.communication.protocol. It represents the
protocol used to export objects on remote JVMs. At this stage, several protocols
are supported: PNP (pnp), PNP over SSL (pnps), ProActive Message Routing (pamr).
The Scheduler is only able to bind to one and only one address. Usually, this limitation is not
seen by the user and no special configuration is required. The Scheduler tries to use the most suitable network
address available. But sometimes, the Scheduler fails to elect the right IP address or the user wants to use
a given IP address. In such case, you can specify the IP address to use by using theses properties:
proactive.hostname, proactive.net.interface, proactive.net.netmask, proactive.net.nolocal, proactive.net.noprivate.
IPv6 can be enabled by setting the proactive.net.disableIPv6 property to false . By default,
the Scheduler does not use IPv6 addresses.
If none of the proactive.hostname, proactive.net.interface, proactive.net.netmask,
proactive.net.nolocal , proactive.net.noprivate properties is defined, then the following algorithm is used to elect an IP address:
-
If a public IP address is available, then use it. If several ones are available, one is randomly chosen.
-
If a private IP address is available, then use it. If several ones are available, one is randomly chosen.
-
If a loopback IP address is available, then use it. If several ones are available, one is randomly chosen.
-
If no IP address is available at all, then the runtime exits with an error message.
-
If
proactive.hostnameis set, then the value returned by InetAddress.getByName(proactive.hostname) is elected. If no IP address is found, then the runtime exits with an error message.
If proactive.hostname is not set, and at least one of the proactive.net.interface , proactive.net.netmask , proactive.net.nolocal , proactive.net.noprivate is set, then one of the addresses matching all the requirements is elected. Requirements are:
-
If
proactive.net.interfaceis set, then the IP address must be bound to the given network interface. -
If
proactive.net.netmaskis set, then the IP address must match the given netmask. -
If
proactive.net.nolocalis set, then the IP address must not be a loopback address. -
If
proactive.net.noprivateis set, then the IP address must not be a private address. -
proactive.useIPaddress: If set to true, IP addresses will be used instead of machines names. This property is particularly useful to deal with sites that do not host a DNS. -
proactive.hostname: When this property is set, the host name on which the JVM is started is given by the value of the property. This property is particularly useful to deal with machines with two network interfaces.
21.3.2. PNP Protocol Properties
PNP allows the following options:
-
proactive.pnp.port: The TCP port to bind to. If not set PNP uses a random free port. If the specified TCP port is already used, PNP will not start and an error message is displayed. -
proactive.pnp.default_heartbeat: PNP uses heartbeat messages to monitor the TCP socket and discover network failures. This value determines how long PNP will wait before the connection is considered broken. Heartbeat messages are usually sent every default_heartbeat/2 ms. This value is a trade-off between fast error discovery and network overhead. The default value is 30000 ms. Setting this value to 0 disables the heartbeat mechanism and client will not be advertised of network failure before the TCP timeout (which can be really long). -
proactive.pnp.idle_timeout: PNP channels are closed when unused to free system resources. Establishing a TCP connection is costly (at least 3 RTT) so PNP connections are not closed immediately but after a grace time. By default the grace time is 60 000 ms. Setting this value to 0 disables the autoclosing mechanism, connections are kept open forever.
21.3.3. PNP over SSL Properties
PNPS support the same options as PNP (in its own option name space) plus some SSL specific options:
-
proactive.pnps.port: same asproactive.pnp.port -
proactive.pnps.default_heartbeat: same asproactive.pnp.default_heartbeat -
proactive.pnps.idle_timeout: same asproactive.pnp.idle_timeout -
proactive.pnps.authenticate: By default, PNPS only ciphers the communication but does not authenticate nor the client nor the server. Setting this option totrueenable client and server authentication. If set totruethe optionproactive.pnps.keystoremust also be set. -
proactive.pnps.keystore: Specify the keystore (containing the SSL private key) to use. The keystore must be of type PKCS12. If not set a private key is dynamically generated for this execution. Below is an example for creating a keystore by using the keytool binary that is shipped with Java:$JAVA_HOME/bin/keytool -genkey -keyalg RSA -keystore keystore.jks \ -validity 365 -keyalg RSA -keysize 2048 -storetype pkcs12 -
proactive.pnps.keystore.password: the password associated to the keystore used by PNPS.
When using the authentication and ciphering mode (or to speed up the initialization in ciphering only mode),
the option proactive.pnps.keystore must be set and a keystore embedding the private SSL key must be
generated. This keystore must be accessible to ProActive services but kept secret to others. The same applies
to the configuration file that contains the keystore password defined with property
proactive.pnps.keystore.password.
21.3.4. PAMR Protocol Properties
PAMR options are listed below:
-
proactive.pamr.router.address: The address of the router to use. Must be set if message routing is enabled. It can be FQDN or an IP address. -
proactive.pamr.router.port: The port of the router to use. Must be set if message routing is enabled. -
proactive.pamr.socketfactory: The Socket Factory to use by the message routing protocol -
proactive.pamr.connect_timeout: Sockets used by the PAMR remote object factory connect to the remote server with a specified timeout value. A timeout of zero is interpreted as an infinite timeout. The connection will then block until established or an error occurs. -
proactive.pamr.agent.id: This property can be set to obtain a given (and fixed) agent ID. This id must be declared in the router configuration and must be between 0 and 4096. -
proactive.pamr.agent.magic_cookie: The Magic cookie to submit to the router. Ifproactive.pamr.agent.idis set, then this property must also be set to be able to use a reserved agent ID.
PAMR over SSH protocol properties
To enable PAMR over SSH, ProActive nodes hosts should be able to SSH to router’s host without password, using SSH keys.
-
proactive.pamr.socketfactory: The underlying Socket factory, should besshto enable PAMR over SSH -
proactive.pamrssh.port: SSH port to use when connecting to router’s host -
proactive.pamrssh.username: username to use when connecting to router’s host -
proactive.pamrssh.key_directory: directory when SSH keys can be found to access router’s host. For instance /home/login/.ssh -
proactive.pamrssh.address: Correspond to the host that actually runs a PAMR router on the remote side of the SSH tunnel. It may be used to point to a different host than the SSH server itself - making the SSH server to act as a gateway. The parameter is also useful when the PAMR router is running inside a cloud based VM which doesn’t support its public IP address. In that case it can be used to enforce the usage of the remote loopback interface.
21.3.5. Enabling Several Communication Protocols
The next options are available to control multiprocol:
-
proactive.communication.additional_protocols: The set of protocol to use separated by commas. -
proactive.communication.benchmark.parameter: This property is used pass parameters to the benchmark. This could be a duration time, a size, … This property is expressed as a String. -
proactive.communication.protocols.order: A fixed order could be specified if protocol’s performance is known in advance and won’t change. This property explain a preferred order for a subset of protocols declared in the property proactive.communication.additional_protocols. If one of the specified protocol isn’t exposed, it is ignored. If there are protocols that are not declared in this property but which are exposed, they are used in the order choose by the benchmark mechanism.Example : Exposed protocols : http,pnp,rmi Benchmark Order : rmi > pnp > http Order : pnp This will give the order of use : pnp > rmi > http
-
proactive.communication.protocols.order: A fixed order could be specified if protocol’s performance is known in advance and won’t change. This automatically disabled RemoteObject’s Benchmark.
21.4. REST API & Web Properties
REST API Properties are read when ProActive Scheduler is started therefore you need to restart it to apply changes.
The REST API documentation can be found at SCHEDULER_URL/rest/doc.
| The REST API documentation for our try platform is available at https://try.activeeon.com/rest/doc/ |
The default configuration file is SCHEDULER_HOME/web/settings.ini.
### Web applications configuration ###

# web applications in dist/war are deployed by default
web.deploy=true

# the maximum number of threads in Jetty for parallel request processing
web.max_threads=100

# port to use to deploy web applications
web.http.port=8080

# define whether HTTP requests are redirected to HTTPS
# this property has effect only if web.https is enabled
web.redirect_http_to_https=false

# HTTPS/SSL configuration
web.https=false
web.https.port=8443

# WARNING: the following HTTPS default values are for testing purposes only!
# do not use them in production but create your own keystore, etc.

# path to keystore, can be absolute or relative to SCHEDULER_HOME
web.https.keystore=config/web/keystore
web.https.keystore.password=activeeon

# path to truststore, can be absolute or relative to SCHEDULER_HOME
#web.https.truststore=config/web/truststore
#web.https.truststore.password=activeeon

# define whether hostname checking is performed or not when HTTPS
# is used to communicate with the REST API
#web.https.allow_any_hostname=true

# define whether all kind of certificates (e,g. self-signed) are allowed
# or not when HTTPS is used to communicate with the REST API
#web.https.allow_any_certificate=true

# Uncomment and set the following settings if resource downloading must pass through a proxy
#resource.downloader.proxy=127.0.0.1
#resource.downloader.proxy.port=8080
#resource.downloader.proxy.scheme=http

### REST API configuration ###

# will be set by JettyStarter, you will need to set it if you run REST server in standalone mode
#scheduler.url=rmi://localhost:1099

# scheduler user that is used as cache
scheduler.cache.login=watcher
scheduler.cache.password=w_pwd
#scheduler.cache.credential=

# cache refresh rate in ms
rm.cache.refreshrate=3500

# will be set by JettyStarter, you will need to set it if you run REST server in standalone mode
#rm.url=rmi://localhost:1099

# rm user that is used as cache
rm.cache.login=watcher
rm.cache.password=w_pwd
rm.cache.credential=

scheduler.logforwardingservice.provider=org.ow2.proactive.scheduler.common.util.logforwarder.providers.SocketBasedForwardingProvider

#### noVNC integration ####

# enable or disable websocket proxy (true or false)
novnc.enabled=false
# port used by websocket proxy (integer)
novnc.port=5900
# security configuration SSL (ON or OFF or REQUIRED)
novnc.secured=ON
# security keystore for SSL
# to create one for development: keytool -genkey -keyalg RSA -alias selfsigned -keystore keystore.jks -storepass password -validity 360 -keysize 2048
novnc.keystore=keystore.jks
# security keystore password
novnc.password=password
# security keystore key password
novnc.keypassword=password


studio.workflows.user.dir=data/defaultuser/
studio.workflows.template.dir=config/workflows/templates/

# properties used to generate PA ear wrapper
war.wrapper.target.server.http.port=9080
war.wrapper.target.server.https.port=9443
war.wrapper.https.enabled=false
war.wrapper.context.root=/

#### Job Planner REST URL
jp.url=http://localhost:8080/job-planner/planned_jobs

;jetty.log.file=./logs/jetty-yyyy_mm_dd.request.log
21.5. Catalog Properties
Catalog Properties are read from its WAR file.
The default configuration file is located at WEB-INF/classes/application.properties. It can be extended with additional Spring properties.
# Configure logging level
logging.level.org.hibernate=warn
logging.level.org.hibernate.SQL=off
logging.level.org.ow2.proactive.catalog=info
logging.level.org.springframework.web=info

# Embedded server configuration
server.compression.enabled=true
server.contextPath=/

##############
# DATASOURCE #
##############

# The default settings are using hsqldb
#spring.datasource.driverClassName=org.hsqldb.jdbc.JDBCDriver
#spring.datasource.url=jdbc:hsqldb:file:/tmp/proactive/catalog;create=true;hsqldb.tx=mvcc;hsqldb.applog=1;hsqldb.sqllog=0;hsqldb.write_delay=false

# For MariaDB/MySQL use the following settings
# note the ProActiveMySQL5InnoDBDialect class that enforces the utf8mb4 charset
#spring.datasource.driverClassName=org.mariadb.jdbc.Driver
#spring.jpa.database-platform=org.ow2.proactive.catalog.util.ProActiveMySQL5InnoDBDialect
#spring.datasource.url=jdbc:mariadb://localhost:3306/catalog

#spring.datasource.username=root
#spring.datasource.password=

# Hibernate ddl auto (create, create-drop, update)
spring.jpa.hibernate.ddl-auto=update

# The classname of a custom org.hibernate.connection.ConnectionProvider which provides JDBC connections to Hibernate
hibernate.connection.provider_class=org.hibernate.hikaricp.internal.HikariCPConnectionProvider

# JDBC connection pool configuration
# https://github.com/brettwooldridge/HikariCP#configuration-knobs-baby
hibernate.hikari.connectionTimeout=60000
hibernate.hikari.maximumPoolSize=20
hibernate.hikari.transactionIsolation=TRANSACTION_READ_COMMITTED

# Enable Hibernate's automatic session context management
hibernate.current_session_context_class=thread

# Prevent warning about deprecated naming strategy
# https://github.com/spring-projects/spring-boot/issues/2763
# Should be changed once Spring Boot 1.4 is used
spring.jpa.properties.hibernate.implicit_naming_strategy=org.hibernate.boot.model.naming.ImplicitNamingStrategyJpaCompliantImpl
spring.jpa.properties.hibernate.ejb.naming_strategy_delegator=
spring.jpa.properties.hibernate.id.new_generator_mappings=false

# Show or not log for each sql query
spring.jpa.show-sql=false

# Disable Spring banner
spring.main.banner_mode=off


pa.scheduler.url=http://localhost:8080
# Used to perform authentication since identity service is not yet available
pa.scheduler.rest.url=${pa.scheduler.url}/rest

# Separator used in kind string, like workflow/pca
kind.separator=/

# Optional catalog security features
pa.catalog.security.required.sessionid=false

# Optional ttf fonts absolute paths to use when generating the pdf report. This is required when catalog objects contains Asian characters
pa.catalog.pdf.report.ttf.font.path=
pa.catalog.pdf.report.ttf.font.bold.path=
pa.catalog.pdf.report.ttf.font.italic.path=
pa.catalog.pdf.report.ttf.font.bold.italic.path=
21.6. Scheduler Portal Properties
Scheduler Portal Properties are read when Portal main page is loaded.
The Configuration file named scheduler-portal-display.conf is located in the folder $PROACTIVE_HOME/config/portal/.
21.6.1. The list of Columns property
It is possible to specify a list of Variables or Generic Information to display in new columns of the Execution List table (Job Centric View). The defined columns will be added after the default columns of the view, following the order given in the configuration file. The list of columns is defined as a JSON array, for example:
execution-list-extra-columns: [{ \
	"title": "start at", \
	"information": { \
		"type": "generic-information", \
		"key": "START_AT"}, \
	"hide": false }, \
	{ \
	"title": "My var", \
	"information": { \
		"type": "variable", \
		"key": "MY_VAR"}, \
	"hide": false }]
The property execution-list-extra-columns contains the JSON array. If the array is written on several lines, each line except the last one should end with the caracter \. Each element of the array should contain the following fields:
-
title: the header of the column containing the value of the Variable or Generic Information -
information: the information about the value displayed in the column. This field contains 2 fields:-
type: the type, either variable or generic-information -
key: the key of the value in the Variable or Generic Information map
-
-
hide: whether the column should be hidden by default
21.7. Node Sources
The ProActive Resource Manager supports ProActive Nodes aggregation from heterogeneous environments. As a node is just a process running somewhere, the process of communication to such nodes is unified. The only part which has to be defined is the procedure of nodes deployment which could be quite different depending on infrastructures and their limitations. After installation of the server and node parts it is possible to configure an automatic nodes deployment. Basically, you can say to the Resource Manager how to launch nodes and when.
In the ProActive Resource Manager, there is always a default node source consisted of DefaultInfrastructureManager and Static policy. It is not able to deploy nodes anywhere but makes it possible to add existing nodes to the RM.
21.7.1. Node Source Infrastructure
An Infrastructure Manager is responsible for deploying nodes. In most of the cases it knows how to launch a node on a remote machine. For instance the SSH infrastructure manager connects via SSH to a remote machine and launches nodes.
Default Infrastructure Manager
Default infrastructure manager is designed to be used with ProActive agent. It cannot perform an automatic deployment but any users (including an agent) can add already existing nodes into it. In order to create a node source with this infrastructure, run the following command:
$ PROACTIVE_HOME/bin/proactive-client --createns defaultns -infrastructure org.ow2.proactive.resourcemanager.nodesource.infrastructure.DefaultInfrastructureManager rmURL
The only parameter to provide is the following one:
-
rmURL - the URL of the Resource Manager.
Local Infrastructure Manager
Local Infrastructure Manager can be used to start nodes locally, i.e, on the host running the Resource Manager. In order to create a node source with this infrastructure, run the following command:
$ PROACTIVE_HOME/bin/proactive-client --createns localns -infrastructure org.ow2.proactive.resourcemanager.nodesource.infrastructure.LocalInfrastructure rmURL credentialsPath numberOfNodes timeout javaProperties
-
rmURL - URL of the Resource Manager server (can leave it empty to use default value, i.e, the URL of the Resource Manager you connect to)
-
credentialsPath - The absolute path of the credentials file used to set the provider of the nodes.
-
numberOfNodes - The number of nodes to deploy.
-
timeout - The length in ms after which one a node is not expected anymore.
-
javaProperties - The java properties to setup the ProActive environment for the nodes
SSH Infrastructure
This infrastructure allows to deploy nodes over SSH. This infrastructure needs 10 arguments, described hereafter:
-
RM URL - The Resource Manager’s URL that will be used by the deployed nodes to register by themselves.
-
SSH Options - Options you can pass to the SSHClient executable ( -l inria to specify the user for instance )
-
Java Path - Path to the java executable on the remote hosts.
-
Scheduling Path - Path to the Scheduler installation directory on the remote hosts.
-
Node Time Out - A duration after which one the remote nodes are considered to be lost.
-
Attempt - The number of time the Resource Manager tries to acquire a node for which one the deployment fails before discarding it forever.
**Wait time between failed attempts** - The time in milliseconds that the Resource Manager wait before trying to
acquire a node for which one the deployment fails before.
-
Target OS - One of 'LINUX', 'CYGWIN' or 'WINDOWS' depending on the machines' ( in Hosts List file ) operating system.
-
Java Options - Java options appended to the command used to start the node on the remote host.
-
RM Credentials Path - The absolute path of the 'rm.cred' file to make the deployed nodes able to register to the Resource Manager ( config/authentication/rm.cred ).
-
Hosts List - Path to a file containing the hosts on which resources should be acquired. This file should contain one host per line, described as a host name or a public IP address, optionally followed by a positive integer describing the number of runtimes to start on the related host (default to 1 if not specified). Example:
rm.example.com
test.example.net 5
192.168.9.10 2
CLI Infrastructure
This generic infrastructure allows to deploy nodes using deployment script written in arbitrary language. The infrastructure just launches this script and waits until the ProActive node is registered in the Resource Manager. Command line infrastructure could be used when you prefer to describe the deployment process using shell scripts instead of Java. Script examples can be found in PROACTIVE_HOME/samples/scripts/deployment. The deployment script has 4 parameters: HOST_NAME, NODE_NAME, NODE_SOURCE_NAME, RM_URL. The removal script has 2 parameters: HOST_NAME and NODE_NAME.
This infrastructure needs 7 arguments, described hereafter:
-
RM URL - The Resource Manager’s URL that will be used by the deployed nodes to register by themselves.
-
Interpreter - Path to the script interpreter (bash by default).
-
Deployment Script - A script that launches a ProActive node and register it to the RM.
-
Removal Script - A script that removes the node from the Resource Manager.
-
Hosts List - Path to a file containing the hosts on which resources should be acquired. This file should contain one host per line, described as a host name or a public IP address, optionally followed by a positive integer describing the number of runtimes to start on the related host (default to 1 if not specified). Example:
rm.example.com
test.example.net 5
192.168.9.10 2
-
Node Time Out - The length in ms after which one a node is not expected anymore.
-
Max Deployment Failure - the number of times the resource manager tries to relaunch the deployment script in case of failure.
EC2 Infrastructure
The Elastic Compute Cloud, aka EC2, is an Amazon Web Service, that allows its users to use machines (instances) on demand on the cloud. An EC2 instance is a Xen virtual machine, running on different kinds of hardware, at different prices, but always paid by the hour, allowing lots of flexibility. Being virtual machines, instances can be launched using custom operating system images, called AMI (Amazon Machine Image). For the Resource Manager to use EC2 instances as computing nodes, a specific EC2 Infrastructure as well as AMI creation utilities are provided.
To use the EC2 Infrastructure in the Resource Manager, proper Amazon credentials are needed. This section describes briefly how to obtain them, and how to use them to configure your environment.
-
First, you need to create an AWS account at http://aws.amazon.com/.
-
With your new AWS account, sign up for EC2 at http://aws.amazon.com/ec2/.
-
Now, you need to obtain the credentials. On the AWS website, point your browser to the Your Web Services Account button, a drop down list displays. Click View Access Key Identifiers.
-
Use this information to fill in the properties aws_key (Access Key), aws_secret_key (Secret Key) in the Create Node Source panel located in the Resource Manager. Those two parameters should never change, except if you need for some reason to handle multiple EC2 accounts. Other properties in the Create Node Source are:
-
rmHostname: The hostname or the public IP address of the Resource Manager. This address needs to be accessible from the AWS cloud.
-
connectorIaasURL: Connector-iaas is a service embedded in the Scheduler used to interact with IaaS like AWS. By default it runs on the following URL rmHostname/connector-iaas.
-
image: Defines which AMI will be used to create an AWS instances. The value to provide is the AWS region together with the unique AMI Id, for example:
eu-west-1/ami-bff32ccc. -
vmUsername: Defines the user name that is used to connect to AWS instances. If not provided, then the AWS instances will be accessed as admin user.
-
vmKeyPairName: Defines the name of the AWS key pair to use. If specified, the key pair must exits in AWS in the region of deployment, and the
vmPrivateKeymust be specified as well. If not specified, then a default key pair will be created or reused in the given region of the deployment. -
vmPrivateKey: Defines the .pem file that will be used to connect tot the AWS instances. If specified, the name of the key pair (
vmKeyPairName) to which this private key belongs to must be specified as well. -
numberOfInstances: Total number of AWS instances to create for this infrastructure.
-
numberOfNodesPerInstance: Total number of Proactive Nodes to deploy in each created AWS instance.
If all the nodes of an AWS instance are removed, the instance will be terminated. For more information on the terminated state in AWS please see AWS Terminating Instances. -
downloadCommand: The command to download the Proactive node.jar. This command is executed in all the newly created AWS instances. The full URL path of the node.jar to download, needs to be accessible from the AWS cloud. Example based on AWS image with windows operating system:
powershell -command "& { (New-Object Net.WebClient).DownloadFile('try.activeeon.com/rest/node.jar', 'node.jar') }" -
additionalProperties: Additional Java command properties to be added when starting each ProActive node JVM in the AWS instances (e.g. \"-Dpropertyname=propertyvalue\").
-
minRam: The minimum required amount of RAM expressed in Mega Bytes for each AWS instance that needs to be created.
-
minCores: The minimum required amount of virtual cores for each AWS instance that needs to be created.
If the combination between RAM and CORES does not match any existing AWS instance type, then the closest to the specified parameters will be selected. -
spotPrice: The maximum price that you are willing to pay per hour per instance (your bid price). Amazon EC2 Spot instances allow you to bid on spare Amazon EC2 computing capacity. Since Spot instances are often available at a discount compared to On-Demand pricing. If your bid price is greater than the current Spot price for the specified instance, and the specified instance is available, your request is fulfilled immediately. Otherwise, the request is fulfilled whenever the Spot price falls below your bid price or the specified instance becomes available. Spot instances run until you terminate them or until Amazon EC2 must terminate them (also known as a Spot instance interruption). More information available on AWS EC2 Spot
-
securityGroupNames: The securityGroupNames option allows you to specify the name(s) of the Security group(s) configured as a virtual firewall(s) to control inbound and outbound traffic for the EC2 instances hosting the proactive nodes. More information regarding Amazon EC2 Security Group available on AWS EC2 Security Groups
-
subnetId: The subnetId option allows you to launch the proactive nodes on EC2 instances, which will run into an existing subnet added to a specific Virtual Private Cloud. More information regarding Amazon EC2 Virtual Private Cloud (Amazon VPC) available on AWS EC2 Virtual Private Cloud and Amazon EC2 Virtual Private Cloud and Subnet available on AWS EC2 Virtual Private Cloud and Subnet
Using this configuration, you can start a Resource Manager and a Scheduler using the /bin/proactive-server script. An EC2 NodeSource can now be added using the Create Node Source panel in the Resource Manager or the command line interface:
$ PROACTIVE_HOME/bin/proactive-client --createns ec2 -infrastructure org.ow2.proactive.resourcemanager.nodesource.infrastructure.AWSEC2Infrastructure aws_key aws_secret_key rmDomain connectorIaasURL image numberOfInstances numberOfNodesPerInstance downloadCommand additionalProperties minRam minCores
-
As AWS is a paying service, when the Scheduler is stopped normally (without removing the created infrastructure), all the created AWS instances will be terminated. And when the Scheduler is restarted, these instances will be re-configured as per previous settings.
| If the Scheduler is forced killed, the created AWS instances will not be terminated. And, when the Scheduler is restarted, the infrastructure will be re-configured as per previous settings. If the instances were delete at the AWS side, they will be re-created and re-configured. |
OpenStack Infrastructure
To use the OpenStack instances as computing nodes, a specific OpenStack Infrastructure can be created using the Resource Manager. This section describes briefly how to make it.
-
First, you need to have an admin account on your OpenStack server. For more information see OpenStack users and tenants.
-
Use the login, tenant and password information to fill in the properties openstack_username (
tenant:login), openstack_password in the Create Node Source panel located in the Resource Manager. Those two parameters should never change, except if you need for some reason to handle multiple OpenStack accounts. Other properties in the Create Node Source are:-
endpoint: The hostname or the IP address of the OpenStack server. This address needs to be accessible from the Resource Manager.
-
rmHostname: The hostname or the public IP address of the Resource Manager. This address needs to be accessible from the OpenStack server.
-
connectorIaasURL: Connector-iaas is a service embedded in the Scheduler used to interact with IaaS like OpenStack. By default it runs on the following URL rmHostname/connector-iaas.
-
image: Defines which image will be used to create the Openstack instance. The value to provide is the Openstack region together with the unique image Id, for example:
RegionOne/74oi56bff32ccc. -
flavor: Defines the size of the instance. For more information see OpenStack flavors.
-
publicKeyName: Defines the name of the public key to use for a remote connection when the instance is created.
In order to use publicKeyName, the key pair needs to be created and imported first on the openstack server. For more information see OpenStack key pair management. -
numberOfInstances: Total number of OpenStack instances to create for this infrastructure.
-
numberOfNodesPerInstance: Total number of Proactive Nodes to deploy in each Openstack created instance.
If all the nodes of an Openstack instance are removed, the instance will be terminated. +
-
downloadCommand: The command to download the Proactive node.jar. This command is executed in all the newly created OpenStack instances. The full URL path of the node.jar to download needs to be accessible from the OpenStack cloud.
-
additionalProperties: Additional Java command properties to be added when starting each ProActive node JVM in the OpenStack instances (e.g. \"-Dpropertyname=propertyvalue\").
-
Using this configuration, you can start a Resource Manager and a Scheduler using the /bin/proactive-server script. An OpenStack NodeSource can now be added using the Create Node Source panel in the Resource Manager or the command line interface:
$ PROACTIVE_HOME/bin/proactive-client --createns openstack -infrastructure org.ow2.proactive.resourcemanager.nodesource.infrastructure.OpenstackInfrastructure username password endpoint rmHostname connectorIaasURL image flavor publicKeyName numberOfInstances numberOfNodesPerInstance downloadCommand additionalProperties
| When the Scheduler is stopped (without removing the created infrastructure), the OpenStack instances will not be terminated. And when the Scheduler is restarted, the infrastrucutre will be re-configured as per previous settings. If the instances were delete at the Openstack server side, they will be re-created and re-configured. |
VmWare Infrastructure
To use the VmWare instances as computing nodes, a specific VmWare Infrastructure can be created using the Resource Manager. This section describes briefly how to make it.
-
First, you need to have an admin account on your VmWare server.For more information see VmWare users.
-
Use the login and password information to fill in the properties vmware_username, vmware_password in the Create Node Source panel located in the Resource Manager. Those two parameters should never change, except if you need for some reason to handle multiple VmWare accounts. Other properties in the Create Node Source are:
-
endpoint: The hostname or the IP address of the VmWare server. This address needs to be accessible from the Resource Manager.
-
rmHostname: The hostname or the public IP address of the Resource Manager. This address needs to be accessible from the VmWare server.
-
connectorIaasURL: Connector-iaas is a service embedded in the Scheduler used to interact with IaaS like VmWare. By default it runs on the following URL rmHostname/connector-iaas.
-
image: Defines which image will be used to create the VmWare instance. The value to provide is the VmWare folder together with the unique image Id, for example:
ActiveEon/ubuntu. -
minRam: The minimum required amount of RAM expressed in Mega Bytes for each VmWare instance that needs to be created.
-
minCores: The minimum required amount of virtual cores for each VmWare instance that needs to be created.
If the combination between RAM and CORES does not match any existing VmWare instance type, then the closest to the specified parameters will be selected. -
vmUsername: Defines the username to log in the instance when it is created.
-
vmPassword: Defines the password to log in the instance when it is created.
The username and password are related to the image. -
numberOfInstances: Total number of VmWare instances to create for this infrastructure.
-
numberOfNodesPerInstance: Total number of Proactive Nodes to deploy in each VmWare created instance.
If all the nodes of an VmWare instance are removed, the instance will be terminated. +
-
downloadCommand: The command to download the Proactive node.jar. This command is executed in all the newly created VmWare instances. The full URL path of the node.jar to download, needs to be accessible from the VmWare cloud.
-
additionalProperties: Additional Java command properties to be added when starting each ProActive node JVM in the VmWare instances (e.g. \"-Dpropertyname=propertyvalue\").
-
Using this configuration, you can start a Resource Manager and a Scheduler using the /bin/proactive-server script. An VmWare NodeSource can now be added using the Create Node Source panel in the Resource Manager or the command line interface:
$ PROACTIVE_HOME/bin/proactive-client --createns vmware -infrastructure org.ow2.proactive.resourcemanager.nodesource.infrastructure.VmwareInfrastructure username password endpoint rmHostname connectorIaasURL image ram cores vmusername vmpassword numberOfInstances numberOfNodesPerInstance downloadCommand additionalProperties
| When the Scheduler is stopped (without removing the created infrastructure), the VmWare instances will not be terminated. And when the Scheduler is restarted, the infrastrucutre will be re-configured as per previous settings. If the instances were delete at the VmWare server side, they will be re-created and re-configured. |
Load Sharing Facility (LSF) infrastructure
This infrastructure knows how to acquire nodes from LSF by submitting a corresponding job. It will be submitted through SSH from the RM to the LSF server.
$ PROACTIVE_HOME/bin/proactive-client --createns lsf -infrastructure org.ow2.proactive.resourcemanager.nodesource.infrastructure.LSFInfrastructure rmURL javaPath SSHOptions schedulingPath javaOptions maxNodes nodeTimeout LSFServer RMCredentialsPath bsubOptions
where:
-
RMURL - URL of the Resource Manager from the LSF nodes point of view - this is the URL the nodes will try to lookup when attempting to register to the RM after their creation.
-
javaPath - path to the java executable on the remote hosts (ie the LSF slaves).
-
SSH Options - Options you can pass to the SSHClient executable ( -l inria to specify the user for instance )
-
schedulingPath - path to the Scheduling/RM installation directory on the remote hosts.
-
javaOptions - Java options appended to the command used to start the node on the remote host.
-
maxNodes - maximum number of nodes this infrastructure can simultaneously hold from the LSF server. That is useful considering that LSF does not provide a mechanism to evaluate the number of currently available or idle cores on the cluster. This can result to asking more resources than physically available, and waiting for the resources to come up for a very long time as the request would be queued until satisfiable.
-
Node Time Out - The length in ms after which one a node is not expected anymore.
-
Server Name - URL of the LSF server, which is responsible for acquiring LSF nodes. This server will be contacted by the Resource Manager through an SSH connection.
-
RM Credentials Path - Encrypted credentials file, as created by the create-cred[.bat] utility. These credentials will be used by the nodes to authenticate on the Resource Manager.
-
Submit Job Opt - Options for the bsub command client when acquiring nodes on the LSF master. Default value should be enough in most cases, if not, refer to the documentation of the LSF cluster.
Portable Batch System (PBS) infrastructure
This infrastructure knows how to acquire nodes from PBS (i.e. Torque) by submitting a corresponding job. It will be submitted through SSH from the RM to the PBS server.
$ PROACTIVE_HOME/bin/proactive-client --createns pbs -infrastructure org.ow2.proactive.resourcemanager.nodesource.infrastructure.PBSInfrastructure rmURL javaPath SSHOptions schedulingPath javaOptions maxNodes nodeTimeout PBSServer RMCredentialsPath qsubOptions
where:
-
RMURL - URL of the Resource Manager from the PBS nodes point of view - this is the URL the nodes will try to lookup when attempting to register to the RM after their creation.
-
javaPath - path to the java executable on the remote hosts (ie the PBS slaves).
-
SSH Options - Options you can pass to the SSHClient executable ( -l inria to specify the user for instance )
-
schedulingPath - path to the Scheduling/RM installation directory on the remote hosts.
-
javaOptions - Java options appended to the command used to start the node on the remote host.
-
maxNodes - maximum number of nodes this infrastructure can simultaneously hold from the PBS server. That is useful considering that PBS does not provide a mechanism to evaluate the number of currently available or idle cores on the cluster. This can result to asking more resources than physically available, and waiting for the resources to come up for a very long time as the request would be queued until satisfiable.
-
Node Time Out - The length in ms after which one a node is not expected anymore.
-
Server Name - URL of the PBS server, which is responsible for acquiring PBS nodes. This server will be contacted by the Resource Manager through an SSH connection.
-
RM Credentials Path - Encrypted credentials file, as created by the create-cred[.bat] utility. These credentials will be used by the nodes to authenticate on the Resource Manager.
-
Submit Job Opt - Options for the qsub command client when acquiring nodes on the PBS master. Default value should be enough in most cases, if not, refer to the documentation of the PBS cluster.
Generic Batch Job infrastructure
Generic Batch Job infrastructure provides users with the capability to add the support of new batch job scheduler by providing a class extending org.ow2.proactive.resourcemanager.nodesource.infrastructure.BatchJobInfrastructure. Once you have written that implementation, you can create a node source which makes usage of this infrastructure by running the following command:
$ PROACTIVE_HOME/bin/proactive-client --createns pbs -infrastructure org.ow2.proactive.resourcemanager.nodesource.infrastructure.GenericBatchJobInfrastructure rmURL javaPath SSHOptions schedulingPath javaOptions maxNodes nodeTimeout BatchJobServer RMCredentialsPath subOptions implementationName implementationPath
where:
-
RMURL - URL of the Resource Manager from the batch job scheduler nodes point of view - this is the URL the nodes will try to lookup when attempting to register to the RM after their creation.
-
javaPath - path to the java executable on the remote hosts (ie the slaves of the batch job scheduler).
-
SSH Options - Options you can pass to the SSHClient executable ( -l inria to specify the user for instance )
-
schedulingPath - path to the Scheduling/RM installation directory on the remote hosts.
-
javaOptions - Java options appended to the command used to start the node on the remote host.
-
maxNodes - maximum number of nodes this infrastructure can simultaneously hold from the batch job scheduler server.
-
Node Time Out - The length in ms after which one a node is not expected anymore.
-
Server Name - URL of the batch job scheduler server, which is responsible for acquiring nodes. This server will be contacted by the Resource Manager through an SSH connection.
-
RM Credentials Path - Encrypted credentials file, as created by the create-cred[.bat] utility. These credentials will be used by the nodes to authenticate on the Resource Manager.
-
Submit Job Opt - Options for the submit command client when acquiring nodes on the batch job scheduler master.
-
implementationName - Fully qualified name of the implementation of org.ow2.proactive.resourcemanager.nodesource.infrastructure.BatchJobInfrastructure provided by the end user.
-
implementationPath - The absolute path of the implementation of org.ow2.proactive.resourcemanager.nodesource.infrastructure.BatchJobInfrastructure.
21.7.2. Node Source Policy
Node source policy is a set of rules and conditions which describes when and how many nodes have to be acquired or released. Policies use node source API to manage the node acquisition.
Node sources were designed in a way that:
-
All logic related to node acquisition is encapsulated in the infrastructure manager.
-
Conditions and rules of node acquisition is described in the node source policy.
-
Permissions to the node source. Each policy has two parameters:
-
nodeUsers - utilization permission defined who can get nodes for computations from this node source. It has to take one of the following values:
-
ME - Only the node source creator
-
users=user1,user2;groups=group1,group2;tokens=t1,t2 - Only specific users, groups or tokens. I.e. users=user1 - node access is limited to user1; users=user1;groups=group1 - node access is limited to user1 and all users from group group1; users=user1;tokens=t1 - node access is limited to user1 or anyone who specified token t1. If node access is protected by a token, node will not be found by the resource manager (getNodes request) unless the corresponding token is specified.
-
ALL - Everybody
-
-
nodeProviders - Provider permission defines who can add nodes to this node source. It should take one of the following values:
-
ME - Only the node source creator
-
users=user1,user2;groups=group1,group2 - Only specific users or groups (for our example user1, user2, group1 and group2). It is possible to specify only groups or only users.
-
ALL - Everybody
-
-
-
The user created the node source is the administrator of this node source. It can add and removed nodes to it, remove the node source itself, but cannot use nodes if usage policy is set to PROVIDER or PROVIDER_GROUPS (unless it’s granted AllPermissions).
-
New infrastructure manager or node source policy can be dynamically plugged into the Resource Manager. In order to do that, it is just required to add new implemented classes in the class path and update corresponding list in the configuration file (PROACTIVE_HOME/config/rm/nodesource).
Static Policy
Static node source policy starts node acquisition when nodes are added to the node source and never removes them. Nevertheless, nodes can be removed by user request. To use this policy, you have to precise the following parameters:
-
nodeUsers - utilization permission defined who can get nodes for computations from this node source. It has to take one of the following values:
-
ME - Only the node source creator
-
users=user1,user2;groups=group1,group2 - Only specific users or groups (for our example user1, user2, group1 and group2). It is possible to specify only groups or only users.
-
ALL - Everybody
-
-
nodeProviders - Provider permission defines who can add nodes to this node source. It should take one of the following values:
-
ME - Only the node source creator
-
users=user1,user2;groups=group1,group2 - Only specific users or groups (for our example user1, user2, group1 and group2). It is possible to specify only groups or only users.
-
ALL - Everybody
-
Time Slot Policy
Time slot policy is aimed to acquire nodes for particular time with an ability to do it periodically. To use this policy, you have to precise the following parameters:
-
nodeUsers - utilization permission defined who can get nodes for computations from this node source. It has to take one of the following values:
-
ME - Only the node source creator
-
users=user1,user2;groups=group1,group2 - Only specific users or groups (for our example user1, user2, group1 and group2). It is possible to specify only groups or only users.
-
ALL - Everybody
-
-
nodeProviders - Provider permission defines who can add nodes to this node source. It should take one of the following values:
-
ME - Only the node source creator
-
users=user1,user2;groups=group1,group2 - Only specific users or groups (for our example user1, user2, group1 and group2). It is possible to specify only groups or only users.
-
ALL - Everybody
-
-
acquireTime - Absolute acquire date (e.g. "6/3/10 1:18:45 PM CEST").
-
releaseTime - Absolute releasing date (e.g. "6/3/10 2:18:45 PM CEST").
-
period - period time in millisecond (default is 86400000).
-
preemptive - Preemptive parameter indicates the way of releasing nodes. If it is true, nodes will be released without waiting the end of jobs running on (default is false).
Cron Policy
Cron policy is aimed to acquire and remove nodes at specific time defined in the cron syntax.To use this policy, you have to precise the following parameters:
-
nodeUsers - utilization permission defined who can get nodes for computations from this node source. It has to take one of the following values:
-
ME - Only the node source creator
-
users=user1,user2;groups=group1,group2 - Only specific users or groups (for our example user1, user2, group1 and group2). It is possible to specify only groups or only users.
-
ALL - Everybody
-
-
nodeProviders - Provider permission defines who can add nodes to this node source. It should take one of the following values:
-
ME - Only the node source creator
-
users=user1,user2;groups=group1,group2 - Only specific users or groups (for our example user1, user2, group1 and group2). It is possible to specify only groups or only users.
-
ALL - Everybody
-
-
nodeAcquision - The time policy will trigger the deployment of all nodes (e.g. "0 12 \* \* \*" every day at 12.00).
-
nodeRemoval - The time policy will trigger the removal of all nodes (e.g. "0 13 \* \* \*" every day at 13.00).
-
preemptive - Preemptive parameter indicates the way of releasing nodes. If it is true, nodes will be released without waiting the end of jobs running on (default is false).
-
forceDeployment - If for the example above (the deployment starts every day at 12.00 and the removal starts at 13.00) you are creating the node source at 12.30 the next deployment will take place the next day. If you’d like to force the immediate deployment set this parameter to true.
Remove Nodes When Scheduler Is Idle
"Remove nodes when scheduler is idle" policy removes all nodes from the infrastructure when the scheduler is idle and acquires them when a new job is submitted. This policy may be useful if there is no need to keep nodes alive permanently. Nodes will be released after a specified "idle time". This policy will use a listener of the scheduler, that is why its URL, its user name and its password have to be specified. To use this policy, you have to precise the following parameters:
-
nodeUsers - utilization permission defined who can get nodes for computations from this node source. It has to take one of the following values:
-
ME - Only the node source creator
-
users=user1,user2;groups=group1,group2 - Only specific users or groups (for our example user1, user2, group1 and group2). It is possible to specify only groups or only users.
-
ALL - Everybody
-
-
nodeProviders - Provider permission defines who can add nodes to this node source. It should take one of the following values:
-
ME - Only the node source creator
-
users=user1,user2;groups=group1,group2 - Only specific users or groups (for our example user1, user2, group1 and group2). It is possible to specify only groups or only users.
-
ALL - Everybody
-
-
schedulerURL - URL of the Scheduler
-
schedulerCredentialsPath - Path to the credentials used for scheduler authentication.
-
idleTime - idle time in millisecond to wait before removing all nodes (default is 60000).
Scheduler Loading Policy
Scheduler loading policy acquires/releases nodes according to the scheduler loading factor. This policy allows to configure the number of resources which will be always enough for the scheduler. Nodes are acquired and released according to scheduler loading factor which is a number of tasks per node.
It is important to correctly configure maximum and minimum nodes that this policy will try to hold. Maximum number should not be greater than potential nodes number which is possible to deploy to underlying infrastructure. If there are more currently acquired nodes than necessary, policy will release them one by one after having waited for a "release period" delay. This smooth release procedure is implemented because deployment time is greater than the release one. Thus, this waiting time deters policy from spending all its time trying to deploy nodes.
To use this policy, you have to precise the following parameters:
-
nodeUsers - utilization permission defined who can get nodes for computations from this node source. It has to take one of the following values:
-
ME - Only the node source creator
-
users=user1,user2;groups=group1,group2 - Only specific users or groups (for our example user1, user2, group1 and group2). It is possible to specify only groups or only users.
-
ALL - Everybody
-
-
nodeProviders - Provider permission defines who can add nodes to this node source. It should take one of the following values:
-
ME - Only the node source creator
-
users=user1,user2;groups=group1,group2 - Only specific users or groups (for our example user1, user2, group1 and group2). It is possible to specify only groups or only users.
-
ALL - Everybody
-
-
schedulerURL - URL of the Scheduler
-
schedulerCredentialsPath - Path to the credentials used for scheduler authentication.
-
refreshTime - time between each calculation of the number of needed nodes.
-
minNodes - Minimum number of nodes to deploy
-
maxNodes - Maximum number of nodes to deploy
-
loadFactor - number of tasks per node. Actually, if this number is N, it does not means that there will be exactly N tasks executed on each node. This factor is just used to compute the total number of nodes. For instance, let us assume that this factor is 3 and that we schedule 100 tasks. In that case, we will have 34 (= upper bound of 100/3) started nodes. Once one task finished and the refresh time passed, one node will be removed since 99 divided by 3 is 33. When there will remain 96 tasks (assuming that no other tasks are scheduled meanwhile), an other node will be removed at the next calculation time, and so on and so forth…
-
nodeDeploymentTimeout - The node deployment timeout.
Cron Load Based Policy
The Cron load based policy triggers new nodes acquisition when scheduler is overloaded (exactly like with "Scheduler loading" policy) only within a time slot defined using crontab syntax. All other time the nodes are removed from the resource manager. To use this policy, you have to precise the following parameters:
-
nodeUsers - utilization permission defined who can get nodes for computations from this node source. It has to take one of the following values:
-
ME - Only the node source creator
-
users=user1,user2;groups=group1,group2 - Only specific users or groups (for our example user1, user2, group1 and group2). It is possible to specify only groups or only users.
-
ALL - Everybody
-
-
nodeProviders - Provider permission defines who can add nodes to this node source. It should take one of the following values:
-
ME - Only the node source creator
-
users=user1,user2;groups=group1,group2 - Only specific users or groups (for our example user1, user2, group1 and group2). It is possible to specify only groups or only users.
-
ALL - Everybody
-
-
schedulerURL - URL of the Scheduler
-
schedulerCredentialsPath - Path to the credentials used for scheduler authentication.
-
refreshTime - time between each calculation of the number of needed nodes.
-
minNodes - Minimum number of nodes to deploy
-
maxNodes - Maximum number of nodes to deploy
-
loadFactor - number of tasks per node. Actually, if this number is N, it does not means that there will be exactly N tasks executed on each node. This factor is just used to compute the total number of nodes. For instance, let us assume that this factor is 3 and that we schedule 100 tasks. In that case, we will have 34 (= upper bound of 100/3) started nodes. Once one task finished and the refresh time passed, one node will be removed since 99 divided by 3 is 33. When there will remain 96 tasks (assuming that no other tasks are scheduled meanwhile), an other node will be removed at the next calculation time, and so on and so forth…
-
nodeDeploymentTimeout - The node deployment timeout.
-
acquisionAllowed - The time when the policy starts to work as the "scheduler loading" policy (e.g. "0 12 \* \* \*" every day at 12.00).
-
acquisionForbidden - The time policy removes all the nodes from the resource manager (e.g. "0 13 \* \* \*" every day at 13.00).
-
preemptive - Preemptive parameter indicates the way of releasing nodes. If it is true, nodes will be released without waiting the end of jobs running on (default is false).
-
allowed - If true acquisition will be immediately allowed.
Cron Slot Load Based Policy
The "Cron slot load based" policy triggers new nodes acquisition when scheduler is overloaded (exactly like with "Scheduler loading" policy) only within a time slot defined using crontab syntax. The other time it holds all the available nodes. To use this policy, you have to precise the following parameters:
-
nodeUsers - utilization permission defined who can get nodes for computations from this node source. It has to take one of the following values:
-
ME - Only the node source creator
-
users=user1,user2;groups=group1,group2 - Only specific users or groups (for our example user1, user2, group1 and group2). It is possible to specify only groups or only users.
-
ALL - Everybody
-
-
nodeProviders - Provider permission defines who can add nodes to this node source. It should take one of the following values:
-
ME - Only the node source creator
-
users=user1,user2;groups=group1,group2 - Only specific users or groups (for our example user1, user2, group1 and group2). It is possible to specify only groups or only users.
-
ALL - Everybody
-
-
schedulerURL - URL of the Scheduler
-
schedulerCredentialsPath - Path to the credentials used for scheduler authentication.
-
refreshTime - time between each calculation of the number of needed nodes.
-
minNodes - Minimum number of nodes to deploy
-
maxNodes - Maximum number of nodes to deploy
-
loadFactor - number of tasks per node. Actually, if this number is N, it does not means that there will be exactly N tasks executed on each node. This factor is just used to compute the total number of nodes. For instance, let us assume that this factor is 3 and that we schedule 100 tasks. In that case, we will have 34 (= upper bound of 100/3) started nodes. Once one task finished and the refresh time passed, one node will be removed since 99 divided by 3 is 33. When there will remain 96 tasks (assuming that no other tasks are scheduled meanwhile), an other node will be removed at the next calculation time, and so on and so forth…
-
nodeDeploymentTimeout - The node deployment timeout.
-
acquisionAllowed - The time when the policy starts to work as the "scheduler loading" policy (e.g. "0 12 \* \* \*" every day at 12.00).
-
acquisionForbidden - The time policy removes all the nodes from the resource manager (e.g. "0 13 \* \* \*" every day at 13.00).
-
preemptive - Preemptive parameter indicates the way of releasing nodes. If it is true, nodes will be released without waiting the end of jobs running on (default is false).
-
allowed - If true acquisition will be immediately allowed.
EC2 Policy
Allocates resources according to the Scheduler loading factor, releases resources considering that EC2 instances are paid by the hour. To use this policy, you have to precise the following parameters:
-
nodeUsers - utilization permission defined who can get nodes for computations from this node source. It has to take one of the following values:
-
ME - Only the node source creator
-
users=user1,user2;groups=group1,group2 - Only specific users or groups (for our example user1, user2, group1 and group2). It is possible to specify only groups or only users.
-
ALL - Everybody
-
-
nodeProviders - Provider permission defines who can add nodes to this node source. It should take one of the following values:
-
ME - Only the node source creator
-
users=user1,user2;groups=group1,group2 - Only specific users or groups (for our example user1, user2, group1 and group2). It is possible to specify only groups or only users.
-
ALL - Everybody
-
-
schedulerURL - URL of the Scheduler
-
schedulerCredentialsPath - Path to the credentials used for scheduler authentication.
-
preemptive - Preemptive parameter indicates the way of releasing nodes. If it is true, nodes will be released without waiting the end of jobs running on (default is false).
-
refreshTime - time between each calculation of the number of needed nodes.
-
loadFactor - number of tasks per node. Actually, if this number is N, it does not means that there will be exactly N tasks executed on each node. This factor is just used to compute the total number of nodes. For instance, let us assume that this factor is 3 and that we schedule 100 tasks. In that case, we will have 34 (= upper bound of 100/3) started nodes. Once one task finished and the refresh time passed, one node will be removed since 99 divided by 3 is 33. When there will remain 96 tasks (assuming that no other tasks are scheduled meanwhile), an other node will be removed at the next calculation time, and so on and so forth…
-
releaseDelay - Delay between each node release. This time is useful since the deploying time is important. Let us assume that a node has to be removed. If this releaseDelay did not exist (or if it was set to 0), this node would be removed instantaneously. Let us assume assume that right after this removal, another task is scheduled, requiring a new node. In that case, we would lose a lot of time removing the previous node and deploying another one whereas the task could have been scheduled on the same node. This releaseDelay therefore represents the time to wait before effectively removing a node.
21.8. Command Line
The ProActive client allows to interact with the Scheduler and Resource Manager. The client has an interactive mode started if you do not provide any command.
The client usage is also available using the -h parameter as shown below:
$ PROACTIVE_HOME/bin/proactive-client -h
21.8.1. Command Line Examples
Deploy ProActive Nodes
In non-interactive mode
$ PROACTIVE_HOME/bin/proactive-client -cn 'moreLocalNodes' -infrastructure 'org.ow2.proactive.resourcemanager.nodesource.infrastructure.LocalInfrastructure' './config/authentication/rm.cred' 4 60000 '' -policy org.ow2.proactive.resourcemanager.nodesource.policy.StaticPolicy 'ALL' 'ALL'In interactive mode
$ PROACTIVE_HOME/bin/proactive-client
> createns( 'moreLocalNodes', ['org.ow2.proactive.resourcemanager.nodesource.infrastructure.LocalInfrastructure', './config/authentication/rm.cred', 4, 60000, ''], ['org.ow2.proactive.resourcemanager.nodesource.policy.StaticPolicy', 'ALL', 'ALL'])
Install ProActive packages
To install a ProActive package, you can use the ProActive CLI by providing a path to your package. It can be a local directory, a ZIP file or can be a URL to a web directory, a direct-download ZIP file, a GitHub repository or ZIP or a directory inside a GitHub repository. Please note that URL forwarding is supported.
In non-interactive mode
-
To install a package located in a local directory or ZIP
$ PROACTIVE_HOME/bin/proactive-client -pkg /Path/To/Local/Package/Directory/Or/Zip-
To install a package located in a web folder (Supports only Apache Tomcat directory listing)
$ PROACTIVE_HOME/bin/proactive-client -pkg http://example.com/installablePackageDirectory/-
To install a package with a direct download ZIP URL:
$ PROACTIVE_HOME/bin/proactive-client -pkg https://s3.eu-west-2.amazonaws.com/activeeon-public/proactive-packages/package-example.zip-
To install a package located in a GitHub repository (either in the repository root or in a sub-folder within a repository):
$ PROACTIVE_HOME/bin/proactive-client -pkg https://github.com/ow2-proactive/hub-packages/tree/master/package-example