All documentation links
User Guide
ProActive Workflow & Scheduler (PWS) User Guide (Workflows, Tasks, Jobs Submission, Resource Management)
ML Open Studio
Machine Learning Open Studio (ML-OS) User Guide (ready to use palettes with ML Tasks & Workflows)
Cloud Automation
ProActive Cloud Automation (PCA) User Guide (automate deployment and management of Services)
Admin Guide
Administration Guide (Installation, networks, nodes, clusters, users, permissions)
API documentation: Scheduler REST Scheduler CLI Scheduler Java Workflow Creation Java Python Client
1. Overview
1.1. What is Machine Learning Open Studio (ML-OS)?
Machine Learning Open Studio (ML-OS) is an interactive graphical interface that enables developers and data scientists to quickly and easily build, train, and deploy machine learning models at any scale. It provides a rich set of generic machine learning tasks that can be connected together to build either basic or complex machine learning workflows for various use cases such as: fraud detection, text analysis, online offer recommendations, prediction of equipment failures, facial expression analysis, etc.
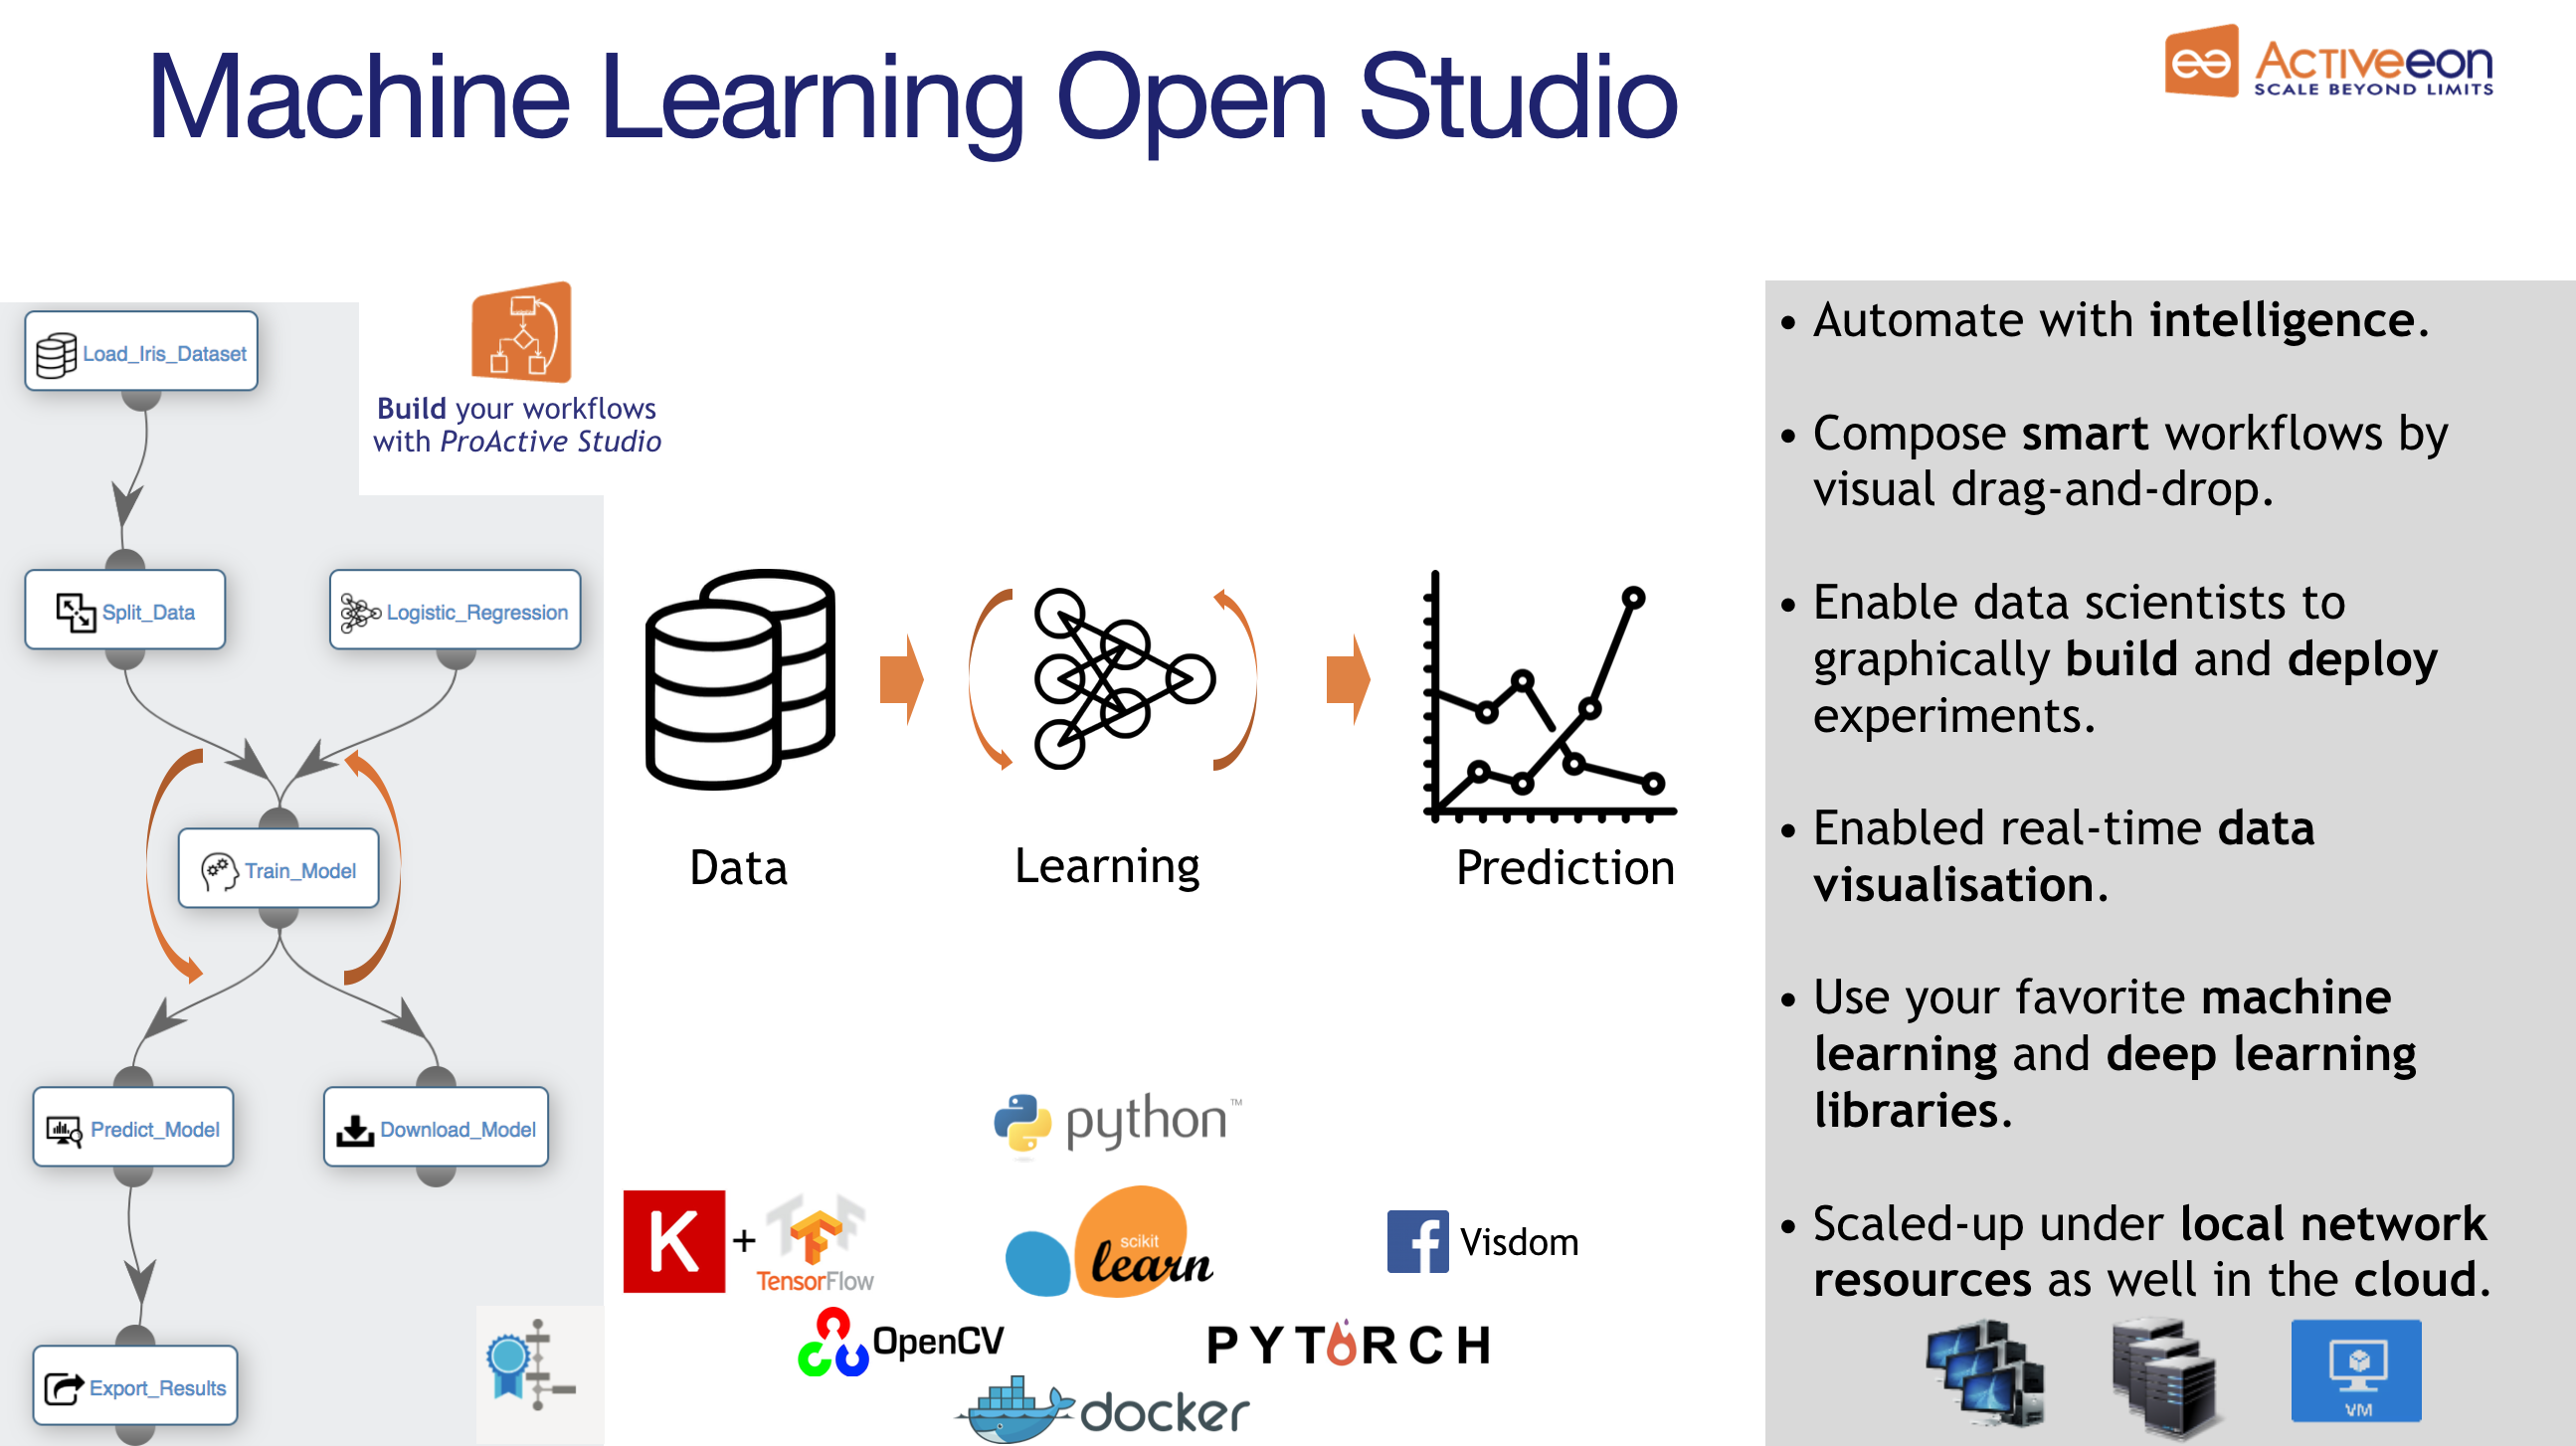
Machine Learning Open Studio is open source and allows easy task parallelization, running them on resources matching constraints (Multi-CPU, GPU, data locality, library).
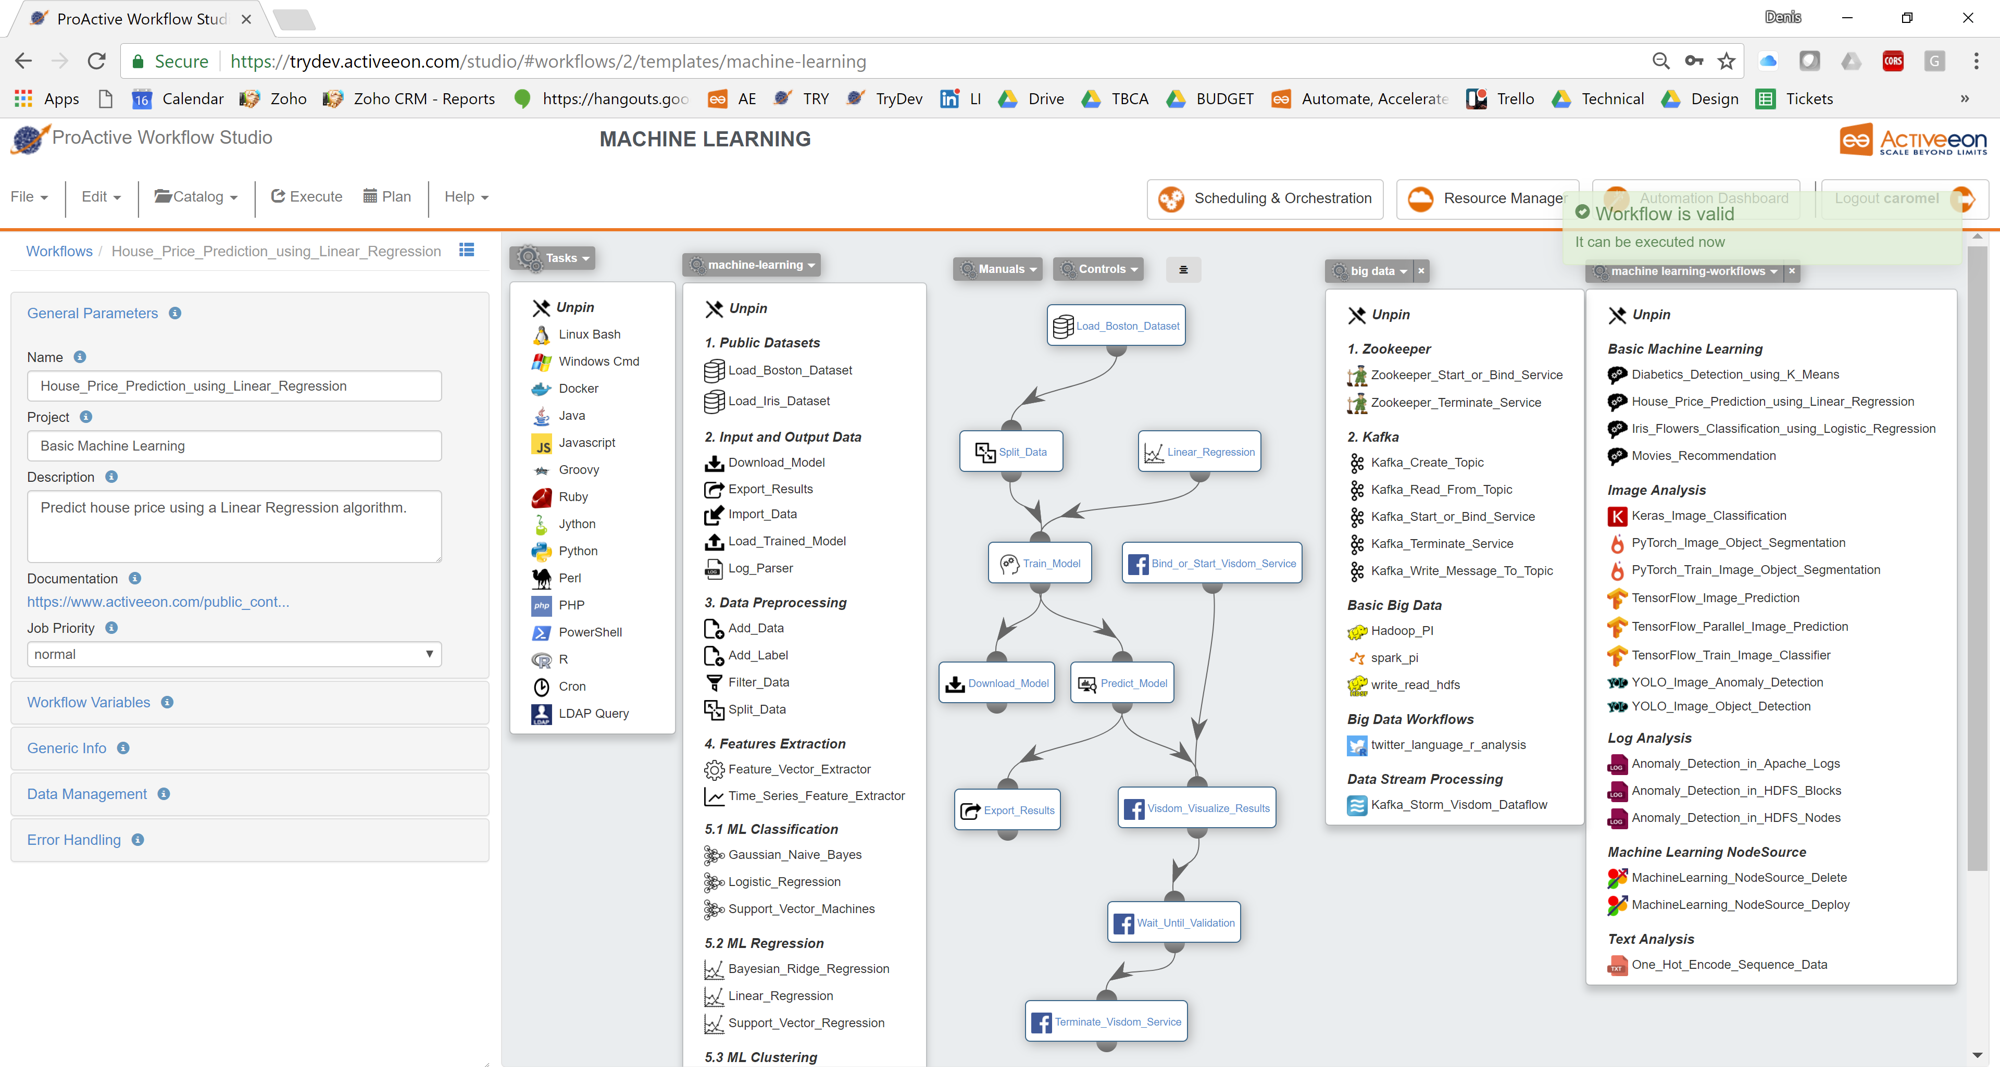
The Machine Learning Open Studio can be tried for free online here.
1.2. Glossary
The following terms are used throughout the documentation:
- ProActive Workflows & Scheduling
-
The full distribution of ProActive for Workflows & Scheduling, it contains the ProActive Scheduler server, the REST & Web interfaces, the command line tools. It is the commercial product name.
- ProActive Scheduler
-
Can refer to any of the following:
-
A complete set of ProActive components.
-
An archive that contains a released version of ProActive components, for example
activeeon_enterprise-pca_server-OS-ARCH-VERSION.zip. -
A set of server-side ProActive components installed and running on a Server Host.
-
- Resource Manager
-
ProActive component that manages ProActive Nodes running on Compute Hosts.
- Scheduler
-
ProActive component that accepts Jobs from users, orders the constituent Tasks according to priority and resource availability, and eventually executes them on the resources (ProActive Nodes) provided by the Resource Manager.
| Please note the difference between Scheduler and ProActive Scheduler. |
- REST API
-
ProActive component that provides RESTful API for the Resource Manager, the Scheduler and the Catalog.
- Resource Manager Web Interface
-
ProActive component that provides a web interface to the Resource Manager.
- Scheduler Web Interface
-
ProActive component that provides a web interface to the Scheduler.
- Workflow Studio
-
ProActive component that provides a web interface for designing Workflows.
- Job Planner Portal
-
ProActive component that provides a web interface for planning Workflows, and creating Calendar Definitions
- Job Planner
-
A ProActive component providing advanced scheduling options for Workflows.
- Bucket
-
ProActive notion used with the Catalog to refer to a specific collection of ProActive Objects and in particular ProActive Workflows.
- Server Host
-
The machine on which ProActive Scheduler is installed.
SCHEDULER_ADDRESS-
The IP address of the Server Host.
- ProActive Node
-
One ProActive Node can execute one Task at a time. This concept is often tied to the number of cores available on a Compute Host. We assume a task consumes one core (more is possible, so on a 4 cores machines you might want to run 4 ProActive Nodes. One (by default) or more ProActive Nodes can be executed in a Java process on the Compute Hosts and will communicate with the ProActive Scheduler to execute tasks.
- Compute Host
-
Any machine which is meant to provide computational resources to be managed by the ProActive Scheduler. One or more ProActive Nodes need to be running on the machine for it to be managed by the ProActive Scheduler.
|
Examples of Compute Hosts:
|
PROACTIVE_HOME-
The path to the extracted archive of ProActive Scheduler release, either on the Server Host or on a Compute Host.
- Workflow
-
User-defined representation of a distributed computation. Consists of the definitions of one or more Tasks and their dependencies.
- Generic Information
-
Are additional information which are attached to Workflows.
- Job
-
An instance of a Workflow submitted to the ProActive Scheduler. Sometimes also used as a synonym for Workflow.
- Job Icon
-
An icon representing the Job and displayed in portals. The Job Icon is defined by the Generic Information workflow.icon.
- Task
-
A unit of computation handled by ProActive Scheduler. Both Workflows and Jobs are made of Tasks.
- Task Icon
-
An icon representing the Task and displayed in the Studio portal. The Task Icon is defined by the Task Generic Information task.icon.
- ProActive Agent
-
A daemon installed on a Compute Host that starts and stops ProActive Nodes according to a schedule, restarts ProActive Nodes in case of failure and enforces resource limits for the Tasks.
2. Get Started
To submit your first Machine Learning workflow to ProActive Scheduler, install it in your environment (default credentials: admin/admin) or just use our demo platform try.activeeon.com.
ProActive Scheduler provides comprehensive interfaces that allow to:
We also provide REST and command line interfaces for advanced users. try.activeeon.com/rest
3. Create a First Predictive Solution
Suppose you need to predict houses prices based on this information (features) provided by the estate agency:
-
CRIM per capita crime rate by town
-
ZN proportion of residential lawd zoned for lots over 25000
-
INDUS proportion of non-retail business acres per town
-
CHAS Charles River dummy variable
-
NOX nitric oxides concentration
-
RM average number of rooms per dwelling
-
AGE proportion of owner-occupied units built prior to 1940
-
DIS weighted distances to five Boston Employment centres
-
RAD index of accessibility to radial highways
-
TAX full-value property-tax rate per $10 000
-
PTRATIO pupil-teacher ratio by town
-
B 1000(Bk - 0.63)^2 where Bk is the proportion of blacks by town
-
LSTAT % lower status of the population
-
MDEV Median value of owner-occupied homes in $1000' s
Predicting houses prices is a complex problem, but we can simplify it a bit for this step by step example. We’ll show you how you can easily create a predictive analytics solution using Machine Learning Open Studio.
3.1. Manage the Canvas
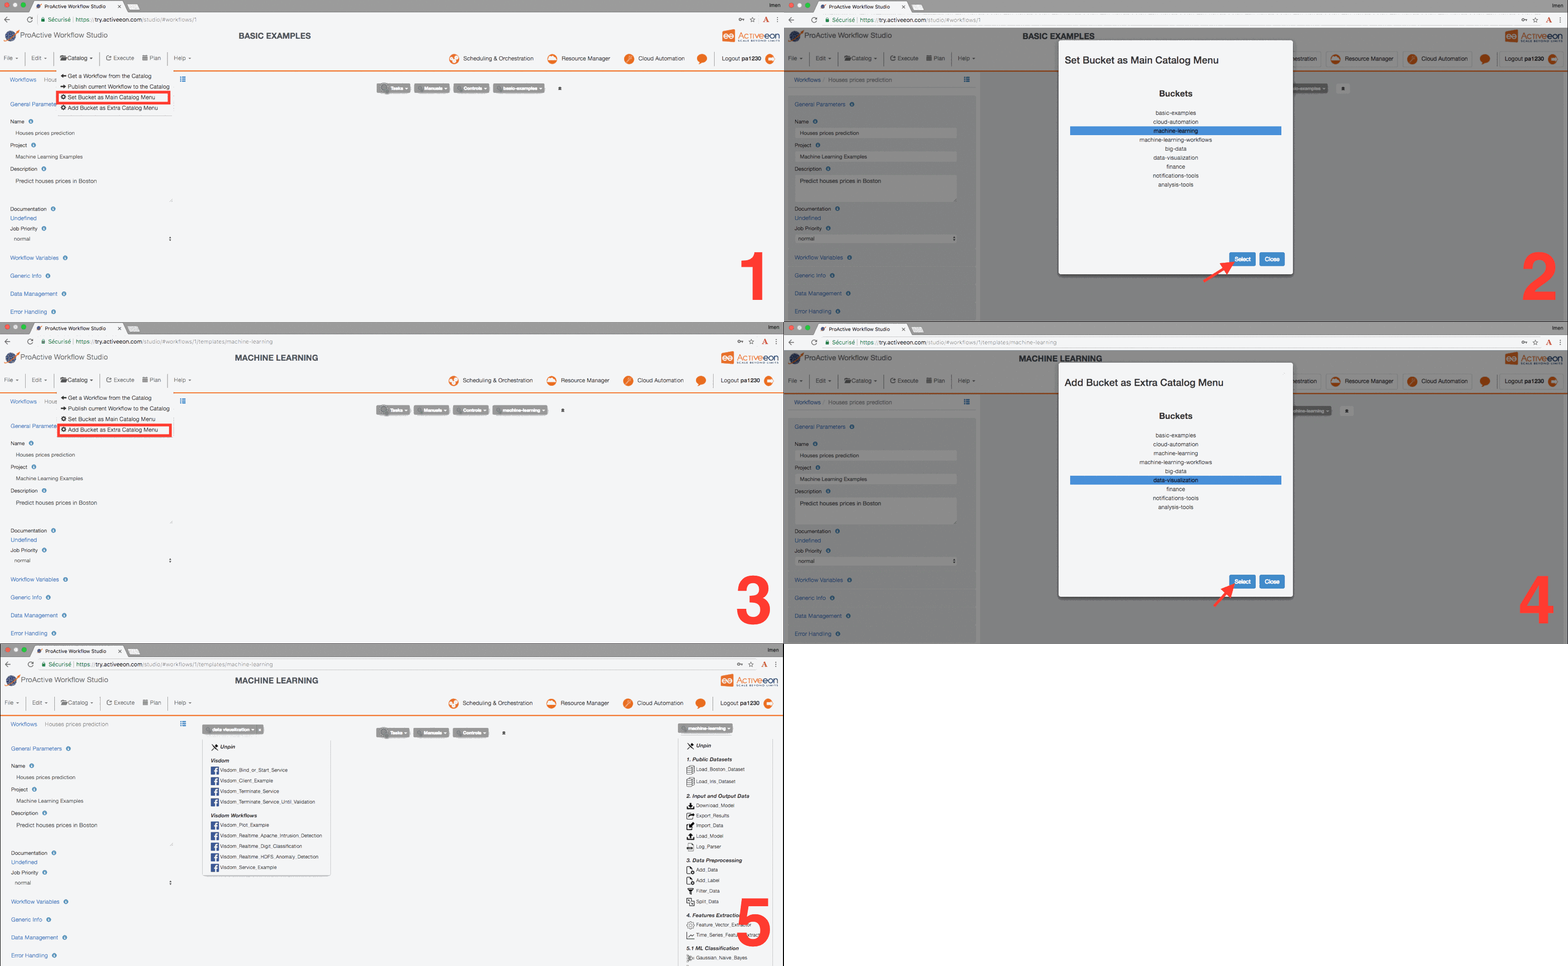
To use Machine Learning Open Studio, you need to add the Machine Learning Bucket as main catalog in the ProActive Studio. This bucket contains a set of generic tasks that enables you to upload and prepare data, train a model and test it.
-
Open ProActive Workflow Studio home page.
-
Create a new workflow.
-
Fill the Workflow
General Parameters. -
Click on
Catalogmenu thenSet Bucket as Main Catalog Menuand selectmachine-learningbucket. This can also be achieved by adding/templates/machine-learningat the end of the URL of the proActive workflow studio. -
Click on
Catalogmenu thenAdd Bucket as Extra Catalog Menuand selectdata-visualizationbucket. -
Organize your canvas.
| Set Bucket as Main Catalog Menu allows the user to change the bucket used to get workflows from the Catalog in the studio. By selecting a bucket, the user can change the content of the main Catalog menu (named as the current bucket) to get workflows from another bucket as templates. |
3.2. Upload Data
To upload data into the Workflow, you need to use a dataset stored in a CSV file.
-
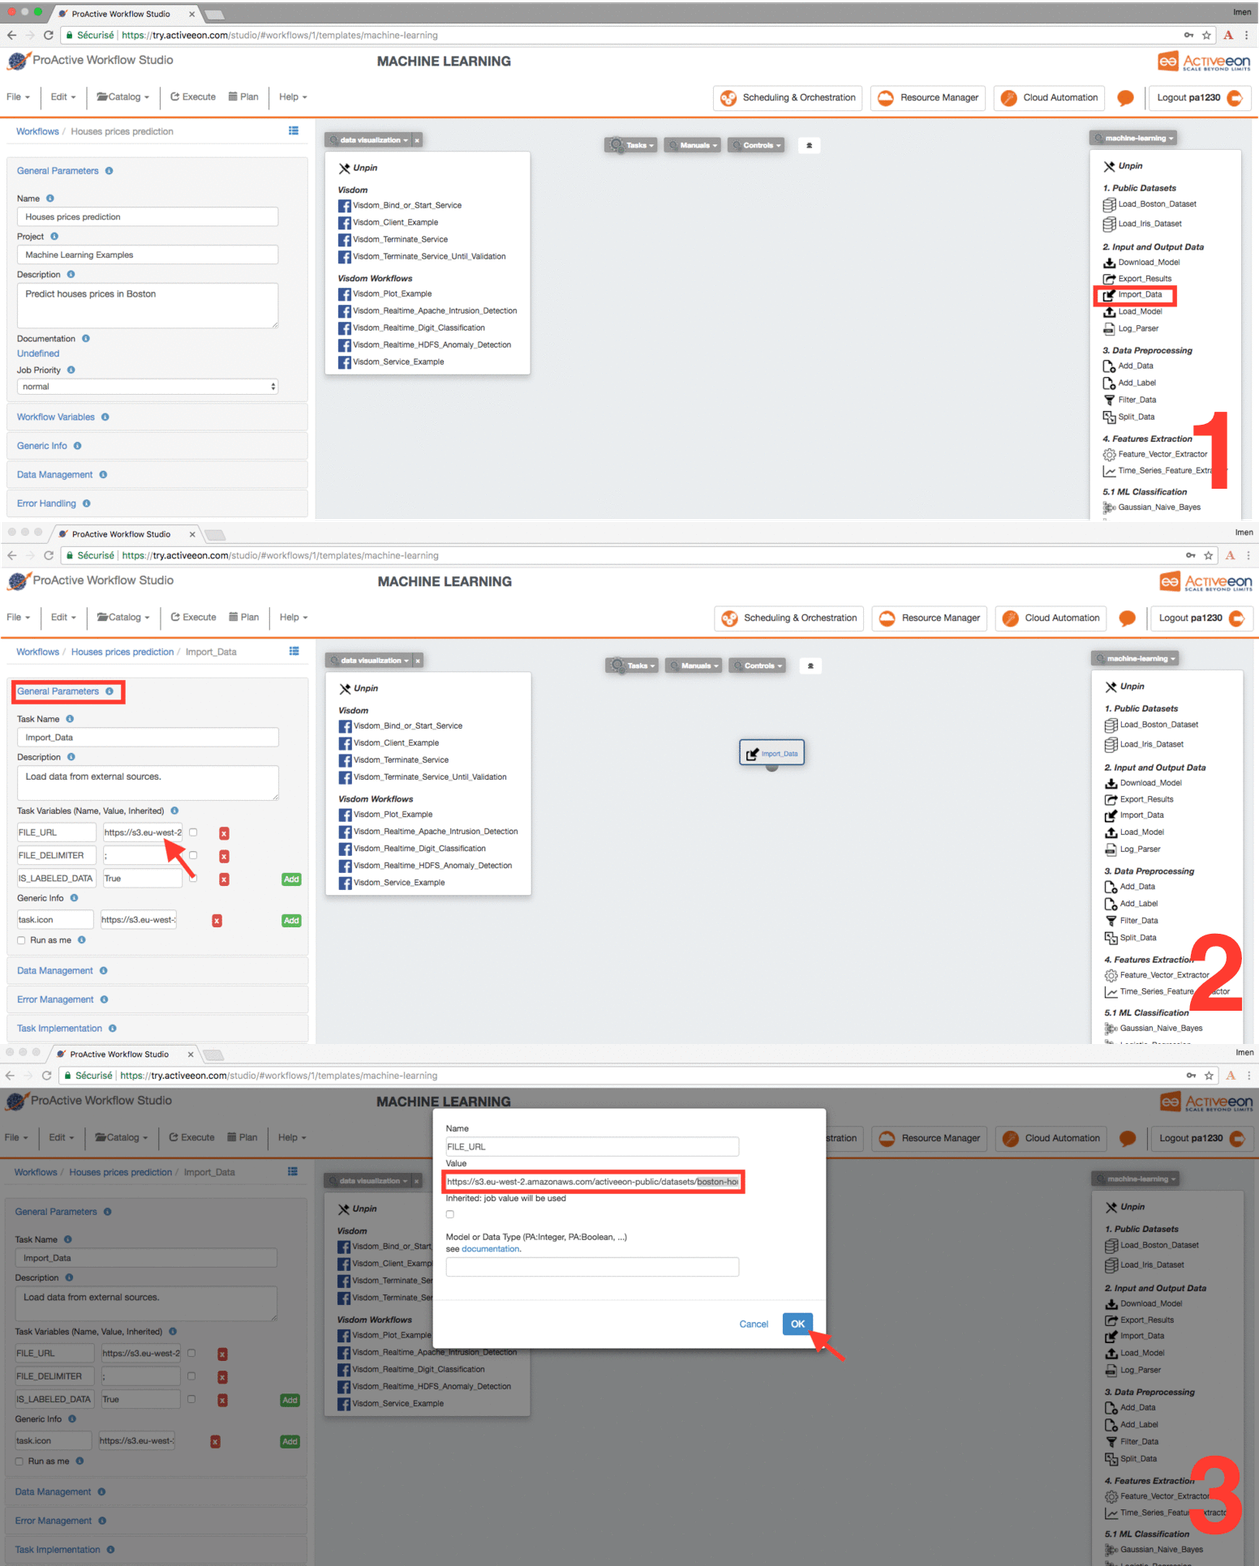
Once your dataset has been converted to CSV format, upload it into a cloud storage service for example Amazon S3. For this tutorial, we will use Boston house prices dataset available on this link: https://s3.eu-west-2.amazonaws.com/activeeon-public/datasets/boston-houses-prices.csv
-
Drag and drop the Import_Data task from the machine-learning bucket in the ProActive Workflow Studio.
-
Click on the task and click
General Parametersin the left to change the default parameters of this task. -
Put in FILE_URL variable the S3 link to upload your dataset.
-
Set the other parameters according to your dataset format.
This task uploads the data into the workflow that we can for model training and testing.
If you want to skip these steps, you can directly use the Load_Boston_Dataset Task by a simple drag and drop.
3.3. Prepare Data
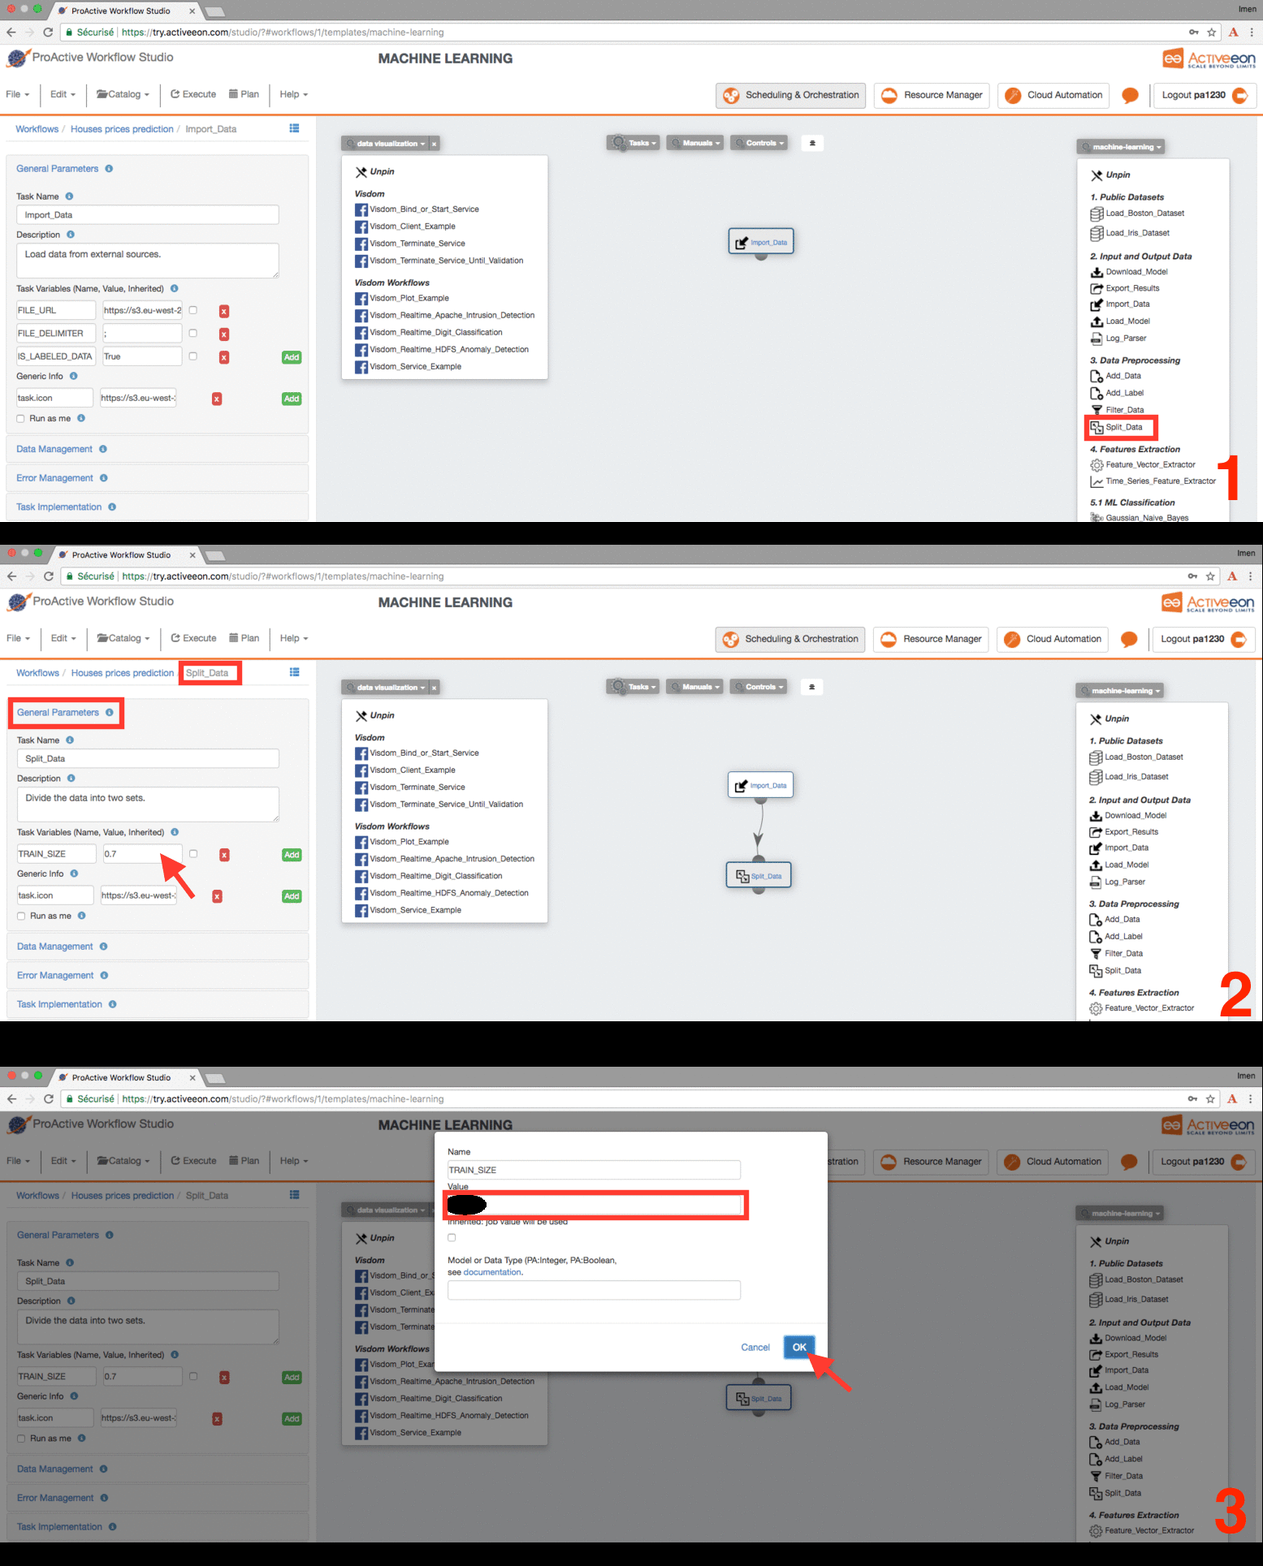
This step consists of preparing the data for the training and testing of the predictive model. So in this example, we will simply split our datset into two separate datasets: one for training and one for testing.
To do this, we use the Split_Data Task in the machine_learning bucket.
-
Drag and drop the Split_Data Task into the canvas, and connect it to the Import_Data or Load_Boston_Dataset Task.
-
By default, the ratio is 0.7 this means that 70% of the dataset will be used for training the model and 0.3 for testing it.
-
Click the Split_Data Task and set the TRAIN_SIZE variable to 0.6.
3.4. Train a Predictive Model
Using Machine Learning Open Studio, you can easily create different machine learning models in a single experiment and compare their results. This type of experimentation helps you find the best solution for your problem.
You can also enrich the machine-learning bucket by adding new machine learning algorithms and publish or customize an existing task according to your requirements as the tasks are open source.
To change the code of a task click on it and click the Task Implementation. You can also add new variables to a specific task.
|
In this step, we will create two different types of models and then compare their scores to decide which algorithm is most suitable to our problem. As the Boston dataset used for this example consists of predicting price of houses (continuous label). As such, we need to deal with a regression predictive problem.
To solve this problem, we have to choose a regression algorithm to train the predictive model. To see the available regression algorithms available on the Machine Learning Open Studio, see ML Regression Section in the machine-learning bucket.
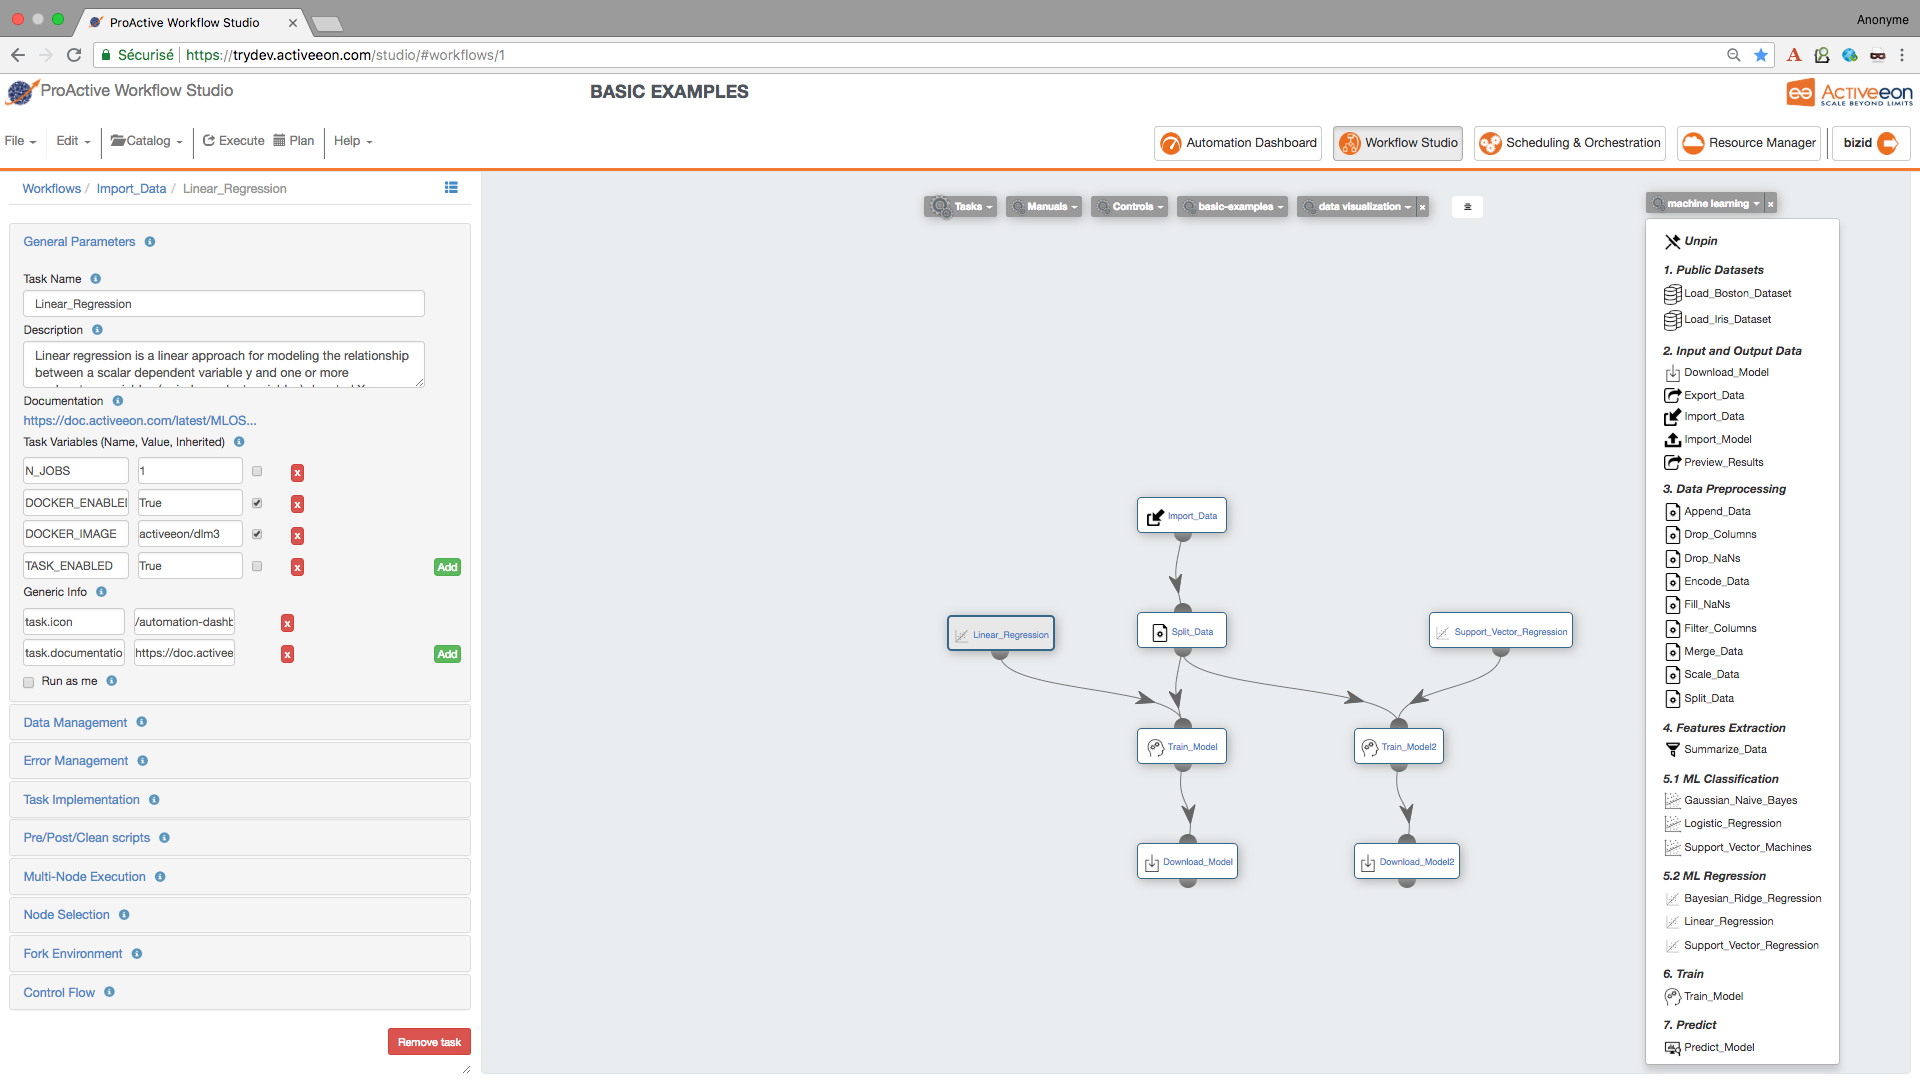
For this example, we will use Linear_Regression Task and Support_Vector_Regression Task.
-
Find the Linear_Regression Task and Support_Vector_Regression Task and drag them into the canvas.
-
Find the Train_Model Task and drag it twice into the canvas and set its LABEL_COLUMN variable to LABEL.
-
Connect the Split_Data Task to the two Train_Model Tasks in order to give it access to the training data. Connect then the Linear_Regression Task to the first Train_Model Task and Support_Vector_Regression to the second Train_Model Task.
-
To be able to download the model learned by each algorithm, drag two Download_Model Tasks and connect them to each Train_Model Task.
3.5. Test the Predictive Model
To evaluate the two learned predictive models, we will use the testing data that was separated out by the Split_Data Task to score our trained models. We can then compare the results of the two models to see which generated better results.
-
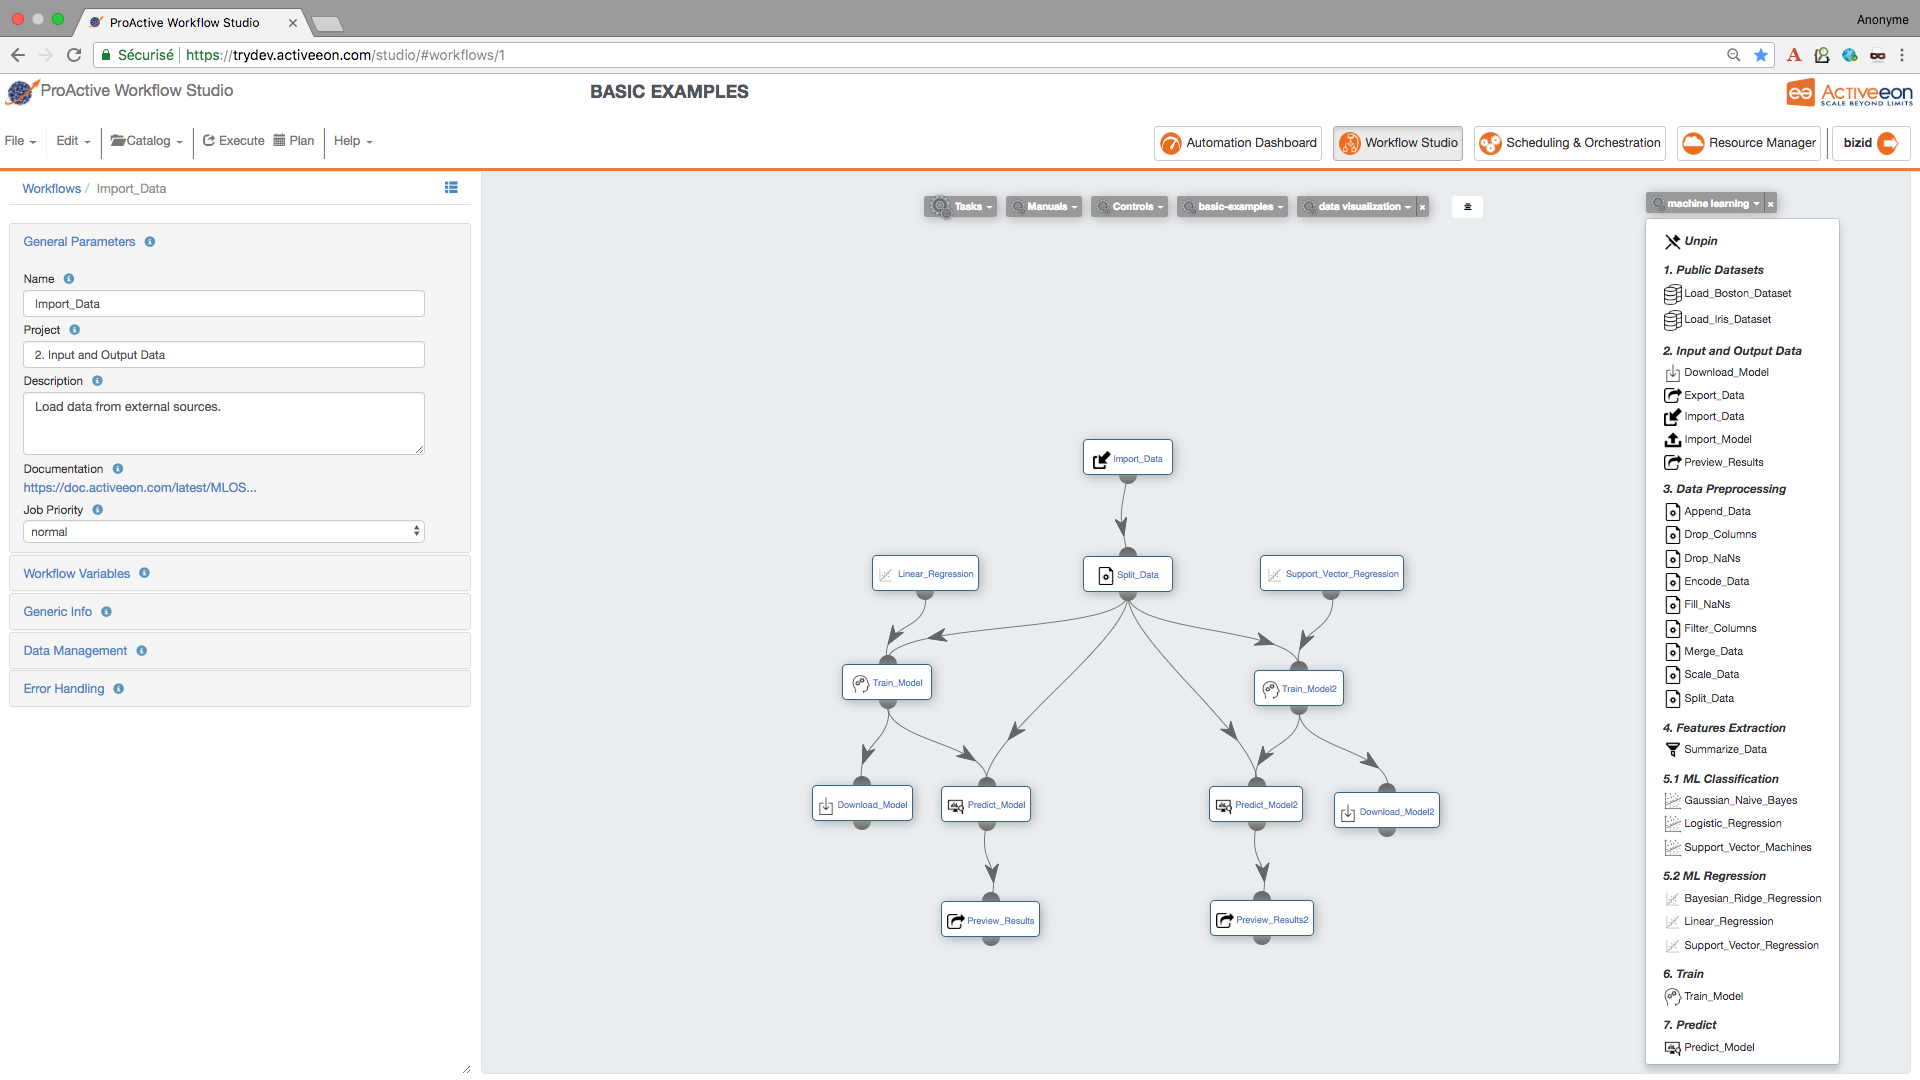
Find the Predict_Model Task and drag and drop it twice into the canvas and set its LABEL_COLUMN variable to LABEL.
-
Connect the first Predict_Model Task to the Train_Model Task that is connected to Support_Vector_Regression Task.
-
Connect the second Predict_Model Task to the Train_Model Task that is connected to Linear_Regression Task.
-
Connect the second Predict_Model Task to the Split_Data Task
-
Find the [Preview_Results] Task in the Machine Learning bucket and drag and drop it twice into the canvas.
-
Connect each [Preview_Results] Task with Predict_Model.
| if you have a pickled file (.pkl) containing a predictive model that you have learned using another platform and you need to test it in the Machine Learning Open Studio, you can load it using Import_Model Task. |
3.6. Run the Experiment and Preview the Results
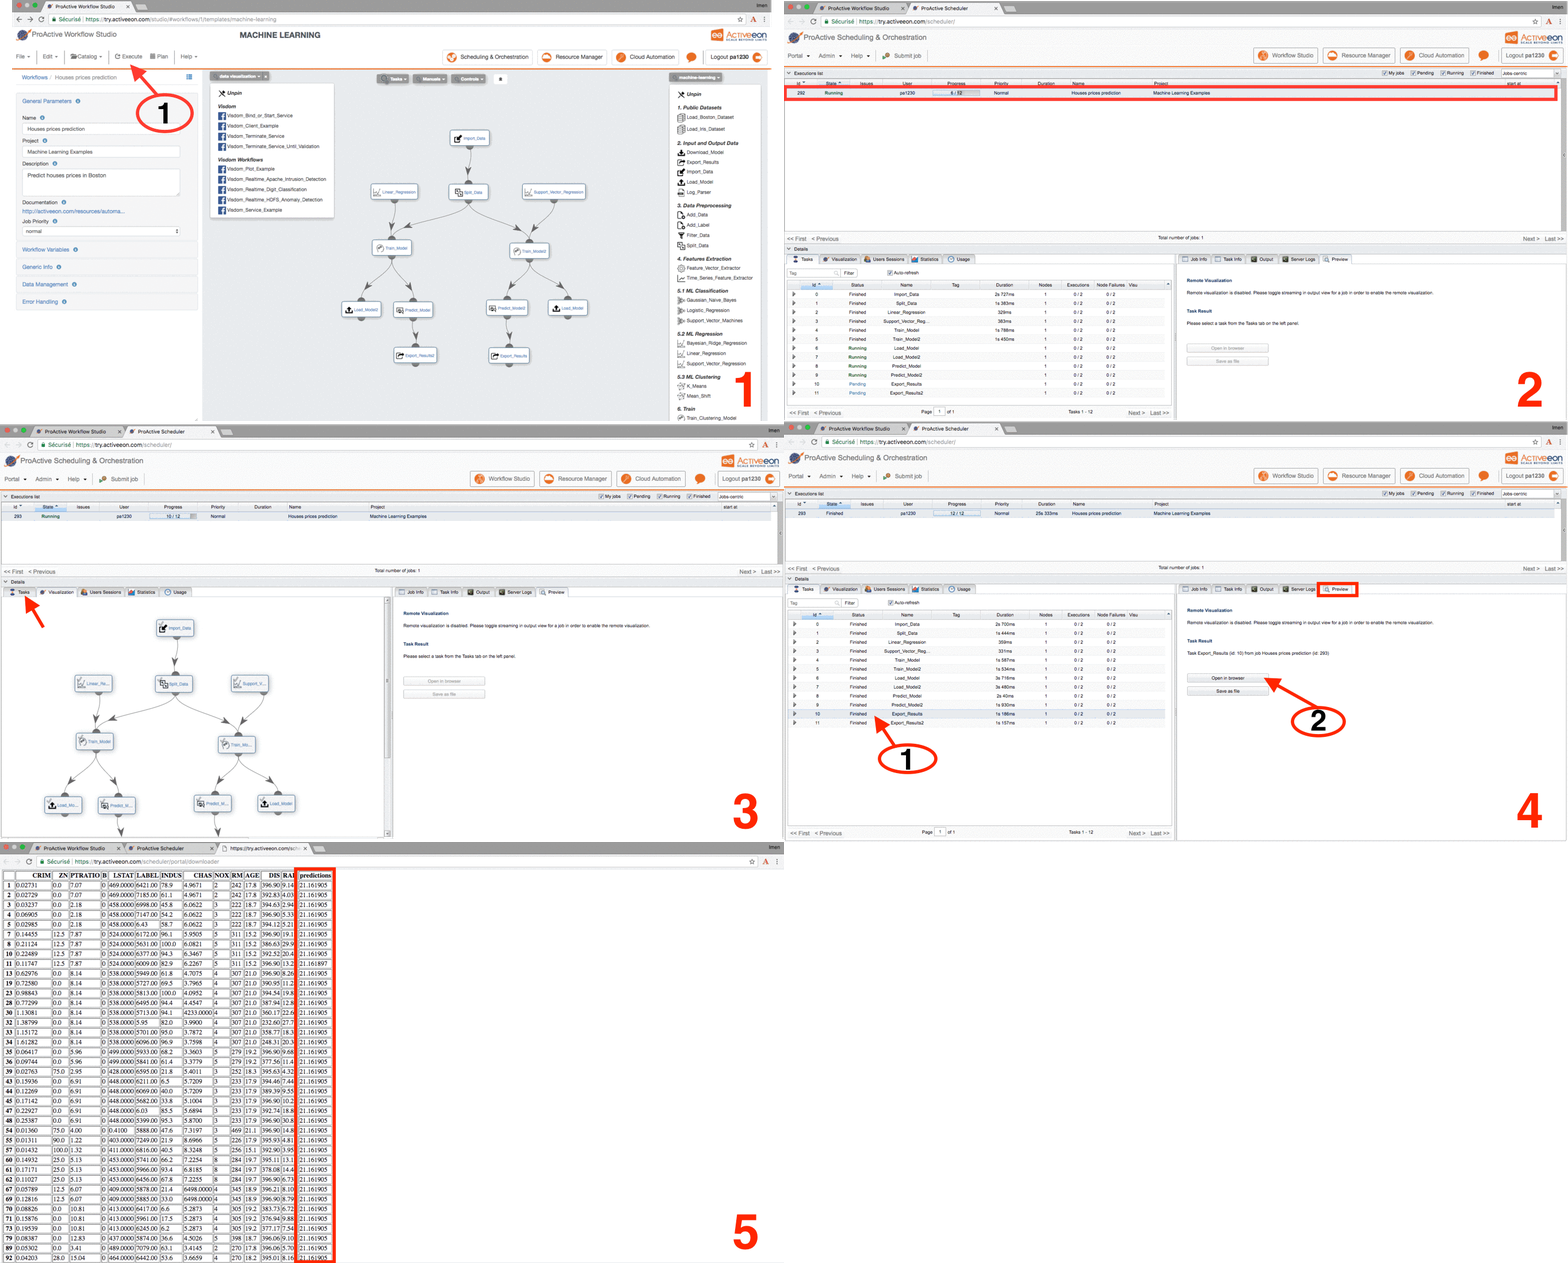
Now the workflow is completed, let’s execute it by:
-
Click the Execute button on the menu to run the workflow.
-
Click the Scheduling & Orchestration button to track the workflow execution progress.
-
Click the Visualization tab and track the progress of your workflow execution (a green check mark appears on each Task when its execution is finished).
-
Visualize the output logs by clicking on the output tab and check the streaming check box.
-
Click the Tasks tab, select an Export_Results task and click on the Preview tab, then click either on Open in browser to preview the results on your browser or on Save as file to download the results locally.
4. Customize the Machine Learning Bucket
4.1. Create or Update a ML Task
Machine Learning Bucket contains various open source tasks that can be easily used by a simple drag and drop.
It is possible to enrich the Machine Learning Bucket by adding your own tasks. (see section 4.3)
It is also possible to customize the code of the generic Machine Learning tasks. In this case, you need to drag and drop the targeted task to modify its code in the Task Implementation section.
| It is also possible to add or/and delete variables of each task, set your own fork environments etc. More details available on Proactive User Guide |
4.2. Set the Fork Environment
A fork execution environment is a new Java Virtual Machine (JVM) which is started exclusively to execute a task. Starting a new JVM means that the task inside it will run in a new environment. This environment can be set up by the creator of the task. A new JVMs is set up with a new classpath, new system properties and more customization.
We used a Docker fork environment for all the Machine Learning tasks. activeeon/dlm3 was used as a docker container for all tasks. If your task needs to install new Machine Learning libraries which are not available in this container, then, use your own docker container or an appropriate environment with the needed libraries.
| The use of docker containers is recommended as that way other tasks will not be affected by change. Docker containers provide isolation so that the host machine’s software stays the same. More details available on Proactive User Guide |
4.3. Publish a ML Task
The Catalog menu provides the possibility for a user to publish newly created or/and update tasks inside Machine Learning Bucket, you need just to click on Catalog Menu then Publish current Workflow to the Catalog.
Choose machine-leaning Bucket to store your newly added workflow on it.
If the Task with the same name already exists in the 'machine-leaning' bucket, then, it will be updated.
We recommend to submit Tasks with a commit message for easier differentiation between the different submitted versions.
| More details available on ProActive User Guide |
4.4. Create a ML Workflow
The quickstart tutorial on try.activeeon.com shows you how to build a simple workflow using ProActive Studio.
We show below an example of a workflow created with the Studio:
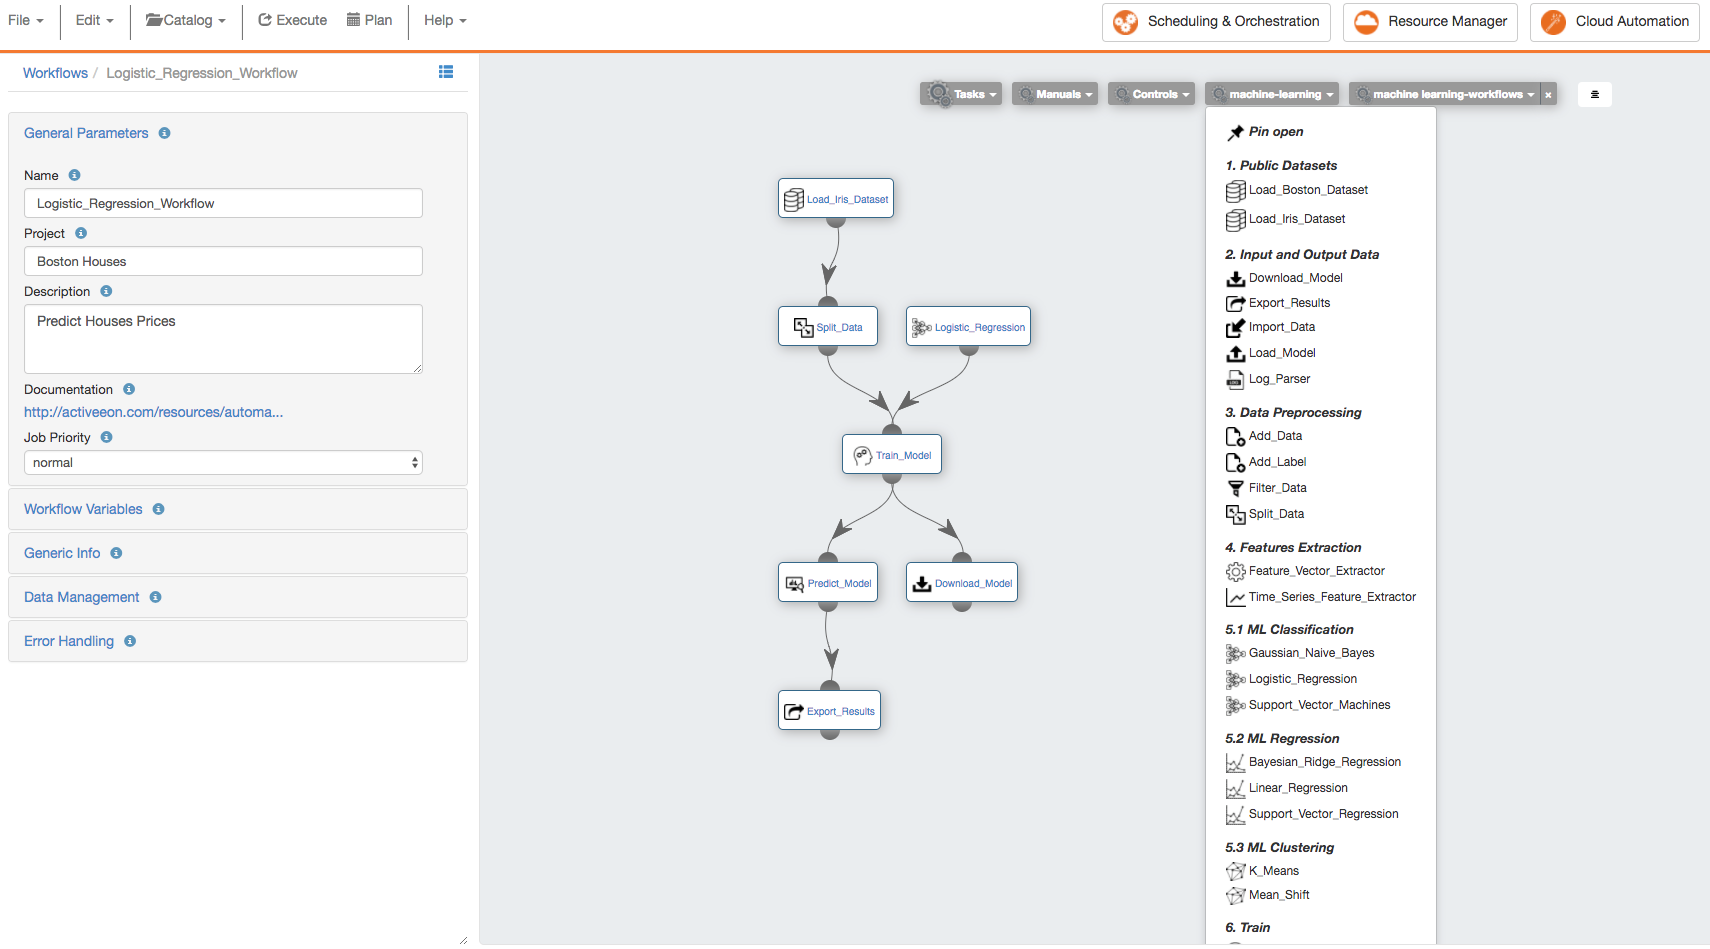
At the left part, are illustrated the General Parameters of the workflow with the following information:
-
Name: the name of the workflow. -
Project: the project name to which belongs the workflow. -
Description: the textual description of the workflow. -
Documentation: if the workflow has a Generic Information named "Documentation", then its URL value is displayed as a link. -
Job Priority: the priority assigned to the workflow. It is by default set toNORMAL, but can be increased or decreased once the job is submitted.
| The workflow represented in the above is available on the 'machine-learning-workflows' bucket. |
5. Machine Learning Workflows Examples
The Machine Learning Open Studio provides a fast, easy and practical way to execute different workflows using the machine learning bucket. We present useful machine learning workflows for different applications in the following sub-sections.
To test these workflows, you need to add the machine-Learning-workflows Bucket as main catalog in the ProActive Studio.
-
Open ProActive Workflow Studio home page.
-
Create a new workflow.
-
Click on
Catalogmenu thenAdd Bucket as Extra Catalog Menuand selectmachine-learning-workflowsbucket. -
Open this added extra catalog menu and drag and drop the workflow example of your choice.
-
Execute the chosen workflow, track its progress and preview its results.
More details about these workflows are available in this in ActiveEon’s Machine Learning Documentation
5.1. Basic Machine Learning
The following workflows present some machine learning basic examples. These workflows are built using generic Machine learning and data visualization tasks available on the Machine Learning and Data Visualization buckets.
Diabetics_Detection_using_K_means: trains and tests a clustering model using Mean_shift algorithm.
House_Price_Prediction_using_Linear_Regression: trains and tests a regression model using Mean_shift algorithm.
Iris_Flowers_Classification_using_Logistic_Regression: trains and tests a predictive model using logistic_regressive algorithm.
Movies_Recommendation: create a movie recommendation engine using collaborative filtering algorithm.
5.2. Image Analysis
The following workflows present useful computer vision applications using Convolutional Neural Networks based on deep learning for image recognition, object detection, anomaly detection, and image segmentation. Open source libraries, such as TensorFlow, Keras, Caffe, OpenCV, PyTorch and scikit-learn are used as backend for AI workflows.
Keras_Image_Classification: classifies an input image using deep ConvNets (specifically, VGG16) pre-trained on the ImageNet dataset.
Pytorch_Image_Object_Segmentation: returns the horse segments of a given input image.
Pytorch_Train_Image_Object_Segmentation: trains an image segmentation algorithm using PyTorch* to segment horses. It segments horses in the input image using a deep neural network (DNN).
Tensorflow_Parallel_Image_Prediction: predicts three different images of flower species in parallel.
Tensorflow_Image_Prediction: returns the flower species of a given input image.
Tensorflow_Train_Image_Classifier: trains a deep ConvNets (specifically, Inception)* to recognize flower species.
YOLO_Image_Object_Detection: detects real-world objects in a image with the YOLO* library using a pre-trained.
YOLO_Image_Anomaly_Detection: checks if an anomaly exists in a certain scene using the YOLO library. However, we show a scene where only people are allowed on a pedestrian street. Anything detected other than people is considered as anomaly.
YOLO_Demo_Object_Detection: detects real-world objects in a image with the YOLO* library using a pre-trained model.
5.3. Log Analysis
The following workflows are designed to detect anomalies in log files. They are constructed using generic tasks which are available on the machine-learning and data-visualization buckets.
Anomaly_Detection_in_Apache_Logs: detects intrusions in apache logs using a predictive model trained using Support Vector Machines algorithm.
Anomaly_detection_in_HDFS_Blocks: trains and test an anomaly detection model for detecting anomalies in HDFS Blocks.
Anomaly_detection_in_HDFS_Nodes: trains and test an anomaly detection model for detecting anomalies in HDFS Nodes.
Unsupervised_Anomaly_Detection: detects anomalies using an Unsupervised One-Class SVM.
6. Deep Learning Workflows Examples
ML-OS provides a fast, easy and practical way to execute deep learning workflows. In the following sub-sections, we present useful deep learning workflows for text and image classification and generation.
You can test these workflows by following these steps :
-
Open ProActive Workflow Studio home page.
-
Create a new workflow.
-
Click on
Catalogmenu thenAdd Bucket as Extra Catalog Menuand selectdeep-learning-workflowsbucket. -
Open this added extra catalog menu and drag and drop the workflow example of your choice.
-
Execute the chosen workflow, track its progress and preview its results.
6.1. Azure Cognitive Services
The following workflows present useful examples composed by pre-built Azure cognitive services available on azure-cognitive-services bucket.
Emotion_Detection_in_Bing_News: is a mashup that searches for images of a person using Azure Bing Image Search then performs an emotion detection using Azure Emotion API.
Sentiment_Analysis_in_Bing_News: is a mashup that searches for news related to a given search term using Azure Bing News API then performs a sentiment analysis using Azure Text Analytics API.
6.2. Microsoft Cognitive Toolkit
The following workflows present useful examples for predictive models training and test using Microsoft Cognitive Toolkit (CNTK).
CNTK_ConvNet: trains a Convolutional Neural Network (CNN) on CIFAR-10 dataset.
CNTK_SimpleNet: trains a 2-layer fully connected deep neural network with 50 hidden dimensions per layer.
GAN_Generate_Fake_MNIST_Images: generates fake MNIST images using a Generative Adversarial Network (GAN).
DCGAN_Generate_Fake_MNIST_Images: generates fake MNIST images using a Deep Convolutional Generative Adversarial Network (DCGAN).
6.3. Mixed Workflows
The following workflow presents an example of a workflow built using pre-built Azure cognitive services tasks available on the azure-cognitive-services bucket and custom AI tasks available on the deep-learning bucket.
Custom_Sentiment_Analysis: is a mashup that searches for news related to a given search term using Azure Bing News API then performs a sentiment analysis using a custom deep learning based pretrained model.
6.4. Custom AI Workflows
The following workflows present an example of workflows built using custom AI tasks available on the deep-learning bucket. Such tasks enable you to train and test your own AI models by a simple drag and drop of custom AI task.
IMDB_Sentiment_Analysis: trains a model for opinions identification and categorization expressed in a piece of text, especially in order to determine the opinion of IMDB users regarding specific movies [positive or negative]. NOTE: Instead of training a model from scratch, you can use a pre-trained sentiment analysis model which is available on this link.
Image_Classification: uses a pre-trained deep neural network to classify ants and bees images. The pre-trained model is available on this link.
Language_Detection: involves building an RNN model from a lot of text data of respective languages and then identifying the test data (text) among the trained models.
Fake_Celebrity_Faces_Generation: generates a wild diversity of fake faces using a GAN model that was trained based on thousands of real celebrity photos. The pre-trained GAN model is available on this link
Image_Segmentation: predicts a segmentation model using SegNet network on Oxford-IIIT Pet Dataset. The pre-trained image segmentation model which is available on this link
Object_Detection: detects objects using a pre-trained YOLO v3 model on COCO dataset proposed by Microsoft Research. The pre-trained model is available on this link.
| It is recommended to use an enabled-GPU node to run the deep learning tasks. |
7. References
7.1. Machine Learning Bucket
The machine-learning bucket contains diverse generic machine learning tasks that enable you to easily compose workflows for predictive models learning and testing. This bucket can be easily customized according to your needs.
This bucket offers different options, you can customize it by adding new tasks or update the existing tasks.
ALl the tasks included in this bucket have som common task variables that we describe in the table below.
Common Task Variables:
Variable name |
Description |
Type |
|
If True, the tasks will be executed on a Docker container. activeeon/dlm3 image is used by default. If False, the required libraries should be installed in the different nodes that will be used. |
Boolean (default=True) |
|
Specifies the docker image that will be used to execute the task. |
String (default="activeeon/dlm3" |
|
If False, the will be ignored, it will not be executed. |
Boolean (default=True) |
|
Specifies how many rows of the dataframe will be previewed in the browser to check each task results. |
Int (default=-1) (-1 means preview all the rows) |
7.1.1. Public Datasets
Load_Boston_Dataset
Task Overview: Load and return the Boston House-Prices dataset.
| Features | Targets | Dimensionality | Samples Total |
|---|---|---|---|
Real, positive |
Real 5. -50 |
13 |
506 |
How to use this task:
-
The Boston House-Prices is a dataset for regression, you can only use it with a regression algorithm, such as Linear Regression and Support Vector Regression.
-
After this task, you can use the Split_Data task to divide the dataset into training and testing sets.
| More information about this dataset can be found here. |
Load_Iris_Dataset
Task Overview: Load and return the iris dataset.
| Features | Classes | Dimensionality | Samples per class | Samples total |
|---|---|---|---|---|
Real, positive |
3 |
4 |
50 |
150 |
How to use this task:
-
The Iris is a dataset for classification, you can only use it with a classification algorithm, such as Support Vector Machines and Logistic Regression.
-
After this task, you can use the Split_Data task to divide the dataset into training and testing sets.
| More information about this dataset can be found here. |
7.1.2. Input and Output Data
Download_Model
Task Overview: Download a trained model on your computer device.
How to use this task: It should be used after the Train_Model or Train_Clustering_Model tasks.
Export_Results
Task Overview: Export the results of the predictions generated by a classification, clustering or regression algorithm.
Task Variables:
Variable name |
Description |
Type |
|
Converts the prediction results to HTML or CSV file. |
String [HTML or CSV] |
How to use this task: It should be used after Predict_Model or Predict_Clustering_Model tasks.
Import_Data
Task Overview: Load data from external sources.
Task Variables:
Variable name |
Description |
Type |
|
Enter you URL of the CSV file. |
String |
|
Delimiter to use. |
String |
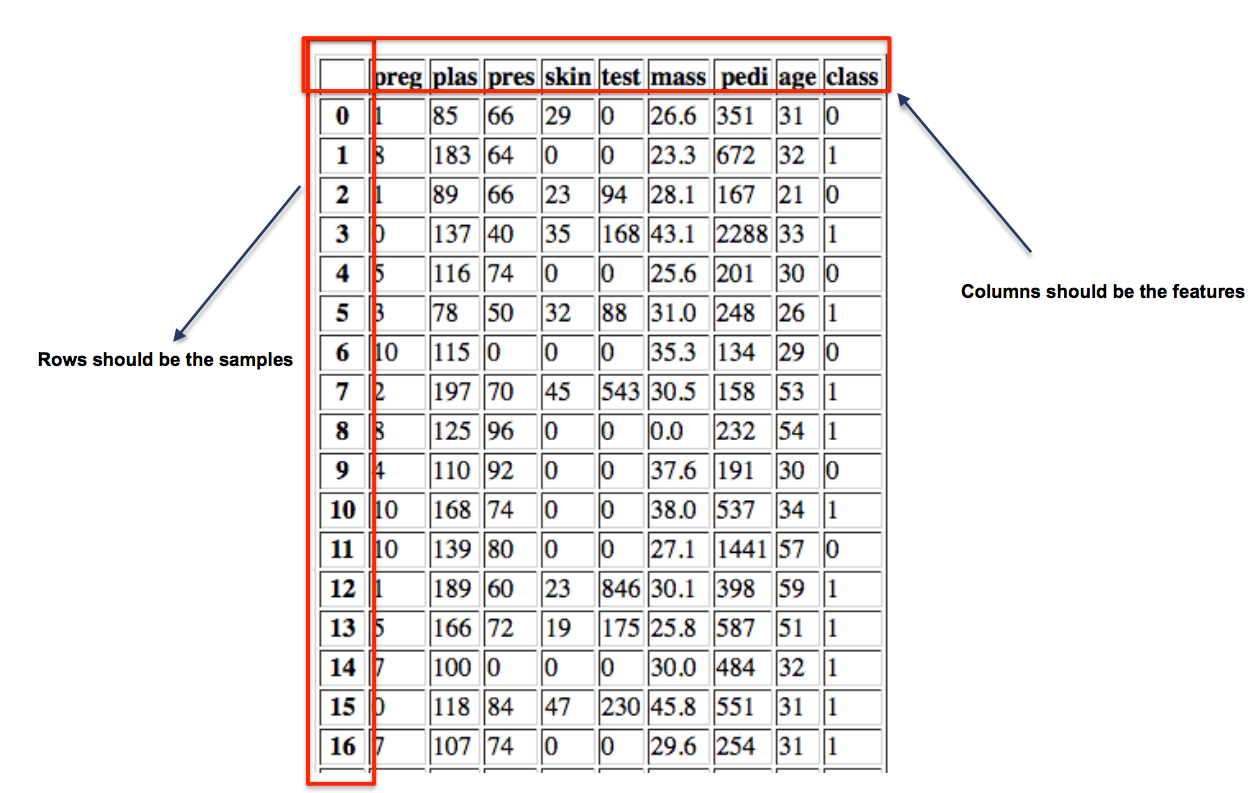
| Your CSV file should be in a table format. See the example below. |
Import_Model
Task Overview: Load a trained model, and use it to make predictions for new coming data.
Task Variables:
Variable name |
Description |
Type |
|
Type the URL to load your trained model. default: https://s3.eu-west-2.amazonaws.com/activeeon-public/models/pima-indians-diabetes.model |
String |
How to use this task: It should be used before Predict_Model or Predict_Clustering_Model to make predictions.
Log_Parser
Task Overview: Convert an unstructured raw log file into a structured one by matching a group of event patterns.
Task Variables:
Variable name |
Description |
Type |
|
Put the URL of the raw log file that you need to parse. |
String |
|
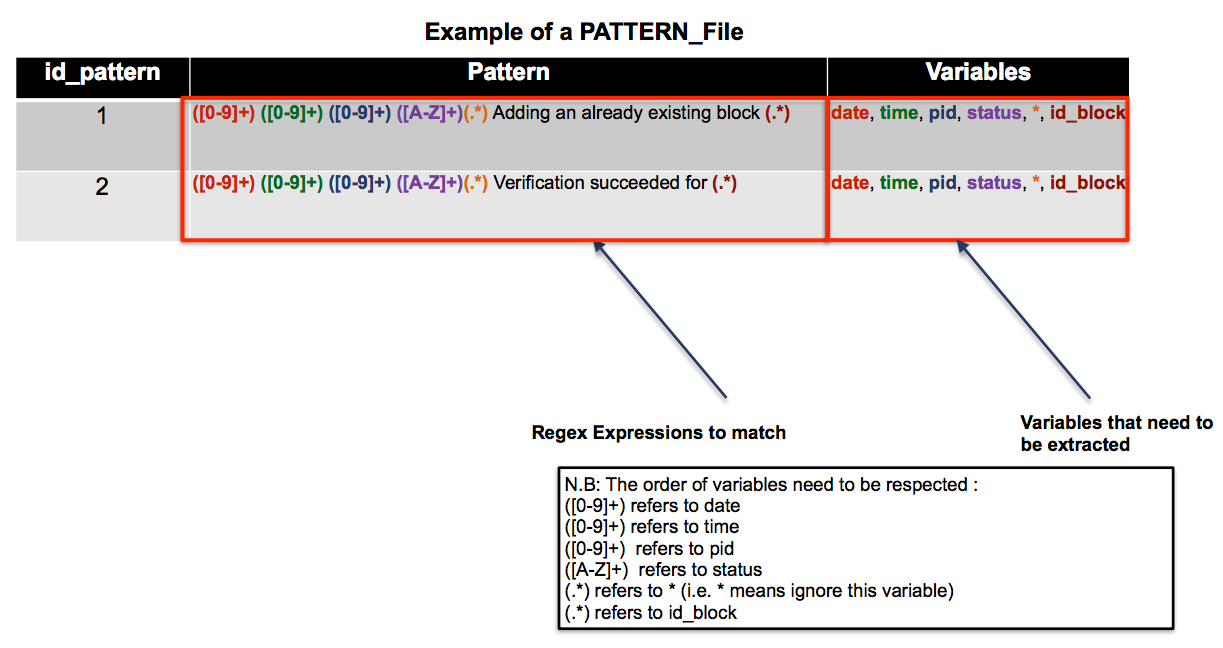
Put the URL of the CSV file that contains the different RegEx expressions of each possible pattern and their corresponding variables. The csv file must contain three columns (See the example below): A. id_pattern: Integer Specify the column containing the identifier of each pattern B. Pattern: RegEx expression Define the regex expression of each pattern C. Variables: String Specify the name of each variable included in the pattern. N.B: Use the symbol ‘*’ for variables that you need to neglect. (e.g. in the example below the 5th variable is neglected) N.B: All variables specified in each Regex expressions have to be mentioned in the column « Variables » in the right order (use ',' to separate the variable names). |
String |
|
Indicate the extension of the file where you will save the resulted structured logs. |
String [CSV or HTML] |
How to use this task: Could be connected with Filter_Data task and [Feature_Vector_Extractor] tasks.
7.1.3. Data Preprocessing
Drop_Columns
Task Overview: Drop the columns specified in COLUMNS_NAME variable.
Task Variables:
Variable name |
Description |
Type |
|
The list of columns that need to be dropped. Columns names should be separated by a comma. |
String |
| More details about the source code of this task can be found here. |
Drop_NaNs
Task Overview: Replace inf values to NaNs in a first place then drop objects on a given axis where alternately any or all of the data are missing.
| More details about the source code of this task can be found here. |
Encode_Data
Task Overview: Encode the values of the columns specified in COLUMNS_NAME variable with integer values between 0 and "the number of unique variables"-1.
Task Variables:
Variable name |
Description |
Type |
|
The list of columns that need to be encoded. Columns names should be separated by a comma. |
String |
| More details about the source code of this task can be found here. |
Fill_NaNs
Task Overview: Fill NA/NaN values using the specified method.
Task Variables:
Variable name |
Description |
Type |
|
Refers to the value to use to fill holes (e.g. 0). |
Integer |
| More details about the source code of this task can be found here. |
Filter_Columns
Task Overview: Subset columns of a dataframe according to the specified list of coluumns in the COLUMNS_NAME variable.
Task Variables:
Variable name |
Description |
Type |
|
The list of columns to restrict to. Columns names should be separated by a comma. |
String |
| More details about the source code of this task can be found here. |
Merge_Data
Task Overview: Merge DataFrame objects by performing a database-style join operation based on a specific reference column specified in the REF_COLUMN variable.
Task Variables:
Variable name |
Description |
Type |
|
The list of columns to restrict to. Columns names should be separated by a comma. |
String |
| More details about the source code of this task can be found here. |
Scale_Data
Task Overview: Scale a dataset based on a robust scaler or standard scaler.
Task Variables:
Variable name |
Description |
Type |
|
The list of columns to restrict to. Columns names should be separated by a comma. |
List [RobustScaler, StandardScaler] (default=RobustScaler) |
|
The list of columns that will be scaled. column names should be separated by a comma. |
String |
| More details about the source code of this task can be found here. |
Split_Data
Task Overview: Separate data into train and test subsets.
Task Variables:
Variable name |
Description |
Type |
|
This parameter must be float within the range (0.0, 1.0), not including the values 0.0 and 1.0. default = 0.7 |
Float |
How to use this task: It should be used before Train and Predict tasks.
| More details about the source code of this task can be found here. |
Filter_Data
Task Overview: Query the columns of your data with a boolean expression.
Task Variables:
Variable name |
Description |
Type |
|
The query string to evaluate. |
String |
|
Refers to the extension of the file where the resulted filtered data will be saved. |
String [CSV or HTML] |
| More details about the source code of this task can be found here. |
7.1.4. Feature Extraction
Summarize_Data
Task Overview: Calculate the histogram of a dataframe based on a reference column that need to be specified in the variable REF_COLUMN.
Task Variables:
Variable name |
Description |
Type |
|
The model that will be used to summarize data. |
List [KMeans, PolynomialFeatures] (default=KMeans) |
|
The column that will be used to group by the different histogram measures. |
String |
| More details about the source code of this task can be found here. |
Tsfresh_Features_Extraction
Task Overview: Calculate a comprehensive number of time series features based on the library TSFRESH.
Task Variables:
Variable name |
Description |
Type |
|
The column that contains the values of the time series |
String |
|
The column that will be used to group by the different features. |
String |
|
False if you do not need to extract all the possible features extractable by the library TSFRESH. |
Boolean [default = False] |
| More details about the source code of this task can be found here. |
7.1.5. ML Anomaly Detection
Local_Outlier_Factor
Task Overview: Local Outlier Factor is an unsupervised outlier detection method which computes the local density deviation of a given data point with respect to its neighbors. It considers as outlier samples that have a substantially lower density than their neighbors.
Task Variables:
Variable name |
Description |
Type |
|
Number of neighbors to use by default for kneighbors queries. If n_neighbors is larger than the number of samples provided, all samples will be used. |
Integer, Optional (default=20) |
|
The number of parallel jobs to run for neighbors search. If -1, then the number of jobs is set to the number of CPU cores. |
Integer, Optional (default=1) |
| More information about the source of this task can be found here. |
One_Class_SVM
Task Overview: One-class SVM is an unsupervised algorithm that learns a decision function for novelty detection: classifying new data as similar or different to the training set.
Task Variables:
Variable name |
Description |
Type |
|
An upper bound on the fraction of training errors and a lower bound of the fraction of support vectors. It should be in the interval [0, 1]. |
Float, Optional (default=0.5) |
|
Specifies the kernel type to be used in the algorithm. It must be one of ‘linear’, ‘poly’, ‘rbf’, ‘sigmoid’, ‘precomputed’ or a callable. If none is given, ‘rbf’ will be used. If a callable is given it is used to precompute the kernel matrix. |
string, Optional (default='rbf') |
|
Kernel coefficient for ‘rbf’, ‘poly’ and ‘sigmoid’. If gamma is ‘auto’ then 1/n_features will be used instead. |
Float, Optional (default='auto') |
| More information about the source of this task can be found here. |
7.1.6. ML Classification
Gaussian_Naive_Bayes
Task Overview: Naive Bayes classifier is a family of simple probabilistic classifier based on applying Bayes' theorem with strong (naive) independence assumptions between the features.
Task Variables:
Variable name |
Description |
Type |
|
Prior probabilities of the classes. If specified the priors are not adjusted according to the data. |
array-like, shape (n_classes) |
How to use this task: It should be connected with Train_Model or Train_Clustering_Model and Predict_Model or Predict_Clustering_Model.
| More information about this task can be found here. |
Logistic_Regression
Task Overview: Logistic Regression is a regression model where the Dependent Variable (DV) is categorical.
Task Variables:
Variable name |
Description |
Type |
|
Used to specify the norm used in the penalization. The ‘newton-cg’, ‘sag’ and ‘lbfgs’ solvers support only l2 penalties. default=‘l2’ |
String |
|
Algorithm to use in the optimization problem. |
‘newton-cg’, ‘lbfgs’, ‘liblinear’, ‘sag’, ‘saga’, default: ‘liblinear’ |
|
Useful only for the newton-cg, sag and lbfgs solvers. Maximum number of iterations taken for the solvers to converge. |
Integer (default=100) |
|
Number of CPU cores used. If given a value of -1, all cores are used. |
Integer (default=1) |
How to use this task: It should be connected with Train_Model or Train_Clustering_Model and Predict_Model or Predict_Clustering_Model.
| More information about the source code of this task can be found here. |
Support_Vector_Machines
Task Overview: Support vector machines are supervised learning models with associated learning algorithms that analyze data used for classification.
Task Variables:
Variable name |
Description |
Type |
|
Penalty parameter C of the error term. |
Float, optional (default=1.0) |
|
Specifies the kernel type to be used in the algorithm. It must be one of ‘linear’, ‘poly’, ‘rbf’, ‘sigmoid’,‘precomputed’ or a callable. |
string, optional (default=’rbf’) |
How to use this task: It should be connected with Train_Model or Train_Clustering_Model and Predict_Model or Predict_Clustering_Model.
| More information about the source of this task can be found here. |
7.1.7. ML Regression
Bayesian_Ridge_Regression
Task Overview: Bayesian linear regression is an approach to linear regression in which the statistical analysis is undertaken within the context of Bayesian inference.
Task Variables:
Variable name |
Description |
Type |
|
Penalty parameter C of the error term. |
Integer, optional (default=300) |
|
Hyper-parameter : shape parameter for the Gamma distribution prior over the alpha parameter. |
Float (default=1.e-6) |
|
Hyper-parameter : inverse scale parameter (rate parameter) for the Gamma distribution prior over the alpha parameter. |
Float (default=1.e-6) |
|
Hyper-parameter : shape parameter for the Gamma distribution prior over the lambda parameter. |
Float (default=1.e-6) |
|
Hyper-parameter : inverse scale parameter (rate parameter) for the Gamma distribution prior over the lambda parameter. |
Float (default=1.e-6) |
How to use this task: It should be connected with Train_Model or Train_Clustering_Model and Predict_Model or Predict_Clustering_Model.
| More information about the source of this task can be found here. |
Linear_Regression
Task Overview: Linear regression is a linear approach for modeling the relationship between a scalar dependent variable y and one or more explanatory variables (or independent variables) denoted X.
Task Variables:
Variable name |
Description |
Type |
|
Penalty parameter C of the error term. |
Integer (default=1) |
How to use this task: IT should be connected with Train_Model or Train_Clustering_Model and Predict_Model or Predict_Clustering_Model.
| More information about the source of this task can be found here. |
Support_Vector_Regression
Task Overview: Support vector regression are supervised learning models with associated learning algorithms that analyze data used for regression.
Task Variables:
Variable name |
Description |
Type |
|
Penalty parameter C of the error term. |
Float, optional (default=1.0) |
|
Specifies the kernel type to be used in the algorithm. It must be one of ‘linear’, ‘poly’, ‘rbf’, ‘sigmoid’, ‘precomputed’ or a callable. |
String, optional (default=’rbf’) |
|
It specifies the epsilon-tube within which no penalty is associated in the training loss function with points predicted within a distance epsilon from the actual value. |
Float, optional (default=0.1) |
How to use this task: It should be connected with Train_Model or Train_Clustering_Model and Predict_Model or Predict_Clustering_Model.
| More information about the source of this task can be found here. |
7.1.8. ML Clustering
K_Means
Task Overview: K-means clustering aims to partition n observations into k clusters in which each observation belongs to the cluster with the nearest mean, serving as a prototype of the cluster
Task Variables:
Variable name |
Description |
Type |
|
The number of clusters to form as well as the number of centroids to generate |
Integer, optional (default=8) |
|
Maximum number of iterations of the k-means algorithm for a single run. |
Integer, optional (default=300) |
|
The number of jobs to use for the computation. This works by computing each of the n_init runs in parallel. If -1 all CPUs are used. If 1 is given, no parallel computing code is used at all |
Integer, optional (default=1) |
How to use this task: It should be connected with Train_Model or Train_Clustering_Model and Predict_Model or Predict_Clustering_Model.
| More information about the source of this task can be found here. |
Mean_Shift
Task Overview: Mean shift is a non-parametric feature-space analysis technique for locating the maxima of a density function.
Task Variables:
Variable name |
Description |
Type |
|
The number of clusters to form as well as the number of centroids to generate. |
Boolean [True or False] |
|
If true, then all points are clustered, even those orphans that are not within any kernel. Orphans are assigned to the nearest kernel. If false, then orphans are given cluster label -1. |
Integer (default=1) |
How to use this task: It should be connected with Train_Model or Train_Clustering_Model and Predict_Model or Predict_Clustering_Model.
| More information about the source of this task can be found here. |
7.1.9. Train
Train_Anomaly_Model
Task Overview: Train an anomaly model.
How to use this task: It should be connected to Local_Outlier_Factor task or One_Class_SVM task.
| More information about the source of this task can be found here. |
Train_Clustering_Model
Task Overview: Train a clustering model.
How to use this task: It should be used after a clustering algorithm such as Bayesian_Ridge_Regression, Linear_Regression and Support_Vector_Regression.
| More information about the source of this task can be found here. |
Train_Model
Task Overview: Train a model using a classification or regression algorithm.
How to use this task: It should be used after a classification or regression algorithm, such as Support_Vector_Machines, Gaussian_Naive_Bayes and Linear_Regression.
| More information about the source of this task can be found here. |
7.1.10. Predict
Predict_Anomaly_Model
Task Overview: Generate predictions using a trained model.
How to use this task: It should be used after the Train_Model Task.
| More information about the source of this task can be found here. |
Predict_Clustering_Model
Task Overview: Generate predictions using a trained model.
How to use this task: It should be used after the Train_Clustering_Model Task.
| More information about the source of this task can be found here. |
Predict_Model
Task Overview: Generate predictions using a trained model.
How to use this task: It should be used after the Train_Model Task.
| More information about the source of this task can be found here. |
7.2. Deep Learning Bucket
The deep-learning bucket contains diverse generic deep learning tasks that enable you to easily compose workflows for predictive models learning and testing. This bucket can be easily customized according to your needs.
It offers different options, you can customize it by adding new tasks or update the existing tasks.
| It is recommended to use an enabled-GPU machine to run the deep learning tasks. |
7.2.1. Input and Output
Import_Image_Dataset
Task Overview: Load and return an image dataset. There are some simple rules for organizing your files and folders.
-
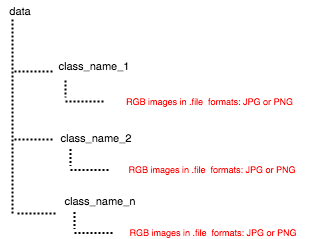
Image Classification Dataset: Each class must have its own folder which should contain its related images. The Figure below shows how your folders and files should be organized.
| You can find an example of the organization of the folders at: https://s3.eu-west-2.amazonaws.com/activeeon-public/datasets/ants_vs_bees.zip |
-
Image Segmentation Dataset: Two folders are required: the first folder should contain the RGB images in JPG format and another folder should contain its corresponding annotations in PASCAL VOC format. RGB images and annotations should be organized as follows:
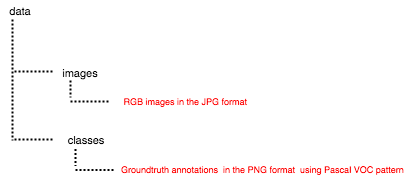
| You can find an example of the organization of the folders at: https://s3.eu-west-2.amazonaws.com/activeeon-public/datasets/oxford.zip |
-
Object Detection Dataset: Two folders are demanded: the first folder should contain the RGB images in JPG format and another folder should contain its corresponding anotations in XML format using PASCAL VOC format or TXT format using COCO format (http://cocodataset.org/#home). The RGB images and annotations should be organized as follows:
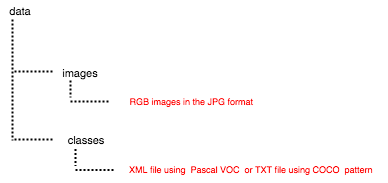
| In these links, you can find an example of the organization of the folders using Pascal_VOC Dataset and COCO Dataset. |
Task Variables:
Variable name |
Description |
Type |
|
URL pointing to the zip folder containing the needed data. |
String |
|
Must be a float within the range (0.0, 1.0), not including the values 0.0 and 1.0. |
Float (default=1) |
|
Must be a float within the range (0.0, 1.0), not including the values 0.0 and 1.0. |
Float (default=0.3) |
|
Must be a float within the range (0.0, 1.0), not including the values 0.0 and 1.0. |
Float (default=0.1) |
|
If True, the tasks will be executed on GPU nodes. |
Boolean (default=True) |
|
If True, the tasks will be executed on a Docker container. activeeon/dlm3 image is used by default. If False, the required libraries should be installed in the different nodes that will be used. |
Boolean (default=True) |
|
Enter the type of your dataset. There are two possible types: classification or segmentation |
List [Classification or Segmentation] |
How to use this task: It should be connected with Train_Image_Segmentation_Model, Train_Image_Classification_Model or Predict_Image_Classification_Model, Predict_Image_Segmentation_Model.
| Torchvision were used to preprocess and load the dataset. |
Export_Model
Task Overview: Export a trained model by a deep learning algorithm.
How to use this task: It should be connected with Train_Image_Segmentation_Model or Train_Image_Classification_Model or Train_Text_Classification_Model.
Import_Model
Task Overview: Import a trained model by a deep learning algorithm.
Task Variables:
Variable name |
Description |
Type |
|
URL pointing to the zip folder containing the needed model. |
String |
|
If True, the tasks will be executed on GPU nodes. |
Boolean (default=True) |
|
If True, the tasks will be executed on a Docker container. activeeon/dlm3 image is used by default. If False, the required libraries should be installed in the different nodes that will be used. |
Boolean (default=True) |
How to use this task: It should be connected with Predict_Text_Classification_Model or Predict_Image_Classification_Model, Predict_Image_Segmentation_Model.
Import_Text_Dataset
Task Overview: Import data from external sources. Each unique label must have its own folder which should contain its related text file. If your data is unlabeled, use the name 'unlabeled' for the folder containing your text file.
Task Variables:
Variable name |
Description |
Type |
|
URL pointing to the zip folder containing the needed data. |
String |
|
Must be a float within the range (0.0, 1.0), not including the values 0.0 and 1.0. |
Float (default=1) |
|
Must be a float within the range (0.0, 1.0), not including the values 0.0 and 1.0. |
Float (default=0.3) |
|
Must be a float within the range (0.0, 1.0), not including the values 0.0 and 1.0. |
Float (default=0.1) |
|
Use a subset of the data to train the model fastly. |
Boolean (default=True) |
|
Transform the text into tokens. Different options are available (str.split,moses,spacy,revtok,subword) |
List (default=str.split) |
|
Split the text into separated paragraphs, separated lines, separated words. Choose your own separator. |
String (default=\r) |
|
Encode to be used to read the text. |
String (default='utf-8') |
|
True if data is labeled. |
Boolean (default=True) |
How to use this task: It should be connected with Train_Text_Classification_Model or Predict_Text_Classification_Model.
| Torchtext were used to preprocess and load the text input. More information about this library can be found here. |
Export Results
Task Overview: Export the results of the predictions generated by the trained model.
Task Variables:
Variable name |
Description |
Type |
|
Converts the prediction results to HTML or CSV file. |
List (default='HTML') |
|
If True, the tasks will be executed on GPU nodes. |
Boolean (default=True) |
|
If True, the tasks will be executed on a Docker container. activeeon/dlm3 image is used by default. If False, the required libraries should be installed in the different nodes that will be used. |
Boolean (default=True) |
How to use this task: It should be used after Predict_Text_Classification_Model or Predict_Image_Classification_Model or Predict_Image_Segmentation_Model task.
Export Images
Task Overview: Download a zip file of your results.
How to use this task: It should be connected to Predict_Image_Classification_Model or Predict_Image_Segmentation_Model task.
7.2.2. Image Classification
AlexNet
Task Overview: AlexNet is the name of a Convolutional Neural Network (CNN), originally written with CUDA to run with GPU support, which competed in the ImageNet Large Scale Visual Recognition Challenge in 2012.
How to use this task: It should be connected to Train_Image_Classification_Model task.
Variable name |
Description |
Type |
|
If True, the tasks will be executed on GPU nodes. |
Boolean (default=True) |
|
If True, the tasks will be executed on a Docker container. activeeon/dlm3 image is used by default. If False, the required libraries should be installed in the different nodes that will be used. |
Boolean (default=True) |
|
Parameter to use a pre-trained model for training. If True, the pre-trained model with the corresponding number of layers is loaded and used for training. Otherwise, the network is trained from scratch. |
Boolean (default=True) |
| Pytorch were used to build the model architecture based on AlexNet. |
DenseNet-161
Task Overview: Densely Connected Convolutional Network (DenseNet) is a network architecture where each layer is directly connected to every other layer in a feed-forward fashion (within each dense block).
How to use this task: It should be connected to Train_Image_Classification_Model task.
| Pytorch were used to build the model architecture based on DenseNet-161. |
Variable name |
Description |
Type |
|
If True, the tasks will be executed on GPU nodes. |
Boolean (default=True) |
|
If True, the tasks will be executed on a Docker container. activeeon/dlm3 image is used by default. If False, the required libraries should be installed in the different nodes that will be used. |
Boolean (default=True) |
|
Parameter to use a pre-trained model for training. If True, the pre-trained model with the corresponding number of layers is loaded and used for training. Otherwise, the network is trained from scratch. |
Boolean (default=True) |
ResNet-18
Task Overview: Deep Residual Networks (ResNet-18) is a deep convolutional neural network, trained on 1.28 million ImageNet training images, coming from 1000 classes.
How to use this task: It should be connected to Train_Image_Classification_Model task.
| Pytorch were used to build the model architecture based on ResNet-18. |
Variable name |
Description |
Type |
|
If True, the tasks will be executed on GPU nodes. |
Boolean (default=True) |
|
If True, the tasks will be executed on a Docker container. activeeon/dlm3 image is used by default. If False, the required libraries should be installed in the different nodes that will be used. |
Boolean (default=True) |
|
Parameter to use a pre-trained model for training. If True, the pre-trained model with the corresponding number of layers is loaded and used for training. Otherwise, the network is trained from scratch. |
Boolean (default=True) |
VGG-16
Task Overview: The VGG-16 is an image classification convolutional neural network.
How to use this task: It should be connected to Train_Image_Classification_Model task.
| Pytorch were used to build the model architecture based on VGG-16. |
Variable name |
Description |
Type |
|
If True, the tasks will be executed on GPU nodes. |
Boolean (default=True) |
|
If True, the tasks will be executed on a Docker container. activeeon/dlm3 image is used by default. If False, the required libraries should be installed in the different nodes that will be used. |
Boolean (default=True) |
|
Parameter to use a pre-trained model for training. If True, the pre-trained model with the corresponding number of layers is loaded and used for training. Otherwise, the network is trained from scratch. |
Boolean (default=True) |
7.2.3. Image Segmentation
FCN
Task Overview: The FCN16 combines layers of the feature hierarchy and refines the spatial precision of the output.
How to use this task: It should be connected to Train_Image_Segmentation_Model task.
| Pytorch were used to build the model architecture based on FCN. |
Variable name |
Description |
Type |
|
If True, the tasks will be executed on GPU nodes. |
Boolean (default=True) |
|
If True, the tasks will be executed on a Docker container. activeeon/dlm3 image is used by default. If False, the required libraries should be installed in the different nodes that will be used. |
Boolean (default=True) |
|
Insert (width, height) of the images as a tuple with 2 elements. |
Integer (default=(64, 64)) |
|
Number of classes. |
Integer (default=5) |
SegNet
Task Overview: is a deep convolutional encoder-decoder architecture for robust semantic pixel-wise labelling.
How to use this task: It should be connected to Train_Image_Segmentation_Model task.
| Pytorch were used to build the model architecture based on SegNet. |
Variable name |
Description |
Type |
|
If True, the tasks will be executed on GPU nodes. |
Boolean (default=True) |
|
If True, the tasks will be executed on a Docker container. activeeon/dlm3 image is used by default. If False, the required libraries should be installed in the different nodes that will be used. |
Boolean (default=True) |
|
Insert (width, height) of the images as a tuple with 2 elements. |
Integer (default=(64, 64)) |
|
Number of classes. |
Integer (default=5) |
UNet
Task Overview: consists of a contracting path to capture context and a symmetric expanding path that enables precise localization.
How to use this task: It should be connected to Train_Image_Segmentation_Model task.
| Pytorch were used to build the model architecture based on UNet. |
Variable name |
Description |
Type |
|
If True, the tasks will be executed on GPU nodes. |
Boolean (default=True) |
|
If True, the tasks will be executed on a Docker container. activeeon/dlm3 image is used by default. If False, the required libraries should be installed in the different nodes that will be used. |
Boolean (default=True) |
|
Insert (width, height) of the images as a tuple with 2 elements. |
Integer (default=(64, 64)) |
|
Number of classes. |
Integer (default=5) |
7.2.4. Object Detection
SSD
Task Overview: produces a fixed-size collection of bounding boxes and scores for the presence of object class instances in those boxes, followed by a non-maximum suppression step to produce the final detections. For more details click on this link
How to use this task: It should be connected to Train_Object_Detection_Model task.
| Pytorch were used to build the model architecture based on SSD. |
Variable name |
Description |
Type |
|
If True, the tasks will be executed on GPU nodes. |
Boolean (default=True) |
|
If True, the tasks will be executed on a Docker container. activeeon/dlm3 image is used by default. If False, the required libraries should be installed in the different nodes that will be used. |
Boolean (default=True) |
|
Initial iteration. |
Integer (default=0) |
|
Maximum iteration. |
Integer (default=5) |
|
Learning steps update for SGD (Stochastic Gradient Descent). |
Integer (default=5) |
|
Learning rate update for SGD. |
Float (default= 1e-3) Range in [0, 1]. |
|
Gamma update for SGD. |
Float (default=0.1) Range in [0, 1]. |
|
Minimum object size for detection by specifying numerical values or reference areas on screen. Objects smaller than that are ignored. |
Integer (default= [30, 60, 111, 162, 213, 264]) |
|
Maximum object size for detection by specifying numerical values or reference areas on screen. Objects larger than that are ignored. |
Integer (default= [60, 111, 162, 213, 264, 315]) |
|
Initial learning rate. |
Float (default= 1e-8) Range in [0, 1]. |
|
Momentum value for optimization. |
Float (default=0.9) Range in [0, 1]. |
|
Weight decay for SGD |
Float (default= 5e-4) Range in [0, 1]. |
|
Insert (width, height) of the images as a tuple with 2 elements. |
Integer (default=(300, 300)) |
|
Number of classes. |
Integer (default=21) |
|
The URL of the file containing the class names of the dataset. |
String (default=(https://s3.eu-west-2.amazonaws.com/activeeon-public/datasets/voc.names)) |
|
Parameter to use pre-trained model for training. If True, the pre-trained model with the corresponding number of layers is loaded and used for training. Otherwise, the network is trained from scratch. |
Boolean (default=True) |
| The default parameters of the SSD network were set for the PASCAL VOC dataset (http://host.robots.ox.ac.uk/pascal/VOC/voc2012/). If you’d like to use another dataset, you probably need to change the default parameters. |
YOLO
Task Overview: You only look once (YOLO) is a single neural network to predict bounding boxes and class probabilities. For more details click on this link
How to use this task: It should be connected to Train_Object_Detection_Model task.
| Pytorch were used to build the model architecture based on YOLO. |
Variable name |
Description |
Type |
|
If True, the tasks will be executed on GPU nodes. |
Boolean (default=True) |
|
If True, the tasks will be executed on a Docker container. activeeon/dlm3 image is used by default. If False, the required libraries should be installed in the different nodes that will be used. |
Boolean (default=True) |
|
Initial learning rate |
Float (default= 0.0005) Range in [0, 1]. |
|
Momentum value for optimization. |
Float (default=0.9) Range in [0, 1]. |
|
Weight decay for SGD |
Float (default= 5e-4) Range in [0, 1]. |
|
Insert (width, height) of the images as a tuple with 2 elements. |
Integer (default=(414, 416)) |
|
Number of classes. |
Integer (default=81) |
|
This parameter shows how certain it is that the predicted bounding box actually encloses some object. This score doesn’t say anything about what kind of object is in the box, just if the shape of the box is any good. |
Float (default=0.5) Range in [0, 1]. |
|
This parameter will select only the most accurate (highest probability) one of the boxes. |
Float (default=0.45) Range in [0, 1]. |
|
The URL of the file containing the class names of the dataset. |
String (default=(https://s3.eu-west-2.amazonaws.com/activeeon-public/datasets/coco.names)) |
|
Parameter to use pre-trained model for training. If True, the pre-trained model with the corresponding number of layers is loaded and used for training. Otherwise, the network is trained from scratch. |
Boolean (default=True) |
| The default parameters of the YOLO network were set for the COCO dataset (http://cocodataset.org/#home). If you’d like to use another dataset, you probably need to change the default parameters. |
7.2.5. Text Classification
GRU
Task Overview: Gated recurrent units (GRUs) are a gating mechanism in recurrent neural networks.
Task Variables:
Variable name |
Description |
Type |
|
The dimension of the vectors that will be used to map words in some languages. |
Integer (default=50) |
|
Hidden dimension of the neural network. |
Integer (default=40) |
|
Batch size to be used. |
Integer (default=2) |
|
Percentage of the neurons that will be ignored during the training. |
Float (default=0.5) |
How to use this task: It should be connected to Train_Text_Classification_Model task.
| Pytorch were used to build the model architecture based on GRU. |
LSTM
Task Overview: Long short-term memory (LSTM) units (or blocks) are a building unit for layers of a recurrent neural network (RNN).
Task Variables:
Variable name |
Description |
Type |
|
The dimension of the vectors that will be used to map words in some languages. |
Integer (default=50) |
|
Hidden dimension of the neural network. |
Integer (default=40) |
|
Batch size to be used. |
Integer (default=2) |
|
Percentage of the neurons that will be ignored during the training. |
Float (default=0.5) |
How to use this task: It should be connected to Train_Text_Classification_Model task.
| Pytorch were used to build the model architecture based on LSTM. |
RNN
Task Overview: A recurrent neural network (RNN) is a class of artificial neural network where connections between units form a directed graph along a sequence.
Task Variables:
Variable name |
Description |
Type |
|
The dimension of the vectors that will be used to map words in some languages. |
Integer (default=50) |
|
Hidden dimension of the neural network. |
Integer (default=40) |
|
Batch size to be used. |
Integer (default=2) |
|
Percentage of the neurons that will be ignored during the training. |
Float (default=0.5) |
How to use this task: It should be connected to Train_Text_Classification_Model task.
| Pytorch were used to build the model architecture based on RNN. |
7.2.6. Train Model
Train_Image_Classification_Model
Task Overview: Train a model using a Convolutional Neural Network (CNN) algorithm.
Task Variables:
Variable name |
Description |
Type |
|
Number of times all of the training vectors are used once to update the weights. |
Integer (default=1) |
|
Batch size to be used. |
Integer (default=4) |
|
Number of subprocesses to use for data loading. 0 means that the data will be loaded in the main process. |
Integer (default=2) |
|
If True, the tasks will be executed on GPU nodes. |
Boolean (default=True) |
|
If True, the tasks will be executed on a Docker container. activeeon/dlm3 image is used by default. If False, the required libraries should be installed in the different nodes that will be used. |
Boolean (default=True) |
How to use this task: Could be connected to Predict_Image_Classification_Model and Export_Model tasks.
Train_Image_Segmentation_Model
Task Overview: Train a model using an image segmentation algorithm.
Task Variables:
Variable name |
Description |
Type |
|
Number of times all of the training vectors are used once to update the weights. |
Integer (default=1) |
|
Batch size to be used. |
Integer (default=4) |
|
Number of subprocesses to use for data loading. 0 means that the data will be loaded in the main process. |
Integer (default=2) |
|
If True, the tasks will be executed on GPU nodes. |
Boolean (default=True) |
|
If True, the tasks will be executed on a Docker container. activeeon/dlm3 image is used by default. If False, the required libraries should be installed in the different nodes that will be used. |
Boolean (default=True) |
How to use this task: Could be connected to Predict_Image_Segmentation_Model and Export_Model tasks.
Train_Text_Classification_Model
Task Overview: A recurrent neural network (RNN) is a class of artificial neural network where connections between units form a directed graph along a sequence.
Task Variables:
Variable name |
Description |
Type |
|
Determines how quickly or how slowly you want to update the parameters. |
Float (default=0.001) |
|
Choose the optimization algorithm that would help you to minimize the Loss function. Different options are available (42B, 840B, twitter.27B,6B). |
List (default=Adam) |
|
Choose the function that will be used to compute the loss. Different options are available (Adam,RMS, SGD, Adagrad, Adadelta). |
List (default=NLLLoss) |
|
Number of times all of the training vectors are used once to update the weights. |
Integer (default=10) |
|
True if you want to update the embedding vectors during the training process. |
Boolean (default=False) |
|
Choose the glove vectors that need to be used for words embedding. Different options are available (42B, 840B, twitter.27B,6B) |
List (default=6B) |
|
True if you need to execute the training task in a GPU node. |
Boolean (default=True) |
How to use this task: Could be connected to Predict_Text_Classification_Model and Export_Model tasks.
Train_Object_Detection_Model
Task Overview: Train a model using an object detection algorithm.
Task Variables:
Variable name |
Description |
Type |
|
Number of times all of the training vectors are used once to update the weights. |
Integer (default=1) |
|
Batch size to be used. |
Integer (default=4) |
|
Number of subprocesses to use for data loading. 0 means that the data will be loaded in the main process. |
Integer (default=2) |
|
If True, the tasks will be executed on GPU nodes. |
Boolean (default=True) |
|
If True, the tasks will be executed on a Docker container. activeeon/dlm3 image is used by default. If False, the required libraries should be installed in the different nodes that will be used. |
Boolean (default=True) |
7.2.7. Predict
Predict_Image_Classification_Model
Task Overview: Generate predictions using a trained model.
Variable name |
Description |
Type |
|
Batch size to be used. |
Integer (default=4) |
|
Number of subprocesses to use for data loading. 0 means that the data will be loaded in the main process. |
Integer (default=2) |
|
If True, the tasks will be executed on GPU nodes. |
Boolean (default=True) |
|
If True, the tasks will be executed on a Docker container. activeeon/dlm3 image is used by default. If False, the required libraries should be installed in the different nodes that will be used. |
Boolean (default=True) |
How to use this task: It should be used after the Train_Image_Classification_Model or Export_Model Task.
Predict_Image_Segmentation_Model
Task Overview: Generate predictions using a trained segmentation model.
Variable name |
Description |
Type |
|
Batch size to be used. |
Integer (default=4) |
|
Number of subprocesses to use for data loading. 0 means that the data will be loaded in the main process. |
Integer (default=2) |
|
If True, the tasks will be executed on GPU nodes. |
Boolean (default=True) |
|
If True, the tasks will be executed on a Docker container. activeeon/dlm3 image is used by default. If False, the required libraries should be installed in the different nodes that will be used. |
Boolean (default=True) |
How to use this task: It should be used after the Train_Image_Classification_Model or Export_Model Task.
Predict_Text_Classification_Model
Task Overview: Generate predictions using a trained model.
Variable name |
Description |
Type |
|
Choose the function that will be used to compute the loss. Different options are available (Adam,RMS, SGD, Adagrad, Adadelta). |
List (default=NLLLoss) |
|
If True, the tasks will be executed on GPU nodes. |
Boolean (default=True) |
|
If True, the tasks will be executed on a Docker container. activeeon/dlm3 image is used by default. If False, the required libraries should be installed in the different nodes that will be used. |
Boolean (default=True) |
How to use this task: It should be used after the Train_Text_Classification_Model or Export_Model Task.
Predict_Object_Detection_Model
Task Overview: Generate predictions using a trained object detection model.
Variable name |
Description |
Type |
|
Batch size to be used. |
Integer (default=4) |
|
Number of subprocesses to use for data loading. 0 means that the data will be loaded in the main process. |
Integer (default=2) |
|
If True, the tasks will be executed on GPU nodes. |
Boolean (default=True) |
|
If True, the tasks will be executed on a Docker container. activeeon/dlm3 image is used by default. If False, the required libraries should be installed in the different nodes that will be used. |
Boolean (default=True) |
How to use this task: It should be used after the Predict_Object_Detection_Model or Export_Model Task.
7.3. Data Visualization Bucket
Visdom Bucket integrates generic tasks that can be easily used to broadcast visualizations of the analytic results provided by ML tasks. These visualization are created, organized, and shared using Visdom, a flexible tool proposed by Facebook Research.
It provides a large set of plots that can be organized programmatically or through the UI. These plots can be used to create dashboards for both live and real-time data, inspect results of experiments, or debug experimental code.
Visdom bucket provides a fast, easy and practice way to execute different workflows generating these diverse visualizations that are automatically cached by the Visdom Server.
7.3.1. Visdom
Start_Visdom_Service
Task Overview: Bind or/and Start Visdom server.
Task Variables:
Variable name |
Description |
Type |
|
The id of the Visdom service. |
String (default="Visdom") |
|
The instance name of the server to use to broadcast visualization |
String (default="visdom-server-1") |
| If two workflows use the same service instance names, then, their generated plots will be created on the same service instance. |
Visdom_Client_Example
Task Overview: Connect and plot a text into the Visdom Server.
Task Variables:
To adapt according to the plots that you need to visualize
How to use this task: Customize this task by putting the source code generating your code in the Task Implementation section
| This task has to be connected to the Start_Visdom_Service Task. The Visdom server should be up in order to be able to broadcast visualizations. |
Stop_Visdom_Service
Task Overview: Stop and remove the Visdom Server.
Task Variables:
Variable name |
Description |
Type |
|
The id of the Visdom service. |
String (default="Visdom") |
|
The instance name of the server to use to broadcast visualization |
String (default="visdom-server-1") |
How to use this task: This task can be connected to Visdom_Client_Example. Visualize, then, stop the Visdom Service.
| This task will immediately stop the service. |
Stop_Visdom_Service_After_Validation
Task Overview: wait for the validation of the job by the user to stop and remove the Visdom Server.
Task Variables:
Variable name |
Description |
Type |
|
The id of the Visdom service. |
String (default="Visdom") |
|
The instance name of the server to use to broadcast visualization |
String (default="visdom-server-1") |
How to use this task: This task can be connected to Visdom_Client_Example. Visualize, then, stop the Visdom Service.
| This task will stop the service once the user has validated this requirement using ProActive Cloud Automation portal. |
Visdom_Visualize_Results
Task Overview: plot the different results obtained by a predictive model using Visdom
Task Variables:
Variable name |
Description |
Type |
|
The targeted class that you need to track |
String |
How to use this task: This task has to be connected to the Start_Visdom_Service Task. The Visdom server should be up in order to be able to broadcast visualizations.
7.3.2. Visdom Worflows
The following workflows present some examples using Visdom service to visualize the results obtained while training and testing some predictive models.
Visdom_Plot_Example: returns numerous examples of plots covered by Visdom.
Visdom_Realtime_Apache_Intrusion_Detection: broadcasts in real time some visualizations of the analytic results provided by the Apache log intrusion detector.
Visdom_Service_Example: evaluates in real time the performance of a simple Convolutional Neural Network (CNN) for MNIST* handwritten digit classification during the training and test processes.
A demo video of these workflows is available in ActiveEon Youtube Channel.