All documentation links
ProActive Workflows & Scheduling (PWS)
-
PWS User Guide
(Workflows, Workload automation, Jobs, Tasks, Catalog, Resource Management, Big Data/ETL, …) PWS Modules
Job Planner
(Time-based Scheduling)Cloud Watch
(Event-based Scheduling)Cloud Automation
(PaaS On-Demand, Service deployment and management)
PWS Admin Guide
(Installation, Infrastructure & Nodes setup, Agents,…)
Machine Learning Open Studio (MLOS)
MLOS User Guide
(a complete Data Science and Machine Learning Platform)
1. Overview
ProActive Scheduler is a comprehensive Open Source job scheduler and Orchestrator, also featuring Workflows and Resource Management. The user specifies the computation in terms of a series of computation steps along with their execution and data dependencies. The Scheduler executes this computation on a cluster of computation resources, each step on the best-fit resource and in parallel wherever its possible.
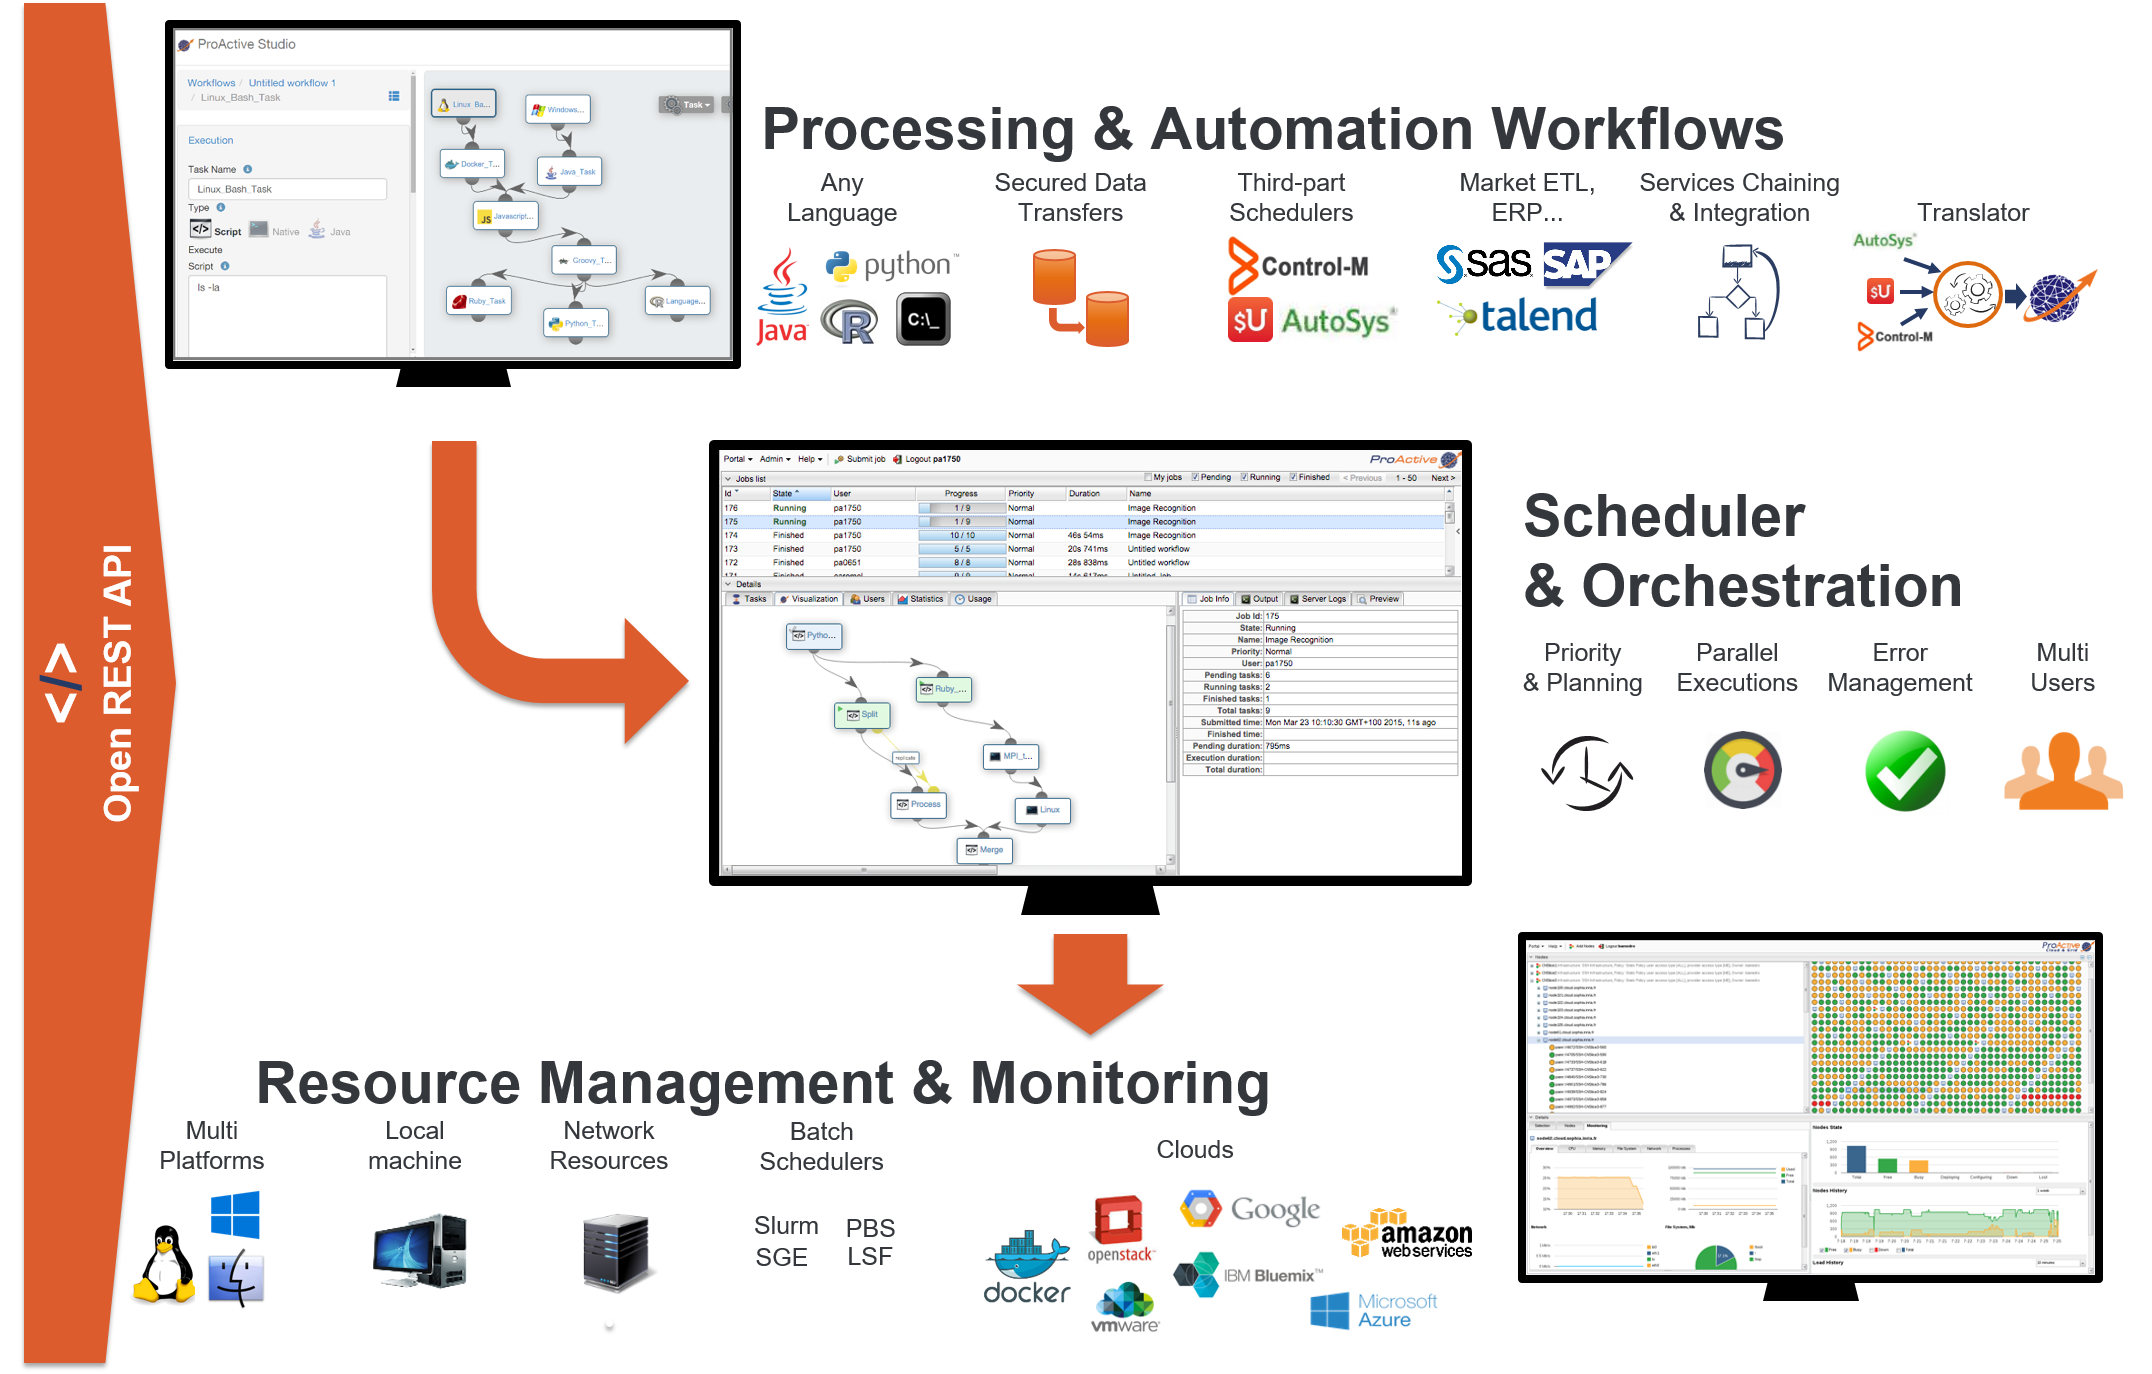
On the top left there is the Studio interface which allows you to build Workflows. It can be interactively configured to address specific domains, for instance Finance, Big Data, IoT, Artificial Intelligence (AI). See for instance the Documentation of Machine Learning Open Studio here, and try it online here. In the middle there is the Scheduler which enables an enterprise to orchestrate and automate Multi-users, Multi-application Jobs. Finally, at the bottom right is the Resource manager interface which manages and automates resource provisioning on any Public Cloud, on any virtualization software, on any container system, and on any Physical Machine of any OS. All the components you see come with fully Open and modern REST APIs.
The screenshot above shows the Catalog Portal, where one can store Workflows, Calendars, Scripts, etc. Powerful versioning together with full access control (RBAC) is supported, and users can share easily Workflows and templates between teams, and various environments (Dev, Test, Staging and Prod).
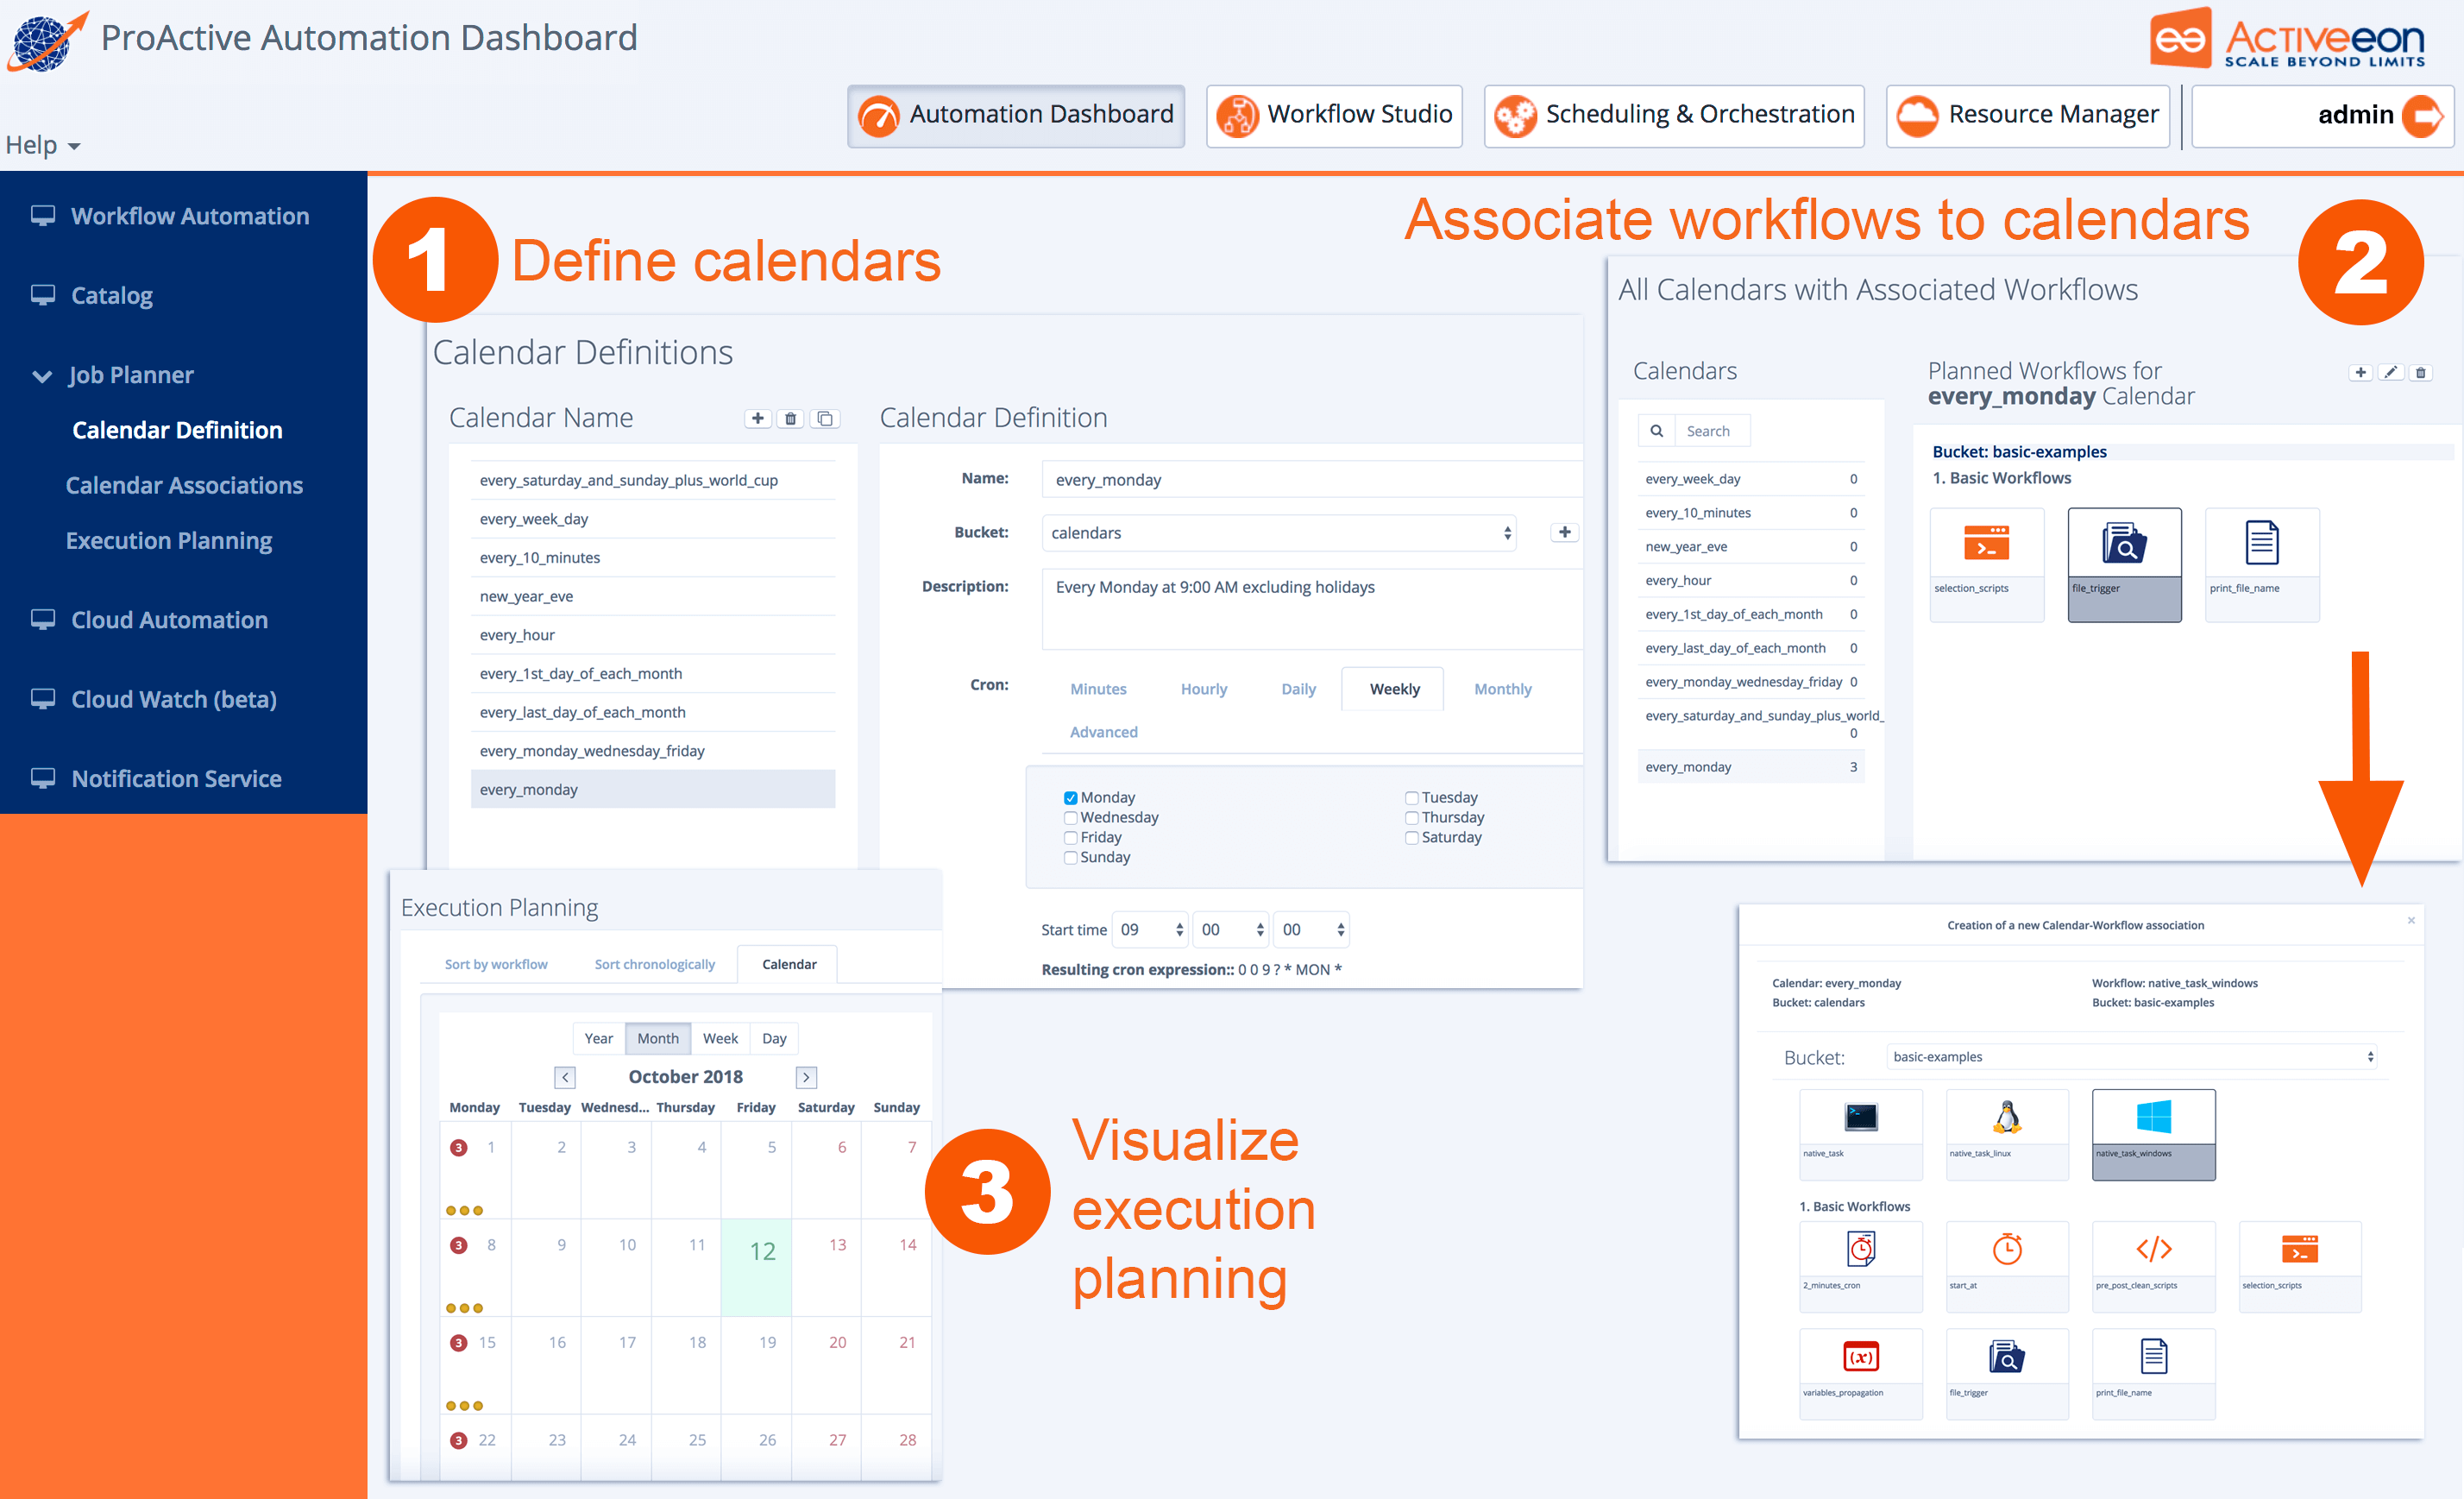
The screenshot above shows the Job Planner Portal, allowing to automate and schedule recurring Jobs. From left to right, you can define and use Calendar Definitions , associate Workflows to calendars, visualize the execution planning for the future, as well as actual executions of the past.
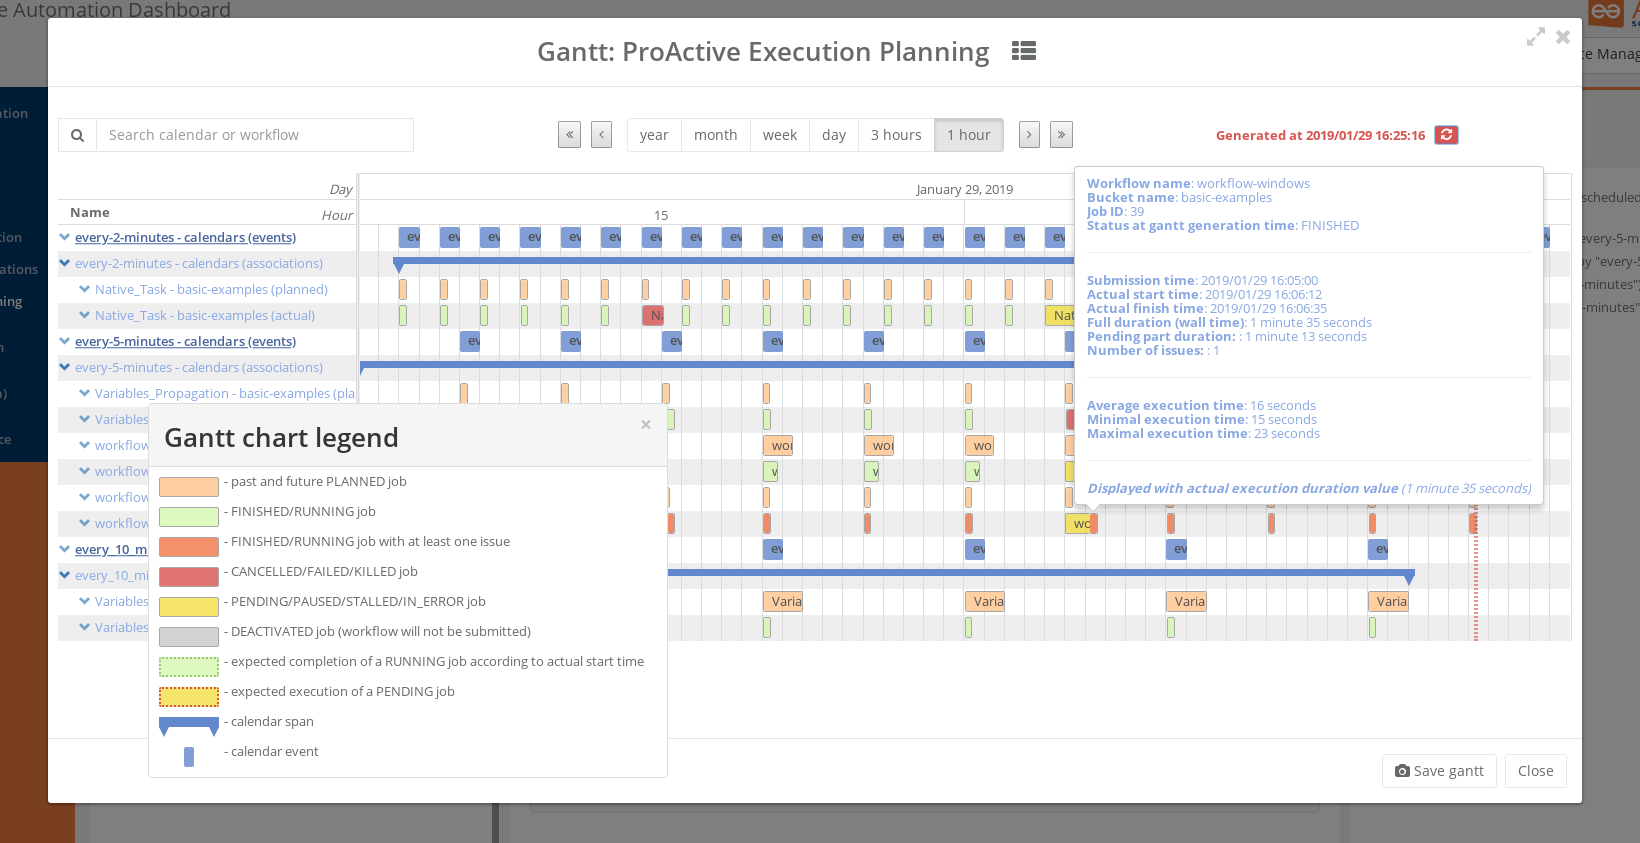
The Gantt screenshot above shows the Gantt View of Job Planner, featuring past job history, current Job being executed, and future Jobs that will be submitted, all in a comprehensive interactive view. You easily see the potential differences between Planned Submission Time and Actual Start Time of the Jobs, get estimations of the Finished Time, visualize the Job that stayed PENDING for some time (in Yellow) and the Jobs that had issues and got KILLED, CANCELLED, or FAILED (in red).
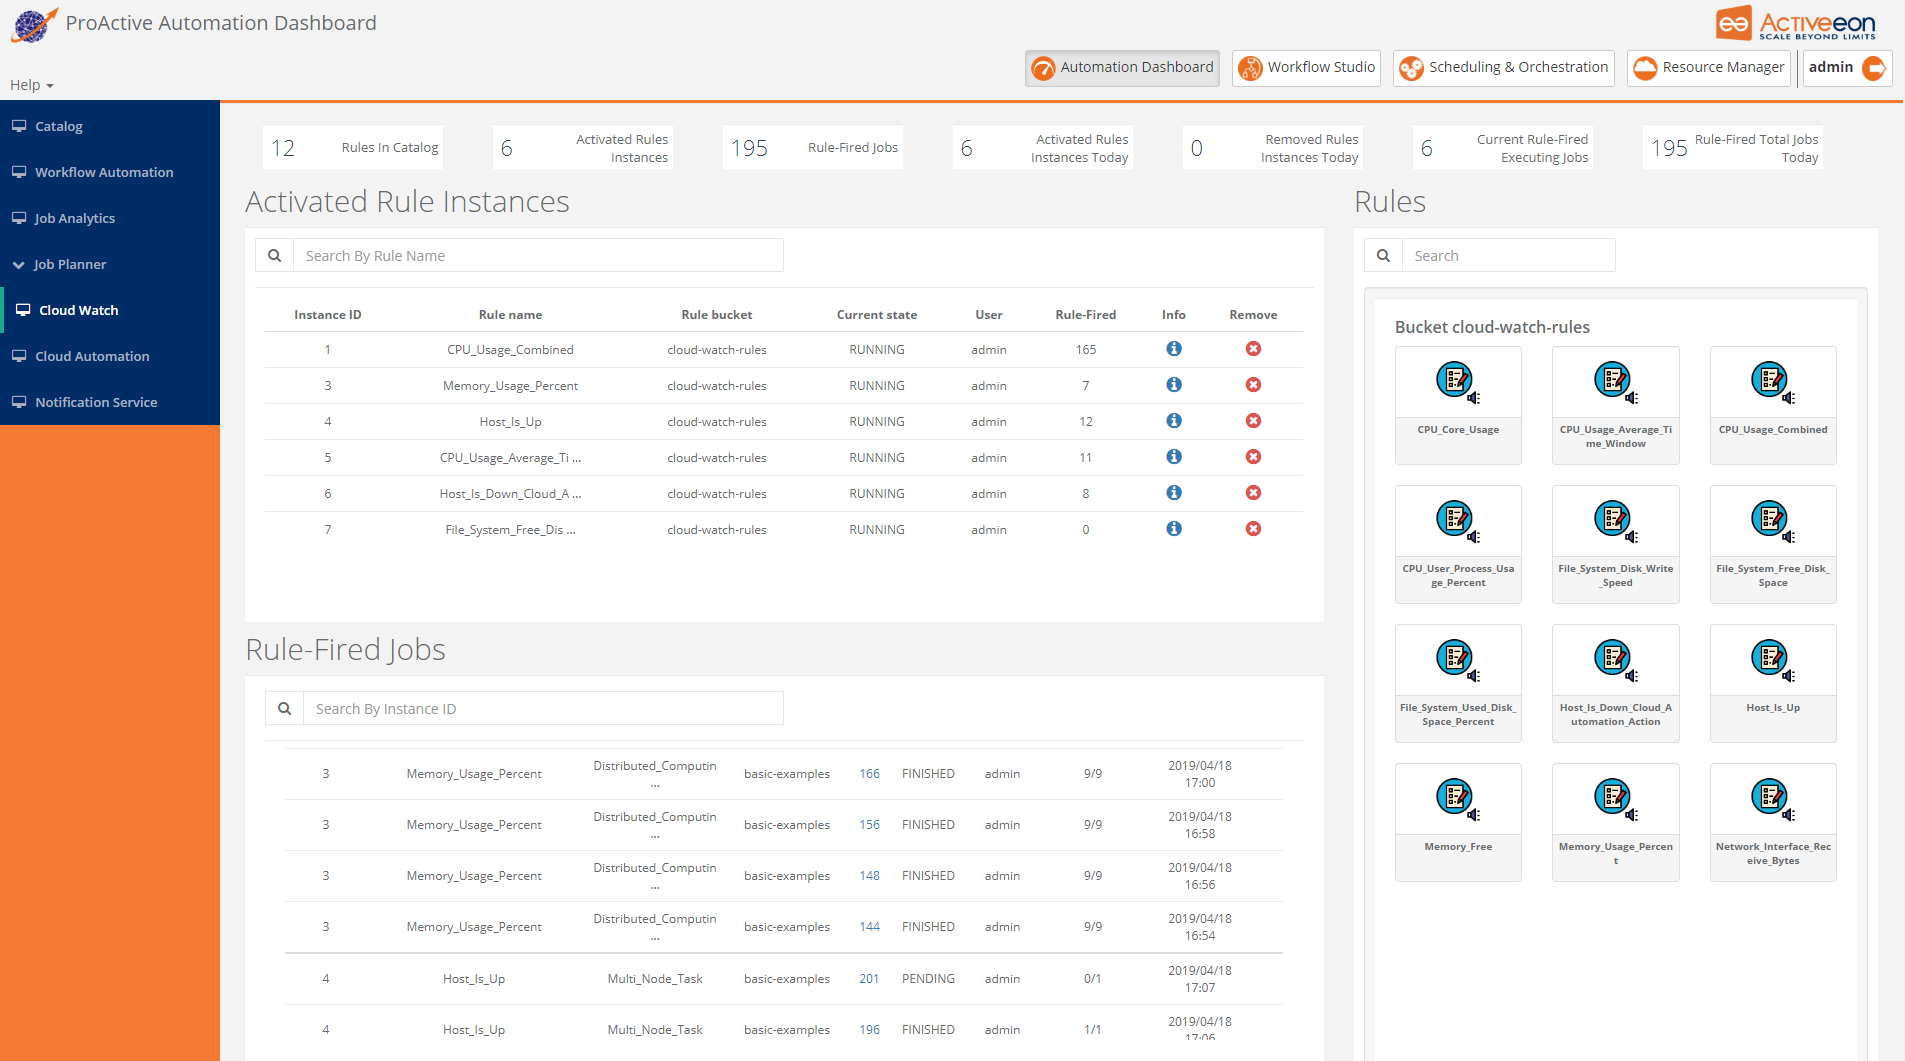
The screenshot above shows the Cloud Watch portal, where a user can manage and benefit from Cloud Watch - smart monitoring system. This ProActive component detects complex events and then triggers user-specified actions according to predefined set of rules.
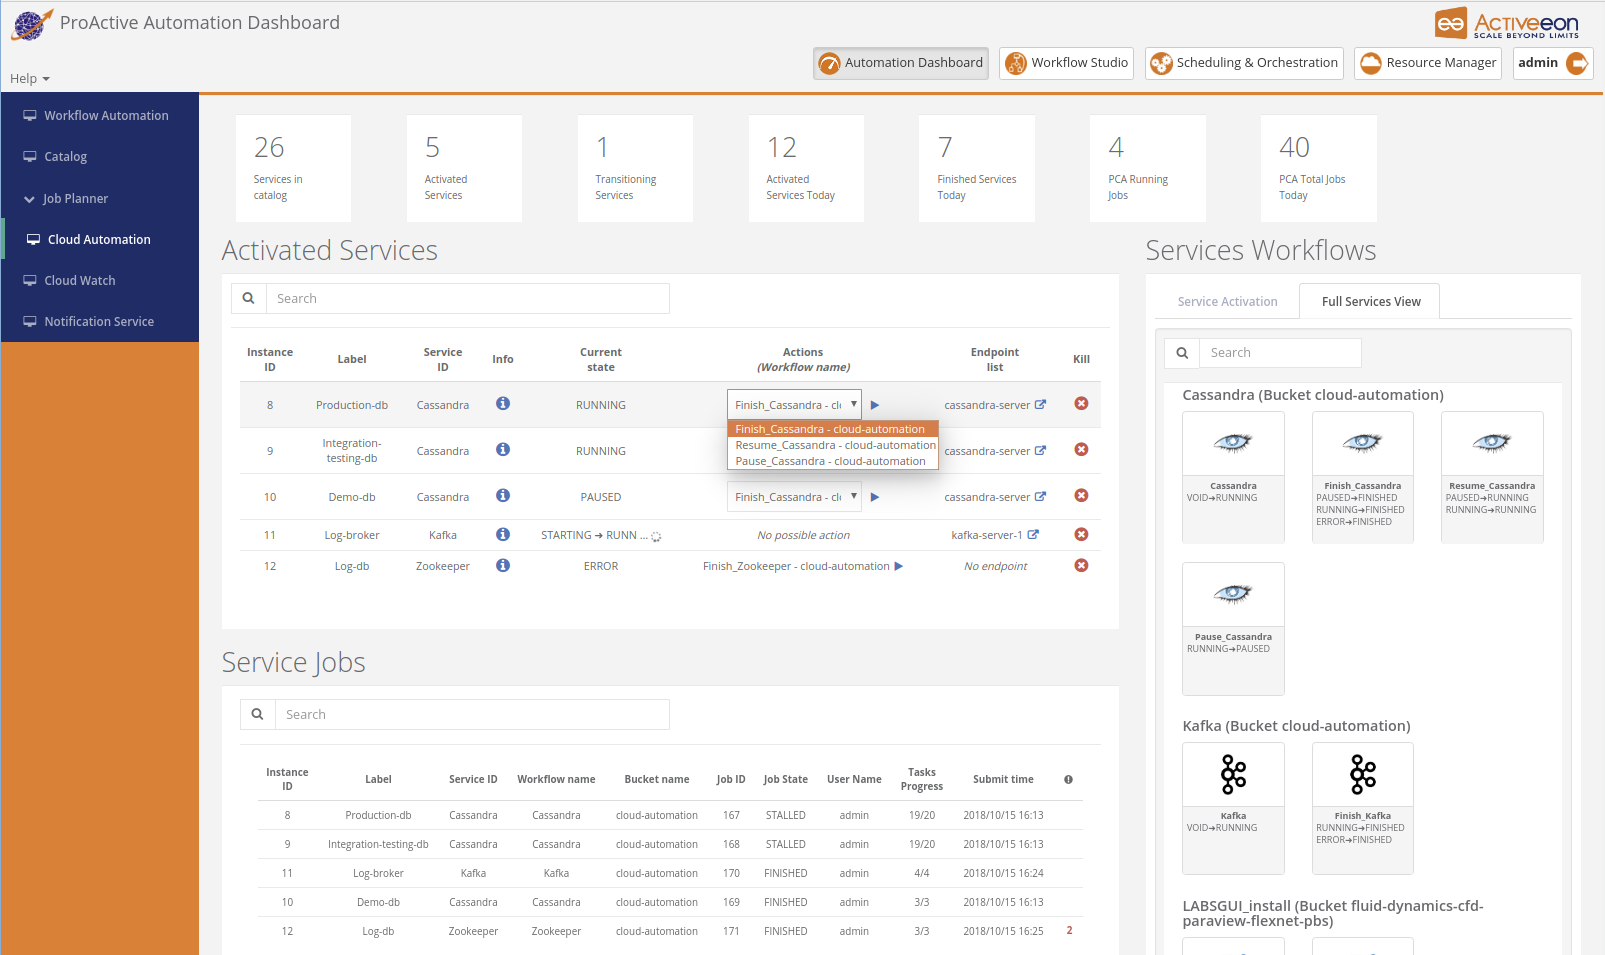
The screenshot above shows the Cloud Automation portal which is actually a PaaS automation tool. It allows you to easily manage any On-Demand Services with full Life-Cycle Management (create, deploy, suspend, resume and terminate).
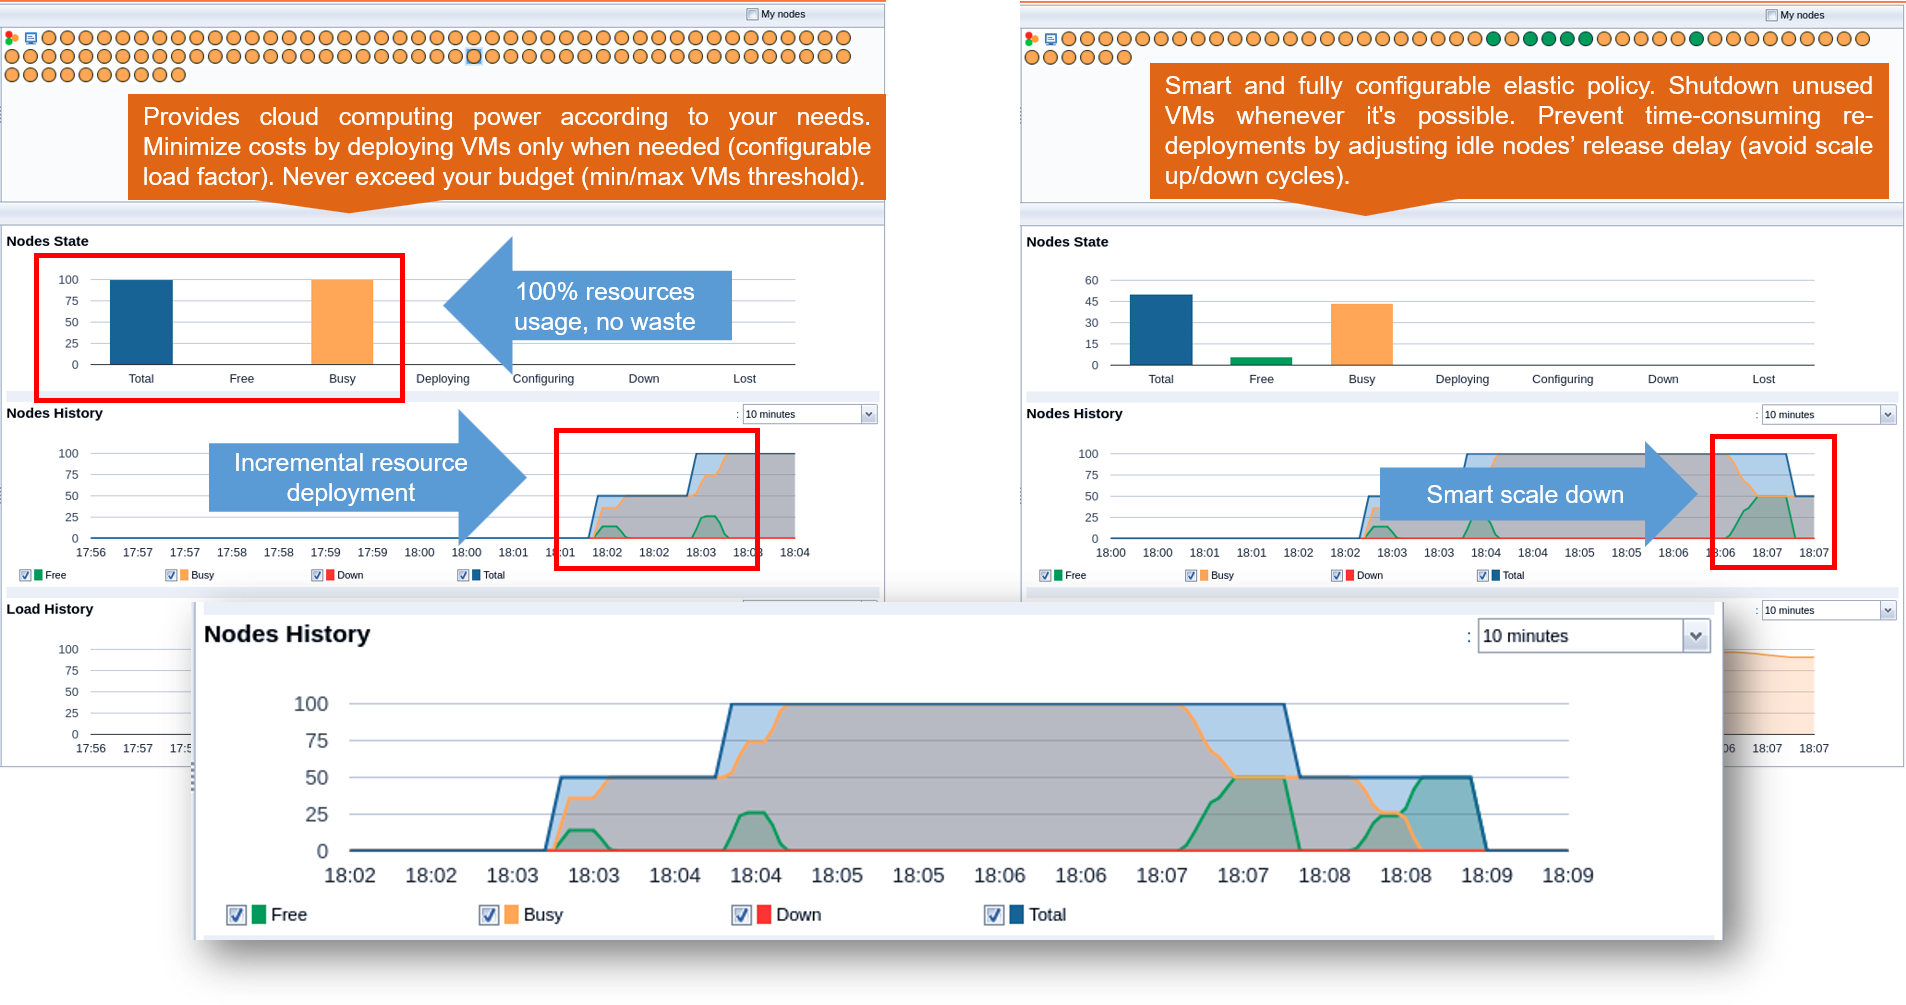
The screenshots above taken from the Resource Manager portal shows that you can configure ProActive Scheduler to dynamically scale up and down the infrastructure being used (e.g. the number of VMs you buy on Clouds) according to the actual workload to execute.
1.1. Glossary
The following terms are used throughout the documentation:
- ProActive Workflows & Scheduling
-
The full distribution of ProActive for Workflows & Scheduling, it contains the ProActive Scheduler server, the REST & Web interfaces, the command line tools. It is the commercial product name.
- ProActive Scheduler
-
Can refer to any of the following:
-
A complete set of ProActive components.
-
An archive that contains a released version of ProActive components, for example
activeeon_enterprise-pca_server-OS-ARCH-VERSION.zip. -
A set of server-side ProActive components installed and running on a Server Host.
-
- Resource Manager
-
ProActive component that manages ProActive Nodes running on Compute Hosts.
- Scheduler
-
ProActive component that accepts Jobs from users, orders the constituent Tasks according to priority and resource availability, and eventually executes them on the resources (ProActive Nodes) provided by the Resource Manager.
| Please note the difference between Scheduler and ProActive Scheduler. |
- REST API
-
ProActive component that provides RESTful API for the Resource Manager, the Scheduler and the Catalog.
- Resource Manager Web Interface
-
ProActive component that provides a web interface to the Resource Manager. Also called Resource Manager Portal.
- Scheduler Web Interface
-
ProActive component that provides a web interface to the Scheduler. Also called Scheduler Portal.
- Workflow Studio
-
ProActive component that provides a web interface for designing Workflows.
- Job Planner
-
A ProActive component providing advanced scheduling options for Workflows.
- Job Planner Portal
-
A ProActive portal to manage the Job Planner service.
- Bucket
-
ProActive notion used with the Catalog to refer to a specific collection of ProActive Objects and in particular ProActive Workflows.
- Server Host
-
The machine on which ProActive Scheduler is installed.
SCHEDULER_ADDRESS-
The IP address of the Server Host.
- ProActive Node
-
One ProActive Node can execute one Task at a time. This concept is often tied to the number of cores available on a Compute Host. We assume a task consumes one core (more is possible, see multi-nodes tasks, so on a 4 cores machines you might want to run 4 ProActive Nodes. One (by default) or more ProActive Nodes can be executed in a Java process on the Compute Hosts and will communicate with the ProActive Scheduler to execute tasks. We distinguish two types of ProActive Nodes:
-
Server ProActive Nodes: Nodes that are running in the same host as ProActive server;
-
Remote ProActive Nodes: Nodes that are running on machines other than ProActive Server.
-
- Compute Host
-
Any machine which is meant to provide computational resources to be managed by the ProActive Scheduler. One or more ProActive Nodes need to be running on the machine for it to be managed by the ProActive Scheduler.
|
Examples of Compute Hosts:
|
- Node Source
-
A set of ProActive Nodes deployed using the same deployment mechanism and sharing the same access policy.
- Node Source Infrastructure
-
The configuration attached to a Node Source which defines the deployment mechanism used to deploy ProActive Nodes.
- Node Source Policy
-
The configuration attached to a Node Source which defines the ProActive Nodes acquisition and access policies.
- Scheduling Policy
-
The policy used by the ProActive Scheduler to determine how Jobs and Tasks are scheduled.
PROACTIVE_HOME-
The path to the extracted archive of ProActive Scheduler release, either on the Server Host or on a Compute Host.
- Workflow
-
User-defined representation of a distributed computation. Consists of the definitions of one or more Tasks and their dependencies.
- Workflow Revision
-
ProActive concept that reflects the changes made on a Workflow during it development. Generally speaking, the term Workflow is used to refer to the latest version of a Workflow Revision.
- Generic Information
-
Are additional information which are attached to Workflows or Tasks. See generic information.
- Calendar Definition
-
Is a json object attached by adding it to the Generic Information of a Workflow.
- Job
-
An instance of a Workflow submitted to the ProActive Scheduler. Sometimes also used as a synonym for Workflow.
- Job Id
-
An integer identifier which uniquely represents a Job inside the ProActive Scheduler.
- Job Icon
-
An icon representing the Job and displayed in portals. The Job Icon is defined by the Generic Information workflow.icon.
- Task
-
A unit of computation handled by ProActive Scheduler. Both Workflows and Jobs are made of Tasks. A Task must define a ProActive Task Executable and can also define additional task scripts
- Task Id
-
An integer identifier which uniquely represents a Task inside a Job ProActive Scheduler. Task ids are only unique inside a given Job.
- Task Executable
-
The main executable definition of a ProActive Task. A Task Executable can either be a Script Task, a Java Task or a Native Task.
- Script Task
-
A Task Executable defined as a script execution.
- Java Task
-
A Task Executable defined as a Java class execution.
- Native Task
-
A Task Executable defined as a native command execution.
- Additional Task Scripts
-
A collection of scripts part of a ProActive Task definition which can be used in complement to the main Task Executable. Additional Task scripts can either be Selection Script, Fork Environment Script, Pre Script, Post Script, Control Flow Script or Cleaning Script
- Selection Script
-
A script part of a ProActive Task definition and used to select a specific ProActive Node to execute a ProActive Task.
- Fork Environment Script
-
A script part of a ProActive Task definition and run on the ProActive Node selected to execute the Task. Fork Environment script is used to configure the forked Java Virtual Machine process which executes the task.
- Pre Script
-
A script part of a ProActive Task definition and run inside the forked Java Virtual Machine, before the Task Executable.
- Post Script
-
A script part of a ProActive Task definition and run inside the forked Java Virtual Machine, after the Task Executable.
- Control Flow Script
-
A script part of a ProActive Task definition and run inside the forked Java Virtual Machine, after the Task Executable, to determine control flow actions.
- Control Flow Action
-
A dynamic workflow action performed after the execution of a ProActive Task. Possible control flow actions are Branch, Loop or Replicate.
- Branch
-
A dynamic workflow action performed after the execution of a ProActive Task similar to an IF/THEN/ELSE structure.
- Loop
-
A dynamic workflow action performed after the execution of a ProActive Task similar to a FOR structure.
- Replicate
-
A dynamic workflow action performed after the execution of a ProActive Task similar to a PARALLEL FOR structure.
- Cleaning Script
-
A script part of a ProActive Task definition and run after the Task Executable and before releasing the ProActive Node to the Resource Manager.
- Script Bindings
-
Named objects which can be used inside a Script Task or inside Additional Task Scripts and which are automatically defined by the ProActive Scheduler. The type of each script binding depends on the script language used.
- Task Icon
-
An icon representing the Task and displayed in the Studio portal. The Task Icon is defined by the Task Generic Information task.icon.
- ProActive Agent
-
A daemon installed on a Compute Host that starts and stops ProActive Nodes according to a schedule, restarts ProActive Nodes in case of failure and enforces resource limits for the Tasks.
2. Get started
To submit your first computation to ProActive Scheduler, install it in your environment (default credentials: admin/admin) or just use our demo platform try.activeeon.com.
ProActive Scheduler provides comprehensive interfaces that allow to:
-
Create workflows using ProActive Workflow Studio
-
Submit workflows, monitor their execution and retrieve the tasks results using ProActive Scheduler Portal
-
Add resources and monitor them using ProActive Resource Manager Portal
-
Version and share various objects using ProActive Catalog Portal
-
Provide an end-user workflow submission interface using Workflow Automation Portal
-
Generate metrics of multiple job executions using Job Analytics Portal
-
Plan workflow executions over time using Job Planner Portal
-
Add services using Cloud Automation Portal
-
Perform event based scheduling using Cloud Watch Portal
-
Control manual workflows validation steps using Notification Portal
We also provide a REST API. and command line interfaces for advanced users.
3. Create and run your computation
3.1. Jobs, workflows and tasks
In order to use Scheduler for executing various computations, one needs to write the execution definition also known as the Workflow definition. A workflow definition is an XML file that adheres to XML schema for ProActive Workflows.
It specifies a number of XML tags for specifying execution steps, their sequence and dependencies. Each execution step corresponds to a task which is the smallest unit of execution that can be performed on a computation resources (ProActive Node). There are several types of tasks which caters different use cases.
3.1.1. Task Types
ProActive Scheduler currently supports three main types of tasks:
-
Native Task, a command with eventual parameters to be executed
-
Script Task, a script written in Groovy, Ruby, Python and other languages supported by the JSR-223
-
Java Task, a task written in Java extending the Scheduler API
For instance, a Script Task can be used to execute an inline script definition or a script file as an execution step whereas a Native Task can be used to execute a native executable file.
| We recommend to use script tasks that are more flexible rather than Java tasks. You can easily integrate with any Java code from a Groovy script task. |
3.1.2. Additional Scripts
In addition to the main definition of a Task, scripts can also be used to provide additional actions. The following actions are supported:
-
one or more selection scripts to control the Task resource (ProActive Node) selection.
-
a fork environment script script to control the Task execution environment (a separate Java Virtual Machine or Docker container).
-
a pre script executed immediately before the main task definition (and inside the forked environment).
-
a post script executed immediately after the main task definition if and only if the task did not trigger any error (also run inside the forked environment).
-
a control flow script executed immediately after the post script (if present) or main task definition to control flow behavior such as branch, loop or replicate (also run inside the forked environment).
-
finally, a clean script executed after the task is finished, whether the task succeeded or not, and directly on the ProActive Node which hosted the task.
3.1.3. Task Dependencies
A workflow in ProActive Workflows & Scheduling can be seen as an oriented graph of Tasks:
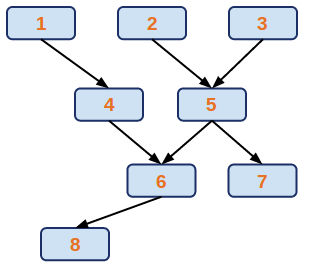
In this tasks graph, we see that task 4 is preceded by task 1, this means that the ProActive Scheduler will wait for the end of task 1 execution before launching task 4. In a more concrete way, task 1 could be the calculation of a part of the problem to solve, and task 4 takes the result provided by task 1 and compute another step of the calculation. We introduce here the concept of passing data between tasks. This relation is called a Dependency, and we say that task 4 depends on task 1.
We see that task 1, 2 and 3 are not linked, so these three tasks can be executed in parallel, because they are independent from each other.
The task graph is defined by the user at the time of workflow creation, but can also be modified dynamically during the job execution by control flow actions such as Replicate.
A finished job contains the results and logs of each task. Upon failure, a task can be restarted automatically or cancelled.
3.2. Native Tasks
A Native Task is a ProActive Workflow task which main execution is defined as a command to run.
Native tasks are the simplest type of Task, where a user provides a command with a list of parameters.
Using native tasks, one can easily reuse existing applications and embed them in a workflow.
Once the executable is wrapped as a task you can easily leverage some of the workflow constructs to run your executable commands in parallel.
You can find an example of such integration in this XML workflow or you can also build one yourself using the Workflow Studio.
Native application by nature can be tied to a given operating system so if you have heterogeneous nodes at your disposal, you might need to select a suitable node to run your native task. This can be achieved using selection script.
| Native Tasks are not the only possibility available to run executables or commands, this can also be achieved using shell language script tasks. |
3.3. Script Tasks
A Script Task is a ProActive Workflow task which main execution is defined as a script.
ProActive Workflows supports tasks in many scripting languages. The currently supported dynamic languages or backends are Groovy, Jython, Python, JRuby, Javascript, Scala, Powershell, R, Perl, Bash, Any Unix Shell, Windows CMD, Docker File, Docker Compose and Kubernetes.
Though Docker File, Docker Compose and Kubernetes are not really scripting language but rather description languages, ProActive tasks can interpret Docker files, Docker Compose or Kubernetes yaml files to start containers or pods.
|
As seen in the list above, Script Tasks can be used to run native operating system commands by providing a script written in bash, ksh, windows cmd, Powershell, etc…
Simply set the language attribute to bash, shell, or cmd and type your command(s) in the workflow.
In this sense, it can replace in most cases a Native Task.
| You can easily embed small scripts in your workflow. The nice thing is that the workflow will be self-contained and will not require to compile your code before executing. However, we recommend that you keep these scripts small to keep the workflow easy to understand. |
You can find an example of a script task in this XML workflow or you can also build one yourself using the Workflow Studio. The quickstart tutorial relies on script tasks and is a nice introduction to writing workflows.
Scripts can also be used to decorate any kind of task (Script, Java or Native) with specific actions, as described in the additional scripts section.
It is thus possible to combine various scripting languages in a single Task. For example a pre script could be written in bash to transfer some files from a remote file system, while the main script will be written in python to process those files.
Finally, a Script Task may or may not return a result materialized by the result script binding.
3.3.1. Script Bindings
A Script Task or additional scripts can use automatically-defined script bindings. These bindings allow to associate the script inside its workflow context, for example, the ability to know the current workflow variables as submitted by a user, the workflow job id as run inside the ProActive Scheduler, etc.
Bindings allow as well to pass information between various scripts inside the same task or across different tasks.
A script binding can be either:
-
Defined automatically by the ProActive Scheduler before the script starts its execution. In this case, we call it also a provided or input script binding.
-
Needed to be defined by the script during its execution to provide meaningful results. In this case, we call it also a result or output script binding.
Below is an example of Script Task definition which uses both types of bindings:
jobId = variables.get("PA_JOB_ID")
result = "The Id of the current job is: " + jobId
As we can see, the variables binding in provided automatically by the ProActive Scheduler before the script execution and it is used to compute a result binding as task output.
Bindings are stored internally inside the ProActive Scheduler as Java Objects. Accordingly, a conversion may be performed when targetting (or when reading from) other languages.
For example, Generic Information or Workflow Variables are stored as Java objects implementing the Map interface.
When creating the variables or genericInformation bindings prior to executing a Groovy, JRuby, Jython or Python script, the ProActive Scheduler will convert it to various types accepted by the target language.
In those languages, printing the type of the genericInformation binding will show:
Groovy: class com.google.common.collect.RegularImmutableBiMap
JRuby: Java::ComGoogleCommonCollect::RegularImmutableBiMap
Jython: <type 'com.google.common.collect.RegularImmutableBiMap'>
Python: <class 'py4j.java_collections.JavaMap'>
We see here that Groovy, JRuby and Jython did not perform any conversion, whereas Python (CPython) did. This behavior is expected as CPython script execution is run as a standalone python process and a custom type conversion occurs while the formers are run directly inside the task Java Virtual Machine will full Java type compatibility.
Depending on the script type (task script, selection script, etc…), the script may need to define an output binding to return some information to the scheduler.
Below are some examples of output bindings for various kind of scripts:
-
resultandresultMetadatafor a Script Task main execution script. -
selectedfor a selection script. -
loopfor a Loop construct flow script. -
runsfor a Replicate construct flow script.
The complete list of script bindings (both input and output) is available in the Script Bindings Reference section.
Below are descriptions of some specific scripting language support, which can be used in Script Tasks main execution script or in any Task additional scripts.
3.4. Java Tasks
A workflow can execute Java classes thanks to Java Tasks. In terms of XML definition, a Java Task consists of a fully-qualified class name along with parameters:
<task name="Java_Task">
  <javaExecutable class="org.ow2.proactive.scheduler.examples.WaitAndPrint">
    <parameters>
      <parameter name="sleepTime" value="20"/>
      <parameter name="number" value="2"/>
    </parameters>
  </javaExecutable>
</task>
The provided class must extend the JavaExecutable abstract class and implement the execute method.
Any parameter must be defined as public attributes. For example, the above WaitAndPrint class contains the following attributes definitions:
/** Sleeping time before displaying. */
public int sleepTime;

/** Parameter number. */
public int number;
A parameter conversion is performed automatically by the JavaExecutable super class. If this automatic conversion is not suitable, it is possible to override the init method.
Finally, several utility methods are provided by JavaExecutable and should be used inside execute. A good example is getOut which allows writing some textual output to the workflow task or getLocalSpace which allows access to the task execution directory.
The complete code for the WaitAndPrint class is available below:
public class WaitAndPrint extends JavaExecutable {

    /** Sleeping time before displaying. */
    public int sleepTime;

    /** Parameter number. */
    public int number;

    /**
     * @see JavaExecutable#execute(TaskResult[])
     */
    @Override
    public Serializable execute(TaskResult... results) throws Throwable {
        String message = null;

        try {
            getErr().println("Task " + number + " : Test STDERR");
            getOut().println("Task " + number + " : Test STDOUT");

            message = "Task " + number;
            int st = 0;
            while (st < sleepTime) {
                Thread.sleep(1000);
                try {
                    setProgress((st++) * 100 / sleepTime);
                } catch (IllegalArgumentException iae) {
                    setProgress(100);
                }
            }

        } catch (Exception e) {
            message = "crashed";
            e.printStackTrace(getErr());
        }

        getOut().println("Terminate task number " + number);

        return ("No." + this.number + " hi from " + message + "\t slept for " + sleepTime + " Seconds");
    }

}
3.5. Run a workflow
To run a workflow, the user submits it to the ProActive Scheduler. It will be possible to choose the values of all Job Variables when submitting the workflow (see section Job Variables). A verification is performed to ensure the well-formedness of the workflow. A verification will also be performed to ensure that all variables are valid according to their model definition (see section Variable Model). Next, a job is created and inserted into the pending queue and waits until free resources become available. Once the required resources are provided by the ProActive Resource Manager, the job is started. Finally, once the job is finished, it goes to the queue of finished jobs where its result can be retrieved.
You can submit a workflow to the Scheduler using the Workflow Studio, the Scheduler Web Interface or command line tools. For advanced users we also expose REST and JAVA APIs.
| During the submission, you will be able to edit Workflow variables, so you can effectively use them to parameterize workflow execution and use workflows as templates. |
3.5.1. Job & Task states
During their execution, jobs go through different states. The screenshot below shows Pending and Current Jobs states summary as seen in Workflow Automation portal.
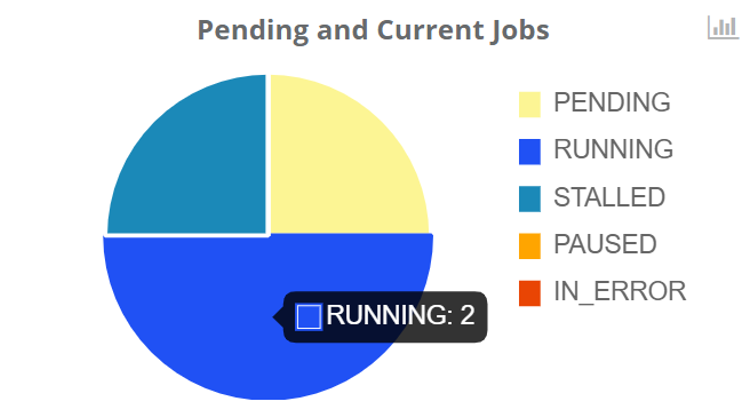
| State | Name | Description |
|---|---|---|
|
Pending |
The job is waiting to be scheduled. None of its tasks have been Running so far. |
|
Running |
The job is running. At least one of its task has been scheduled. |
|
Stalled |
The job has been launched but no task is currently running. |
|
Paused |
The job is paused waiting for user to resume it. |
|
In-Error |
The job has one or more In-Error tasks that are suspended along with their dependencies. User intervention is required to fix the causing issues and restart the In-Error tasks to resume the job. |
The screenshot below shows Past Jobs states summary as seen in Workflow Automation portal.
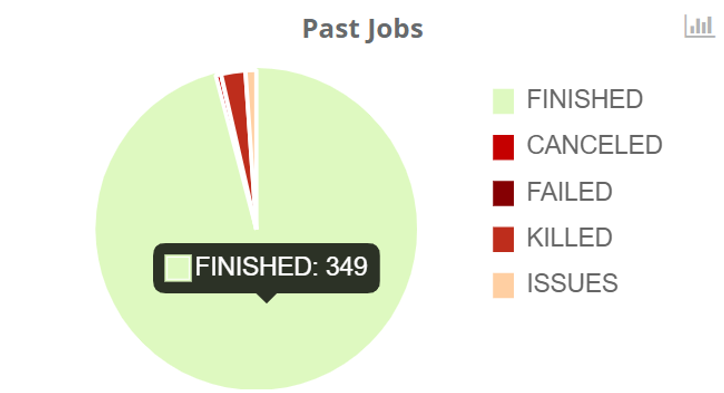
| State | Name | Description |
|---|---|---|
|
Finished |
The job is finished. Tasks are finished or faulty. |
|
Cancelled |
The job has been canceled because of an exception. This status is used when an exception is thrown by the user code of a task and when the user has asked to cancel the job on exception. |
|
Failed |
The job has failed. One or more tasks have failed (due to resources failure). There is no more executionOnFailure left for a task. |
|
Killed |
The job has been killed by the user. |
Similarly to jobs, during their execution, tasks go through different states.
| State | Name | Description |
|---|---|---|
|
Aborted |
The task has been aborted by an exception on an other task while the task is running. (job is cancelOnError=true). Can be also in this status if the job is killed while the concerned task was running. |
|
Resource down |
The task is failed (only if maximum number of execution has been reached and the node on which it was started is down). |
|
Faulty |
The task has finished execution with error code (!=0) or exception. |
|
Finished |
The task has finished execution. |
|
In-Error |
The task is suspended after first error, if the user has asked to suspend it. The task is waiting for a manual restart action. |
|
Could not restart |
The task could not be restarted. It means that the task could not be restarted after an error during the previous execution. |
|
Could not start |
The task could not be started. It means that the task could not be started due to dependencies failure. |
|
Paused |
The task is paused. |
|
Pending |
The task is in the scheduler pending queue. |
|
Running |
The task is executing. |
|
Skipped |
The task was not executed: it was the non-selected branch of an IF/ELSE control flow action. |
|
Submitted |
The task has just been submitted by the user. |
|
Faulty… |
The task is waiting for restart after an error (i.e. native code != 0 or exception, and maximum number of execution is not reached). |
|
Failed… |
The task is waiting for restart after a failure (i.e. node down). |
3.5.2. Job Priority
A job is assigned a default priority of NORMAL but the user can increase or decrease the priority once the
job has been submitted. When they are scheduled, jobs with the highest priory are executed first.
The following values are available:
-
IDLE -
LOWEST -
LOW -
NORMAL -
HIGHcan only be set by an administrator -
HIGHESTcan only be set by an administrator
3.6. Retrieve logs
It is possible to retrieve multiple logs from a job, these logs can either be:
-
The standard output/error logs associated with a job.
-
The standard output/error logs associated with a task.
-
The scheduler server logs associated with a job.
-
The scheduler server logs associated with a task.
Unless your account belongs to an administrator group, you can only see the logs of a job that you own.
3.6.1. Retrieve logs from the portal
-
Job standard output/error logs:
To view the standard output or error logs associated with a job, select a job from the job list and then on the Output tab in the bottom right panel.
Click on Streaming Output checkbox to auto-fetch logs for running tasks of the entire Job. The logs panel will be updated as soon as new log lines will be printed by this job.
You cannot select a specific Task in the streaming mode. If you activate streaming while some Tasks are already finished, you will get the logs of those Tasks as well.
Click on Finished Tasks Output button to retrieve logs for already finished tasks. For all the finished Tasks within the Job, or for the selected Task.
The command does work when Job is still in Running state, as well as when Job is Finished.
Logs are limited to 1024 lines. Should your job logs be longer, you can select the Full logs (download) option from the drop down list. -
Task standard output/error logs:
To view the standard output or error logs associated with a task, select a job from the job list and a task from the task list.
Then in the Output tab, choose Selected task from the drop down list.
Once the task is terminated, you will be able to click on the Finished Tasks Output button to see the standard output or error associated with the task.
It is not possible to view the streaming logs of single task, only the job streaming logs are available. -
Job server logs:
Whether a job is running or finished, you can access the associated server logs by selecting a job, opening the Server Logs tab in the bottom-right panel and then clicking on Fetch logs.
Server logs contains debugging information, such as the job definition, output of selection or cleaning scripts, etc. -
Task server logs:
In the Server Logs tab, you can choose Selected task to view the server logs associated with a single task.
3.6.2. Retrieve logs from the command line
The chapter command line tools explains how to use the command line interface. Once connected, you can retrieve the various logs using the following commands. Server logs cannot be accessed from the command line.
-
Job standard output/error logs: joboutput(jobid)
> joboutput(1955)
[1955t0@precision;14:10:57] [2016-10-27 14:10:057 precision] HelloWorld
[1955t1@precision;14:10:56] [2016-10-27 14:10:056 precision] HelloWorld
[1955t2@precision;14:10:56] [2016-10-27 14:10:056 precision] HelloWorld
[1955t3@precision;14:11:06] [2016-10-27 14:11:006 precision] HelloWorld
[1955t4@precision;14:11:05] [2016-10-27 14:11:005 precision] HelloWorld
-
Task standard output/error logs: taskoutput(jobid, taskname)
> taskoutput(1955,'0_0')
[1955t0@precision;14:10:57] [2016-10-27 14:10:057 precision] HelloWorld
-
Streaming job standard output/error logs: livelog(jobid)
> livelog(2002)
Displaying live log for job 2002. Press 'q' to stop.
> Displaying live log for job 2002. Press 'q' to stop.
[2002t2@precision;15:57:13] [ABC, DEF]
3.7. Retrieve results
Once a job or a task is terminated, it is possible to get its result. Unless you belong to the administrator group, you can only get the result of the job that you own. Results can be retrieved using the Scheduler Web Interface or the command line tools.
| When running native application, the task result will be the exit code of the application. Results usually make more sense when using script or Java tasks. |
3.7.1. Retrieve results from the portal
In the scheduler portal, select a job, then select a task from the job’s task list. Click on Preview tab in the bottom-right panel.
In this tab, you will see two buttons:
-
Open in browser: when clicking on this button, the result will be displayed in a new browser tab. By default, the result will be displayed in text format. If your result contains binary data, it is possible to specify a different display mode using <<_assigning_metadata_to_task_result,Result Metadata>.
If the task failed, when clicking on the Open in browser button, the task error will be displayed. -
Save as file: when clicking on this button, the result will be saved on disk in binary format. By default, the file name will be generated automatically using the job and task ids, without an extension. It is possible to customize this behavior and specify in the task a file name, or a file extension using Result Metadata.
The following example gets one png image and add the metadata to help the browser display it and add a name when downloading.
file = new File(fileName)
result = file.getBytes()
resultMetadata.put("file.name", fileName)
resultMetadata.put("content.type", "image/png")
3.7.2. Retrieve results from the command line
The chapter command line tools explains how to use the command line interface. Once connected, you can retrieve the task or job results:
-
Result of a single task: taskresult(jobid, taskname)
> taskresult(2002, 'Merge')
task('Merge') result: true
-
Result of all tasks of a job: jobresult(jobid)
> jobresult(2002)
job('2002') result:
Merge : true
Process*1 : DEF
Process : ABC
Split : {0=abc, 1=def}
4. ProActive Studio
ProActive Workflow Studio is used to create and submit workflows graphically. The Studio allows to simply drag-and-drop various task constructs and draw their dependencies to form complex workflows. It also provides various flow control widgets such as conditional branch, loop, replicate etc to construct workflows with dynamic structures.
The studio usage is illustrated in the following example.
4.1. A simple example
The quickstart tutorial on try.activeeon.com shows how to build a simple workflow using script tasks.
Below is an example of a workflow created with the Studio:
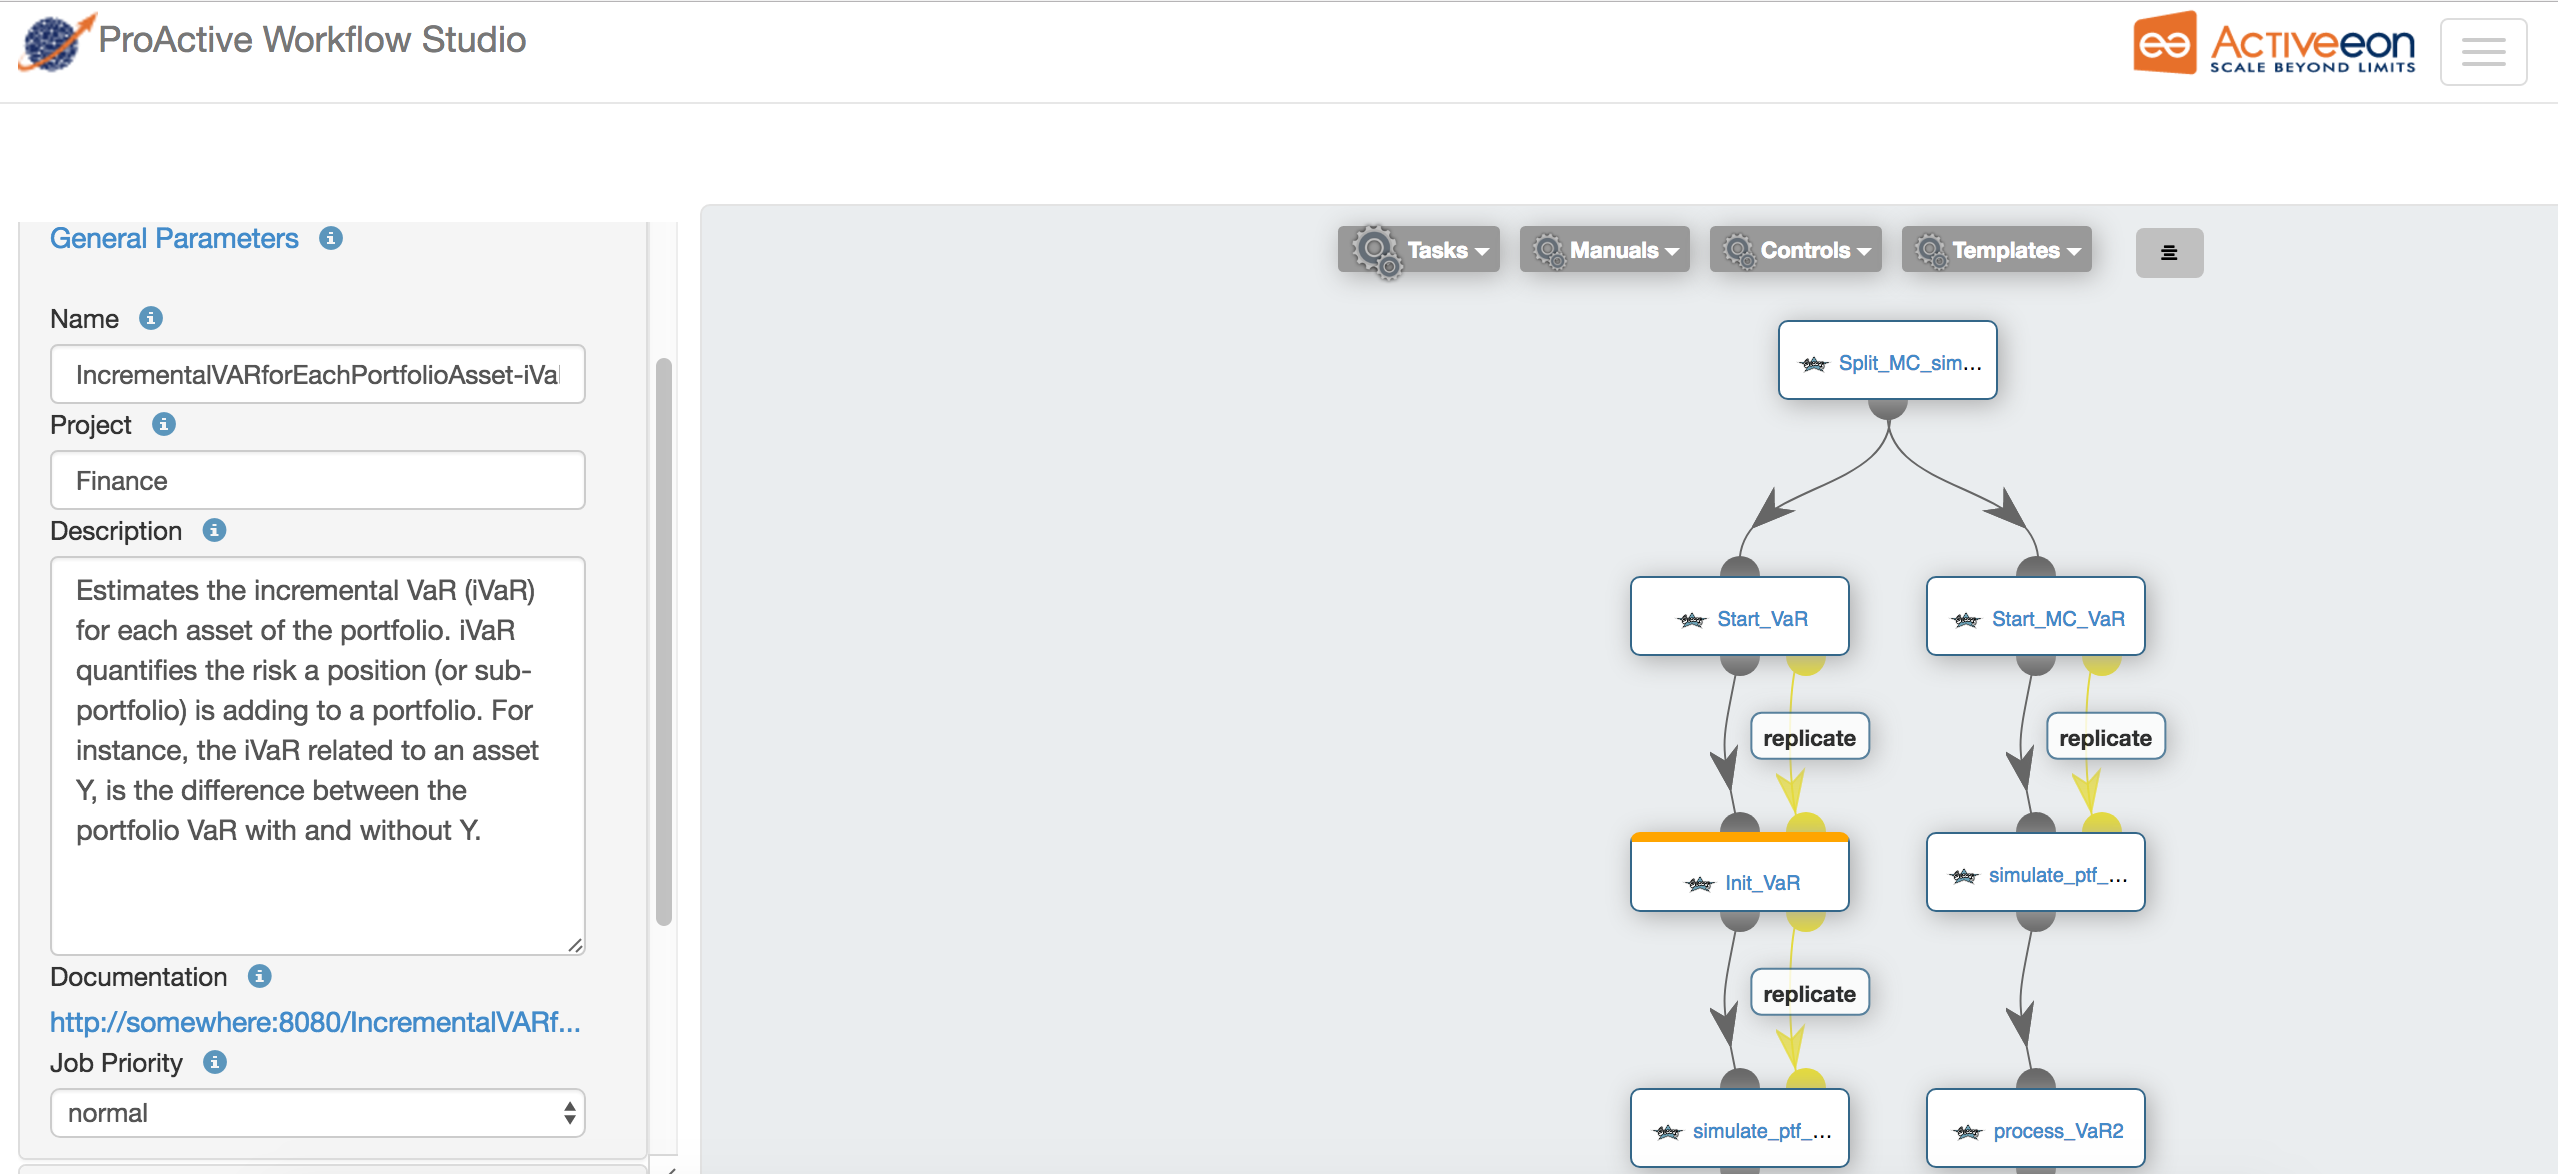
In the left part, are illustrated the General Parameters of the workflow with the following information:
-
Name: the name of the workflow. -
Project: the project name to which belongs the workflow. -
Description: the textual description of the workflow. -
Documentation: if the workflow has a Generic Information named "Documentation", then its URL value is displayed as a link. -
Job Priority: the priority assigned to the workflow. It is by default set toNORMAL, but can be increased or decreased once the job is submitted.
In the right part, we see the graph of dependent tasks composing the workflow. Each task can be selected to show the task specific attributes and defintions.
Finally, above the workflow graph, we see the various palettes which can be used to drag & drop sample task definitions or complex constructs.
The following chapters describe the three main type of tasks which can be defined inside ProActive Workflows.
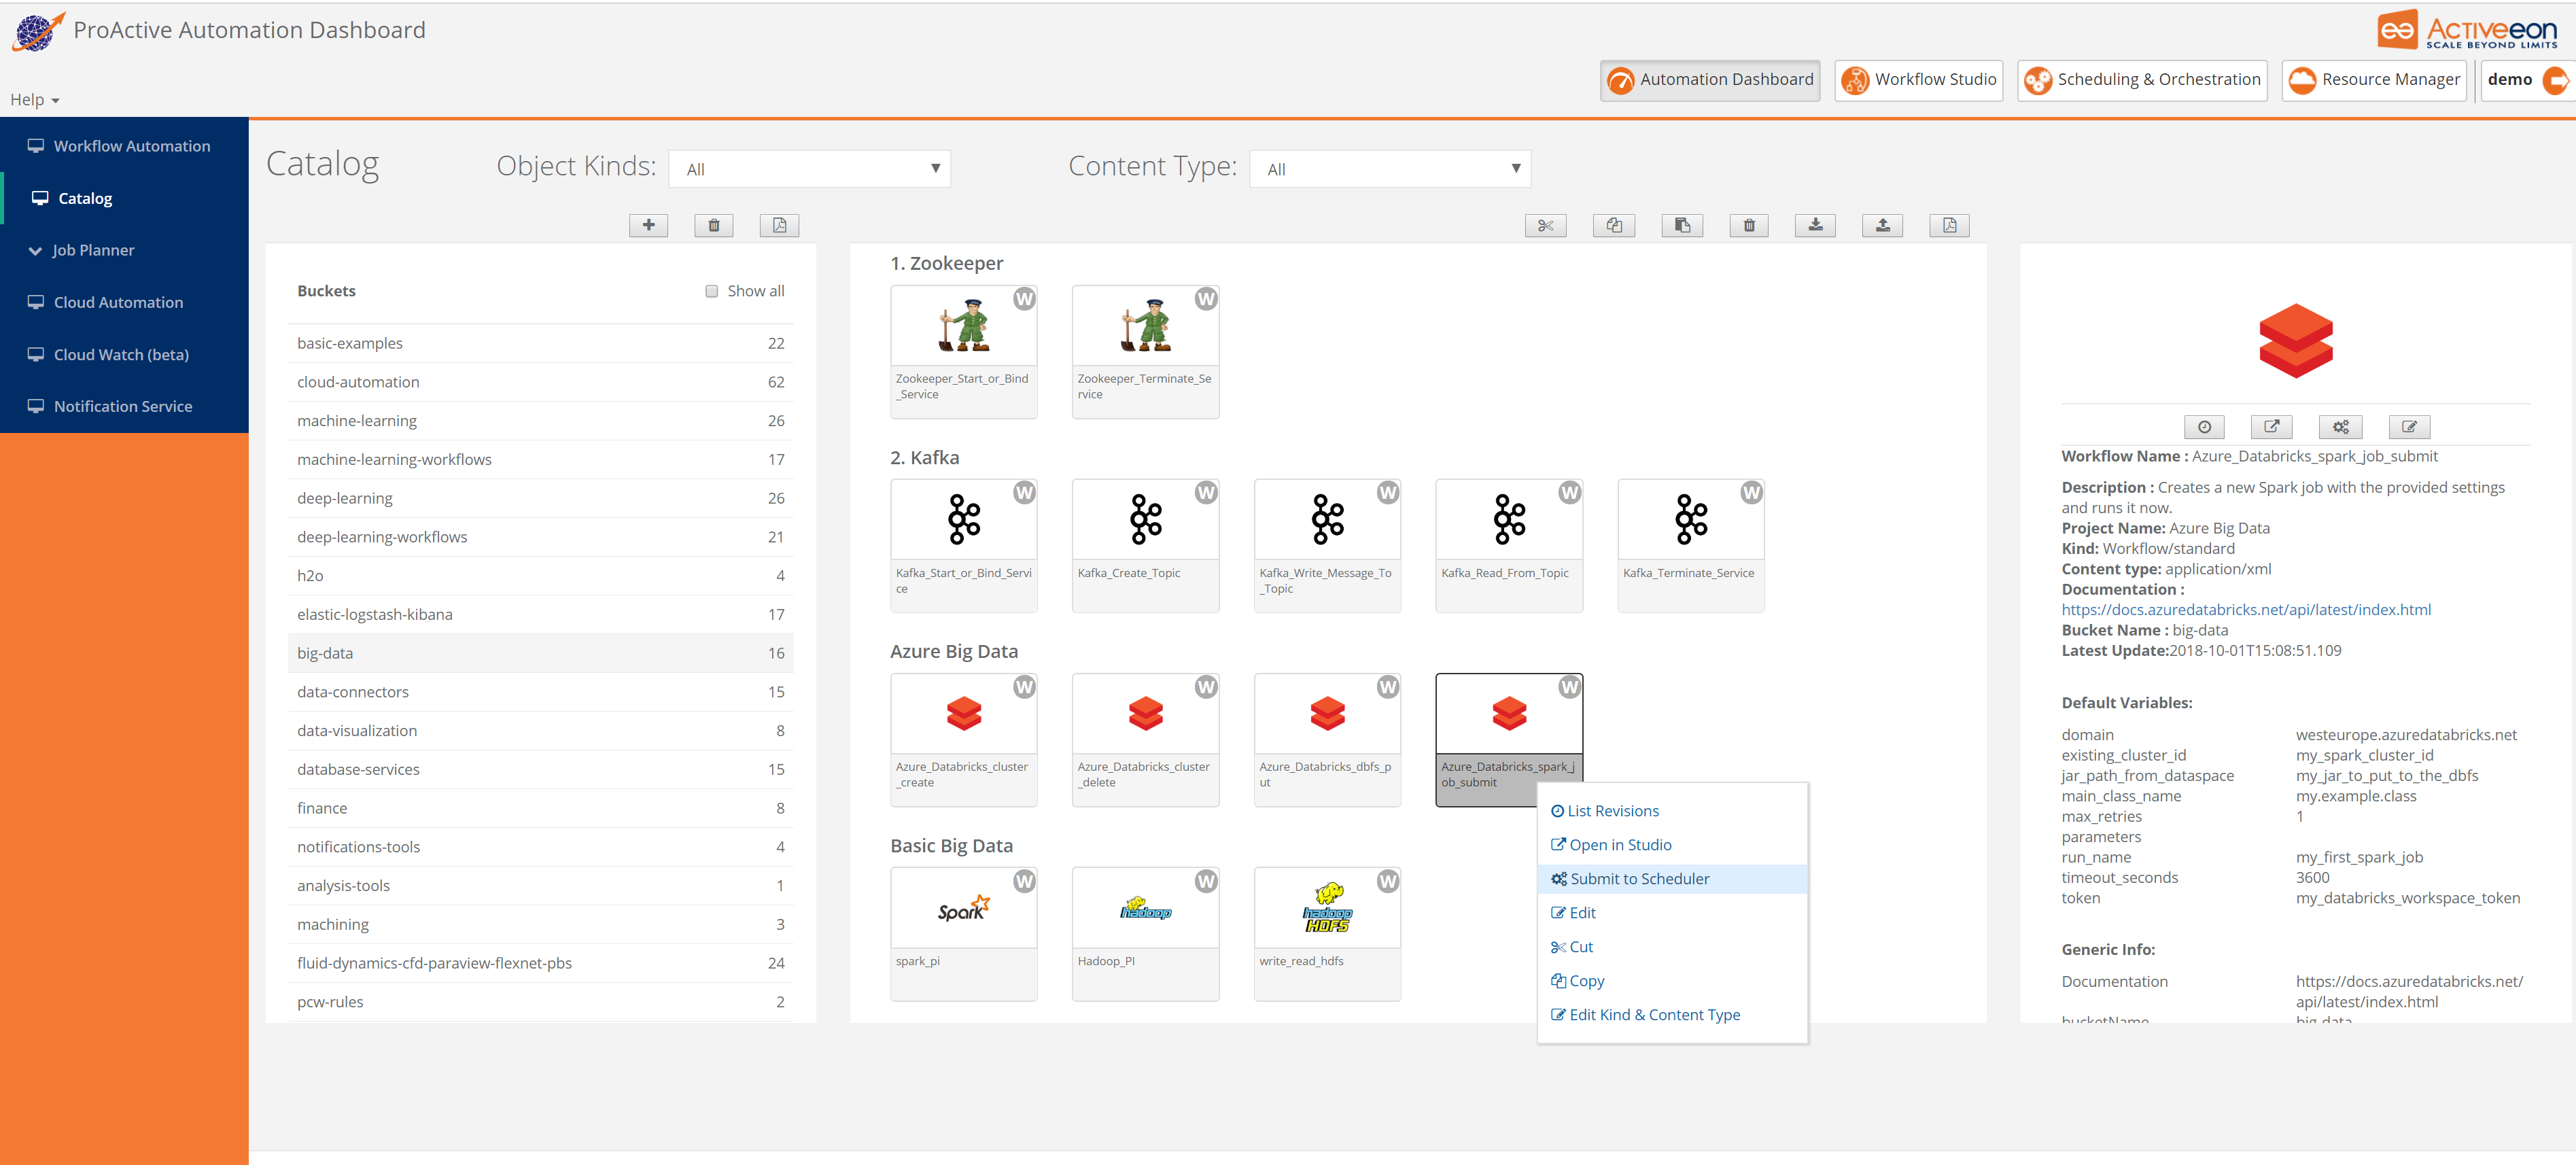
4.2. Use the ProActive Catalog from the Studio
The GUI interaction with the Catalog can be done in two places: the Studio and Catalog Portal. The portals follow the concepts of the Catalog: Workflows are stored inside buckets, a workflow has some metadata and can have several revisions.
The Catalog view in the Studio or in the Catalog Portal allows to browse all the workflows in the Catalog grouped by buckets and to list all the revisions of a workflow along with their commit message.
Inside the Studio, there is a Catalog menu from which a user can directly interact with the Catalog to import or publish Workflows.
Additionally, the Palette of the Studio lists the user’s favourite buckets to allow easy import of workflows from the Catalog with a simple Drag & Drop.

4.2.1. Publish current Workflow to the Catalog
Workflows created in the studio can be saved inside a bucket in the Catalog by using the Publish current Workflow to the Catalog action.
When saving a Workflow in the Catalog, users can add a specific commit message.
If a Workflow with the same name already exists in the specified bucket, a new revision of the Workflow is created.
We recommend to always specify commit messages at any commit for an easier differentiation between stored versions.
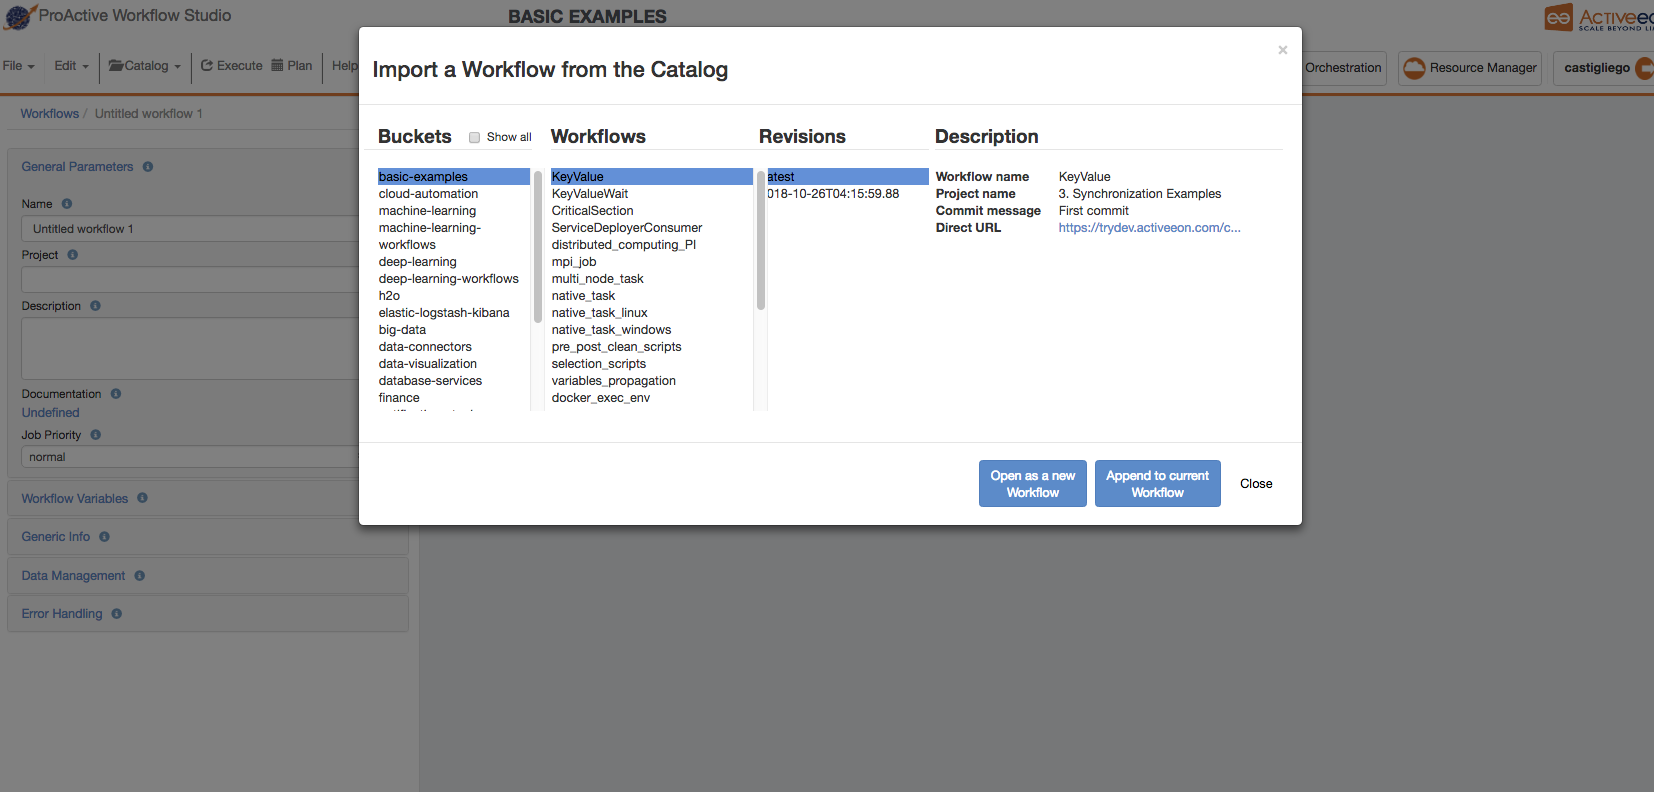
4.2.2. Get a Workflow from the Catalog
When the Workflow is selected from Catalog you have two options:
-
Open as a new Workflow: Open the Workflow from Catalog as a new Workflow in Studio. -
Append to current Workflow: Append the selected Workflow from the Catalog to the Workflow already opened inside the Studio.
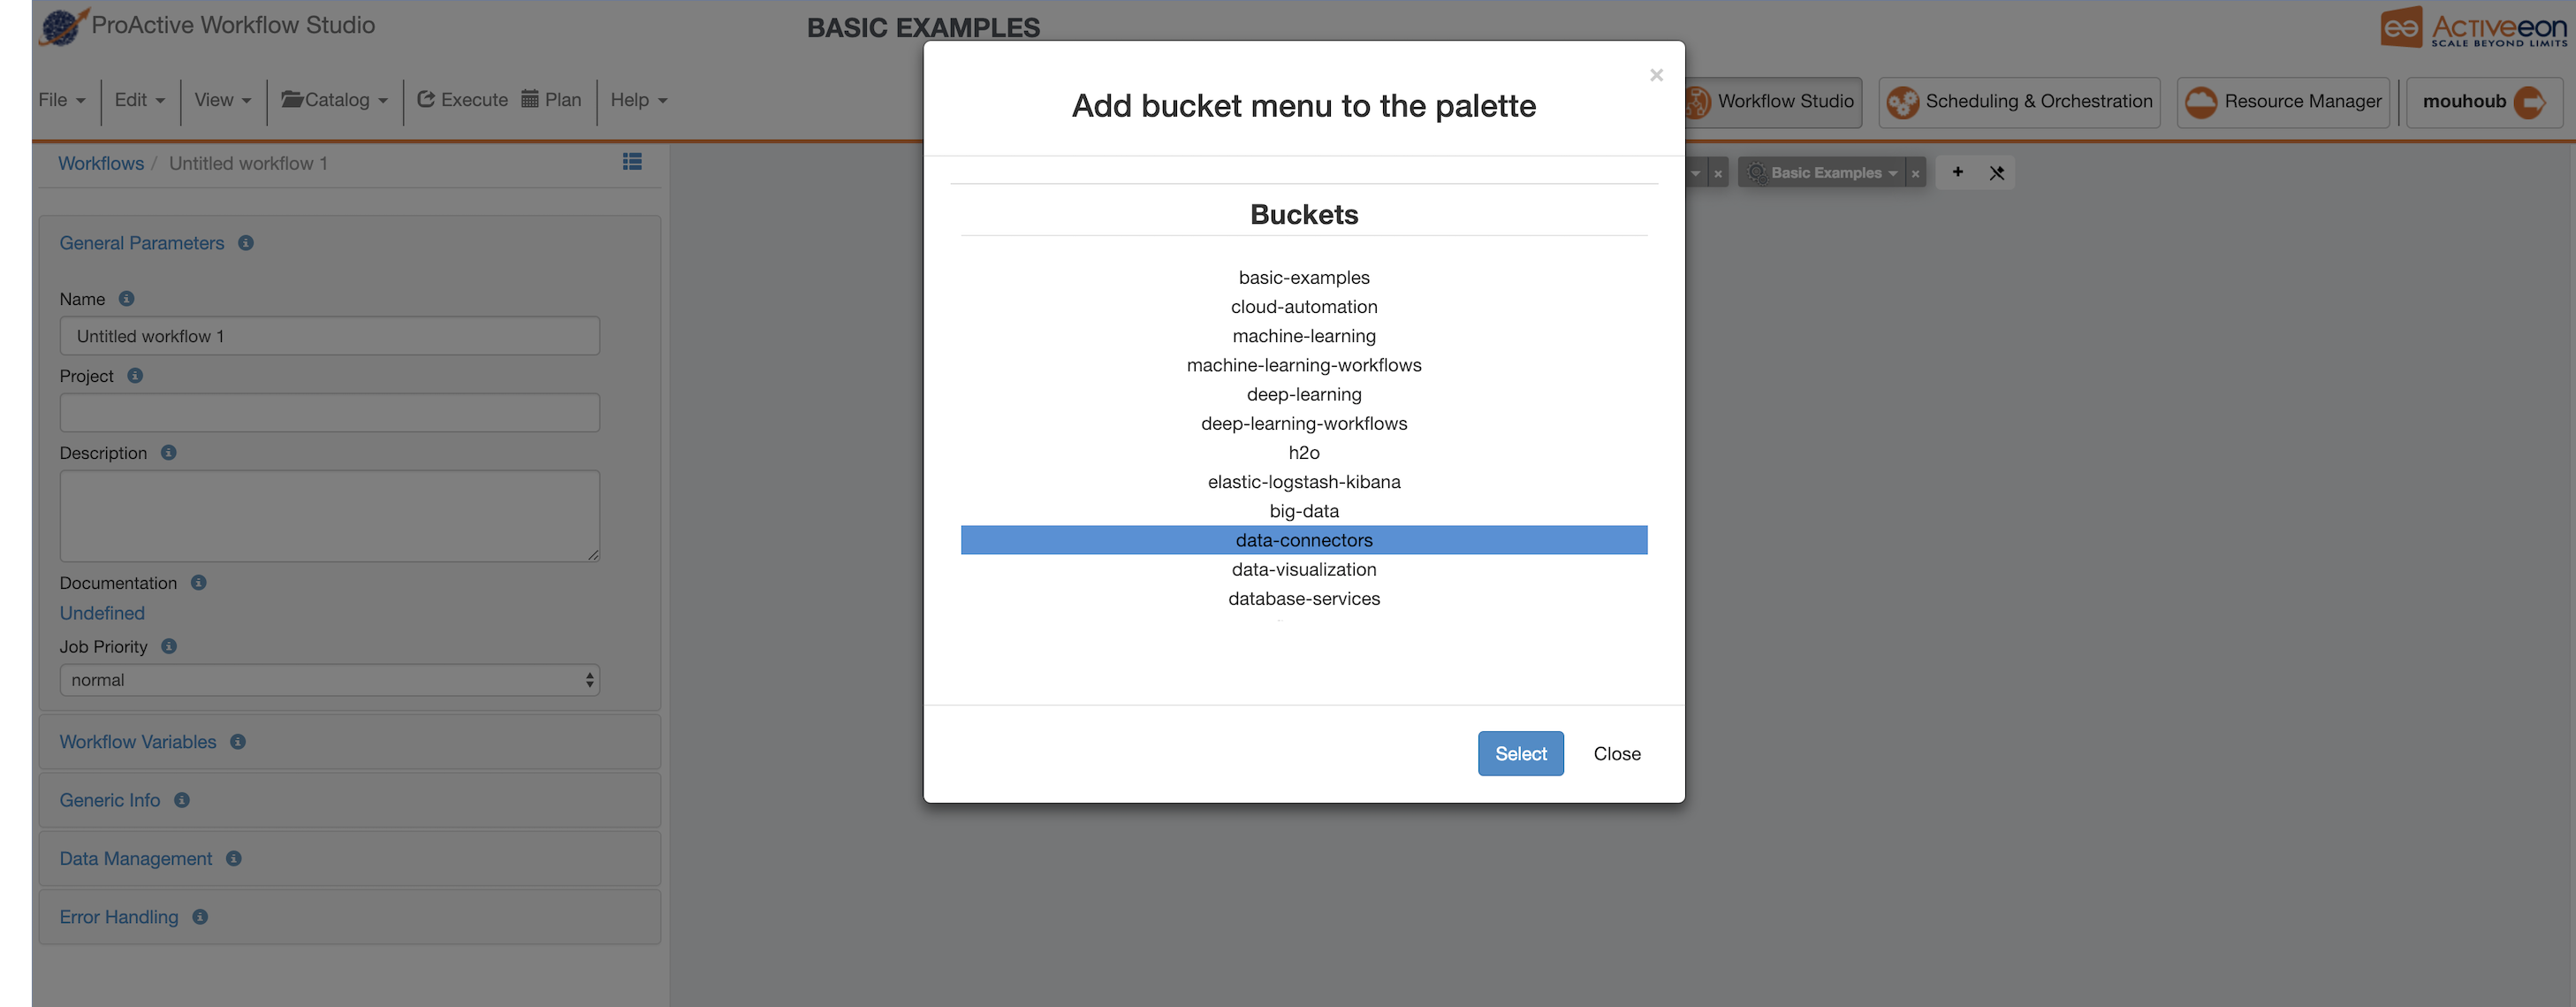
4.2.3. Add Bucket Menu to the Palette
The Palette makes it easier to use workflows stored in a specific Bucket of the Catalog as templates when designing a Workflow.
To add a bucket from the Catalog as a dropdown menu in the Palette: Click on View → Add Bucket Menu to the Palette or you press the ![]() button in the palette.
A window will show up to ask you which bucket you want to add to the Palette as in the image below.
button in the palette.
A window will show up to ask you which bucket you want to add to the Palette as in the image below.
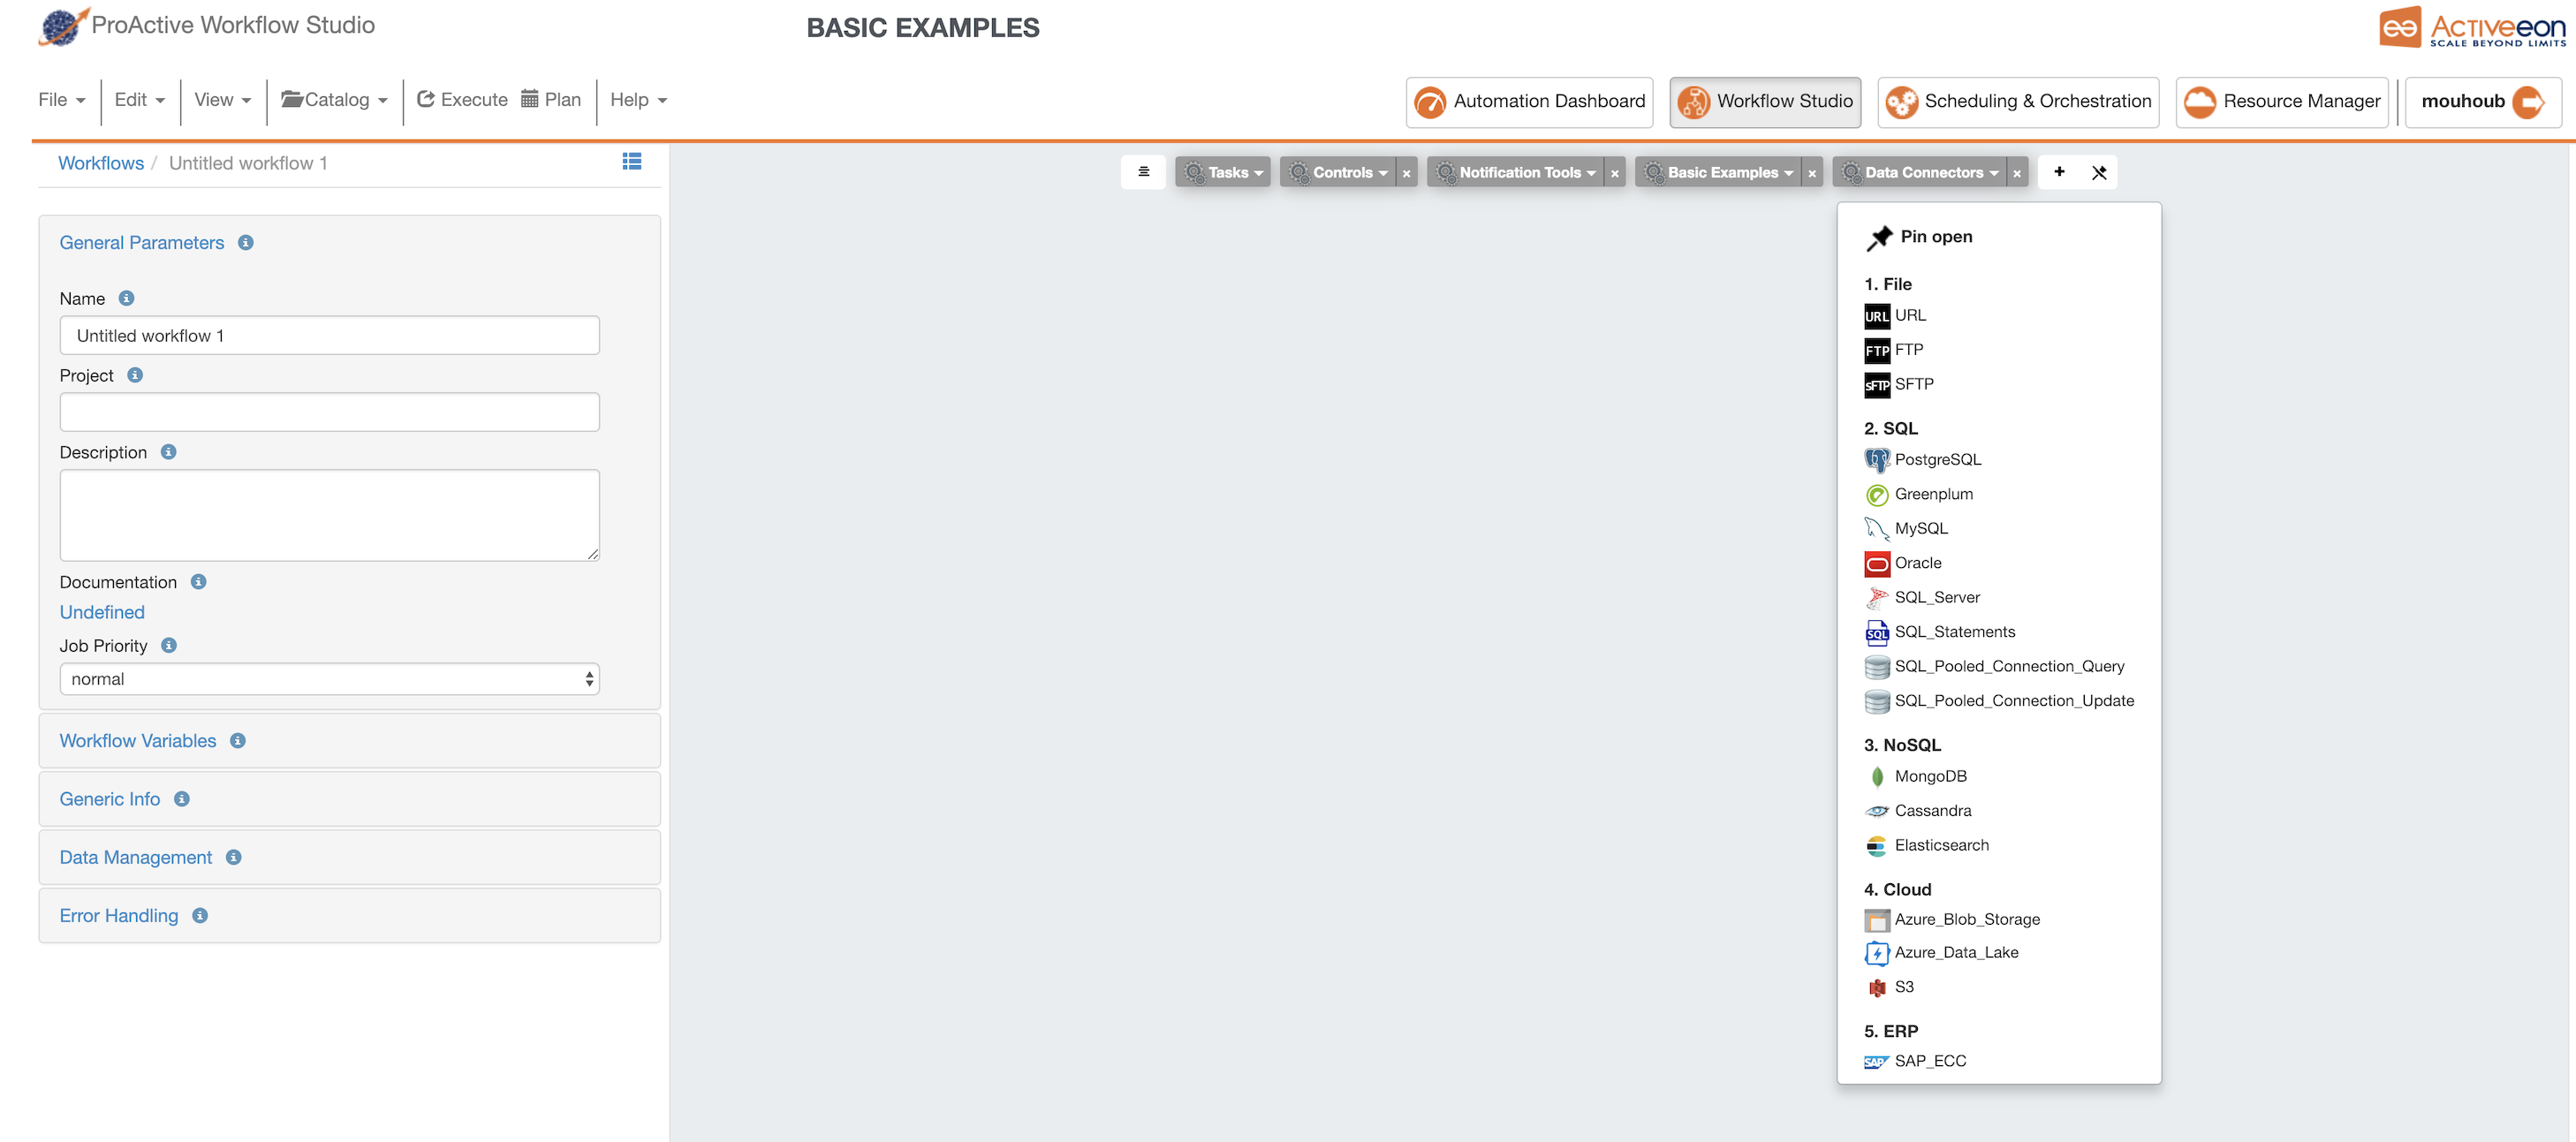
The selected Data Connectors Bucket now appears as a menu in the Studio. See the image below.
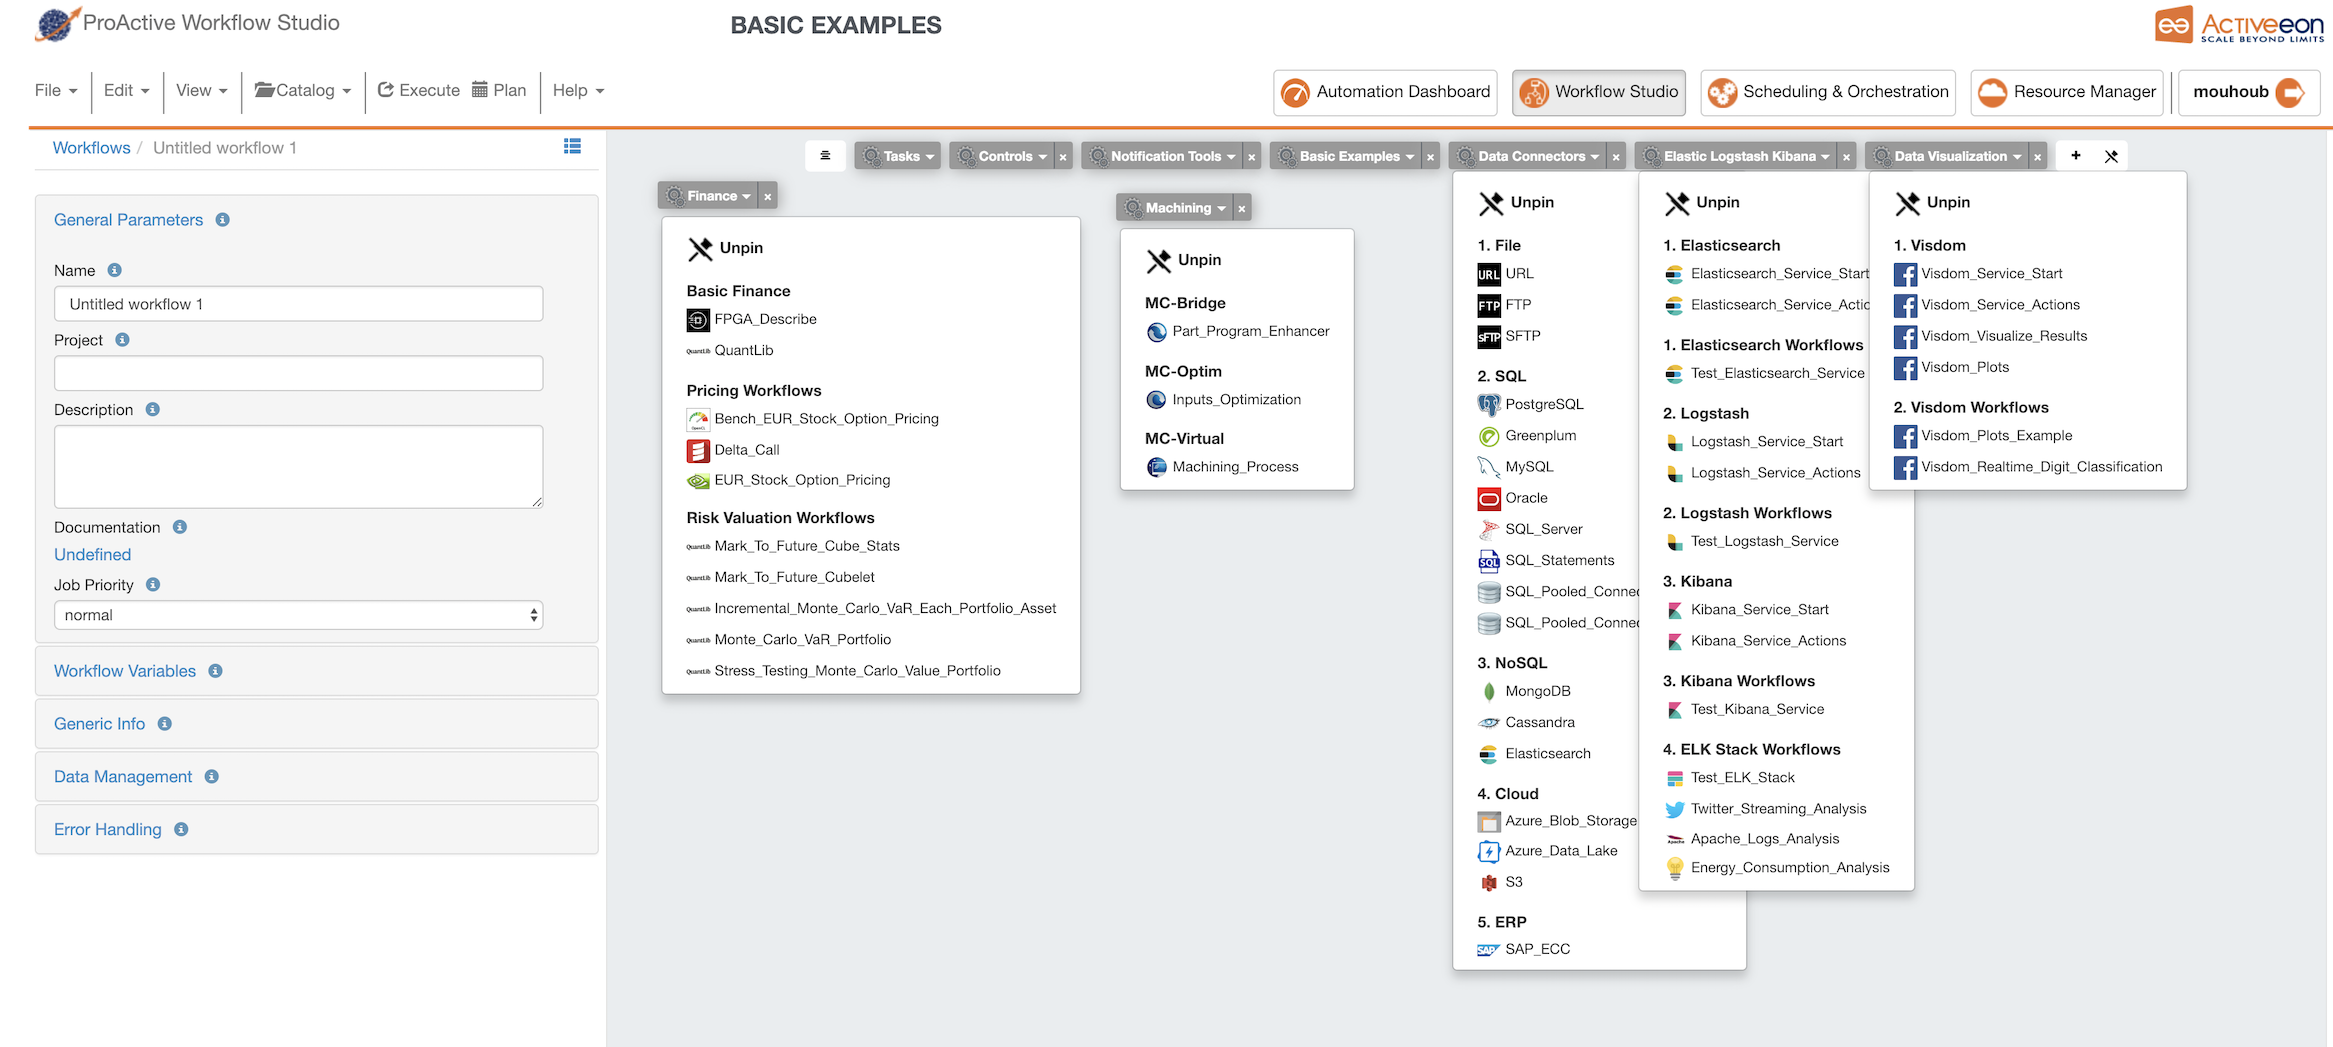
You can repeat the operation as many times as you wish in order to add other specific Menus you might need for your workflow design. See the image below.
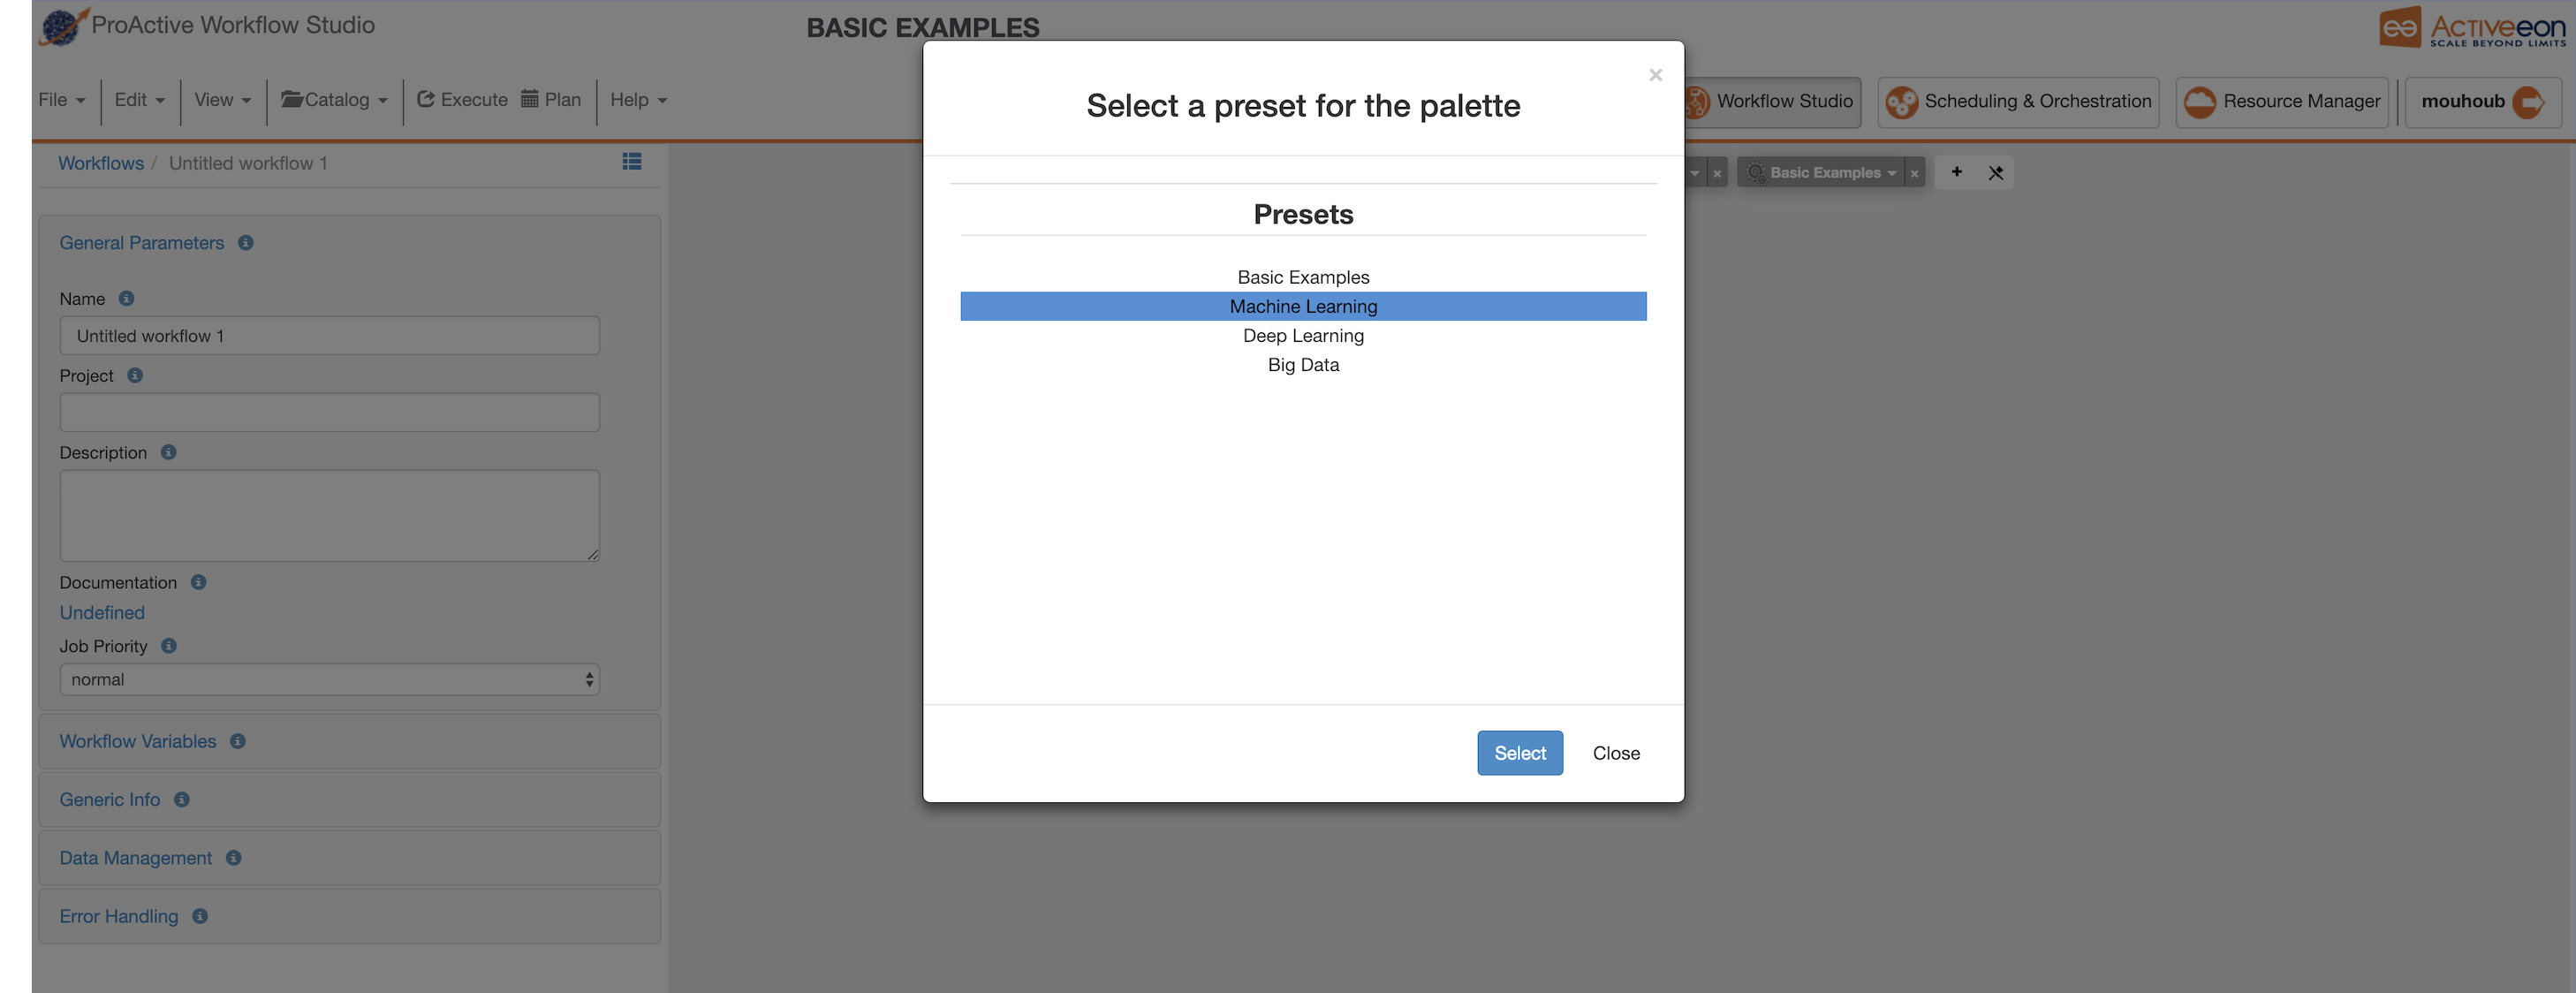
4.2.4. Change Palette Preset
The Studio offers the possibility to set a Preset for the Palette. This makes it easier to load the Palette with a predefined set of default buckets.
Presets are generally arranged by theme (Basic Examples, Machine Learning, Deep Learning, Big Data, etc.)
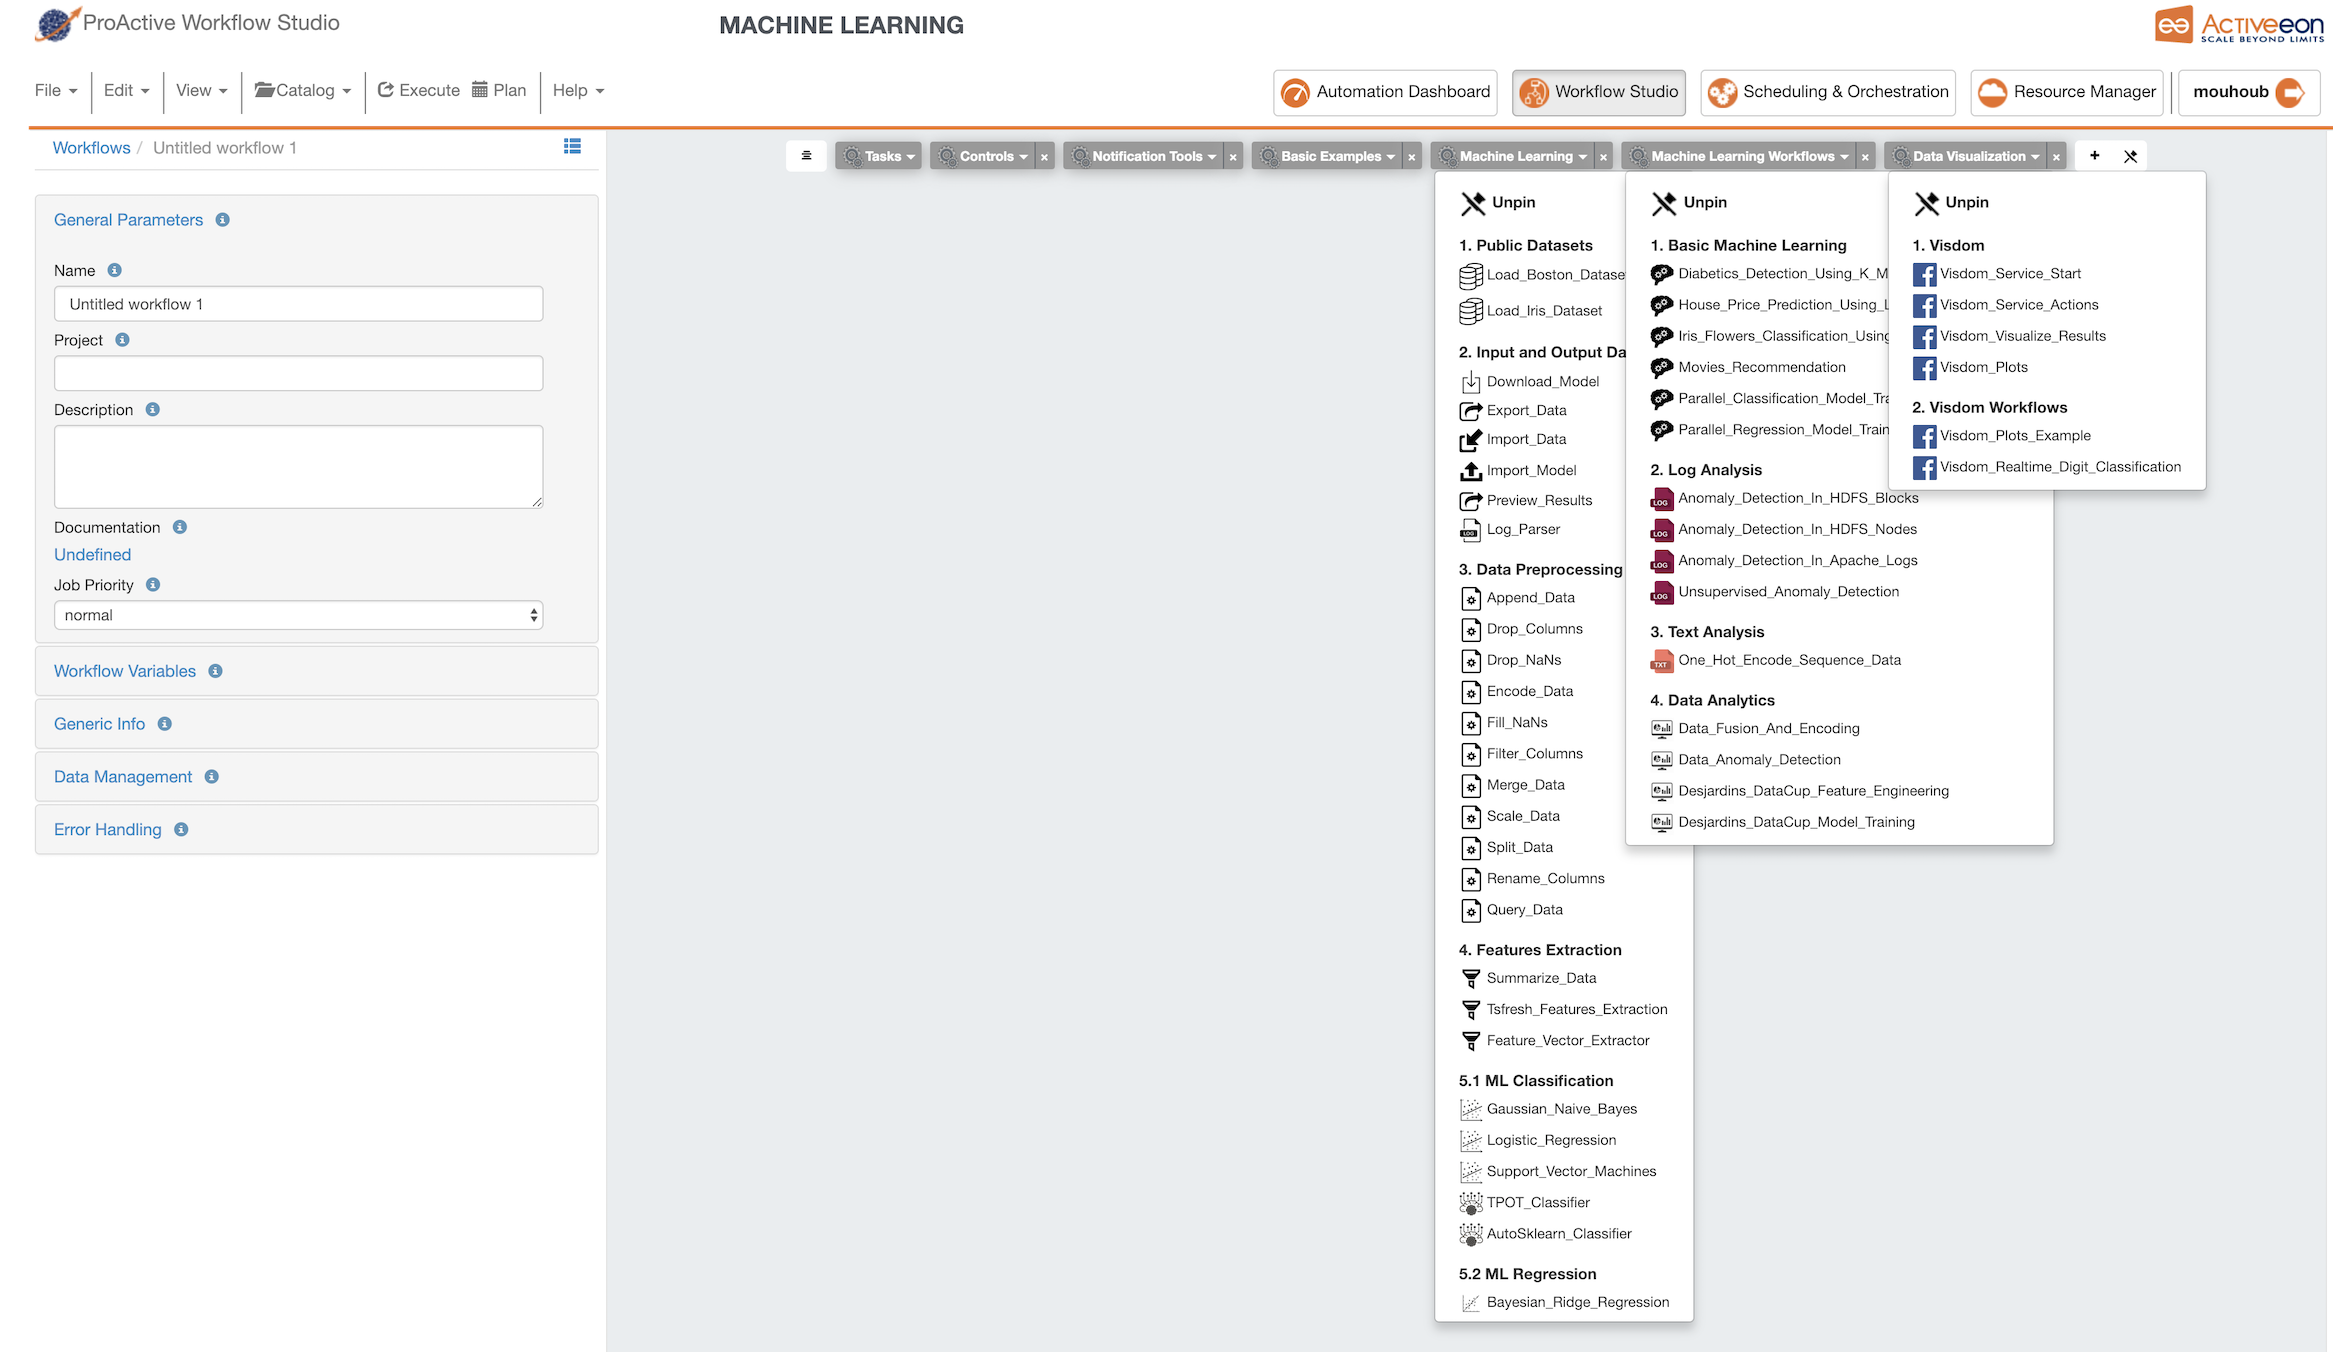
The Palette’s preset can be changed by clicking View → Change Palette Preset. This will show a window with the current list of presets as in the image below.
After changing the preset, its name appears at the top of the Studio and all its buckets are added to the Palette.
5. Workflow concepts
Workflows comes with constructs that help you distribute your computation. The tutorial Advanced workflows is a nice introduction to workflows with ProActive.
The following constructs are available:
-
Dependency
-
Replicate
-
Branch
-
Loop
| Use the Workflow Studio to create complex workflows, it is much easier than writing XML! |
5.1. Dependency
Dependencies can be set between tasks in a TaskFlow job. It provides a way to execute your tasks in a specified order, but also to forward result of an ancestor task to its children as parameter. Dependency between tasks is then both a temporal dependency and a data dependency.
Dependencies between tasks can be added either in ProActive Workflow Studio or simply in workflow XML as shown below:
<taskFlow>
    <task name="task1">
        <scriptExecutable>
            <script>
                <code language="groovy">
                    println "Executed first"
                </code>
            </script>
        </scriptExecutable>
    </task>
    <task name="task2">
        <depends>
            <task ref="task1"/>
        </depends>
        <scriptExecutable>
            <script>
                <code language="groovy">
                    println "Now it's my turn"
                </code>
            </script>
        </scriptExecutable>
    </task>
</taskFlow>
5.2. Replicate
The replication allows the execution of multiple tasks in parallel when only one task is defined and the number of tasks to run could change.
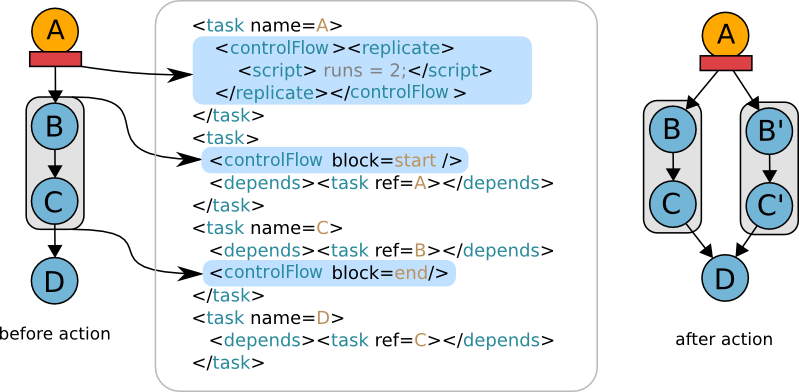
-
The target is the direct child of the task initiator.
-
The initiator can have multiple children; each child is replicated.
-
If the target is a start block, the whole block is replicated.
-
The target must have the initiator as only dependency: the action is performed when the initiator task terminates. If the target has an other pending task as dependency, the behaviour cannot be specified.
-
There should always be a merge task after the target of a replicate: if the target is not a start block, it should have at least one child, if the target is a start block, the corresponding end block should have at least one child.
-
The last task of a replicated task block (or the replicated task if there is no block) cannot perform a branching or replicate action.
-
The target of a replicate action can not be tagged as end block.
-
The current replication index (from to 0 to
runs) can be accessed via thePA_TASK_REPLICATIONvariable.
| If you are familiar with programming, you can see the replication as forking tasks. |
5.3. Branch
The branch construct provides the ability to choose between two alternative task flows, with the possibility to merge back to a common flow.
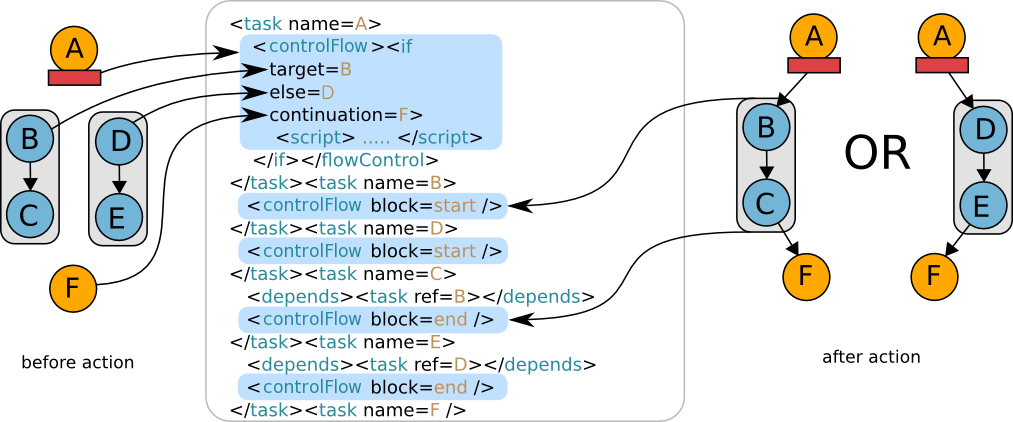
-
There is no explicit dependency between the initiator and the if/else targets. These are optional links (ie. A → B or E → F) defined in the if task.
-
The if and else flows can be merged by a continuation task referenced in the if task, playing the role of an endif construct. After the branching task, the flow will either be that of the if or the else task, but it will be continued by the continuation task.
-
If and else targets are executed exclusively. The initiator however can be the dependency of other tasks, which will be executed normally along the if or the else target.
-
A task block can be defined across if, else and continuation links, and not just plain dependencies (i.e. with A as start and F as end).
-
If using no continuation task, the if and else targets, along with their children, must be strictly distinct.
-
If using a continuation task, the if and else targets must be strictly distinct and valid task blocks.
-
if, else and continuation tasks (B, D and F) cannot have an explicit dependency.
-
if, else and continuation tasks cannot be entry points for the job, they must be triggered by the if control flow action.
-
A task can be target of only one if or else action. A continuation task can not merge two different if actions.
| If you are familiar with programming, you can see the branch as a if/then/else. |
5.4. Loop
The loop provides the ability to repeat a set of tasks.
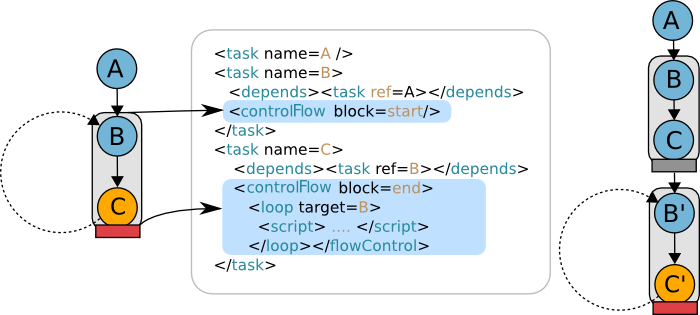
-
The target of a loop action must be a parent of the initiator following the dependency chain; this action goes back to a previously executed task.
-
Every task is executed at least once; loop operates in a do…while fashion.
-
The target of a loop should have only one explicit dependency. It will have different parameters (dependencies) depending if it is executed for the first time or not. The cardinality should stay the same.
-
The loop scope should be a task block: the target is a start block task, and the initiator its related end block task.
-
The current iteration index (from 0 to n until
loopis false) can be accessed via thePA_TASK_ITERATIONvariable.
| If you are familiar with programming, you can see the loop as a do/while. |
5.5. Task Blocks
Workflows often relies on task blocks. Task blocks are defined by pairs of start and end tags.
-
Each task of the flow can be tagged either start or end
-
Tags can be nested
-
Each start tag needs to match a distinct end tag
Task blocks are very similar to the parenthesis of most programming languages: anonymous and nested start/end tags. The only difference is that a parenthesis is a syntactical information, whereas task blocks are semantic.
The role of task blocks is to restrain the expressiveness of the system so that a workflow can be statically checked and validated. A treatment that can be looped or iterated will be isolated in a well-defined task block.
-
A loop flow action only applies on a task block: the initiator of the loop must be the end of the block, and the target must be the beginning.
-
When using a continuation task in an if flow action, the if and else branches must be task blocks.
-
If the child of a replicate task is a task block, the whole block will be replicated and not only the child of the initiator.
5.6. Variables
Variables can come at hand while developing ProActive applications. Propagate data between tasks, customize jobs, and store useful debug information are a few examples of how variables can ease development. ProActive has basically two groups of variables:
-
Workflow variables, declared on the XML job definition.
-
Dynamic Variables, system variables or variables created at task runtime.
5.6.1. Workflow variables
Workflow variables are declared in the XML job definition. Within the definition we can have variables in several levels, at job level the variables are visible and shared by all tasks. At task level, variables are visible only within the task execution context.
Job variables
In a workflow you can define job variables that are shared and visible by all tasks.
A job variable is defined using the following attributes:
-
name: the name of the variable
-
value: the value of the variable
-
model: the type of the value (optional). See section Variable Model
Variables are very useful to use workflows as templates where only a few parameters change for each execution. Upon submission you can define variable values in several ways from CLI, using the ProActive Workflow Studio, directly editing the XML job definition, or even using REST API.
The following example shows how to define a job variable in the XML:
<job ... >
    <variables>
        <variable name="variable" value="value" model=""/>
    </variables>
    ...
</job>
Job variables can be referenced anywhere in the workflow, including other job variables.
The syntax for referencing a variable is the pattern ${variable_name} (case-sensitive), for example:
<nativeExecutable>
    <staticCommand value="${variable}" />
</nativeExecutable>
Task variables
Similarly to job variables, Task variables can be defined within task scope in the job XML definition. Task variables scope is strictly limited to the task definition.
A task variable is defined using the following attributes:
-
name: the name of the variable
-
value: the value of the variable
-
inherited: asserts when the content of this variable is propagated from a previous task. If true, the value defined in the task variable will only be used if no variable with the same name is propagated.
-
model: the type of the value (optional). See section Variable Model
When the inherited parameters is true the variable value is propagated by a previous task (See Script variables for more details). Value field can be left empty however it can also work as a default value in case a previous task fails to define the variable.
For example:
<task ... >
    <variables>
        <variable name="variable" value="value" inherited="false" model=""/>
    </variables>
    ...
</task>
Task variables can be used similarly to job variables using the pattern ${variable_name} but only inside the task where the variable is defined.
Task variables override job variables, this means that if a job variable and a task variable are defined with the same name, the task variable value will be used inside the task, and the job variable value will be used elsewhere in the job.
Variable Model
Job and Task variables can define a model attribute which let the workflow designer control the variable value syntax.
A workflow designer can for example decide that the variable NUMBER_OF_ENTRIES is expected to be convertible to an Integer ranged between 0 and 20.
The workflow designer will then provide a default value to the variable NUMBER_OF_ENTRIES, for example "10". This workflow is valid as "10" can be converted to an Integer and is between 0 and 20.
When submitting the workflow, it will be possible to choose a new value for the variable NUMBER_OF_ENTRIES. If the user submitting the workflow chooses for example the value -5, the validation will fail and an error message will appear.
Available Models
The following list describes the various model syntaxes available:
-
PA:BOOLEAN : variable is either "true", "false", "0" or "1".
-
PA:INTEGER , PA:INTEGER[min,max] : variable can be converted to java.lang.Integer, and eventually is contained in the range [min, max].
Examples: PA:INTEGER will accept "-5" but not "1.4", PA:INTEGER[0,20] will accept "12" but not "25". -
PA:LONG , PA:LONG[min,max] : same as above with java.lang.Long.
-
PA:FLOAT , PA:FLOAT[min,max] : same as above with java.lang.Float.
Examples: PA:FLOAT[-0.33,5.99] will accept "3.5" but not "6". -
PA:DOUBLE , PA:DOUBLE[min,max] : same as above with java.lang.Double.
-
PA:SHORT , PA:SHORT[min,max] : same as above with java.lang.Short.
-
PA:URL : variable can be converted to java.net.URL.
Examples: PA:URL will accept "http://mysite.com" but not "c:/Temp". -
PA:URI : variable can be converted to java.net.URI.
Examples: PA:URI will accept "/tmp/file" but not "c:\a^~to" due to invalid characters. -
PA:DATETIME(format) , PA:DATETIME(format)[min,max] : variable can be converted to a java.util.Date using the format specified (see the format definition syntax in the SimpleDateFormat class).
A range can also be used in the PA:DATETIME model. In that case, each bound of the range must match the date format used.Examples:
PA:DATETIME(yyyy-MM-dd) will accept "2014-12-01" but not "2014".
PA:DATETIME(yyyy-MM-dd)[2014-01-01, 2015-01-01] will accept "2014-12-01" but not "2015-03-01".
PA:DATETIME(yyyy-MM-dd)[2014, 2015] will result in an error during the workflow definition as the range bounds [2014, 2015] are not using the format yyyy-MM-dd. -
PA:LIST(item1,item2,…) : variable must be one of the values defined in the list.
Examples: PA:LIST(a,b,c) will accept "a", "b", "c" but no other value. -
PA:REGEXP(pattern) : variable syntax must match the regular expression defined in the pattern. The regular expression syntax is described in class Pattern.
Examples: PA:REGEXP([a-z]+) will accept "abc", "foo", but not "Foo". -
PA:MODEL_FROM_URL(url) : variable syntax must match the model fetched from the given URL. This can be used for example when the model needs to represent a list of elements which may evolve over time and is updated inside a file. Such as a list of machines in an infrastructure, a list of users, etc.
Examples: PA:MODEL_FROM_URL(file:///srv/machines_list_model.txt), if the file machines_list_model.txt contains PA:LIST(host1,host2), will accept only "host1" and "host2", but may accept other values as the machines_list_model file changes. -
PA:CRON : variable syntax must be a valid cron expression as defined in the cron4j manual.
Examples: PA:CRON will accept "5 * * * *" but not "* * * *" (missing minutes sub-pattern). -
PA:SPEL(SpEL expression) : variable syntax will be evaluated by a SpEL expression. Refer to next paragraph.
-
PA:CATALOG_OBJECT : variable syntax must be a valid expression that matches the following pattern:
bucketName/objectName[/revision]. Note that the revision sub-pattern is a hash code number represented by 13 digit.
Examples: PA:CATALOG_OBJECT will accept "bucket-example/object-example/1539310165443" and "bucket-example/object-example" but not "bucket-example/object-example/153931016" (invalid revision number) and "bucket-example/" (missing object name). -
PA:JSON : variable syntax must be a valid JSON expression as defined in JSON doc.
Examples: PA:JSON will accept {"name": "John", "city":"New York"} and empty values like {} or [{},{}], but not ["test" : 123] (Unexpected character ':') and {test : 123} (Unexpected character 't').
Spring Expression Language Model
The PA:SPEL(expr) model allows to define expressions able to validate a variable value or not. Additionally, this model can be used to validate multiple variable values or to dynamically update other variables.
The syntax of the SpEL expression is defined by the Spring Expression Language reference.
For security concerns, we apply a restriction on the authorized class types. Besides the commonly used data types (Boolean, String, Long, Double, etc.), we authorize the use of ImmutableSet, ImmutableMap, ImmutableList, Math, Date types, JSONParser and ObjectMapper for JSON type and DocumentBuilderFactory for XML type.
In order to interact with variables, the expression has access to the following properties:
-
#value: this property will contain the value of the current variable defined by the user.
-
variables['variable_name']: this property array contains all the variables of the same context (for example of the same task for a task variable).
The SpEL expression must return a boolean value, true if the value is correct, false otherwise, returning another type will raise an error.
-
Example of SpEL simple validations:
PA:SPEL(#value == 'abc') : will accept the value if it’s the 'abc' string
PA:SPEL(T(Integer).parseInt(#value) > 10) : will accept the value if it’s an integer greater than 10.Note that #value always contains a string and must be converted to other types if needed.
-
Example of SpEL multiple validations:
PA:SPEL(variables['var1'] + variables['var2'] == 'abcdef') : will be accepted if the string concatenation of variable var1 and var2 is 'abcdef'.
PA:SPEL(T(Integer).parseInt(variables['var1']) + T(Integer).parseInt(variables['var2']) < 100) : will be accepted if the sum of variables var1 and var2 are smaller than 100. -
Example of SpEL variable inference:
PA:SPEL( variables['var2'] == '' ? (variables['var2'] = variables['var1']) instanceof T(String) : true ) : if the variable var2 is empty, it will use the value of variable var1 instead.
-
Example of SpEL variable using ObjectMapper type:
PA:SPEL( (variables['var1'] = new org.codehaus.jackson.map.ObjectMapper().readTree('{"abc": "def"}').get('abc').getTextValue()) instanceof T(String) ): will assign the value 'def' to the variable var1.
-
Example of SpEL variable using DocumentBuilderFactory type:
PA:SPEL( (variables['var'] = T(javax.xml.parsers.DocumentBuilderFactory).newInstance().newDocumentBuilder().parse(new org.xml.sax.InputSource(new java.io.StringReader('<employee id="101"><name>toto</name><title>tata</title></employee>'))).getElementsByTagName('name').item(0).getTextContent()) instanceof T(String) ): will assign the value 'toto' to the variable var1.
Note that the SpEL expression must always return a boolean value, this is why in this last expression we use the
instanceofkeyword to not return a string value.
Generic Information
In addition to variables, another key/value structure can be accessed inside a script: Generic Information.
Generic information semantics differ from Job variables semantics in the following way:
-
Generic information can be accessed inside a script, but cannot be modified.
-
Generic information can be defined at job level or at task level. If the same generic information is defined at job level and at task level, the latter value takes precedence inside the task scope.
-
Generic information cannot be used directly inside the workflow with the syntax ${} (See Job variables).
-
Generic information are used in general internally by the scheduler, for example to provide information to the scheduling loop on how to handle the task. An example of such generic information is the START_AT info used inside Cron Tasks.
-
Generic information can use in their definition job/task variables patterns, pattern replacements can be done at execution time when using task generic information.
Example of generic information definition:
For example:
<task ... >
    <genericInformation>
        <info name="ginfo" value="${test}"/>
    </genericInformation>
    ...
</task>
Icon management variables
There are specific variables that are dedicated to icon management.
The icon for Job level is specified inside Workflow Generic Information -workflow.icon. The task related icon is described inside Task Generic Information task.icon.
Job and task icons should be related to their specific nature. These variables are used in the ProActive portals for correct visualization of workflows with icons.
5.6.2. Dynamic Variables
As opposed to Workflow variables, dynamic variables are created or manipulated directly when executing scripts,
through the use of the variables script binding map (see the Script Bindings chapter or Script Bindings Reference for more information about script bindings).
We have mainly two types of dynamic variables:
-
ProActive system variables, declared by the ProActive scheduler.
-
Script variables, created after adding values to the
variablesmap.
ProActive system variables
Some variables are implicitly defined by the Scheduler to retrieve runtime information about a job or a task.
Here is the list of ProActive system variables:
Variable name |
Description |
Type |
|
The current job ID. |
String |
|
The current job name. |
String |
|
The current task ID. |
String |
|
The current task name. |
String |
|
The current iteration index, when using looping, starts at 0. |
Integer |
|
The current iteration index, when using a replication, starts at 0. |
Integer |
|
The path to the progress file, used to set the task’s progress. You can import and use the utility class |
String |
|
The path to Scheduler home, where the Scheduler or the Node is installed. |
String |
|
The path to the hostfile when using a multi nodes task. |
String |
|
The number of acquired nodes when using a multi nodes task. |
Integer |
|
The username of the ProActive user who has submitted the job. |
String |
They can be used inside the workflow with the pattern syntax, for example:
<task ...>
    ...
     <forkEnvironment workingDir="/opt/${PA_JOB_ID}"></forkEnvironment>
    ...
</task>
Script variables
In addition to the ability to declare variables directly inside job XML definition, it is also possible to
dynamically read and write new variables while executing a task script with the variables map. This map of variables is bound to
hash type depending on the script engine you are using, for instance in native
Java as Map.
In Groovy as a global map, see below:
String var = variables.get("one_variable")
variables.put("other_variable", "foo")
In the Groovy example above the first line retrieve the value of variable
one_variable from the variables map. The second line create a new entry other_variable with value foo.
The variables map is propagated down the execution chain. If a task modifies a variable in the variables map,
or add a new variable, all dependent tasks will have access to this modification.
For example:
// task1
String var = variables.get("one_variable")
variables.put("one_variable", "foo")
variables.put("other_variable", "bar")
// task2 depends on task1
println variables.get("one_variable") // will display "foo"
println variables.get("other_variable") // will display "bar"If a task depends on several tasks and each task modifies the same variable, the final value of the variable which is propagated down the execution chain, depends on the order of task execution. Therefore, the users need to take appropriate measures to prevent any undesired effects such as race conditions.
System variables can also be accessed from the variables map, for example:
println variables.get("PA_JOB_ID") // will display the id of the current jobIf using a Bash shell script, variables are accessible through environment variables.
#!/bin/bash
echo $variables_PA_TASK_NAME| In native tasks and Bash/CMD script engines, variables can be read but not written to. |
For Java native script you can set any Java serializable object as a variable value. They will be converted into strings using toString() method when required, for instance, to make those values available as environment variables in native tasks.
The field variable tag has an inherited field, if this field is set as true a task variable will read
its value from the variables map instead of the value field in the XML definition.
In this case, the value field becomes optional and work as a default value.
Below a XML schema that shows two tasks: first and second. Task first insert a new
variable using variables.put("inherited_var", "somevalue").
Task second declares inherited_var
but with defaultvalue, this value will be overwritten by the first task, variables.put("inherited_var", "somevalue").
Defining a default value might be useful if for some reason the first task fails before inserting the inhereted_var
on variables map. In this last case the defaultvalue remains unchanged.
<task name="first" >
    <scriptExecutable>
        <script>
            <code language="groovy">
                <![CDATA[
                variables.put("inherited_var", "somevalue")
                ]]>
            </code>
        </script>
    </scriptExecutable>
</task>
...
<task name="second">
    <variables>
        <variable name="inherited_var" value="defaultvalue" inherited="true"/>
    </variables>
    <depends>
        <task ref="before"/>
    </depends>
...
</task>
Dynamic replacements
We’ve seen in Job variables that we can use the ${varname} syntax to create and access variables.
Dynamic replacement is in charge to resolve variables just before the execution of task script, or
in case of job variables, just before submitting the job.
We can also combine recursive definitions of variables.
For example, one could write:
<job ...>
    ...
    <variables>
        <variable name="job_var" value="hello" model=""/>
        <variable name="job_var2" value="${job_var}" model=""/>
        <variable name="job_var3" value="${job_var2}" model=""/>
    </variables>
    ...
</job>
The dynamic replacement will resolve job_var3 to hello just before submitting the job to the scheduler.
| We can use job variable references in task variables but not otherwise. |
When dynamic replacing a task script variable the resolution happens just before running the task. So we can
use the variables map value. The example below will print "hello world" because hello is recursively
resolved at job level assigning hello world to inherited_var. When task_2 starts its local
variable task_var2 is dynamically replaced by hello world, i.e., the content of inherited_var that was
inserted in the variables map by the previous task.
<job ... >
  <variables>
    <variable name="job_var" value="hello" model=""/>
    <variable name="job_var2" value="${job_var}" model=""/>
  </variables>
  <taskFlow>
    <task name="task_1" >
      <scriptExecutable>
        <script>
          <code language="groovy">
            <![CDATA[
            variables.put("inherited_var", "\${job_var2} world")
            ]]>
          </code>
        </script>
      </scriptExecutable>
    </task>
    <task name="task_2">
      <variables>
        <variable name="task_var2" value="${inherited_var}" inherited="false"/>
      </variables>
      <depends>
        <task ref="task_1"/>
      </depends>
      <scriptExecutable>
        <script>
          <code language="groovy">
            <![CDATA[
            println ""+variables.get("task_var2")
            ]]>
          </code>
        </script>
      </scriptExecutable>
    </task>
  </taskFlow>
</job>
Note that we can combine recursive definitions of variables.
For example, one could write:
<task ...>
    ...
     <forkEnvironment workingDir="/opt/${DIRECTORY_${PA_TASK_REPLICATION}}"></forkEnvironment>
    ...
</task>
In that case, the variable DIRECTORY_0 or DIRECTORY_1, etc (depending on the replication index) will be used in the working dir attribute.
Pattern variable replacements may be performed at submission time or at execution time:
-
A replacement performed at execution time means that the replacement is executed only when the task enclosing the replacement is executed.
-
A replacement performed at submission time means that the replacement is directly executed when the job is submitted to the scheduler.
Replacements directly using global job or task variables will always be performed at submission time.
In the following example, the description replacement is performed at submission time:
<job ... >
    <variables>
        <variable name="description" value="My ProActive workflow"/>
    </variables>
    ...
    <task ... >
        <description>${description}</description>

    </task>
</job>
Replacements using system variables, such as the workingDir example above, will always be performed at execution time.
5.7. Task result
Another way to propagate data from a task to another relies on result variable. Anywhere in a task (usually at the end) you can set a value to a reserved variable named result. This value will be available in tasks depending on it. If a task has one or several dependencies, results will always be an array.
Assuming that we have two tasks task1 and task2 written in Groovy:
// task1
result = "task1";
// task2
result = "task2";and task3 that depends on tasks task1 and task2, then, you can access result values defined by the parents as follows:
// task3
println(results[0]);
// will print "task1"
println(results[1]);
// will print "task2"| results will be aggregated according to the order declared in the dependency list. Consequently, if the xml depends tag of task3 contains the list [task1, task2] (see the xml example below), then results[0] will contain the result of task1 and results[1] the result of task2. On the contrary, if the depends list is [task2, task1], then results[0] will contain the result of task2 and results[1] the result of task1. |
<depends>
        <task ref="task1"/>
        <task ref="task2"/>
</depends>
For nearly all script languages, the results variable contains a list of TaskResult java object. In order to access the result value, the value() method of this object must be called. Example for Python/Jython:
print results[0].value()5.7.1. Assigning metadata to task result
Result metadata can contain additional information associated with the result. In order to store metadata information, use the following syntax, if task2 depends on task1:
// task1
result = "task1";
resultMetadata.put("mymetadata", "myvalue")
// task2
println(results[0].getMetadata());It is up to the user code to decide the metadata semantics, but some specific metadata can have a meaning when downloading or previewing results from the Scheduler portal:
-
file.name: the name of the file, including the extension, which will be used when storing the result in binary format.
// fileNameTask file = new File("balloon13.png") result = file.getBytes() resultMetadata.put("file.name","balloon13.png") -
file.extension: the extension, which will be appended to the automatically generated name, when storing the result in binary format
// fileExtensionTask file = new File("balloon13.png") result = file.getBytes() resultMetadata.put("file.extension",".png") -
content.type: the display format, which will be used when previewing the file in the browser. Open the following link for the complete list of mime-types.
// contentTypeTask
file = new File("balloon13.png")
result = file.getBytes()
resultMetadata.put("content.type","image/png")
A Task result can be added to the list of results of a Job, see section Result List below.
5.8. Job Results
Job Results are composed of two elements: Result List and Result Map. Each task can contribute as for Result List as for Result Map. Once the job is finished, you can download/visualize Job Results from the Scheduler portal:
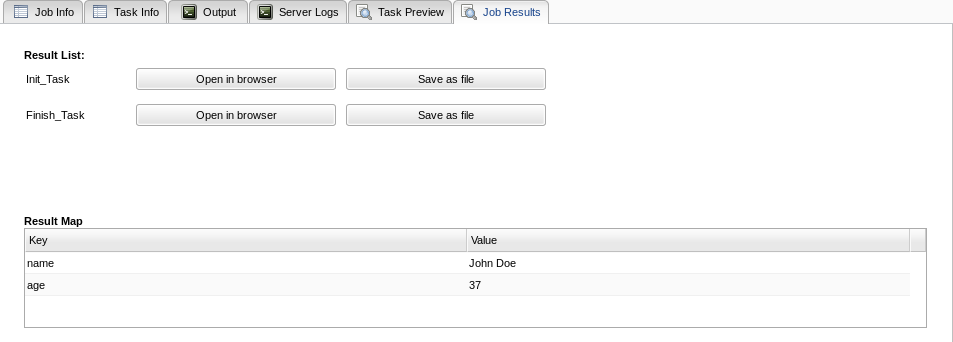
In the figure above, the label in Result List corresponds to the task name that generated the value.
5.8.1. Result List
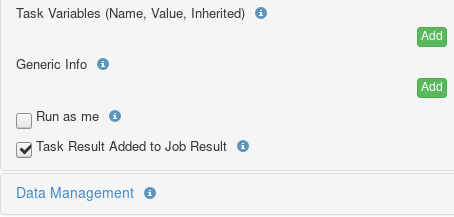
Each task has its own result (see section Task result). However, some task results can be marked as Task Result Added to Job Result. In that case, this task result will be added to the Result List. You can mark your task in the Studio:
In the Job xml schema it is available as preciousResult:
<task name="Init_Task" preciousResult="true" >5.8.2. Result Map
In addition to the Results List, a Job can also store some results into a dedicated key-value map, which is called Result Map. Every task can contribute to this Result Map. It is a write-only map, in such a way that a task cannot see what other tasks already wrote to the result map. When several tasks write the same key to the result map, the last write always takes precedence. This map contains String as a key, and Serializable as value.
Consider the following groovy example.
Task 1 writes to Result Map:
resultMap.put("filename", "results.txt")
resultMap.put("latestError", "no error")
Task 2 writes to Result Map:
resultMap.put("latestError", "wrong user id")Once the job is finished, Result Map would contain:
"filename" -> "results.txt"
"latestError" -> "wrong user id"
5.9. Control Flow Scripts
To perform a control flow action such as if, replicate or loop, a Control Flow Script is executed on the ProActive node. This script takes the result of the task as input; meaning a Java object if it was a Java or Script task, or nothing if it was a native task.
The script is executed on the ProActive node, just after the task’s
executable. If the executable is a Java Executable and returns a result,
the variable result will be set in the script’s environment so that
dynamic decisions can be taken with the task’s result as input. Native
Java objects can be used in a Groovy script.
loop = resultSimilarly to how parameters are passed through the result variable to the script, the script needs to define variables specific to each action to determine what action the script will lead to.
-
A replicate control flow action needs to define how many parallel runs will be executed, by defining the variable
runs:
// assuming result is a java.lang.Integer
runs = result % 4 + 1
The assigned value needs be a strictly positive integer.
-
An if control flow action needs to determine whether the if or the else branch is selected, it does this by defining the boolean variable
branch:
// assuming result is a java.lang.Integer
if (result % 2) {
  branch = "if"
} else {
  branch = "else"
}
The assigned value needs to be the string value if or else.
-
The loop control flow action requires setting the
loop, which will determine whether looping to the statically defined target is performed, or if the normal flow is executed as would a continue instruction do in a programming language:
loop = result as BooleanThe assigned value needs to be a boolean.
Failure to set the required variables or to provide a valid control flow script will not be treated gracefully and will result in the failure of the task.
5.10. Loop and Replicate awareness
When Control Flow actions such as replicate or loop are performed, some tasks are replicated. To be able to identify replicated tasks uniquely, each replicated task has an iteration index, replication index, and a tag. In addition to help to identify uniquely, these tags are useful to filter tasks by iterations for example.
5.10.1. Task name
First, those indexes are reflected inside the names of the tasks themselves. Indeed, task names must be unique inside a job. The indexes are added to the original task name as a suffix, separated by a special character.
-
If a task named T is replicated after a loop action, the newly created tasks will be named T#1, T#2, etc. The number following the # separator character represents the iteration index.
-
The same scheme is used upon replicate actions: newly created tasks are named T*1, T*2, and so on. The number following the * separator represents the replication index.|
-
When combining both of the above, the resulting task names are of the form: T#1*1, T#2*4, etc., in that precise order.
5.10.2. Task tag
Tags are assigned automatically by the scheduler when a task is created by replication from another task. They are designed to reflect the task that initiated the replication for the first time, the type of replication (loop or replicate) and the iteration index or replication indexes. So the tag is formed like this: (LOOP|REPLICATE)-Name_of_the_initiator-index.
-
If the task T1 initiates a loop that contains the tasks T2 and T3, then the tasks T2#1 and T3#1 will have the tag LOOP-T1-1. The tasks T2#2 and T3#2 will have the tag LOOP-T1-3.
-
If the loop is a cron loop, the index is replaced by the resolved time of the initiated looping. For example, in a cron loop that was initiated the 21/12/2015 at 14h00, the task T1#1 will have the tag LOOP-T1#1-21_12_15_14_00.
-
If the task T1 replicates a block that contains the tasks T2 and T3, then the tasks T2*1 and T3*1 will have the tag REPLICATE-T1-1. The tasks T2*2 and T3*2 will have the tag REPLICATE-T1-2.
-
If the task T1#1, inside a loop, replicates tasks, the new tasks will have the tags REPLICATE-T1#1-1, REPLICATE-T1#1-2, etc…
-
If the replicated task T1*1 initiates a loop inside a replicate, the new created tasks will have the tags LOOP-T1*1-1, LOOP-T1*1-2, etc…
5.10.3. Task definition
Those indexes are also available as workflow variables. They can be obtained using the variable names:
-
PA_TASK_REPLICATION
-
PA_TASK_ITERATION
Here is how to access those variables:
-
Native Executable arguments:
<staticCommand value="/path/to/bin.sh">
  <arguments>
<argument value="/some/path/${PA_TASK_ITERATION}/${PA_TASK_REPLICATION}.dat" />-
Dataspace input and output:
<task name="t1" retries="2">
  <inputFiles>
    <files includes="foo_${PA_TASK_ITERATION}_${PA_TASK_REPLICATION}.dat" accessMode="transferFromInputSpace"/>
  </inputFiles><outputFiles>
<files includes="bar_${PA_TASK_ITERATION}_${PA_TASK_REPLICATION}.res" accessMode="transferToOutputSpace"/>| Scripts affected by the variable substitutions are: Pre, Post, Control Flow. No substitution will occur in selection scripts or clean scripts. |
5.10.4. Task executable
The iteration and replication indexes are available inside the executables launched by tasks.
In script tasks, the indexes are exported through the following workflow variables:
PA_TASK_ITERATION and PA_TASK_REPLICATION.
int it  = variables.get("PA_TASK_ITERATION")
int rep = variables.get("PA_TASK_REPLICATION")
In a similar fashion, environment variables are set when launching a
native executable: PAS_TASK_ITERATION and PAS_TASK_REPLICATION:
#!/bin/sh
myApp.sh /path/to/file/${variables_PAS_TASK_ITERATION}.dat
5.11. Example: Embarrassingly Parallel problem
An Embarrassingly Parallel problem is a problem that is easy to split into smaller independent tasks. With ProActive Scheduler you can tackle this type of problem with the Replicate construct.
| Familiar with MapReduce? Well, a workflow using replication uses similar concepts. |
The Advanced workflows is an example of an embarrassingly parallel problem where the computation is easily distributed across ProActive Nodes.
5.12. Example: MPI application
MPI is often used in the area of parallel computing. The Scheduler integrates with MPI with the concept of multi node tasks. This particular task will acquire several nodes and will expose these nodes to the MPI environment.
Applications built with MPI are often executed using the mpirun command. It accepts several parameters to choose how many CPUs and how many machines will be used. One particular parameter is the machine file that is built by the Scheduler when using multi node tasks. Here is how an MPI application invocation would look like when executed with the Scheduler:
mpirun -hostfile $variables_PA_NODESFILE myApplication
The variable $variables_PA_NODESFILE contains the path to a machine file created by the Scheduler that will be similar to:
compute-host
compute-host
another-host
Meaning that myApplication will use 2 CPUs on compute-host and 1 CPU on another-host.
You can also use $variables_PA_NODESNUMBER to retrieve the number of acquired nodes.
You can find an example of a native task in this XML workflow or you can also build one yourself using the Workflow Studio.
To achieve the best performance for MPI applications, nodes can be selected taking into account their network topology. One might want to select nodes that are as close to each other as possible to obtain better network performance or nodes on different hosts to split the I/O load. Refer to Topology Types for more details.
6. Workflow Execution Control
ProActive Scheduler supports portable script execution through the JSR-223 Java Scripting capabilities. Scripts can be written in any language supported by the underlying Java Runtime Environment.
They are used in the ProActive Scheduler to:
-
Execute some simple pre, post and cleaning processing (pre scripts, post scripts and cleaning scripts)
-
Select among available resources the node that suits the execution (selection scripts).
6.1. Selection of ProActive Nodes
A selection script provides an ability for the Scheduler to execute tasks on particular ProActive nodes. E.g. you can specify that a task must be executed on a Unix/Linux system.
A selection script is always executed before the task itself on any candidate node:
the execution of a selection script must set the boolean variable selected,
that indicates if the candidate node is suitable for the execution of the associated task.
A Java helper org.ow2.proactive.scripting.helper.selection.SelectionUtils is provided for allowing
user to simply make some kind of selections. Some script samples are available in
PROACTIVE_HOME/samples/scripts/selection.
The following example selects only nodes running on Windows:
importClass(org.ow2.proactive.scripting.helper.selection.SelectionUtils);

/* Check if OS name is Windows */
if (SelectionUtils.checkOSName("windows")) {
    selected = true;
} else {
    selected = false;
}
You can use variables inside the selection script, these variables must be visible within the task context, i.e., declared on job scope, on task scope, or result variable from a previous task. In the last case, it is mandatory that the task which declares the inherited variable precedes the task using the variable. Below is an example job in XML format which uses a task variable to select Unix/Linux as operating system. In this example, variable operating_system (task scope) resolves to variable operating_system_workflow (job scope).
<?xml version="1.0" encoding="UTF-8"?>
<job
  xmlns:xsi="http://www.w3.org/2001/XMLSchema-instance"
  xmlns="urn:proactive:jobdescriptor:3.10"
     xsi:schemaLocation="urn:proactive:jobdescriptor:3.10 https://www.activeeon.com/public_content/schemas/proactive/jobdescriptor/3.10/schedulerjob.xsd"
    name="variable solving"
    priority="normal"
    onTaskError="continueJobExecution"
     maxNumberOfExecution="2"
>
  <variables>
    <variable name="operating_system_workflow" value="linux" model=""/>
  </variables>
  <taskFlow>
    <task name="Groovy_Task0">
      <description>
        <![CDATA[ The simplest task, ran by a groovy engine. ]]>
      </description>
      <variables>
        <variable name="operating_system" value="$operating_system_workflow" inherited="false" />
      </variables>
      <scriptExecutable>
        <script>
          <code language="groovy">
            <![CDATA[
                import org.ow2.proactive.scripting.helper.selection.SelectionUtils
                selected = SelectionUtils.checkOSName(variables.get("operating_system"))
            ]]>
          </code>
        </script>
      </scriptExecutable>
    </task>
  </taskFlow>
</job>
6.2. Fork environment
A fork execution environment is a new Java Virtual Machine (JVM) which is started exclusively to execute a task. This task may need to use some third-party libraries, so it can be executed properly. To do that, the list of path elements to be added when starting a new JVM can be specified inside the Additional Classpath field.
Starting a new JVM means that the task inside it will run in a dedicated, configurable environment.
By default, all workflow tasks are executed in a JVM separated from the ProActive Node JVM.
This behavior can only be changed globally at the ProActive server level, by modifying the global setting pa.scheduler.task.fork in the scheduler configuration file.
The fork execution environment can be changed by writing a fork environment script.
This script contains a specific script binding called forkEnvironment containing a ForkEnvironment java object
giving access to various configuration settings.
For example, the following fork environment groovy script can be written to change the working directory of the task, and the path to the java executable:
forkEnvironment.setWorkingDir("/data/folder")
forkEnvironment.setJavaHome("/usr/java/default")
6.2.1. Docker fork execution environment
A Docker fork execution environment executes a JVM inside a Docker container. Hence the task which is executed in the Docker fork execution environment can be customized by the JVM settings and by the tool-set and isolation provided by Docker containers.
| If your task needs to install new software or updates software, then run it inside a Docker container. That way, other tasks will not be affected by changes, because Docker containers provide isolation so that the host machine’s software stays the same. |
The simplest way to use a Docker fork execution environment
From the Studio Portal, when editing a workflow task, open the Fork Environment section, and select Docker in the Fork Execution Environment Dropdown.
A sample Docker environment script will appear.
These settings ensure, that the current task is executed inside a Docker container, or fail if Docker is not installed or the user has no permission to run Docker containers.
| If the executing Node has no Docker installed, the task will fail. A selection script can ensure that tasks are executed only on Nodes which have Docker installed. |
Docker fork environment script
The default Docker fork environment script contains the following jython code:
# In the Java Home location field, use the value: "/usr" to force using the JRE provided in the docker image below (Recommended).
# Be aware, that the prefix command is internally split by spaces. So paths with spaces won't work.
# Prepare Docker parameters
containerName = 'java'
dockerRunCommand =  'docker run '
dockerParameters = '--rm '
# Prepare ProActive home volume
paHomeHost = variables.get("PA_SCHEDULER_HOME")
paHomeContainer = variables.get("PA_SCHEDULER_HOME")
proActiveHomeVolume = '-v '+paHomeHost +':'+paHomeContainer+' '
# Prepare working directory (For Dataspaces and serialized task file)
workspaceHost = localspace
workspaceContainer = localspace
workspaceVolume = '-v '+localspace +':'+localspace+' '
# Prepare container working directory
containerWorkingDirectory = '-w '+workspaceContainer+' '
# Save pre execution command into magic variable 'preJavaHomeCmd', which is picked up by the node
preJavaHomeCmd = dockerRunCommand + dockerParameters + proActiveHomeVolume + workspaceVolume + containerWorkingDirectory + containerName
This script exports a variable called preJavaHomeCmd, which is picked up by the Node executing the Task.
This variable is supposed to be a Docker run command inside a string.
This string will be split by space and added in front of the fork execution command. As an example:
/usr/bin/java -cp [Classpath] [ExecutedClass]
And the Docker run command is:
docker run java
Then both will be combined to:
docker run java /usr/bin/java -cp [Classpath] [ExecutedClass]
The combined command will execute a JVM inside a docker container. Internally the command is split into docker, run, java, /usr/bin/java, -cp, [Classpath], [ExecutedClass]. That is important to know because the fork execution command is split by spaces. That means, that paths can’t contain spaces. The Docker container mounts the ProActive home and a folder in the temp directory of the operating system. Those cannot contain spaces, because if they do then the fork execution command will be split wrong and fail.
6.3. Pre, Post & Clean Scripts
Another functionality is the possibility to define pre and post scripts. For a given task (Java, Script or Native task), it is possible to launch a script before and after its execution. This possibility can be useful to copy files to a node, or clean a directory before or after task execution, for example.
This is a way to separate from business code the preparation of execution environment and its cleaning. A good example is a script that removes files from a specific directory once the task is finished.
Files.deleteIfExists(new File("/tmp/working_dir/").toPath())6.3.1. File transfer
Input/Output Data in Shared Directory
The easiest way to use your data on computing machines is to set up a shared directory available on all Compute Hosts. For Linux it’s typically an NFS directory, for Windows it could be an SMB network share. Then, in tasks you can manipulate files seamlessly across ProActive Nodes.
File inputData = new File("/data/username/inputfile");This approach has some limitations though:
-
The path to the shared folder should be identical on all Compute Hosts
-
It can be difficult to use with heterogeneous resources, e.g. Linux and Windows hosts
6.3.2. Save script
Save the pre-script in a file and skip its execution
Instead of executing the pre-script, we also provide to save the pre-script in a file and skip the execution. To do so, a Generic Information is required for the desired task, with the key "PRE_SCRIPT_AS_FILE", and the path of the file that you want to save your pre-script as its value. The path should contain a file name. It can be an absolute path, then the file will be stored in this absolute path. It can also be a relative path, then the file will be stored in the Local Space. If you don’t give a specific extension in the path, the extension will be automatically assigned to the corresponding one of the language selected for this pre-script.
6.4. Run computation with your system account
It is possible to start a task under the job owner if the system is configured for that purpose. There are 2 possible ways to run a task under user account (in any case, the administrator should have set computing hosts to authorize one of the 2 methods):
-
Using your scheduling login and password: if computing hosts are configured and user is authorized to run a process under his login and password.
-
Using an SSH key provided by the administrator: if computing hosts are configured, the administrator should have given user an SSH key.
User must first create a credential containing this key:
$ PROACTIVE_HOME/tools/proactive-create-cred -F config/authentication/keys/pub.key -l username -p userpwd -k path/to/private/sshkey -o myCredentials.cred
This command will create a new credentials with username as login, userpwd as password, using Scheduler public key at
config/authentication/keys/pub.key
for credentials encryption and using the private SSH key at
path/to/private/sshkey
provided by administrator. The new credential will be stored in myCredentials.cred
Once created, user must connect the Scheduler using this credential. Then, in order to execute your task under your account set runAsMe=true in the task.
| You can now use third party credentials to store the SSH key with the special entry named SSH_PRIVATE_KEY. |
6.5. Reserve more than one node for a task
To create a multi-nodes task often used for MPI applications you need to add a parallel environment to the task. Parallel environment describes how many nodes are needed for a task as well as where these nodes should be located. For example if you’d like to run 4 processes in parallel it a scope of one task you should specify it in your task
<parallel numberOfNodes="4"/>| For instance if 4 nodes are running on a given note (often because the host has 4 cores), then a multi-nodes task that requires 4 nodes might select the 4 workers on this host. |
6.5.1. Defining a Topology for Multi-Nodes Tasks
In addition to the number of ProActive Nodes you can specify the nodes network topology, e.g the set of nodes within some latency threshold, nodes on the same host and many more.
Here is the list of topologies we support:
-
Arbitrary topology does not imply any restrictions on nodes location
-
Best proximity - the set of closest nodes among those which are not executing other tasks.
-
Threshold proximity - the set of nodes within a threshold proximity (in microseconds).
-
Single Host - the set of nodes on a single host.
-
Single Host Exclusive - the set of nodes of a single host exclusively. The host with selected nodes will be reserved for the user.
-
Multiple Hosts Exclusive - the set of nodes filled in multiple hosts. Hosts with selected nodes will be reserved for the user.
-
Different Hosts Exclusive - the set of nodes each from a different host. All hosts with selected nodes will be reserved for the user.
6.6. Handling failures
It’s possible to have errors when your Job is executed. ProActive Scheduler provides several mechanisms to deal with exceptional situations in your Jobs. If a Task contains errors during Job execution, the ProActive Scheduler automatically restarts this Task. The number of automatic restarts is defined by the Workflow owner by assigning an integer value to the counter Number of Automatic Restarts. The user also defines Where he wants that the scheduler restarts In-Error tasks, i.e., on the same ProActive Node or on another ProActive Node.
If automatic restarts does not fix errors, the Scheduler applies one of the following Task error management policies, i.e., the one defined by the user during Workflow creation:
-
Ignore error and continue Job execution - each In-Error Task inside the Job transits to Faulty and its successor Tasks are executed.
-
Only suspend dependencies of In-Error Tasks - successor Tasks of each In-Error Task are Pending until errors are fixed. The Job is in In-Error state. The user can restart In-Error Tasks as many times as he wishes.
-
Pause Job execution (running Tasks can terminate) - successor Tasks of each In-Error Task are paused until errors are fixed. The Job is paused. The user can restart In-Error Tasks as many times as he wishes.
-
Kill Job (running Tasks are killed) - The Job is killed with all Tasks.
6.6.1. Maximum execution time for a task
A timeout (also known as walltime) can be set at the task’s level to stop a task’s execution when the timeout is reached.
The general format of the walltime attribute is [hh:mm:ss], where h is hour, m is minute and s is second.
The format still allows for more flexibility. We can define the walltime simply as 5 which corresponds to
5 seconds, 10 is 10 seconds, 4:10 is 4 minutes and 10 seconds, and so on.
The walltime mechanism is started just before a task is launched. If a task does finish before its walltime, the mechanism is canceled. Otherwise, the task is terminated. Note that the tasks are terminated without any prior notice.
6.7. Cron Workflows
The ProActive Scheduler allows to schedule Workflows with the Job Planner. Find more information in the Job Planner User Guide.
6.8. Cron Tasks
ProActive Scheduler supports the execution of time-based tasks or cron tasks. The users can assign a
cron expression to the loop variable of a Loop in a ProActive Job. All tasks which belong
that Loop will be executed iteratively and indefinitely. The start time of the next iteration
is the next point of time specified by the cron expression.
6.8.1. Cron Expression Syntax
The syntax of the follows the UNIX crontab pattern, a string consists of five space-separated segments. Please refer cron4j documentation for further details.
6.8.2. Setting up Cron Tasks
Setting up a cron task requires two steps:
-
Define a Loop with the desired cron tasks
-
Assign a cron expression as the
loopvariable value
Example that prints Hello every 10 minutes:
<job name=”cron_job”>
     <genericInformation>
        <info name="START_AT" value="2014-01-01T00:00:00+01:00"/>
    </genericInformation>
    <task name=”cron_task”>
        <scriptExecutable>
            <script>
                <code language="javascript">
                    print("Hello");
                </code>
            </script>
        </scriptExecutable>
        <controlFlow>
            <loop target=”cron_task”>
                <script>
                    loop = “10 * * * *”
                </script>
            <loop>
        </controlFlow>
    </task>
</job>
You can find a complete example running a simple task every minutes in this XML workflow.
6.8.3. Notes
-
The execution of the first iteration occurs immediately and does not depend on the cron expression specified. However the user can specify a start time for the first iteration using
START_ATgeneric information. Its value should be ISO 8601 compliant. -
Each iteration yields one or more task results and the user can query the job state and task states to retrieve information of each iteration.
-
It is assumed that execution time of each iteration is less that time gap specified by the cron expression. If the execution time of an iteration is longer, the execution of the next iteration will occur at next point of time with respect to the current time. For instance it is possible to observe lesser number of iteration executed within a certain time period than number of expected iterations, if some iterations had take longer finish time.
-
If the execution of the task defining the loop (where the <controlFlow> block is defined) fails, the cron execution is terminated.
-
ProActive Scheduler executes any cron task indefinitely. Therefore the state of ProActive Job will remain
RUNNINGunless the cron task execution terminates either by the user (for instance by killing the job or the task) or due an error in the task execution.
6.9. Remote Visualization
Using the Scheduler Web Interface, it is possible to access the display of the ProActive Node running a given task. First remote visualization must be activated via the Scheduler configuration files (set novnc.enabled to true).
| Remote visualization works via VNC where the REST API will connect to the node running the task, i.e a graphical application. The VNC output will be forwarded to the your browser and you will be able to interact with the application. |
The task that you want to visualize must output a special string using the following format: PA_REMOTE_CONNECTION;JOB_ID;TASK_ID;vnc;HOSTNAME:PORT where JOB_ID must be the current job id, TASK_ID the current task id and HOSTNAME:PORT the hostname and port where the VNC server runs.
It is the task’s responsibility to print the string. Here is a sample script that starts a Xvnc server and runs a graphical application. It can be used in a native task for instance.
In the Scheduler Web Interface, select the running job and use the Preview tab to enable remote visualization.
| Since it runs a graphical application, the task will never exit and run forever. The common use case is that you want to check manually some results via the graphical application and then exit the application. The task will then terminate normally. |
6.10. Troubleshoot a Workflow Execution
When a task has IN_ERROR status, a right click on it allows the user to select Mark as finished and resume. This will set the task status as FINISHED and then resume job execution: this task won’t be executed again, subsequent tasks will execute as if the task executed correctly. This allows the user to manually perform actions to the IN_ERROR task, without cancelling the whole job execution.
If the task has not IN_ERROR status, the Mark as finished and resume option will be in grey, meaning that the action is disabled.
6.11. Get Notifications on Job Events
Add a "NOTIFICATION_EVENTS" Generic information in the workflow level, to list events on which a user wants to be notified. List is comma-separated and should be taken from(events are not case sensitive):
-
Job change priority (or JOB_CHANGE_PRIORITY)
-
Job In-Error (or JOB_IN_ERROR)
-
Job paused (or JOB_PAUSED)
-
Job pending to finished (or JOB_PENDING_TO_FINISHED)
-
Job pending to running (or JOB_PENDING_TO_RUNNING)
-
Job restarted from error (or JOB_RESTARTED_FROM_ERROR)
-
Job resumed (or JOB_RESUMED)
-
Job running to finished (or JOB_RUNNING_TO_FINISHED)
-
Job submitted (or JOB_SUBMITTED)
Scheduler can send email to the users when one of the above events is received.
If a user wants to be notified by all these events, the "NOTIFICATION_EVENTS" Generic information should have "All" (not case sensitive) as its value.
Notifications will only be sent for jobs whose generic information (workflow level) contains user’s email address(es) under the "EMAIL" key, if multiple email addresses need to be used, they should be seperated by comma. Example:
<genericInformation>
    <info name="EMAIL" value="user0@example.com, user1@example.com"/>
    <info name="NOTIFICATION_EVENTS" value="Job paused, Job resumed"/>
</genericInformation>
To enable this functionality, the configuration need to be done following the steps introduced in Get Notification on Job Events Configuration.
6.12. Chaining Jobs
In ProActive Studio, the SubmitJobNoWait and SubmitJobAndWait templates under the Controls menu allow you to submit a workflow from another workflow using the schedulerapi binding.
These templates accept the single parameter:
-
called_workflow: a ProActive Catalog path referencing the workflow to submit (e.g. basic-examples/Native_Task)
By default, these templates do not pass any parameter to the submitted workflow (using only default values provided by the workflow).
It is possible to modify this behavior by changing the SubmitJobNoWait or SubmitJobAndWait implementation.
For example, the following line can be replaced:
workflow_variables = Collections.EMPTY_MAPby
workflow_variables = [firstName:'John', lastName:'Doe']To provide the firstName and lastName variables parameters to the submitted workflows.
The SubmitJobNoWait or SubmitJobAndWait templates behavior is different in the sense that the latter will wait until the submitted workflow terminates.
6.13. Control and Validation
In order to better control your workflows, two ProActive Studio templates Web Validation and Email Validation are provided under the Manuals menu. These templates aim at validating part of your workflows manually. The tasks after the validation template will only be executed once you validate it. You can put your description of the validation under the content variable in Web Validation template, and under message variable in Email Validation template. Three options are provided, the Yes option indicates that you want to validate the workflow and continue the execution of the rest tasks; the Maybe option means that you do not know what to do for the moment; the No option denotes that you do not want to validate the workflow, and the remaining of the workflow will be paused.
In order to validate your workflow using Web Validation, you need to go to the ProActive Notification & Validation portal, the workflow will be validated by clicking on one of the three buttons. By using Email Validation, you will receive an email with three links, the workflow can be validated by clicking on one of the links.
7. Data Spaces
If a shared folder or file system is not an option in your environment, the ProActive Scheduler provides a convenient way to transfer files between server and tasks.
This mechanism is called ProActive Data Spaces.
Data Spaces come into two categories:
-
Server Data Spaces: Global and User Spaces belong to this category. It represents data spaces located on the server side.
-
Node Data Spaces: Local and Cache Spaces belong to this category. It represents data spaces located on the Node or during a Task execution.
7.1. Global and User Spaces
Server Data Spaces have two types of storage on the host where the ProActive server is running:
-
A Global Space where anyone can read/write files
-
An User Space which is a personal user data storage
By default, these spaces are linked to folders in the data directory of the ProActive Scheduler host:
-
PROACTIVE_HOME/data/defaultglobal -
PROACTIVE_HOME/data/defaultuser
But it can be changed in PROACTIVE_HOME/config/scheduler/settings.ini.
7.2. Local Space
The Local Space is a Node Data Space created dynamically when a Task is executed.
The Local Space allows to:
-
Transfer files from one of the Server Spaces (Global or User) to the task execution context, before the task starts its execution.
-
Transfer files from the task execution context to one of the Server Spaces (Global or User) at the end of the task execution.
These two types of transfers must be declared in the Task definition in order to occur (transfer is not implicit). You need to define which files have to be transferred from a data space to computing nodes by using input files and reciprocally from computing nodes to a data space by using output files:
<task name="task1">
    ...
    <inputFiles>
        <files includes="tata" accessMode="transferFromGlobalSpace"/>
    </inputFiles>
    <outputFiles>
        <files includes="titi*" accessMode="transferToGlobalSpace"/>
    </outputFiles>
    ...
</task>
Upon the execution of the previous example, ProActive Scheduler automatically transfers all files to a ProActive Node where the task will be executed. The files are put in a special place called Local Space on the ProActive Node. It corresponds to the working directory of a task when the task is in fork mode (default). From a task point of view, files can be accessed normally like shown below:
File inputFile = new File("tata")Then, based on the previous task definition, all the files whose the name starts with titi (e.g titi, titi2, etc.) produced by task1 will be transferred back automatically to Global Space by the Scheduler once the task is finished.
Files can be also transferred from/to User Space by specifying transferFromUserSpace/transferToUserSpace.
Before running your jobs you should first upload your files into either Global or User Space. To do it you can export folders linked to these spaces by one of the standard protocols like FTP, NFS, or use available web interfaces like Pydio.
It is possible to use wildcards in transfer directives, such as:
<task name="task1">
    ...
    <inputFiles>
        <files includes="**/tata" accessMode="transferFromGlobalSpace"/>
    </inputFiles>
    <outputFiles>
        <files includes="*" accessMode="transferToGlobalSpace"/>
    </outputFiles>
    ...
</task>
More information of pattern syntax can be found in the FileSystem class JDK documentation.
7.3. Cache Space
In addition to transferring to the Task Local Space, it is also possible to transfer files to the Node host Cache Space.
From the Node host point of view, the Cache Space is unique and shared for all tasks and all ProActive Nodes deployed on the host.
Transfers to the cache are not concurrent, only a single task can transfer to the cache at the same time. I.e if multiple tasks are run in parallel on the same hosts and they all transfer to the cache, these transfers will be executed sequentially.
If a file declared for the transfer is newer than the existing version in the cache, the file will be updated.
In order to transfer files to the cache, simply use the cache transfer directives inside your job:
<task name="task1">
    ...
    <inputFiles>
        <files includes="tata" accessMode="cacheFromGlobalSpace"/>
        <files includes="toto" accessMode="cacheFromUserSpace"/>
    </inputFiles>
    ...
</task>
The files will not be transferred to the Local Space of the task, so it will not be possible to access these files from the current directory.
In order to access these files, use the cachespace variable which contains the location of the cache, for example in groovy:
inputFile = new File(cachespace, "tata")There are no transfer directives to transfer output files from the cache. Output files transfers are only possible from the Local Space.
Files in the cache space are automatically deleted after a given period. The default invalidation period is two weeks, which means that files older than two weeks will be automatically deleted.
In order to change this period, the ProActive Node must be started with the property node.dataspace.cache.invalidation.period (in miliseconds).
The property node.dataspace.cachedir can also be used to control the cache location on the node.
8. Script Languages
8.1. Script Engines Names
This section gathers the available scripts engines and the operating system where they run.
| Script engine naming is case-sensitive |
| Script Engine Name | Description | Operating System | Additional Requirements |
|---|---|---|---|
|
An engine able to run several linux shell scripts using the shebang notation. |
Linux, Mac |
|
|
An engine able to run linux bash shell scripts. |
Linux, Mac |
|
|
An engine able to run Windows CMD scripts. |
Windows |
|
|
An engine able to run PowerShell scripts. |
Windows |
Powershell 2.0 Engine and .NET Framework 3.5 must be installed |
|
An engine able to run Docker containers defined as Dockerfile. |
Linux, Mac, Windows |
Docker must be installed |
|
An engine able to run composite Docker containers defined as Docker-compose description file. |
Linux, Mac, Windows |
Docker and Docker-Compose must be installed |
|
An engine able to run Kubernetes pods using a kubernetes yaml job description file. |
Linux, Mac, Windows |
Kubernetes client kubectl must be installed |
|
An engine able to run Javascript code using the Nashorn JSR223 implementation. |
Linux, Mac, Windows |
|
|
An engine able to run Groovy scripts. |
Linux, Mac, Windows |
|
|
An engine able to run JRuby scripts. |
Linux, Mac, Windows |
|
|
An engine able to run Jython scripts |
Linux, Mac, Windows |
|
|
An engine able to run native CPython scripts |
Linux, Mac, Windows |
CPython and py4j module must be installed |
|
An engine able to run R language scripts |
Linux, Mac, Windows |
R must be installed and the rJava library |
|
An engine able to run Perl scripts |
Linux, Mac, Windows |
Perl must be installed |
|
An engine able to run Scala scripts |
Linux, Mac, Windows |
8.2. Bash and Shell
The Bash and Shell script engines allows to run linux shell scripts inside ProActive Tasks. The main difference between the two script engines is that the Shell script engine must use the Shebang instruction to define the Shell in use inside the script.
Both engines features the following behaviors:
-
Script bindings are translated as environment variables.
-
Workflow variables are un-modifiable except by using a post-script written in another language such as the
update_variables_from_filescript. -
The result of the script engine execution corresponds to the return code of the bash or shell process executed.
Example bash script (the shebang notation is omitted):
echo "Hello world"Example shell script:
#!/bin/ksh
print "Hello world"
Writing Bash or Shell scripts in ProActive Workflows is rather straightforward, but a few considerations need to be taken into account.
The automatic binding mechanism works differently as other scripting language: it makes use of environment variables.
For example, suppose that the workflow variable foo is defined. This workflow variable can be accessed in the script engine through a specific environment variable created by the ProActive Scheduler:
echo "Here is the value of the foo variable:"
echo "$variables_foo"
The Script Bindings Reference chapter shows how various bindings can be used in bash or shell script engines.
In chapter Script variables, we explain how a given task script can modify the variable map and propagate its modifications inside the workflow. This does not apply to shell script engines, i.e. a shell script engine cannot modify the variables map directly.
For example, suppose the initial value of the foo variable is "Old Value" and Task_A contains the script:
echo "Here is the value of the foo variable:"
echo "$variables_foo"
echo "I want to modify the value of the foo variable:"
variables_foo="New Value"
And Task_B a child of Task_A contains:
echo "Here is the value of the foo variable:"
echo "$variables_foo"
Then, Task_B will display
Here is the value of the foo variable:
Old Value
We can see that the execution of Task_A had no impact on the foo variable.
In general, when a modification of a workflow variable is needed, other script engines should be used.
In ProActive Catalog, an example groovy post script called update_variables_from_file allows to propagate a variable modification from a shell main Task script using a temporary file:
Task_A main bash script:
echo "Here is the value of the foo variable:"
echo "$variables_foo"
echo "I want to modify the value of the foo variable:"
variables_foo="New Value"
echo "foo=$variables_foo">>$localspace/.variables
Task_A grovy post script (update_variables_from_file)
new File(localspace, ".variables").eachLine { line ->
    keyvalue = line.split("\\s*=\\s*")
    if (keyvalue.length == 2) {
        variables.put(keyvalue[0], keyvalue[1])
    }
}
Task_B a child of Task_A:
echo "Here is the value of the foo variable:"
echo "$variables_foo"
Displays:
Here is the value of the foo variable:
New Value
8.3. Windows Cmd
Windows Cmd script engine behaves similarly as bash script engine, but for Microsoft Windows Operating systems.
It features the following behaviors:
-
Script bindings are translated as environment variables.
-
Workflow variables are un-modifiable except by using a post-script written in another language such as the
update_variables_from_filescript (see Bash script language for further explanations). -
The result of the script engine execution corresponds to the return code of the
cmd.exeprocess executed.
Example variable usage:
echo "Here is the value of the foo variable:"
echo "%variables_foo%"
8.4. Python
We support both Jython and Python Script Engines. Jython is an implementation of the Python programming language designed to run on the Java platform, Jython programs use Java classes instead of Python modules. The advantage of using our Jython Script Engine is that you do not need to do any installation. It includes some modules in the standard Python programming language distribution, but lacking the modules implemented originally in C. Besides, the libraries such as numpy, matplotlib, pandas, etc. are not supported by Jython. And the libraries which depends on numpy such as TensorFlow, PyTorch and Keras etc. are not supported neither.
In order to support native Python, we provide also a Python Script Engine. To use the Python Script Engine, the 'Language' field should be put to 'cpython'. By using Python Script Engine, you can personalize the Python version that you want to use. Since there are many different versions of Python (mainly Python2 and Python3) which are not compatible, ProActive supports all the Python versions (Python2, Python3, etc). By default, the Python used to execute the script is the default Python version on your machine. In order to use another Python version to execute the task, it is required to add a 'PYTHON_COMMAND' Generic Information. Its value should contain the symbolic or absolute path to the desired python command to run (for example 'python3' or '/usr/local/opt/python3/bin/python3.6'). If the Generic Information is put at task level this version of Python will be only used for this task, if it is put in the job level this version of Python will be used for all the tasks in this job.
For every tasks which use the native python script engine:
-
Python must be installed on the ProActive Node which will be used to execute the task.
-
The py4j module must be installed. Please refer to Python Script Engine (Python task) for the introduction about the installation of Python Script Engine.
Here is a workflow example (in xml format) about a simple Python task:
  <taskFlow>
    <task name="Python_Task" >
      <description>
        <![CDATA[ The simplest task, ran by a python engine. ]]>
      </description>
      <genericInformation>
        <info name="PYTHON_COMMAND" value="python3"/>
      </genericInformation>
      <scriptExecutable>
        <script>
          <code language="cpython">
            <![CDATA[
import platform
print("The current version of python you are using is: " + platform.python_version())
print("Hello World")
]]>
          </code>
        </script>
      </scriptExecutable>
    </task>
  </taskFlow>
A jython script engine execution runs in the same Java process as the Task execution. A cpython script engine execution runs inside a separate python process.
8.5. R
ProActive R script engine is based on the Java R Interface. In order to use the R script engine inside a ProActive Node (container which executes a workflow Task), the following prerequisites are needed:
-
A R distribution must be installed.
-
The rJava package must be installed.
-
The
R_HOMEenvironment variable needs to be configured, to allow the script engine finding the R distribution. -
The
R_LIBSenvironment variable might need to be configured if R libraries cannot be found automatically in $R_HOME/library.
The ProActive R script engine works on both Linux and Windows.
Here is an example of R script:
jobName <- variables[['PA_JOB_NAME']]
cat('My job is called', jobName, '\n')
The following paragraphs describes the R script language specific syntaxes.
The progress variable is set as follows (notice the leading dot):
.set_progress(50)In contrary to other languages such as groovy or jruby, the parent tasks results (results variable) is accessed directly:
print(results[[0]])Variable affectation can be done via:
variables[["myvar"]] <- "some value"Access to dataspaces variables is similar to other languages:
print(userspace)
print(globalspace)
print(inputspace)
print(localspace)
print(cachespace)
print(outputspace)
Some internal R types (such as lists, vectors, strings) are automatically converted when stored as a result or in the workflow variable map, but other types such as data.table are not automatically converted. Conversion for these types should be done manually, for example using json serialization or an output file.
Java objects such as fork environment variable, scheduler, userspace or globalspace APIs are not available in R.
8.6. PowerShell
ProActive PowerShell script engine is based on jni4net to call the Powershell API from Java.
It requires that Powershell 2.0 Engine and .NET Framework 3.5 are installed on the relevant machines.
An example of Powershell script:
$variables.Set_Item('myvar', 'value')
$result = Get-Date
In contrary to other languages such as groovy or jruby, the parent tasks results (results variable) is accessed directly:
Write-Output $results[0]Variable affectation can be done via:
$variables.Set_Item('myvar', 'value')Internal PowerShell types such as Dates are automatically serialized to an internal format which can be understood by another powershell task, for example in the following two tasks:
Task1:
$result = Get-DateTask2:
Write-Output $results[0].DayThe second task is able to automatically use the Date object received from the first task.
When an internal PowerShell type needs to be used by another language than PowerShell, a manual conversion such as json must be performed.
8.7. Perl
The Perl script engines features the following behaviors:
-
Script bindings are translated as environment variables.
-
Workflow variables are un-modifiable except by using a post-script written in another language such as the
update_variables_from_filescript (see Bash script language for further explanations). -
The result of the script engine execution corresponds to the return code of the
perlprocess executed.
In that sense, the Perl script engine behaves similarly as the Bash or Cmd script engines.
Please see the proper names of the variables in Script Bindings Reference.
Inside Perl, you can access the environment variables using the %ENV hash.
The aim of next examples is to clarify the usage of variables in Perl:
-
to get job name variable you should write the next code:
my $jobName= $ENV{"variables_PA_JOB_NAME"};
-
to get the result of parent task you can implement the next code:
my $parent_task_result= $ENV{"results_0"};
-
to get the userspace please put the next code:
my $USERSPACE= $ENV{"USERSPACE"};
8.8. Docker Compose
In order for Docker_Compose tasks to work, the Node must have Docker and Docker Compose installed. Please refer to the official Docker documentation to see how to install Docker and Docker Compose.
A Docker_Compose task expects the content of a Docker Compose file inside the Script section. You can find out how to write Docker Compose files in the official Docker Compose documentation.
To get started, a simple Docker Compose example is explained below.
The content of the Script section (equal to the content of a Docker Compose file) is:
helloworld:
    image: busybox
    command: echo "Hello ProActive"
The above example describes a container which is called 'helloworld'. That container is created from a busybox image, which will run the command 'echo "Hello ProActive"'
The Docker_Compose task allows to set parameters to the docker-compose tool with regard to the docker-compose CLI reference.
docker-compose [general parameters] COMMAND [options]
It supports general parameters as well as commands options (we currently only support options for the up command).
You can specify these options by supplying a space character separated list in the generic informations.
-
To define a general parameter, use the key docker-compose-options and supply "--verbose" as an example value.
-
To define a docker-compose up option, use the key docker-compose-up-options and supply "--exit-code-from helloworld".
The two latter generic informations will be used to generate the following command:
docker-compose --verbose up --exit-code-from helloworld
If splitting by space is prohibitive you can specify the split regex in the generic informations with the key docker-compose-options-split-regex. If you supply e.g. "!SPLIT!" as value, then your docker-compose-up-options will need to look like this: "--option1!SPLIT!--option2".
8.9. Docker File
The main behavior of a Docker_File task is to first build an image and then run a container instance from it. Once the execution is done, the container is stopped and the built image is deleted.
Advanced options will allow to parametrize these actions.
In order for Docker_File tasks to work, the Node must have Docker installed. Please refer to the official Docker documentation to see how to install Docker.
To use a Docker_File task, put the content of a Dockerfile inside the Task Implementation section. You can find out how to write Dockerfile in the official Dockerfile documentation. A Docker_File task allows executing a succession of docker commands according to the lifecycle of Docker containers. In order, docker build, docker run, docker stop, and docker rmi are ran when a Docker_File task is executed.
To get started, a simple Docker_File task can be tested by using this Dockerfile as the content of the Script section (task implementation)
FROM ubuntu:18.04
RUN echo "Hello ProActive"
RUN sleep 30
It will create an image using the Docker build command, by specifying commands to start (echo and sleep) for every running containers from this image. At the end the built image and the started container are deleted.
The build, start, stop and remove commands can be parametrized through optional command line options explained after.
-
The Docker_File task allows to set parameters to the
docker buildcommand with regard to the docker-build CLI reference.
docker build [OPTIONS] PATH | URL | -
To define a docker-build option, use the generic information docker-build-options
For instance by using the docker-build-options generic information with the value --add-host, a custom host-to-IP mapping will be added to the image.
-
The Docker_File task allows to set parameters to the
docker runcommand with regard to the docker-run CLI reference.
docker run [OPTIONS] IMAGE[:TAG|@DIGEST] [COMMAND] [ARG...]
To define a docker-run option, use the generic information docker-run-options
For instance by using the docker-run-options generic information with the value -d=true, the container will be started in detached mode.
-
The Docker_File task allows to set parameters to the
docker stopcommand with regard to the docker-stop CLI reference.
docker stop [OPTIONS] CONTAINER [CONTAINER...]
To define a docker-run option, use the generic information docker-stop-options
For instance by using the docker-stop-options generic information with the value --time 30, the container will be stopped after 30s.
| a parameter docker.file.keepcontainer is defined in the dockerfile script engine properties file (in config/scriptengines/ folder). Put the value to yes if you do not want to stop the container. |
-
The Docker_File task allows to set parameters to the
docker rmicommand with regard to the docker-rmi CLI reference.
docker rmi [OPTIONS] IMAGE [IMAGE...]
To define a docker-rmi option, use the generic information docker-rmi-options
| a parameter docker.file.keepimage is defined in the dockerfile script engine properties file (in config/scriptengines/ folder). Put the value to yes if you do not want to delete the built image. |
9. Proactive Catalog: Object Storage and Versioning
The ProActive Catalog provides the storage and versioning of Workflows and several other objects inside Buckets. It also features a searching functionality using a GraphQL query language to fetch Workflows based on particular parameters. The Catalog is a RESTful service. A Swagger interface is provided to understand and interact with the service.
This chapter will cover:
-
ProActive Catalog main concepts.
-
How to interact with the Catalog from the various ProActive Workflows and Scheduling Portals.
The Catalog administration guide describe how the catalog can be configured and how access control of buckets can be enforced.
9.1. Bucket concept
A Bucket is a collection of ProActive Objects and in particular ProActive Workflows that can be shared between users.
When the ProActive Scheduler is first started, it contains already a predefined set of buckets, such as:
-
controls (set of workflows containing basic constructs such as branch,loop or replicate)
-
basic_examples (set of Workflows samples publicly readable)
-
notification_tools (set of tasks which can be used to send email or web notifications and/or validations).
-
data_connectors (set of Workflows which can be used to transfer files and data from various sources as explained in the Data Connectors chapter)
Listing the Catalog for existing Buckets is done using the following HTTP request (protocol, port and hostname needs to be adapted accordingly):
GET http://localhost:8080/catalog/buckets
It is also possible to list all objects inside a particular Bucket using its bucketName:
GET http://localhost:8080/catalog/buckets/{bucketName}/resources
Then, we can fetch a particular object based on its name:
GET http://localhost:8080/catalog/buckets/{bucketName}/resources/{name}
| By default, the Catalog will always return the latest version of the objects. |
9.2. Bucket naming requirements
Every bucket is identified by a unique bucket name. The bucket naming should match the following rules:
-
The bucket name must be between 3 and 63 characters long and can contain only lower-case characters, numbers, and dashes.
-
A bucket name must start with a lowercase letter and cannot terminate with a dash.
9.3. Object versioning
The Catalog provides versioning of objects. You can list all the revisions of a particular object using the HTTP request:
GET http://localhost:8080/catalog/buckets/{bucketName}/resources/{name}/revisions
The revision of objects is identified by its commit_time. Commit time specifies the time when the object’s version was added in the Catalog.
You can fetch an object detailed metadata information using its name and commit_time:
GET http://localhost:8080/catalog/buckets/{bucketName}/resources/{name}/revisions/{commit_time}
When an object revision is added to the catalog, depending on its type, it may be parsed by the catalog service to extract some meaningful information.
For example, from a ProActive Workflow, the workflow name, project_name, description, documentation, Generic Information and Workflow variables are extracted.
These information are used in the various portals which interacts with the catalog such as the Workflow Automation Portal.
9.4. Retrieving and searching Objects
9.4.1. Get an Object from the REST API
From REST API it’s possible to retrieve the raw content of a specific revision of an object. For this case it’s required to specify name and commit_time of the object’s revision:
GET http://localhost:8080/catalog/buckets/{bucketName}/resources/{name}/revisions/{commit_time}/raw
In order to get the raw content of a last revision of an object use next REST API endpoint:
GET http://localhost:8080/catalog//buckets/{bucketName}/resources/{name}/raw
In this case you need to provide only the name of an object.
| A complete documentation of the Catalog REST API is available on the following link. |
9.4.2. GraphQL usage
GraphQL is the standardized query language, which provides opportunity to search and retrieve the Workflow by specified criterion from the Catalog. NOTE: Please follow the graphiql endpoint in order to query for the specific Workflow.
9.5. Catalog Portal
The Catalog Portal provides the capability to store objects like Workflows, Calendars, Scripts, etc. Powerful versioning together with full access control (RBAC) is supported, and users can easily share Workflows, templates, and other objects between teams, and various environments (Dev, Test, Staging, Prod).
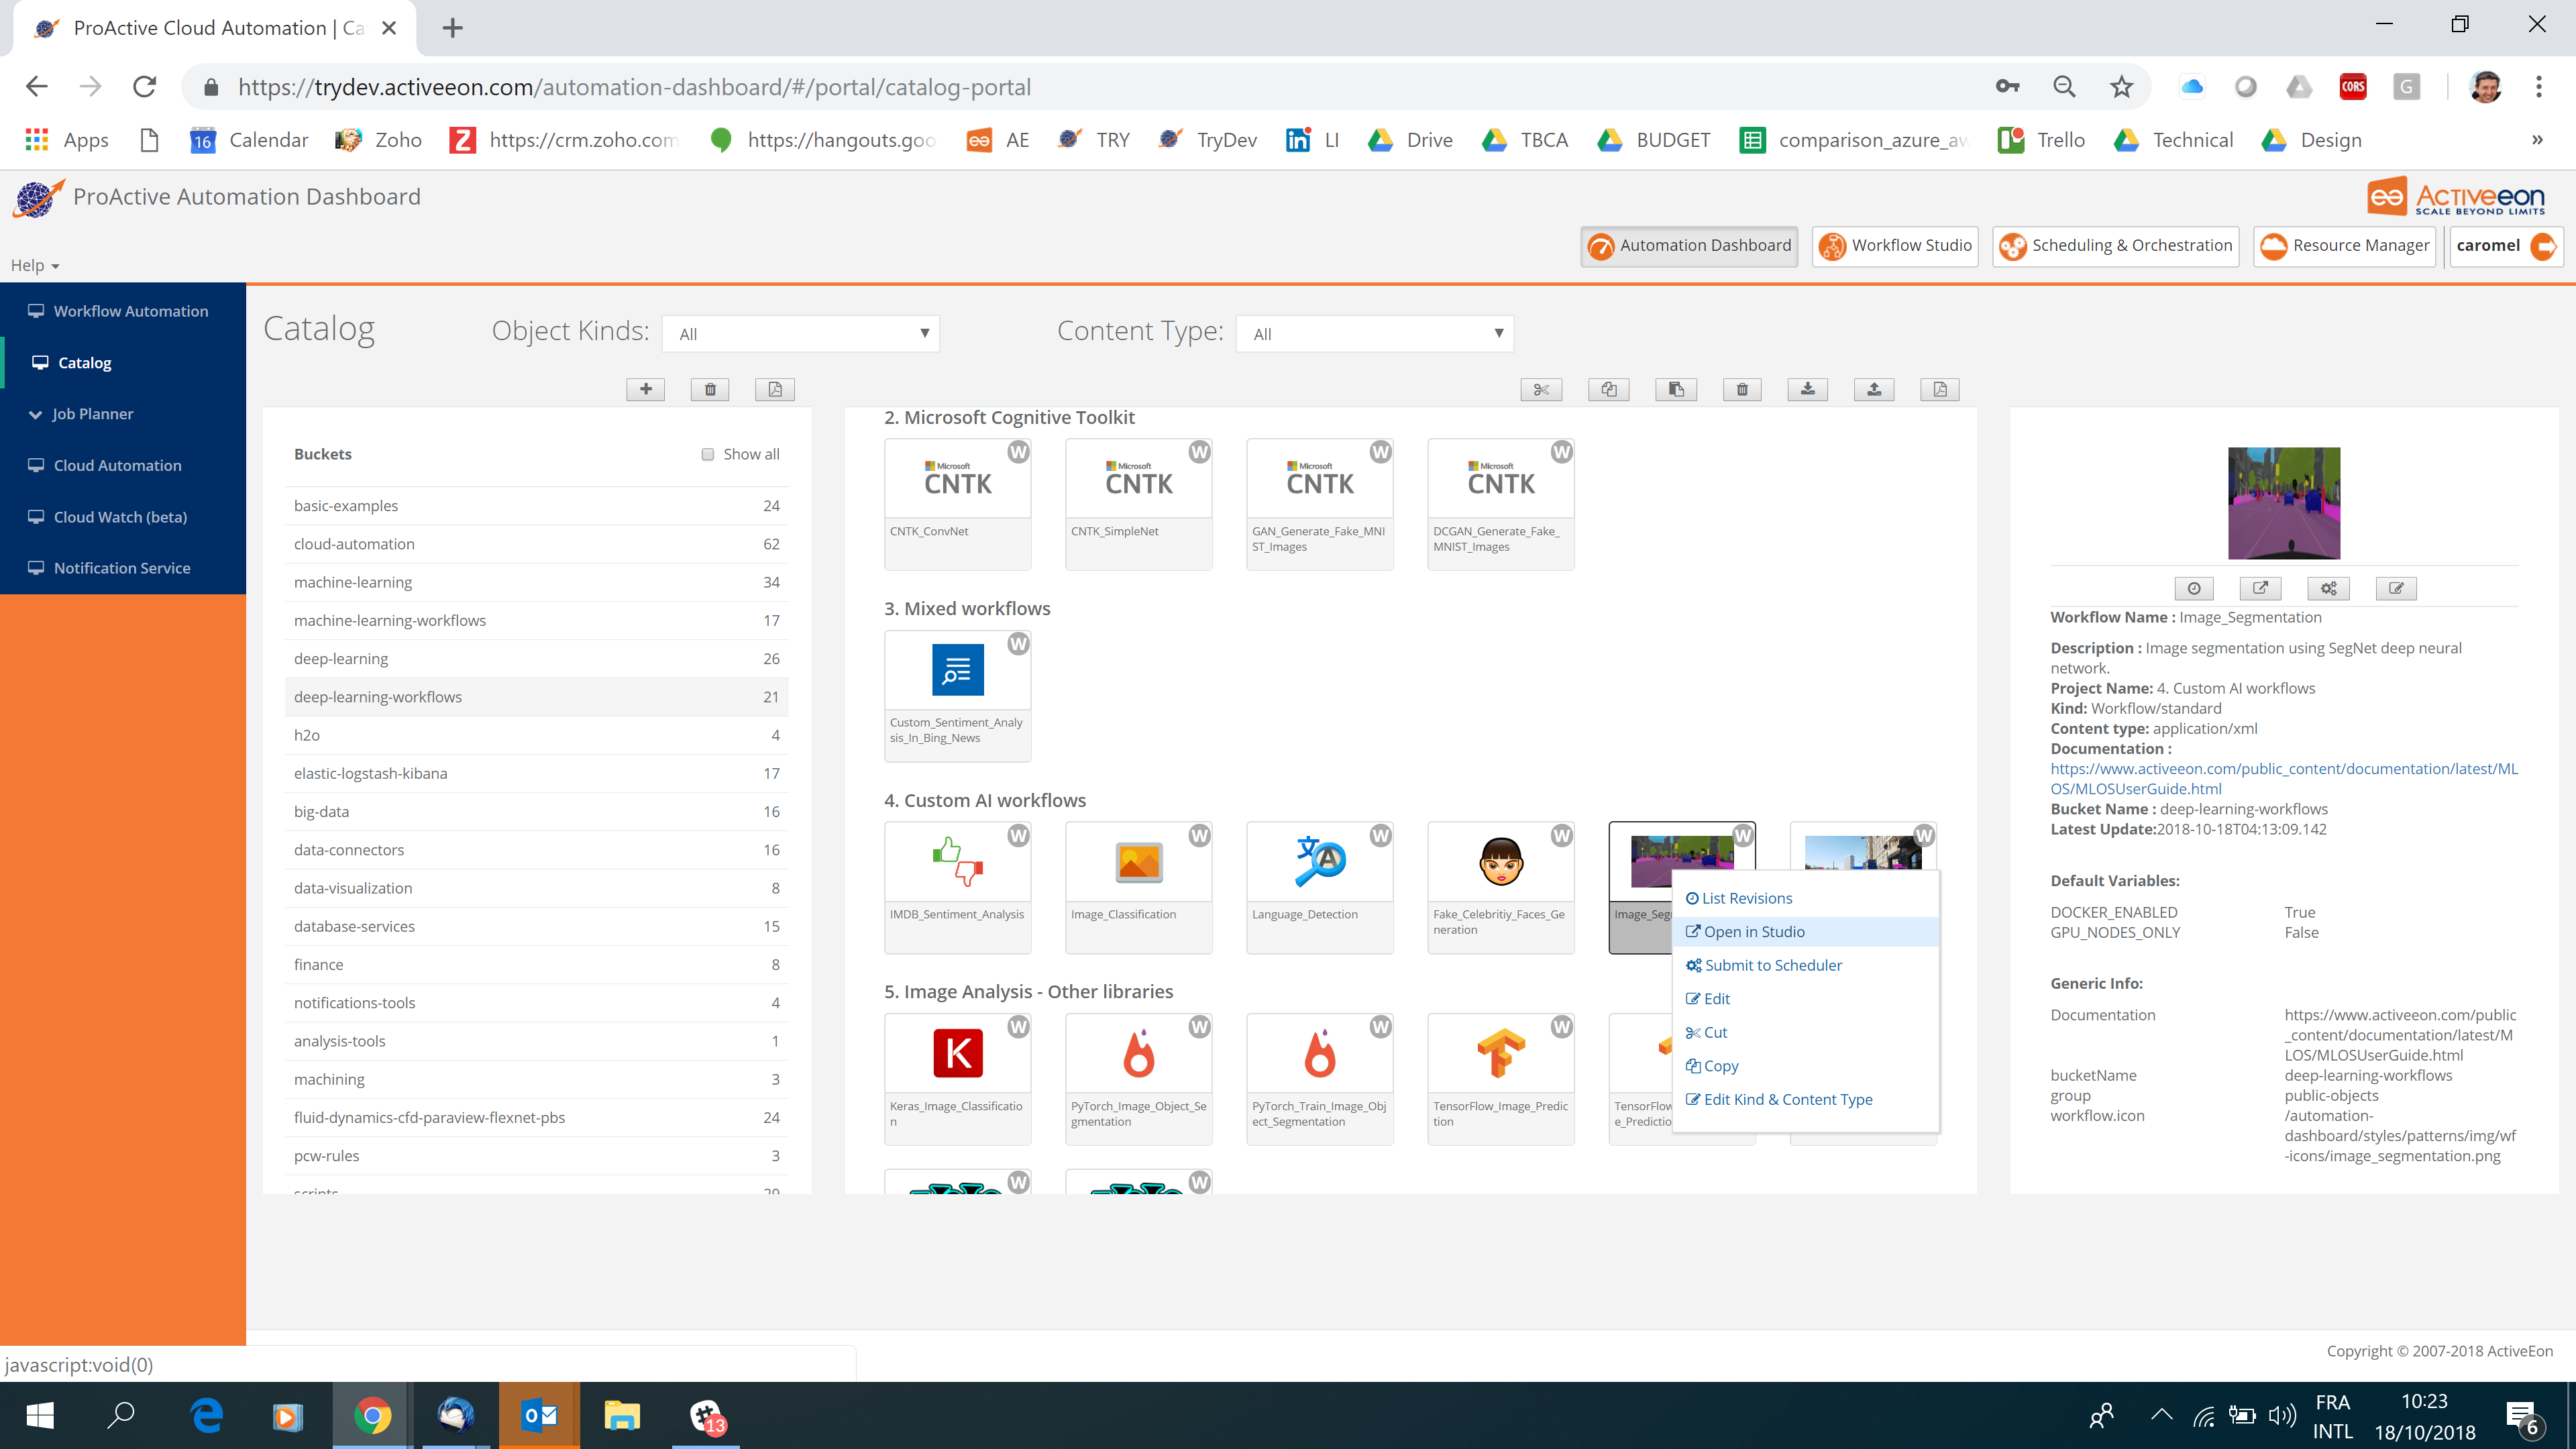
9.5.1. Creating new buckets
Create a new bucket easily by clicking on the plus button.

In the Create the new bucket window, it is possible to associate a bucket to a specific users group.
By doing so, only users from the same group will be able to access the content of the bucket.
The content of the buckets associated with the default - no group is accessible by any user, regardless of the groups they belong to.
A bucket with no associated group is also known as a public bucket.
More information regarding bucket access control is available in the Catalog administration guide.
9.5.2. Removing Objects Inside a Bucket
Select the objects to remove (CTRL + left click to select multiple objects) and click on the trash button.
| All the object’s content will be removed from the database and it cannot be restored. |
9.5.3. Exporting/Importing Objects into the Catalog
Catalog Objects can be exported to a local archive, and share them easily by email, cloud, etc. The same archive can be imported again in the Catalog on the same scheduler or in a different one.
| Use this feature to easily share Catalog objects across different environments. |
To export the selected objects as a ZIP archive, press the download button from portal view.
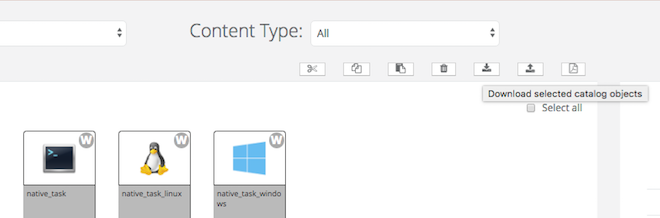
To import, either a downloaded catalog archive zip file or a single object, click on the upload button and follow the instructions:
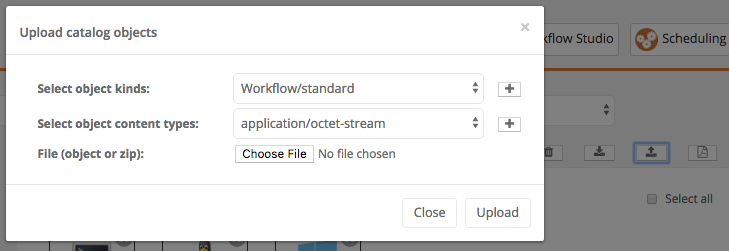
-
Object Kind: The kind of object to add. New Kinds can be added by clicking the
plusbutton. -
Content Type: The Content Type is used to indicate the media type of the resource. New content Types can be added by clicking the
plusbutton.
| In case of uploading an archive, all the objects in the zip must have the same Kind and Content Type. |
9.5.4. Object Versioning in Catalog Portal
The HEAD of a Catalog object corresponds to the last commit and it is displayed on the portal.
In order to see all the commits of the selected Object, please click on the clock button inside the description area.
The commits are shown in chronological order by commit time.
It is possible to restore any previous commit to the HEAD position by clicking the restore button.
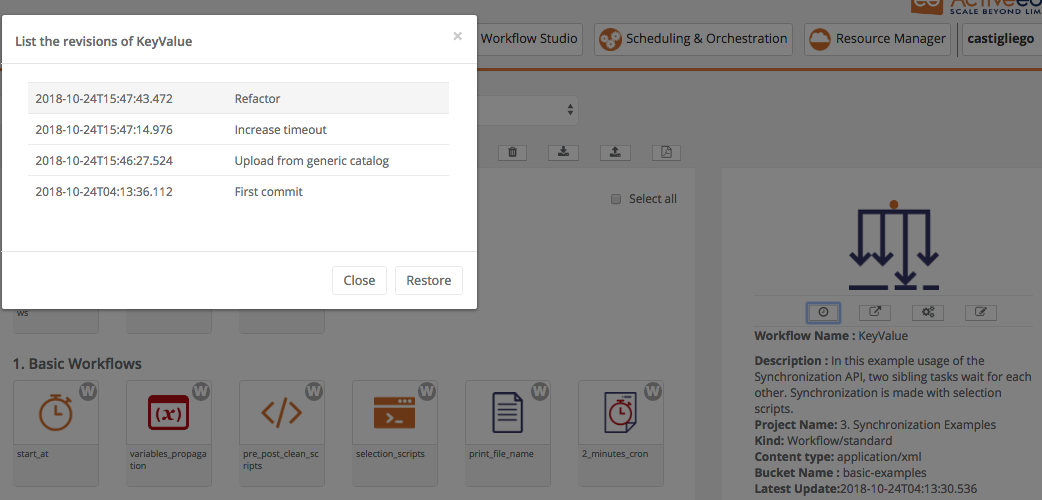
10. Third-party credentials
10.1. Overview
Tasks executed by ProActive
Scheduler might need to use a password or another kind of
credentials to acces third-party services or applications. For example
a user might wish to pass his MySQL password to Native Task which runs
a mysql command to dump a database.
In such cases it is often desireable to store the credentials separately from the Workflow definition. ProActive Scheduler provides such facility.
Third-party credentials in ProActive Scheduler are user-defined key-value pairs of strings stored on the server side in encrypted form. The credentals are accessible in the tasks executed by the user via API (Script and Java Tasks) or variable substitution (arguments of Native Tasks and parameters of Java Tasks).
10.2. Managing third-party credentials
Methods to add or remove the credentials and to list the stored credential keys are exposed in both Java and REST APIs.
End users can manage their credentials using the Scheduler Web Interface (Portal → Manage third-party credentials) or the Command Line Interface.
10.2.1. Example CLI usage
Add credential:
$ ./bin/proactive-client --put-credential MY_MYSQL_PASSWORD mypassword
Credential "MY_MYSQL_PASSWORD" successfully stored.
List credentials (only keys are listed):
$ ./bin/proactive-client --list-credentials
[...]
MY_MYSQL_PASSWORD
Remove credential:
$ ./bin/proactive-client --remove-credential MY_MYSQL_PASSWORD
Credential "MY_MYSQL_PASSWORD" successfully removed.
10.3. Using third-party credentials
10.3.1. In a Script Task
In a Script Task, the credentials script binding is a hash map containing all user’s
credentials:
// mysqlPassword will contain the value corresponding to "MY_MYSQL_PASSWORD" key
mysqlPassword = credentials.get('MY_MYSQL_PASSWORD')
The credentials script binding can also be used in additional scripts defined inside a ProActive Task.
To know in which scripts credentials is available, study the Script Bindings Reference.
|
10.3.2. In Java Task
In a Java Task, the method getThirdPartyCredential of JavaExecutable
returns the credential corresponding to the key passed as parameter:
public class PrintAndReturnCredentialsTask extends JavaExecutable {
  @Override
  public Serializable execute(TaskResult... results) throws Throwable {
    // mysqlPassword will contain the value corresponding to "MY_MYSQL_PASSWORD" key
    String mysqlPassword = getThirdPartyCredential("MY_MYSQL_PASSWORD");
    [...]
  }
}
Another way to use credentials in Java tasks is via parameters. If a
parameter contains a string of the form $credentials_<credential
key>, the string is replaced with the value of the corresponding
credential:
<task name="...">
  <javaExecutable class="...">
    <parameters>
      <!-- mysqlPassword will contain the value corresponding to "MY_MYSQL_PASSWORD" key -->
      <parameter name="mysqlPassword" value="$credentials_MY_MYSQL_PASSWORD"/>
    </parameters>
  </javaExecutable>
</task>
10.3.3. In a Native Task
Finally, a credential can be passed to a Native Task via
argumens. Note that, as with Java Task parameters, the $credentials_
prefix is necessary. In the example below, /bin/echo will be called
with the value corresponding to the key MY_MYSQL_PASSWORD (if the
key is not present, no replacement occurs):
<task name="Task1">
  <nativeExecutable>
    <staticCommand value="/bin/echo" >
      <arguments>
        <argument value="$credentials_MY_MYSQL_PASSWORD"/>
      </arguments>
    </staticCommand>
  </nativeExecutable>
</task>
11. Scheduler, DataSpace, and Synchronization APIs
From a Script Task, several APIs are accessible via Java objects bound to dedicated script bindings:
-
Scheduler API: using the
schedulerapibinding, it is possible to interact directly with the scheduler server and do several operations (submit jobs, wait for tasks termination, list running jobs, etc.). -
DataSpace API: the
userspaceuriorglobalspaceuribindings allow to manipulate files present in User or Global spaces. Operations include listing, uploading, downloading, or deleting files. -
Synchronization API: using the
synchronizationapibinding, it is possible to handle advanced task synchronization dynamically.
11.1. Scheduler API
From inside a Script Task, you can use the Scheduler API binding like the following:
// importing necessary classes
import org.ow2.proactive.scheduler.common.job.*
import org.ow2.proactive.scheduler.common.task.*
import org.ow2.proactive.scripting.*


// connect to the scheduler
schedulerapi.connect()

// create a hello world job
job = new TaskFlowJob()
job.setName("HelloJob")
task = new ScriptTask()
task.setName("HelloTask")
task.setScript(new TaskScript(new SimpleScript("println 'Hello World'", "groovy")))
job.addTask(task)

// submitting the job
jobid = schedulerapi.submit(job)

// Wait for the task termination
taskResult = schedulerapi.waitForTask(jobid.toString(), "HelloTask", 120000)

// displaying the task output
println taskResult.getOutput().getAllLogs(false)
The complete API description can be found in the SchedulerNodeClient JavaDoc.
The schedulerapi script binding can also be used in additional scripts defined inside a ProActive Task.
To know in which scripts schedulerapi is available, study the Script Bindings Reference.
|
11.2. DataSpace API
The traditional way to transfer files from the user or global space to a task is by using file transfer directives as described in chapter Data Spaces.
Where file transfer directives are sufficient to cover usual cases, it is sometimes necessary to manipulate directly the dataspace API to have a finer control level.
Below is an example use of this api inside a Script Task:
// connect to the user space
userspaceapi.connect()

// push file
inFile = new File("inFile.txt");
inFile.write("HelloWorld")
userspaceapi.pushFile(inFile, "remoteDir/inFile.txt")

// list files

remotefiles = userspaceapi.listFiles("remoteDir", "*.txt"
println remotefiles

// pull File
outFile = new File("outFile.txt")
userspaceapi.pullFile("remote/inFile.txt", outFile)

println outFile.text
The complete description of user and global space APIs can be found in the DataSpaceNodeClient JavaDoc.
The userspaceapi and globalspaceapi script bindings can also be used in additional scripts defined inside a ProActive Task.
To know in which scripts these bindings are available, study the Script Bindings Reference.
|
11.3. Synchronization API
This Synchronization API allows for both communication and synchronization between Tasks and between Jobs dynamically at execution. It is based on a Key-Value Store offering atomic operations. It enables to easily put into action all classical synchronization patterns: Critical Sections and Mutual Exclusion, Rendez-vous, Barriers, Producer/Consumer…
Task synchronization is traditionally handled by the ProActive Scheduler through Task Dependencies, where dependent ProActive Tasks are started only after their parents Tasks completed.
In some cases, static task dependencies are not enough to synchronize tasks execution.
This is the case when a task depends on the state of another task executed in a different branch of a workflow, a sibling task or even another job/workflow.
For example, let’s suppose workflow A contains a single task A_1 starting an apache server. Task A_1 starts the server and remains alive while the server is up. When workflow A is killed, task A_1 stops the Apache server.
A task B_1 of another workflow B wants to interact with this server.
Problem: task B_1 does not know if the apache server is up and how to contact it.
Using Task Synchonization API, task A_1 can advertise the server URL to the Synchronization Service.
Task B_1 can use Task Synchonization API to wait until the apache server is advertised, it can also perform the necessary operations and advertise task A_1 that the operation is complete and the apache server can be terminated.
As we can see, Task Synchronization API can be used for two-ways synchronization.
Synchronizations can be used in any part of a Task (Pre/Post/Clean Scripts, Task Implementation, Selection Script). Using Synchronization API within Selection Scripts is a way to avoid a Task to be started (consuming a Node) and to be actually doing nothing, just waiting for a specific condition to occur.
11.3.1. Usage
Task Synchronization API is a Java API defined by the following API documentation.
The Synchronization API is connected to a centralized Synchronization Service. This service ensures that each request is executed atomically, and that changes are persisted on disk.
The Synchronization API is available inside ProActive Tasks through the synchronizationapi script binding.
Channels
The Synchronization Service works as a Key-Value Store organized in channels. Each channel acts as a private Key-Value Store.
This means that each put operation is identified by a 3-tuple: <Channel_identifier, Key_binding, Value>.
Users of the Synchronization API are responsible to create channels as fit their needs. Channels have no notion of ownership, a channel created by workflow A started by user Alice can be used by workflow B started by user Bob.
This is because Synchronization API is often used to synchronize workflow tasks across multiple users.
Therefore, channel naming is important and should be precise enough to avoid accidental overlap. Channels should be created when needed and deleted after use.
For example, a channel which is used only inside a specific job instance (to synchronize tasks withing this job) should be created inside some initialization task at the beginning of this job, and deleted in some cleaning task at the end. The channel name should contain the Job Id.
When channels are created, the user can decide if the channel should be persisted on disk or kept in memory only.
On startup, the Synchronization Service contains only the persistent channels which were previously created using the Synchronization API. In-memory channels created before the reboot of the scheduler are lost.
API Description
The Synchronization API is similar to the Java 8 Map interface, with the following differences:
-
It contains methods to create/delete channels and methods to interact with the channel Map itself.
-
Each channel Map operations must take a channel identifier parameter.
-
The Synchronization API supports Java 8 lambdas, but lambdas must be passed as string arguments defining Groovy Closures. For example,
compute("channel1", "key1", "{k, x -> x+1}")instead ofcompute("channel1", "key1", (k, x) -> x+1). -
The Synchronization Service guaranties that multiple operations, coming from different ProActive Tasks, will all be executed atomically.
-
In addition to the methods present in the Java 8 Map interface, Synchronization API provides blocking methods to wait for a specific condition on a channel. This is mainly why this API is called Synchronization, it allows for different ProActive Tasks to be blocked until specific conditions are met.
-
When an error occurs during the Groovy Closure compilation or execution, dedicated exceptions (CompilationException or ClosureEvaluationException) will be thrown.
11.3.2. Examples
Example 1: Simple Key/Value With Selection Script
In this first example, we will show how one task can delay the execution of another task using the Synchronization API and a selection script.
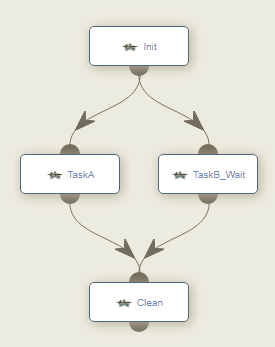
This workflow contains the following Tasks:
-
Init: Initialize the channel. This task creates a channel using the current job id. It also sets a
lockbinding in the key/value store with an initial true value.
jobid = variables.get("PA_JOB_ID")
synchronizationapi.createChannel(jobid, false)
synchronizationapi.put(jobid, "lock", true)
println "Channel " + jobid + " created."-
TaskB_Wait: Wait to be unlocked. This task will not be executed until the
lockbinding changed to false. A selection script allows to handle this verification:
selected = !(synchronizationapi.get(variables.get("PA_JOB_ID"), "lock"))-
TaskA: Unlock TaskB. This task will sleep for a few seconds and then unlock TaskB using the Synchronization API:
println "Sleeping 5 seconds"
Thread.sleep(5000)
println "Unlocking Task B"
synchronizationapi.put(variables.get("PA_JOB_ID"), "lock", false)-
Clean: Delete the channel. This task simply deletes the channel used in this job. As there is no automatic mechanism to remove channels, it is necessary to delete them explicitely when they are not used any more.
jobid = variables.get("PA_JOB_ID")
synchronizationapi.deleteChannel(jobid )
println "Channel " + jobid + " deleted."
Here is output of the Key/Value workflow:
[28t2@trydev.activeeon.com;14:24:22] Channel 28 created.
[28t0@trydev.activeeon.com;14:24:28] Sleeping 5 seconds
[28t0@trydev.activeeon.com;14:24:33] Unlocking Task B
[28t1@trydev.activeeon.com;14:24:40] Task B has been unlocked by Task A
[28t3@trydev.activeeon.com;14:24:46] Channel 28 deleted.| It is also possible to debug the operations performed on the Synchronization Store. This is possible by using the Server Logs associated with the job. Server Logs are very verbose, the [Synchronization] pattern helps to find logs associated with the Synchronization API: |
[2018-04-24 14:24:22,685 de72716883 INFO            o.o.p.s.u.TaskLogger] task 28t2 (Init) [Synchronization]Created new memory channel '28'
[2018-04-24 14:24:22,786 de72716883 INFO            o.o.p.s.u.TaskLogger] task 28t2 (Init) [Synchronization][Channel=28] Put true on key 'lock', previous value was null
[2018-04-24 14:24:34,431 de72716883 INFO            o.o.p.s.u.TaskLogger] task 28t0 (TaskA) [Synchronization][Channel=28] Put false on key 'lock', previous value was true
[2018-04-24 14:24:46,882 de72716883 INFO            o.o.p.s.u.TaskLogger] task 28t3 (Clean) [Synchronization]Deleted memory channel '28'
The Complete Workflow example can be downloaded here.
Example 2: Simple Key/Value with Explicit Wait
In this second example, we will show how one task can delay the execution of another task using the Synchronization API and an explicit wait call.
This example is very similar to the first example, but instead of delaying the execution of TaskB using a selection script, TaskB will start its execution and explicitly call the Synchronization API to wait.
-
Tasks Init, TaskA and Clean do not change
-
TaskB_Wait is modified. The selection script is removed and instead the following code is used in the main task definition:
println "Waiting for Task A"
synchronizationapi.waitUntil(variables.get("PA_JOB_ID"), "lock", "{k, x -> x == false}")
println "Task B has been unlocked by Task A"
As you can see, the waitUntil method expects a BiPredicate defined as a string Groovy Closure.
The predicate receives two parameters: k contains the key, and x contains the binding associated with this key.
This predicate is evaluated on the lock binding, and waits until this binding == false.
Here is the output of the Example 2 workflow:
[29t2@trydev.activeeon.com;14:43:42] Channel 29 created.
[29t0@trydev.activeeon.com;14:43:49] Sleeping 5 seconds
[29t1@trydev.activeeon.com;14:43:48] Waiting for Task A
[29t0@trydev.activeeon.com;14:43:54] Unlocking Task B
[29t1@trydev.activeeon.com;14:43:55] Task B has been unlocked by Task A
[29t3@trydev.activeeon.com;14:44:01] Channel 29 deleted.
The Complete Workflow example can be downloaded here.
Example 3: Critical Section
In this last example, we will show how we can create a critical section inside a workflow, which means, a section of the workflow which can only be accessed by a configurable number of slots.
The Critical Section workflow is defined with a Replicate Control Structure:

It contains the following Tasks:
-
Init: Initialize the channel. This task creates a channel using the current job id. It also sets a
available_slotsbinding in the key/value store with an initial value based on the workflow user-definedNB_SLOTSjob variable.
jobid = variables.get("PA_JOB_ID")
synchronizationapi.createChannel(jobid, false)
synchronizationapi.put(jobid, "available_slots", Integer.parseInt(variables.get("NB_SLOTS")))
println "Channel " + jobid + " created."
This tasks also define a control flow script used to define the number of replicated tasks. The number of replicated tasks is parametrized with the user-defined NB_TASKS job variable:
runs=Integer.parseInt(variables.get("NB_TASKS"))-
Section: Wait for the critical section to be available. This task will block until the number of available slots is greater than 0. As soon as at least one slot is available, it decrements the
available_slotscounter and perform some computation. When the computation is terminated, it releases the slot by incrementing back theavailable_slotscounter.
println "Waiting for available slot"
jobid = variables.get("PA_JOB_ID")
synchronizationapi.waitUntilThen(jobid, "available_slots", "{k, x -> x > 0}", "{k, x -> x - 1}")
println "Enter critical section"
// simulate some computation
Thread.sleep(10000)
println "Release slot"
synchronizationapi.compute(jobid,"available_slots", "{k, x -> x + 1}")
As you can see, the first method used in this section is waitUntilThen. This method expects both a BiPredicate and a BiFunction defined as strings Groovy Closure.
The semantic of this method is to wait until the predicate is met and, as soon as it is, immediately perform a remapping.
In our scenario, the number of available slots is immediately decremented to reserve a slot and enter the critical section.
Releasing of the slot is performed at the end of the task using the compute method.
-
Clean: Delete the channel. Same code as the previous examples.
Here is the output of the Example 3 workflow:
[3t0@trydev.activeeon.com;16:14:14] Channel 3 created.
[3t1@trydev.activeeon.com;16:14:22] Waiting for available slot
[3t4@trydev.activeeon.com;16:14:22] Waiting for available slot
[3t3@trydev.activeeon.com;16:14:22] Waiting for available slot
[3t5@trydev.activeeon.com;16:14:22] Waiting for available slot
[3t1@trydev.activeeon.com;16:14:23] Enter critical section
[3t4@trydev.activeeon.com;16:14:23] Enter critical section
[3t4@trydev.activeeon.com;16:14:33] Release slot
[3t1@trydev.activeeon.com;16:14:33] Release slot
[3t3@trydev.activeeon.com;16:14:33] Enter critical section
[3t5@trydev.activeeon.com;16:14:34] Enter critical section
[3t6@trydev.activeeon.com;16:14:38] Waiting for available slot
[3t3@trydev.activeeon.com;16:14:43] Release slot
[3t5@trydev.activeeon.com;16:14:44] Release slot
[3t6@trydev.activeeon.com;16:14:44] Enter critical section
[3t6@trydev.activeeon.com;16:14:54] Release slot
[3t2@trydev.activeeon.com;16:14:59] Channel 3 deleted.
We can see that no more than two replicated tasks enter the critical section at the same time, and that releasing slots allows new tasks to enter the critical section.
The Complete Workflow example can be downloaded here.
Implementing the Critical Section example using selection scripts rather than explicit wait methods is more complex.
The reason behind is that selection scripts are meant to be stateless.
The same selection script is executed on all ProActive Nodes by the Scheduler before deciding if a Node can be used to execute a single Task.
In our use case, we must both decide atomically if a slot is available (stateless) and reserve a slot (stateful). This decision will be performed simultaneously on all available ProActive Nodes.
An example implementation can be downloaded here. It makes use of a reserved_slots binding containing a set of task ids.
|
11.3.3. Conclusion
Task Synchronization API can be used for multiple dynamic synchronization patterns such as:
-
Cross-workflow synchronization
-
Critical Sections
-
Barriers (Wait for several parallel tasks to reach a certain point)
-
Producer / Consumer
A complete example of Producer / Consumer, ServiceDeployerConsumer can be downloaded here.
12. Scheduling policies
See Admin Guide to congifure scheduling policies.
12.1. Earliest deadline first (EDF) policy
Scheduler has Earliest deadline first policy (EDF policy) that prioritizes jobs with deadlines.
Overall, the general principal is the following: a job that needs to be started as soon as possible to meet its deadline
taking into account its execution time has higher priority.
The EDF policy considers two Generic Information items: JOB_DDL and JOB_EXEC_TIME.
JOB_DDL represents job deadline. Job deadline can be set in one of the following format:
-
absolute format:
YYYY-MM-dd`T`HH:mm:ss+ZZ, e.g.2018-08-14T08:40:30+02:00 -
relative (to the submission time) format:
+HH:mm:ss, e.g.+5:30:00, or+mm:ss, e.g.+4:30, or+ss, e.g.+45(45 seconds)
If job deadline is absolute then its value equals to JOB_DDL.
If job deadline is relative then its value equals to submission time + JOB_DDL.
JOB_EXEC_TIME represents job expected execution time in the following format: HH:mm:ss , e.g. 12:30:00, 5:30:00,
or mm:ss, e.g. 4:30, or ss, e.g. 45 (45 seconds).
EDF policy orders jobs by applying the rules below. The rule considers jobs at submission time when they are still pending, and orders them by priority.
Thus EDF policy applies these rules (in the given order) until one rule actually applies. Here is the ordered list of rules for the EDF policy:
-
compare job’s intrinsic priority (HIGHEST, HIGH, NORMAL, LOW, LOWEST)
-
job with deadline has priority over job without deadline
-
job that is already started has priority over job that has not yet started
-
job that started earlier has priority over job that was started later
-
job with the earliest
JOB_DDLminusJOB_EXEC_TIMEhas a priority -
job with earliest submission time.
12.1.1. Email notifications
EDF policy sends 3 types of email notifications:
-
(Arriving soon) When job deadline is at risk (if the job is not started in the next X minutes, its deadline will be missed)
-
When job will likely miss its deadline (i.e if the provided
JOB_EXEC_TIMEexceeds the left time until the deadline) -
(Arriving soon) When job has already missed its deadline.
Policy sends emails to the address specified in EMAIL Generic Information of the job.
To enable email notifications see Admin Guide.
13. Data Connectors
The data-connectors bucket contains diverse generic data connectors for the most frequently used data storage systems (File, SQL, NoSQL, Cloud, ERP). The aim of a data connector is to facilitate and simplify data access from your workflows to external data sources.
13.1. File
The File connectors allow to import and export data from HTTP, FTP and SFTP servers. We begin by presenting FTP and SFTP connectors then, URL connector.
13.1.1. FTP and SFTP connectors
The FTP and SFTP file connector workflows consists of two tasks:
-
Import_from_FTP/SFTP_Server: Downloads files or folders recursively from an FTP/SFTP server to the data space.
-
Export_to_FTP/SFTP_Serve: Uploads files or folders recursively from the data space (global or user space) to an FTP/SFTP server.
Variables:
The FTP and SFTP workflow tasks share the same list of variables. Consequently, we describe them in the following table using a unique notation.
Variable name |
Description |
Scope |
Required? |
Type |
Default/Examples |
|
Server host. |
Task |
Yes |
String |
|
|
Username to use for the authentication. |
Task |
Yes |
String |
e.g. toto |
|
Listening port. |
Task |
No |
Integer |
e.g. 21, 22 |
|
Either a file name or a wildcard string pattern. |
Task |
Yes |
String |
e.g. file.txt, *.txt, ** |
|
Either a |
Task |
No |
String |
e.g. localDirectory/, /global/path/localDirectory/ |
|
Remote |
Task |
No |
String |
e.g. remoteDirectory/ |
How to use this task:
The task requires the following third-party credentials: {key: <PROTOCOL>://<username>@<hostname>, value: PASSWORD} where <PROTOCOL> can take one of the following values: {FTP, SFTP}. Please refer to the User documentation to learn how to add third-party credentials.
13.1.2. URL connector
The URL connector allows, in addition, to import data using HTTP and HTTPS protocols.
Variables:
Variable name |
Description |
Scope |
Required? |
Type |
Default/Examples |
|
Link to a file accessible using HTTP or HTTP protocols. |
Task |
Yes |
String |
|
|
Local relative path to which we download file(s).
LOCAL_RELATIVE_PATH can contain either a path to a file, a directory terminated by |
Task |
No |
String |
e.g. localDirectory/, example.zip |
|
If set to |
Task |
Yes |
Boolean [true or false] |
false |
13.2. SQL
In this part, we first present the data connector tasks that allow users to access and manipulate data of the most frequently used databases, then we show how to use pooled connection to SQL databases across multiple task executions.
13.2.1. Data Connectors
The data connectors allow to import and export data from and to Relational DataBase Management Systems (RDBMS). Currently, we have connectors for MySQL, Oracle, PostgreSQL, Greenplum and SQL Server.
All SQL connector workflows are composed of two tasks: an import task and an export task.
Variables:
All SQL connectors share the same list of variables. Consequently, we describe them in the following table using a unique notation.
<RDBMS_NAME> can take one of the following values: {POSTGRES, GPDB, ORACLE, SQL_SERVER, MYSQL}
Variable name |
Description |
Scope |
Required? |
Type |
Default/Examples |
|
Label or the IP address of the server hosting the database. |
Workflow |
Yes |
String |
|
|
Listening port. |
Workflow |
No |
Integer |
e.g. 5432, 1521 |
|
Username to use for connecting to the database. |
Workflow |
Yes |
String |
|
|
Database name. |
Workflow |
Yes |
String |
e.g. MY_DATABASE |
|
Requires an SQL query or a table name to fetch data from. |
Import Task |
Yes |
String |
e.g. |
|
If the imported data is labeled for machine learning, a label attribute can be specified using this variable. |
Import Task |
No |
String |
e.g. class |
|
Relative path in the data space used to save the results in a CSV file. |
Import Task |
No |
String |
e.g. |
|
Task result output type ( |
Import Task |
No |
String |
Values: Default: |
|
The table to insert data into. |
Export Task |
Yes |
String |
e.g. MY_TABLE |
|
Indicates the behavior to follow when the table exists in the database amongst: - fail: If table exists, do nothing. - replace: If table exists, drop it, recreate it, and insert data. - append: (default) If table exists, insert data. Create if does not exist. |
Export Task |
Yes |
String |
Default: |
|
- It can be a relative path in the dataspace of a csv file containing the data to import. - or a valid URL amongst |
Export Task |
Yes |
String |
e.g. |
|
The driver to connect to the database. |
Import Task Export Task |
Yes |
String |
e.g. cx_oracle, psycopg2 |
How to use this task:
When you drag & drop an SQL connector, two tasks will be appended to your workflow: an import task and an export task. Each task can be used as a separate component in an ETL pipeline; thus, you can keep one of them depending on your needs and remove the other or you can use them both.
This task uses the driver given in RMDB_DRIVER to connect to the database. To use another driver, make sure you have it properly installed before (e.g. using pip install <RMDBS_DRIVER>).
The task requires the following third-party credential:
{key: <mysql|postgres|sqlserver|oracle|gpdb>://<<RDBMS_NAME>_USER>@<<RDBMS_NAME>_HOST>:<<RDBMS_NAME>_PORT>, value: <RDBMS_NAME>_PASSWORD}.
e.g.
| key | value |
|---|---|
|
your |
|
your |
This is a one-time action and will ensure that your credentials are securely encrypted. Please refer to the User documentation to learn how to add third-party credentials.
In the import mode, the output containing the imported data takes one or many of the following forms:
-
in a CSV format to saved to:
-
the
<RDBMS_NAME>_OUTPUT_FILEin the data space if specified by the user -
and to the
resultvariable to make is previewable in the scheduler portal and to make it accessible for the next tasks.
-
-
in a JSON format using the variable
DATAFRAME_JSON.
13.2.2. Database Connections Pooling
To allow the persistence of a single connection across multiple SQL tasks (basically when running several tasks concurrently on the same machine), we have implemented the connection pooling feature to any external SQL database based on the HikariCP Framework. This feature is demonstrated through two workflow templates: SQL_Pooled_Connection_Query and SQL_Pooled_Connection_Update. Both are single-task workflows.
Variables:
The variables listed in the following table exist for both SQL_Pooled_Connection_Update and SQL_Pooled_Connection_Query workflows.
Variable name |
Description |
Scope |
Required? |
Type |
Default/Examples |
|
Name of the relational database management system. |
Workflow, Task |
Yes |
String |
Values: |
|
Server host. |
Workflow, Task |
Yes |
String |
|
|
Listening port. |
Workflow, Task |
No |
Integer |
e.g. 5432, 1521 |
|
Username to use for connecting to the database. |
Workflow, Task |
Yes |
String |
e.g MY_USER |
|
Database name. |
Workflow, Task |
Yes |
String |
e.g. MY_DATABASE |
|
HikariCP framework provides many data source properties that can be used to configure the DB pooled connection such as autoCommit, maximumPoolSize, maxLifetime, idleTimeout …. You can add as many properties as you want. For each one, please add a new task variable where the variable name is the property name having "POOL_" as a prefix and the variable value is the property value. For more info, please refer to https://github.com/brettwooldridge/HikariCP. |
Workflow, Task |
No |
String |
e.g. POOL_autoCommit, POOL_maximumPoolSize |
|
To change or update data, you have to use CREATE, INSERT , UPDATE , or DELETE statements. To query data, you have to perform SELECT statements. |
Workflow, Task |
Yes |
String |
e.g. |
In addition to the aforementioned variables, SQL_Pooled_Connection_Query workflow has two more variables.
Variable name |
Description |
Scope |
Required? |
Type |
Default/Examples |
|
If set to |
Workflow, Task |
Yes |
String |
Values: Default: |
|
if not empty, the value will be the name of a variable that contains the resultSet of the query (converted into a List of Maps). This variable can be used in other tasks. |
Workflow, Task |
No |
String |
Values: Default: |
How to use these workflows:
The scheduler should be configured in non-fork mode to execute tasks in a single JVM rather than starting a dedicated JVM to run the task (In $PROACTIVE_HOME/config/scheduler/settings.ini, set pa.scheduler.task.fork=false).
Data connectors workflows may need to add some third-party dependencies to their classpath (notably, JDBC jar libraries), so they can be executed properly. Please refer to the Admin guide documentation to learn how to add link:../admin/ProActiveAdminGuide.html#__add_custom_third_party_libraries_to_proactive_server_and_nodes_classpath].
In case the password is required, you have to add the following third-party credential: {key: <mysql|postgresql|sqlserver|oracle|hsqldb:hsql>://<USERNAME>@<HOST>:<PORT>, value: <RDBMS_NAME>_PASSWORD}. This is a one-time action and will ensure that your credentials are securely encrypted. Please refer to the User guide documentation to learn how to add third-party credentials.
13.3. NoSQL
The NoSQL connectors allow to import data from NoSQL Databases. Currently, we have connectors for MongoDB and Cassandra.
13.3.1. MongoDB
Variables:
Variable name |
Description |
Scope |
Required? |
Type |
Default/Examples |
|
Label or the IP address of the server hosting the database. |
Workflow, Import Task, Export Task |
Yes |
String |
|
|
Listening port. |
Workflow, Import Task, Export Task |
No |
Integer |
27018 |
|
Username to use for connecting to MongoDB server if authentication is required. |
Workflow |
No |
String |
|
|
Database to use. In export mode, it is created if it does not exist. |
Workflow, Import Task, Export Task |
Yes |
String |
e.g. my_database |
|
Collection to use. In export mode, it is created if it does not exist. |
Workflow, Import Task, Export Task |
Yes |
String |
e.g. my_collection |
|
Requires a NoSQL query to fetch data. If empty ( |
Import Task |
No |
String |
{} |
|
Relative path in the data space used to save the results in a JSON file. |
Import Task |
No |
String |
e.g. path/to/my/output.json |
|
If the imported data is labeled for machine learning, a label attribute can be specified using this variable. |
Import Task |
No |
String |
e.g. class |
|
A JSON Object/Array to be inserted in MongoDB. This variable can: - A String describing the JSON Object/Array - A relative path in the data space of a JSON file. |
Export Task |
Yes |
String |
e.g.
or |
How to use this task:
The task might require (if the MongoDB server requires authentication) a MONGODB_USER in addition to the following third-party credential: {key: mongodb://<MONGODB_USER>@<MONGODB_HOST>:<MONGODB_PORT>, value: MONGODB_PASSWORD}. Please refer to the User documentation to learn how to add third-party credentials.
In the import mode, the output containing the imported data takes one or many of the following forms:
-
in a JSON format to saved to:
-
the
MONGODB_OUTPUTfile in the data space if specified by the user -
and to the
resultvariable to make is previewable in the scheduler portal and to make it accessible for the next tasks.
-
13.3.2. Cassandra
Variables:
Variable name |
Description |
Scope |
Required? |
Type |
Default/Examples |
|
Label or the IP address of the server hosting the database. |
Workflow, Import Task, Export Task |
Yes |
String |
|
|
Listening port. |
Workflow, Import Task, Export Task |
No |
Integer |
|
|
Keyspace to use. |
Workflow, Import Task, Export Task |
Yes |
String |
e.g. |
|
Query to fetch data. |
Import Task |
Yes |
String |
|
|
Relative path in the data space used to save the results in a CSV file. |
Import Task |
No |
String |
e.g. |
|
If the imported data is labeled for machine learning, a label attribute can be specified using this variable. |
Import Task |
No |
String |
e.g. class |
|
Data is stored in tables containing rows of columns, similar to SQL definitions.. It is created if it does not exist. |
Export Task |
Yes |
String |
e.g. |
|
A primary key identifies the location and order of stored data. The primary key is defined when the table is created and cannot be altered. |
Export Task |
Yes |
String |
e.g. |
|
Path of the CSV file that contains data to be imported. This variable can: - A URL. Valid URL schemes include http, ftp, s3, and file. - A relative path in the data space of a CSV file. |
Export Task |
Yes |
String |
e.g. |
How to use this task:
The task might require (if applicable) the following third-party credentials: CASSANDRA_USERNAME and CASSANDRA_PASSWORD. Please refer to the User documentation to learn how to add third-party credentials.
In the import mode, the output containing the imported data takes one or many of the following forms:
-
a CSV format to saved to:
-
the
CASSANDRA_OUTPUTfile in the data space if specified by the user -
and to the
resultvariable to make is previewable in the scheduler portal and to make it accessible for the next tasks.
-
13.3.3. ElasticSearch
Variables:
Variable name |
Description |
Scope |
Required? |
Type |
Default/Examples |
|
Label or the IP address of the ElasticSearch server. |
Workflow |
Yes |
String |
|
|
Listening port. |
Workflow |
No |
Integer |
|
|
Username to use for connecting to Elasticsearch server if authentication is required. |
Workflow |
No |
String |
|
|
Index to use. In export mode, it is created if it does not exist. |
Import Task, Export Task |
Yes |
String |
e.g. my_index |
|
A query to fetch data. If empty, it will fetch all documents from the index by default. |
Import Task |
No |
String |
|
|
Maximum number of results to return. |
Import Task |
No |
Integer |
|
|
The documents type. |
Import Task |
Yes |
String |
e.g. my_doc_type |
|
A JSON Object/Array to be indexed in ElasticSearch. This variable can: - A String describing the JSON Object/Array - A relative path in the data space of a JSON file. |
Export Task |
Yes |
String |
e.g.
or |
How to use this task:
The task might require (if the Elasticsearch server requires authentication) an ELASTICSEARCH_USER in addition to the following third-party credential: {key: elasticsearch://<ELASTICSEARCH_USER>@<ELASTICSEARCH_HOST>:<ELASTICSEARCH_PORT>, value: ELASTICSEARCH_PASSWORD>. Please refer to the User documentation to learn how to add third-party credentials.
In the import mode, the output containing the imported data takes the form of a JSON format to saved to the result variable to make is previewable in the scheduler portal and to make it accessible for the next tasks.
13.4. Cloud
Cloud data connectors allow to interact with cloud storage services. Currently we provide support for Amazon S3, Azure Blob Storage and Azure Data Lake.
13.4.1. Amazon S3
The Amazon S3 connector allows to upload and download data from S3. The connector workflow consists of two tasks:
-
Import_from_S3: Downloads files or folders recursively from S3 to the global space.
-
Export_to_S3: Uploads files or folders recursively from the global space to S3.
Variables:
Variable name |
Description |
Scope |
Required? |
Type |
Default/Examples |
|
Relative path to a folder in the data space to which the downloaded file(s) will be saved in import mode. In export mode, it should point to an existing file/folder that needs to be uploaded. |
Import Task, Export Task |
Yes |
String |
e.g. or or |
|
A valid URL to an existing S3 object that can be a file or a folder. |
Import Task |
Yes |
String |
e.g. https://s3.eu-west-2.amazonaws.com/activeeon-public/images/ or https://s3.eu-west-2.amazonaws.com/activeeon-public/images/logo.jpg |
|
S3 Bucket name. If it does not exist, a new bucket is created (if possible) and assigned the specified region |
Export Task |
Yes |
String |
e.g. activeeon-public |
|
A valid AWS region code that corresponds to the region of the indicated bucket. |
Export Task |
Yes |
String |
e.g. |
|
Prefix (relative path) used to store the uploaded data in the given bucket under the given path. If empty, the data will be uploaded to the bucket root folder. |
Export Task |
No |
String |
e.g. or |
How to use these tasks:
Amazon S3 connector tasks require your AWS credential keys to be set as a third-party credential (key:value pairs) where {key: ACCESS_KEY, value: SECRET_KEY}; this is a one-time action and will ensure that your credentials are securely encrypted. Please refer to the User documentation to learn how to add third-party credentials.
13.4.2. Azure Data Lake
The Azure Data Lake connector allows to upload U-SQL scripts and then execute them as Data Lake Analytics (DLA) jobs. It requires an existing Data Lake Analytics account with its corresponding Data Lake Store account. The connector workflow consists of three tasks:
-
Submit_job: Connects to Azure Data Lake and submits the provided script.
-
Wait_for_job: Periodically monitors the DLA job status until its finalization.
-
Display_result: Downloads the result file and displays it.
Variables:
Variable name |
Description |
Scope |
Required? |
Type |
Default/Examples |
|
Data Lake Analytics account to be used. It should already exist. |
Workflow |
Yes |
String |
e.g. my_dla_account |
|
Name to identify the job to be submitted. |
Workflow |
Yes |
String |
e.g. my_dla_job |
|
File name of the U-SQL script to submit. The file must be located in the Global Space directory. An example file |
Workflow |
Yes |
String |
Sample file: script.usql
e.g. my_usql_script.usql |
|
Name of the output file to store the result of the script. |
Workflow |
Yes |
String |
e.g. my_output_file.csv |
|
Cron expression to determine how frequently to monitor the completion of the job. |
Workflow |
Yes |
String |
Default: "* * * * *"
(every minute)
e.g. "*/2 * * * *"
(every 2 minutes) |
|
Optional variable to set an Azure subscription when not using the default one. Value can be a subscription’s name or id. |
Workflow |
No |
String |
e.g. Pay-As-You-Go |
How to use these tasks:
Azure Data Lake tasks require your Azure login credentials to be set as third-party credentials (key:value pairs); this is a one-time action and will ensure that your credentials are securely encrypted. Please refer to the User documentation to learn how to add third-party credentials.
You have two options for providing your login credentials:
-
Standard Azure login:
AZ_U:your_user(usually an email).AZ_P:your_password. -
Using an Azure service principal:
AZ_U:appId.AZ_P:password.AZ_T:tenant. By default, ifAZ_Tis set, the tasks will attempt to connect through a service principal.
|
The Output File
|
13.4.3. Azure Blob Storage
The Azure Blob Storage connector allows to upload and download unstructured data (documents, videos, photos, audio files, presentations, web pages …) from Azure Blob Storage. The connector workflow consists of two tasks:
-
Import_from_Azure_Blob: Downloads blob(s) from Azure Blob Storage to the data space. Note that a virtual folder structure is possible in Azure Blob Storage. In that case, blobs are locally downloaded respecting this structure.
-
Export_to_Azure_Blob: Uploads file(s) or directories recursively from the data space to Azure Blob Storage.
Variables:
Variable name |
Description |
Scope |
Required? |
Type |
Default/Examples |
|
Relative path to a directory in the data space to which the downloaded blob(s) will be saved. INPUT_PATH can contain either a path to a file, a directory terminated by / or an empty value for the root. |
Import Task |
No |
String |
e.g. or |
|
In import mode, it should refer to an existing blob. If it’s empty, the entire container is downloaded. In export mode, this value corresponds either to the name of the blob to be uploaded or to the folder structure in which blob(s) will be uploaded. |
Import Task, Export Task |
No |
String |
e.g. or or |
|
Azure storage container name. For the export mode, if it does not exist, a new container will be created (if possible). |
Import Task, Export Task |
Yes |
String |
e.g. |
How to use these tasks:
Azure Blob Storage connector tasks require your azure storage account and account key to be set as a third-party credential (key:value pairs) where {key: STORAGE_ACCOUNT, value: ACCOUNT_KEY}; this is a one-time action and will ensure that your credentials are securely encrypted. Please refer to the User documentation to learn how to add third-party credentials.
13.5. ERP
ProActive’s ERP connectors enable communication and data exchange with popular ERP software providers.
13.5.1. SAP ECC
This connector allows you to interact with an SAP ECC system (not S/4HANA) by means of Remote Function Calls (RFC).
Variables:
Variable name |
Description |
Scope |
Required? |
Type |
Default/Examples |
|
The name of a remote-enabled function module on your SAP System. You can verify the available functions in your ECC transaction SE37. |
Workflow |
Yes |
String |
e.g. RFC_SYSTEM_INFO |
How to use this connector:
In order to securely connect to your SAP ECC system, you first need to store your SAP logon information as ProActive’s third-party credentials. The required credentials are:
Credential |
Description |
Example |
|
Application server host IP. |
10.10.10.1 |
|
System number. |
00 |
|
Client number. |
100 |
|
SAP logon user name. |
myuser |
|
SAP logon password (it will be hidden). |
mypassword |
|
Preferred language. |
EN |
|
(Optional) An SAP Router string, in case you are connecting from an external network. It is important that you keep the /H/ tags. |
/H/192.168.0.1/H/ |
Once the credentials are set, the workflow can be executed. If the connection is successful, the connection attributes will be listed as output. NB. ProActive’s SAP connector provides libraries to connect to an SAP server from a 64-bit OS (Windows, Linux, MacOS); libraries for other OS can be obtained through SAP Marketplace.
The SAP connector will search for the function module provided as the JCO_FUNCTION variable. If the function module exists and is remote-enabled, the script will display the function’s parameters (import, export, tables) right after the Connection attributes.
The SAP connector includes an example of how to execute and handle the result of a function using the default RFC_SYSTEM_INFO, which returns a structure containing the System’s information. After the function is executed, the result can be accessed through the method getExportParameterList().
// execute RFC_SYSTEM_INFO function
sapFunction.execute(destination)
// obtain structure RFCSI_EXPORT
JCoStructure structure = sapFunction.getExportParameterList().getStructure("RFCSI_EXPORT")
if (structure != null) {
  println("System info:")
  // loop on structure to get the info
  for(JCoField field : structure) {
    println(field.getName() + " : " + field.getString())
  }
}
For a more detailed guide of ProActive’s SAP ECC connector, please refer to this document.
Further information and examples using the SAP JCO library are available in the SAP Cloud Platform SDK Documentation and the SAP Java Connector documentation, accessible through SAP Service Marketplace.
13.6. Business Intelligence
Proactive’s BI connectors enable the exportation of data to robust analytics and business intelligence servers.
13.6.1. Export_Data_to_Tableau_Server
This connector allows you to publish data to a Tableau Server.
Variables:
Variable name |
Description |
Scope |
Required? |
Type |
Default/Examples |
|
True if you want to enable docker fork environment. |
Workflow |
Yes |
Boolean |
e.g. True |
|
The name of the docker image that you want to use. |
Task |
Yes if DOCKER_ENABLED is set as True |
String |
e.g. activeeon/dlm3 |
|
True if you want to enable the execution of the task. |
Task |
Yes |
Boolean |
e.g. True |
|
The endpoint of the Tableau server. |
Task |
Yes |
String |
|
|
The site id defined in the Tableau server. |
Task |
Yes |
String |
e.g test_connector |
|
The name of the project where you will save your data in the Tableau server. |
Task |
Yes |
String |
e.g. test |
|
The name of the file that will be created and saved in the Tableau server. |
Task |
Yes |
String |
e.g. test.hyper |
How to use this connector:
In order to securely connect to your Tableau Server, you first need to store your Tableau login information as ProActive’s third-party credentials. The required credentials are:
TABLEAU_SERVER_USERNAME and TABLEAU_SERVER_PASSWORD.
14. Addons
14.1. Statistics on ProActive Jobs and Resource Usage
This addon generates a gantt chart to visualize executions of jobs and tasks, per node and over the time.
An example of a generated gantt chart
This chart can be generated on-demand, running Gantt_chart workflow from the Analytics bucket in the Catalog.
| Please note that to run properly, this workflow requires a third party credential named "SCHEDULER_PASSWORD" with your scheduler password (so the tool can connect to the scheduler and retrieve information to build the chart) See Managing third-party credentials |
14.2. LDAP Query Tasks
14.2.1. Description
This task features the LDAP searching operation.
14.2.2. LDAP query task variables table
The next parameters are provided as task variables:
| Parameter Name | Description | Example |
|---|---|---|
ldapURL |
URL the LDAP server |
|
ldapDnBase |
The base distinguished name of the catalog |
|
ldapUsername |
The username |
|
ldapSearchBase |
base domain name for ldap queries |
|
ldapSearchFilter |
LDAP search filter |
|
ldapSelectedAttributes |
list of attributes to retrieve |
|
If any of these variables must stay private you’ll need to set them as third-party credentials (details are given below).
14.2.3. Authenticate with Third-party credentials
In order to be able to authenticate to the LDAP server you need to define for the right Scheduler user the ldapPassword in the Third-party credentials.
14.2.4. Result of task
The task provides a specific variable for the result, which is called result.
The task result is a String in JSON format.
Output example
Successful task:
{"status":"Ok","attributes":[{"loginShell":"/bin/csh","uid":"yaro","userPassword":"[B@2d6a9952","homeDirectory":"/home/users/yaro","uidNumber":"1000","givenName":"yaro","objectClass":"inetOrgPerson","sn":"yaya","gidNumber":"500","cn":"yaro"}]}Failed task:
{"status":"Error","errorMessage":"javax.naming.NameNotFoundException: [LDAP: error code 32 - No Such Object]; remaining name 'cn=yaro,dc=activeeon,dc=com1'"}14.2.5. Secure connection to LDAP server
In order to use secure connection for the LDAP server, specify a correct LDAP over SSL URL (for example ldaps://localhost:636).
In order to be able to connect to a LDAP server, a valid certificate is needed.
When a self-signed certificate is used, the certificate needs to be added to the trusted certificates of the JRE provided with the Scheduler.
Below is an example for adding a certificate to a Java cacerts file:
keytool -import -alias ldap-self-signed -keystore </pathToScheduler/jre/lib/security/cacerts> -file ldaps.crt -storepass changeit
14.3. PHP Task
The PHP task is a special, predefined task which executes a PHP script on a ProActive Node’s local PHP installation. The PHP script to execute will be downloaded from the ProActive server global space. So, the PHP script must be present in the dataspace beforehand. The task can also be modified to download the PHP script from other sources. Log forwarding and log streaming during PHP execution is conveniently available through the Scheduler portal.
14.3.1. Node configuration
For a ProActive Node to execute a PHP script, PHP must be installed on the machine of the ProActive Node. The PHP task has a selection script which validates a correct PHP installation by searching the PATH and validating if the PHP can be executed successfully. The static selection script validates the PHP execution once and stores the result in the cache, so removing or installing PHP requires a restart of the node or a switch to the dynamic selection script. The selection script predefined in the PHP task does not validate the PHP version, therefore it is advised to use the same PHP version on the ProActive Nodes or to improve the selection script itself.
15. Reference
15.1. Job and task specification
Workflows are written in XML and we provide a XSD grammar to help you write and validate them. The Workflows XSD is available here and you can also find the documentation here.
| Setup your IDE to use the Workflow XSD, you will benefit from live validation and completion! |
15.2. Studio Tasks
This section describes the available predefined tasks in the Tasks menu of ProActive Studio and the operating systems where they run.
| Predefined Task Name | Description | Operating System | Additional Requirements |
|---|---|---|---|
Shell |
Sample Script Task using the generic posix |
Linux,Mac |
|
Bash |
Sample Script Task using the posix |
Linux,Mac |
|
Windows Cmd |
Sample Script Task using the windows |
Windows |
|
Docker Compose |
Sample Script Task using the |
Linux,Windows,Mac |
Docker Compose and Docker must be installed |
Docker File |
Sample Script Task using the |
Linux,Windows,Mac |
Docker must be installed |
Kubernetes |
Sample Script Task using the |
Linux |
Kubernetes CLI must be installed |
Java |
Sample Java Task. |
Linux,Windows,Mac |
|
Scalaw |
Sample Script Task using the |
Linux,Windows,Mac |
|
Javascript |
Sample Script Task using the |
Linux,Windows,Mac |
|
Groovy |
Sample Script Task using the |
Linux,Windows,Mac |
|
Ruby |
Sample Script Task using the |
Linux,Windows,Mac |
|
Jython |
Sample Script Task using the |
Linux,Windows,Mac |
|
Python |
Sample Script Task using the |
Linux,Windows,Mac |
CPython and py4j module must be installed |
Perl |
Sample Script Task using the |
Linux,Windows,Mac |
Perl must be installed |
PHP |
A custom Script Task able to call the |
Linux,Mac,Windows |
PHP interpreter must be installed |
PowerShell |
Sample Script Task using the |
Windows |
.NET Framework 3.5 and Poweshell 2.0 Engine must be installed |
R |
Sample Script Task using the |
Linux,Windows,Mac |
R must be installed and the rJava library |
Cron |
Task executed periodically using a cron syntax |
Linux,Mac,Windows |
|
LDAP Query |
Provides an LDAP client for querying an LDAP server |
Linux,Mac,Windows |
15.3. Script Bindings Reference
This section describes useful bindings and variables, their scope, and their usage.
The following script names refer to:
-
selection: a script executed to select nodes suitable to execute a task. This script is executed on many nodes from the scheduling loop, before the task is deployed.
-
environment: the default mode to execute a task is to fork a dedicated JVM from the selected ProActive Node. The environment script, if defined in the workflow, is executed on the node to let the user define which environment parameters will be given to the forked JVM.
-
pre: a script which is executed before the task execution, in the same context (for example in the forked JVM).
-
task: the main script of a task when the task is a script task.
-
post: a script which is executed after the task execution, in the same context. The post script is executed only if there was no error inside the task.
-
flow: a script which is executed after the task execution, in the same context, and when the task is part of a control flow.
-
clean: a script which is executed after the task execution, directly on the node selected to execute the task (so not inside the forked JVM), whether there was a task error or not. The clean script is mainly used to clean the task host. If there was a node failure (the node is lost during the task execution), then the clean script is not executed and the task will be executed on another node.
The order in this list corresponds to the task life-cycle order. all scripts refers to all above scripts
| Variable name and description | Use from a script | Use from a native task | Use from the workflow | Available in | Not Available in |
|---|---|---|---|---|---|
Task result. Variable set by the user to return the result of a task. See Result variables. |
result = "value"; |
The result will be the exit code. |
- |
- |
|
Task arguments. Arguments of a script defined in the workflow. Available via all kind of scripts, when referencing an external file or directly as XML elements. |
… = args[0]; |
Passed to native executable. |
- |
all scripts, as external file, or XML element |
- |
Results of previous tasks. An array containing the results of parent tasks. See Result variables. |
… = results[0]; |
$results_0 |
- |
- |
|
Branch. Either "if" or "else". See branch. |
branch = "if"; |
- |
- |
flow (if) |
bash, cmd, perl |
Parallel runs. Number of replications. See replication. |
runs = 3; |
- |
- |
flow (replicate) |
bash, cmd, perl |
Loop variable. A boolean variable used in a flow script to decide if the loop continues or not. See loop. |
loop = false; |
- |
- |
flow (replicate) (loop) |
bash, cmd, perl |
Task progress. Represents the progress of the task. Can be set to a value between 0 and 100. |
import org.ow2.proactive.scripting.helper.progress.ProgressFile; ProgressFile.setProgress(variables.get("PA_TASK_PROGRESS_FILE"), 50); |
echo "50" > $variables_PA_TASK_PROGRESS_FILE |
- |
- |
|
Workflow variables. Job variables defined in the workflow. See Workflow variables. |
variables.get("key") |
$variables_key |
${key} |
all scripts |
- |
Generic information. Generic information defined in the workflow. See Generic Information. |
genericInformation.get("key") |
$genericInformation_key |
- |
all scripts |
- |
Job ID. ID of the current job. |
variables.get( "PA_JOB_ID" ) |
$variables_PA_JOB_ID |
${PA_JOB_ID} |
all scripts |
- |
Job name. Name of the current job. |
variables.get( "PA_JOB_NAME" ) |
$variables_PA_JOB_NAME |
${PA_JOB_NAME} |
all scripts |
- |
Task ID. Id of the task. |
variables.get( "PA_TASK_ID" ) |
$variables_PA_TASK_ID |
${PA_TASK_ID} |
all scripts |
- |
Task name. Name of the task. |
variables.get( "PA_TASK_NAME" ) |
$variables_PA_TASK_NAME |
${PA_TASK_NAME} |
all scripts |
- |
User. The name of user who submitted the job. |
variables.get( "PA_USER" ) |
$variables_PA_USER |
${PA_USER} |
all scripts |
- |
Scheduler Home. Installation directory of the scheduler on the ProActive node. |
variables.get( "PA_SCHEDULER_HOME" ) |
$variables_PA_SCHEDULER_HOME |
- |
- |
|
Task iteration index. Index of iteration for this task inside a loop control. See Task executable. |
variables.get( "PA_TASK_ITERATION" ) |
$variables_PA_TASK_ITERATION |
${PA_TASK_ITERATION} |
all scripts |
- |
Task replication index. Index of replication for this task inside a replicate control. See Task executable. |
variables.get( "PA_TASK_REPLICATION" ) |
$variables_PA_TASK_REPLICATION |
${PA_TASK_REPLICATION} |
all scripts |
- |
Task Success. A variable accessible only from the clean script. It is a boolean value which is true if the task succeeded and false if the task failed. |
variables.get( "PA_TASK_SUCCESS" ) |
$variables_PA_TASK_SUCCESS |
- |
- |
|
Node URL. The URL of the node which executes the current task. |
variables.get( "PA_NODE_URL" ) |
$variables_PA_NODE_URL |
${PA_NODE_URL} |
- |
|
Node URL (Selection Script). The URL of the node which executes the selection script. See Selection of ProActive Nodes. |
selected = (nodeurl == "pnp://mymachine:14200/Node1") |
- |
- |
- |
|
Node Name. The name of the node which executes the current task. |
variables.get( "PA_NODE_NAME" ) |
$variables_PA_NODE_NAME |
${PA_NODE_NAME} |
- |
|
Node Name (Selection Script). The name of the node which executes the selection script. See Selection of ProActive Nodes. |
selected = (nodename == "Node1") |
- |
- |
- |
|
Node Host. The hostname of the node which executes the current task. |
variables.get( "PA_NODE_HOST" ) |
$variables_PA_NODE_HOST |
${PA_NODE_HOST} |
- |
|
Node Host (Selection Script). The hostname of the node which executes the selection script. See Selection of ProActive Nodes. |
selected = (nodehost == "mymachine") |
- |
- |
- |
|
Third party credentials. Credentials stored on the server for this user account. See Managing third-party credentials |
credentials.get( "pw" ) |
- |
$credentials_pw (only in the task arguments) |
- |
|
SSH private key. Private SSH Key used at login. See Run computation with your system account. |
credentials.get( "SSH_PRIVATE_KEY" ) |
- |
- |
environment, pre, task, post, flow |
- |
Number of nodes. Number of nodes used by this task. See Example: MPI application. |
nodesurl.size() |
$variables_PA_NODESNUMBER |
- |
environment, pre, task, post, flow |
- |
Url of nodes. List of URL of nodes. See Example: MPI application. |
nodesurl.get(0) |
$variables_PA_NODESFILE |
- |
environment, pre, task, post, flow |
- |
User space. Location of the user space. See Data Spaces. |
println userspace |
$USERSPACE |
- |
environment, pre, task, post, flow |
- |
Global space. Location of the global space. See Data Spaces. |
println globalspace |
$GLOBALSPACE |
- |
environment, pre, task, post, flow |
- |
Input space. Location of the input space. See Data Spaces. |
println inputspace |
$INPUTSPACE |
- |
environment, pre, task, post, flow |
- |
Local space. Location of the local space. See Data Spaces. |
println localspace |
$LOCALSPACE |
- |
environment, pre, task, post, flow |
- |
Cache space. Location of the cache space. See Data Spaces. |
println cachespace |
$CACHESPACE |
- |
environment, pre, task, post, flow |
- |
Output space. Location of the output space. See Data Spaces. |
println outputspace |
$OUTPUTSPACE |
- |
environment, pre, task, post, flow |
- |
Selection. Variable which must be set to select the node. See Selection of ProActive Nodes. |
selected = true |
- |
- |
bash, cmd, perl |
|
Fork Environment. Fork Environment variable is a ForkEnvironment java object allowing a script to set various initialization parameters of the forked JVM. See Fork Environment |
forkEnvironment.setJavaHome( "/usr/java/default" ) |
- |
- |
bash, cmd, perl, R, PowerShell |
|
Scheduler API. Scheduler API variable is a SchedulerNodeClient java object which can connect to the ProActive Scheduler frontend and interact directly with its API. |
schedulerapi.connect() |
- |
- |
bash, cmd, perl, R, PowerShell |
|
UserSpace API. UserSpace API variable is a DataSpaceNodeClient java object which can connect to the User Space and interact directly with its API. |
userspaceapi.connect() |
- |
- |
bash, cmd, perl, R, PowerShell |
|
GlobalSpace API. GlobalSpace API variable is a DataSpaceNodeClient java object which can connect to the Global Space and interact directly with its API. |
globalspaceapi.connect() |
- |
- |
bash, cmd, perl, R, PowerShell |
|
Synchronization API. Synchronization API variable is a Synchronization java object which can connect to the Synchronization Service and interact directly with its API. |
synchronizationapi.createChannel("channel1", false) |
- |
- |
all scripts |
bash, cmd, perl, R, PowerShell |
15.3.1. Variables maps
The syntax for accessing maps (like variables, credentials or genericInformation) is language dependent.
For Groovy:
print variables.get("key")For Python/Jython:
print variables["key"]For Ruby:
puts $variables["key"]For R:
print(variables[["key"]])For Bash:
echo $variables_keyFor PowerShell:
Write-Output $variables.Get_Item('key')15.3.2. Script results
The last statement of a script corresponds to the script result. The result can also be explicitly set with a manual affectation to a result variable.
Different kind of scripts (selection, flow, etc) will need to affect different kind of variable as results (for example selected, branch, runs, etc).
Example for Groovy selection scripts:
selected = java.net.InetAddress.getLocalHost().getHostName() == "mymachine"It is important to note that the result of a script will be converted to Java, and that some internal language types are not automatically convertible. If the task displays an error due to the result conversion, several approaches can be used:
-
the script can manually convert the internal type to a more primitive type.
-
the result can instead be stored in a file and transferred as an output file.
Results of parent tasks are stored in the results variable. Like the variables map, accessing this results variable is language-dependant.
For ruby, python, jython or groovy script languages, the parent tasks results (results variable) contains a list of TaskResult java object. In order to access the result real value, the value() method of this object must be called:
Example for Python/Jython:
print results[0].value()Other languages such as R or PowerShell can access the results directly
Example for R:
print(results[[0]])More information about various script engines particularities and syntax is available in the Script Languages chapter.
15.4. Topology Types
ProActive Scheduler supports the following nodes topologies for multi-nodes tasks.
-
Arbitrary topology does not imply any restrictions on nodes location
<parallel numberOfNodes="4">
    <topology>
        <arbitrary/>
    </topology>
</parallel>-
Best proximity - the set of closest nodes among those which are not executing other tasks.
<parallel numberOfNodes="4">
    <topology>
        <bestProximity/>
    </topology>
</parallel>-
Threshold proximity - the set of nodes within a threshold proximity (in microseconds).
<parallel numberOfNodes="4">
    <topology>
        <thresholdProximity threshold="100"/>
    </topology>
</parallel>-
Single Host - the set of nodes on a single host.
<parallel numberOfNodes="4">
    <topology>
        <singleHost/>
    </topology>
</parallel>-
Single Host Exclusive - the set of nodes of a single host exclusively. The host with selected nodes will be reserved for the user.
<parallel numberOfNodes="4">
    <topology>
        <singleHostExclusive/>
    </topology>
</parallel>
For this task the scheduler will try to find a host with 4 nodes. If there is no such a host another one will be used with a bigger capacity (if exists). In this case extra nodes on this host will be also occupied by the task but will not be used for the execution.
-
Multiple Hosts Exclusive - the set of nodes filled in multiple hosts. Hosts with selected nodes will be reserved for the user.
<parallel numberOfNodes="4">
    <topology>
        <multipleHostsExclusive/>
    </topology>
</parallel>
For this task the scheduler will try to find 4 nodes on a set of hosts. If there is no such a set which gives you exactly 4 nodes another one will be used with a bigger capacity (if exists). In this case extra nodes on this host will be also occupied by the task but will not be used for the execution.
-
Different Hosts Exclusive - the set of nodes each from a different host. All hosts with selected nodes will be reserved for the user.
<parallel numberOfNodes="4">
    <topology>
        <differentHostsExclusive/>
    </topology>
</parallel>
For this task the scheduler will try to find 4 hosts with one node on each. If number of "single node" hosts are not enough hosts with bigger capacity will be selected. In this case extra nodes on this host will be also occupied by the task but will not be used for the execution.
15.5. Command Line
The ProActive client allows to interact with the Scheduler and Resource Manager. The client has an interactive mode started if you do not provide any command.
The client usage is also available using the -h parameter as shown below:
$ PROACTIVE_HOME/bin/proactive-client -h
15.5.1. Command Line Examples
Deploy ProActive Nodes
In non-interactive mode
$ PROACTIVE_HOME/bin/proactive-client -cn 'moreLocalNodes' -infrastructure 'org.ow2.proactive.resourcemanager.nodesource.infrastructure.LocalInfrastructure' './config/authentication/rm.cred' 4 60000 '' -policy org.ow2.proactive.resourcemanager.nodesource.policy.StaticPolicy 'ALL' 'ALL'In interactive mode
$ PROACTIVE_HOME/bin/proactive-client
> createns( 'moreLocalNodes', ['org.ow2.proactive.resourcemanager.nodesource.infrastructure.LocalInfrastructure', './config/authentication/rm.cred', 4, 60000, ''], ['org.ow2.proactive.resourcemanager.nodesource.policy.StaticPolicy', 'ALL', 'ALL'])
Install ProActive packages
To install a ProActive package, you can use the ProActive CLI by providing a path to your package. It can be a local directory, a ZIP file or can be a URL to a web directory, a direct-download ZIP file, a GitHub repository or ZIP or a directory inside a GitHub repository. Please note that URL forwarding is supported.
In non-interactive mode
-
To install a package located in a local directory or ZIP
$ PROACTIVE_HOME/bin/proactive-client -pkg /Path/To/Local/Package/Directory/Or/Zip-
To install a package located in a web folder (Supports only Apache Tomcat directory listing)
$ PROACTIVE_HOME/bin/proactive-client -pkg http://example.com/installablePackageDirectory/-
To install a package with a direct download ZIP URL:
$ PROACTIVE_HOME/bin/proactive-client -pkg https://s3.eu-west-2.amazonaws.com/activeeon-public/proactive-packages/package-example.zip-
To install a package located in a GitHub repository (either in the repository root or in a sub-folder within a repository):
$ PROACTIVE_HOME/bin/proactive-client -pkg https://github.com/ow2-proactive/hub-packages/tree/master/package-exampleIn interactive mode
-
To install a package located in any of the aforementioned possible locations
$ PROACTIVE_HOME/bin/proactive-client
> installpackage(PackagePathOrURL)
Legal notice
Activeeon SAS, © 2007-2019. All Rights Reserved.
For more information, please contact contact@activeeon.com.